|
|
|
Porsche, and the Porsche crest are registered trademarks of Dr. Ing. h.c. F. Porsche AG.
This site is not affiliated with Porsche in any way. Its only purpose is to provide an online forum for car enthusiasts. All other trademarks are property of their respective owners. |
|
|


| barefoot |
 Jan 3 2018, 02:17 PM Jan 3 2018, 02:17 PM
Post
#1
|
|
Senior Member  Group: Members Posts: 1,485 Joined: 19-March 13 From: Charleston SC Member No.: 15,673 Region Association: South East States |
New 2L build case align bored and gallery plugs replaced with threaded plugs so i know everything's clean in there. New CB type 1 oil pump mod the fit Tp 4. Temporary oil pressure gage fitted, Valvoline VR-1 20W-50 oil and all bearings pre-lubed with assembly lube (the red stuff)
With my test rig I'm trying to make sure oil pressure observed before trying to fire the engine. Spark plugs pulled, so easy cranking. I've now cranked it over perhaps 30 revs so far and no pressure showing yet. I did not pre-fill oil filter (not sure why that's a bad idea) I pulled filter and there was ~ 1/4 full, so it seems oil's getting somewhere, but how long does it take to build pressure ??? 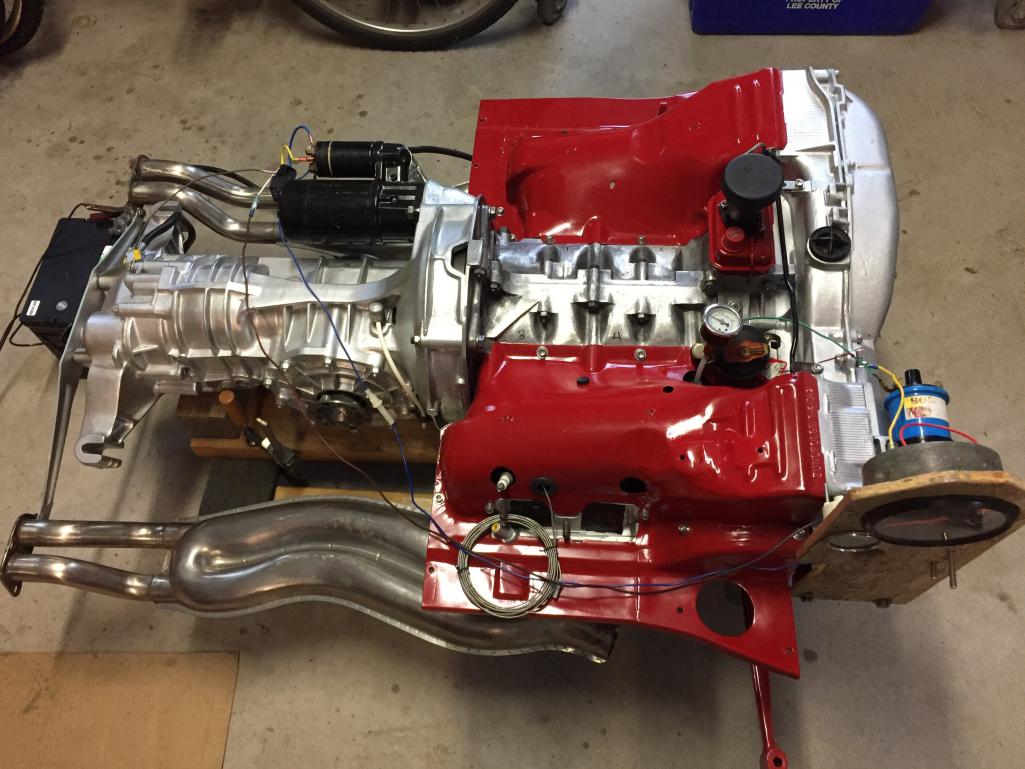 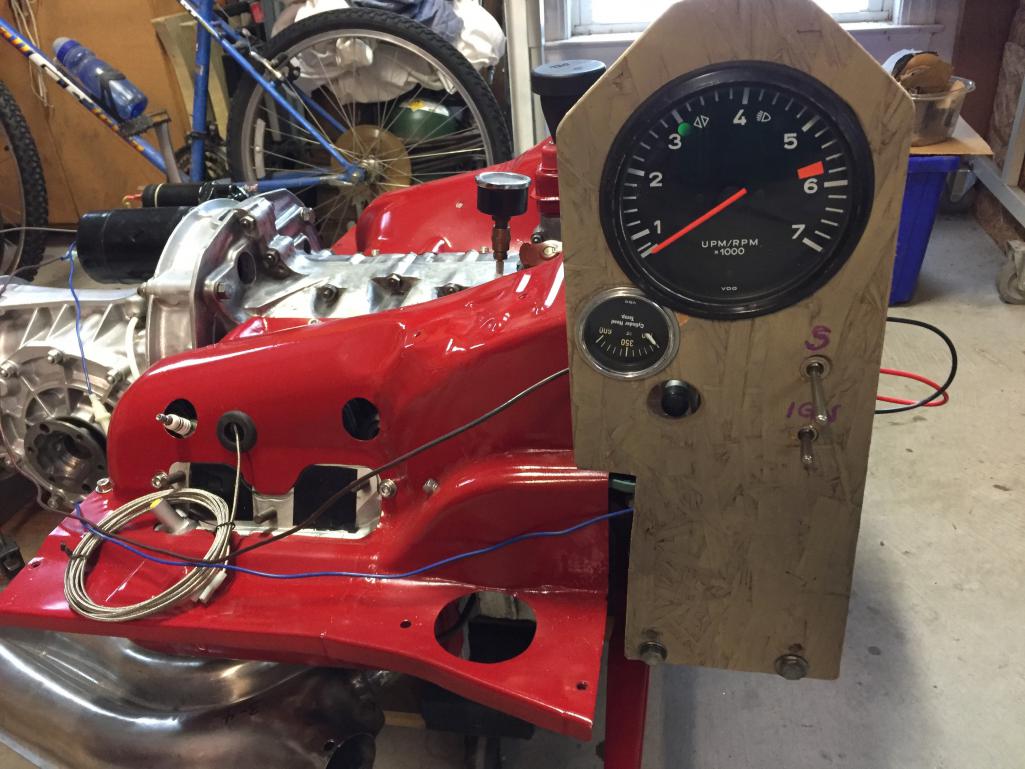 |
   |

 
|
  |
Replies(1 - 10)
| VaccaRabite |
Jan 3 2018, 03:13 PM
Post
#2
|
|
En Garde! Group: Admin Posts: 13,841 Joined: 15-December 03 From: Dallastown, PA Member No.: 1,435 Region Association: MidAtlantic Region |
Assuming you have pulled the spark plugs out...
Just crank till the idiot light goes out. It takes longer then you think it should. Though my engine had extra plumbing so it had to fill all that too. So long as you used engine lube when building the motor you won't hurt anyhting building pressure. Zach |
|
|
|
| jcd914 |
Jan 3 2018, 03:44 PM
Post
#3
|
|
Advanced Member Group: Members Posts: 2,096 Joined: 7-February 08 From: Sacramento, CA Member No.: 8,684 Region Association: Northern California |
|
|
|
|
| 914forme |
Jan 3 2018, 04:08 PM
Post
#4
|
|
Times a wastin', get wrenchin'! Group: Members Posts: 3,899 Joined: 24-July 04 From: Dayton, Ohio Member No.: 2,388 Region Association: None |
Just let the starter rest a bit. You can also build a Pressure lubber.
Gavity will prelube your engine very well even have oil dripping from the rocker arms. Take a 1 QT or 1 litre oil jug. Remove the cap and drill a hole in it and thread the hole for 1/4 pipe. Buy a 1/4 pipe hose barb and thread it into the cap. Using wire or welding rod etc twist up a basket to hold a 1 qt or 1 litre oil jug upside down with a hook to hang it. Buy some oil proof hose (clear plastic line is ok too.) Obtain a hose barb with 8mm thread on one end. Remove the oil sending unit or fitting from the engine and screw in the 8mm hose barb with the hose attached and the cap on the other end. 3 feet works about right. Get your fresh oil jug and place it in the wire basket you made. Unscew the cap and screw it on to the cap attached to the free end. Hang the oil jug upside down. Take a sharpe awl or knife and poke a hole into the top of the oil jug. (Actually the bottom but it is now facing up) This lets the air in and the oil out. Go for lunch. When you return the oil will have traveled by gravity down the hose or line right into the oil galleries of the engine and dry start ups are eliminated. You can also use air pressure in that little hole, but if you have a loose fitting it can cover everything in oil in a matter of seconds. (IMG:style_emoticons/default/headbang.gif) BTDT Can also do the same thing with a pump herbicide sprayer. I have one of these I built to fill Miata Transmission, same concept just a different way around. Oh don't forget to remove the amount of oil out of the engine you have add via this method. |
|
|
|
| Montreal914 |
Jan 3 2018, 04:17 PM
Post
#5
|
|
Advanced Member Group: Members Posts: 2,053 Joined: 8-August 10 From: Claremont, CA Member No.: 12,023 Region Association: Southern California |
Takes a little while.
Are these 2.0 HE or 1.7–1.8? Good looking engine and trans! Came break in. |
|
|
|
| barefoot |
Jan 3 2018, 05:29 PM
Post
#6
|
|
Senior Member Group: Members Posts: 1,485 Joined: 19-March 13 From: Charleston SC Member No.: 15,673 Region Association: South East States |
QUOTE(Montreal914 @ Jan 3 2018, 05:17 PM)  Takes a little while. Are these 2.0 HE or 1.7–1.8? Good looking engine and trans! Cam break in. 1.7-1.8 H/E's, yes want to run the engine on my little test rig for cam break-in cycle. Will then re-torque heads and check valve clearance before loading into car. Will have 40 Dell's and my fuel system will be an elevated tank to provide 3 psi Not sure if I'll ned to add the muffler, time will tell ! |
|
|
|
| VaccaRabite |
Jan 3 2018, 08:15 PM
Post
#7
|
|
En Garde! Group: Admin Posts: 13,841 Joined: 15-December 03 From: Dallastown, PA Member No.: 1,435 Region Association: MidAtlantic Region |
Put the muffler on. Once the muffler is on you have the engine ready to be lifted into your car once the run in is done. Its also a lot easier on your ears.
Also, put the rest of your tins on. You don't want to run the engine for any length of time with out the tins in place, or you won't get enough pressure to cool the engine. Zach |
|
|
|
| ndfrigi |
Jan 3 2018, 09:44 PM
Post
#8
|
|
Advanced Member Group: Members Posts: 2,978 Joined: 21-August 11 From: Orange County Member No.: 13,474 Region Association: Southern California |
QUOTE(barefoot @ Jan 3 2018, 12:17 PM) New 2L build case align bored and gallery plugs replaced with threaded plugs so i know everything's clean in there. New CB type 1 oil pump mod the fit Tp 4. Temporary oil pressure gage fitted, Valvoline VR-1 20W-50 oil and all bearings pre-lubed with assembly lube (the red stuff) With my test rig I'm trying to make sure oil pressure observed before trying to fire the engine. Spark plugs pulled, so easy cranking. I've now cranked it over perhaps 30 revs so far and no pressure showing yet. I did not pre-fill oil filter (not sure why that's a bad idea) I pulled filter and there was ~ 1/4 full, so it seems oil's getting somewhere, but how long does it take to build pressure ??? wow! what a beautiful engine! It looks like a display engine only for that very clean engine! Congratulation! |
 |
|
| falcor75 |
Jan 4 2018, 12:19 AM
Post
#9
|
|
Senior Member Group: Members Posts: 1,579 Joined: 22-November 12 From: Sweden Member No.: 15,176 Region Association: Scandinavia |
For me it takes about 3 to 6 ten second bursts from the starter to get the idiot light to go out on the dash after an oil change. So just keep at it. Aslong as the bearings were lubed you're not hurting anyting.
|
|
|
|
| barefoot |
Jan 6 2018, 02:33 PM
Post
#10
|
|
Senior Member Group: Members Posts: 1,485 Joined: 19-March 13 From: Charleston SC Member No.: 15,673 Region Association: South East States |
After WAY too much starter cranking and still no oil pressure i got very concerned, how can i not be getting pressure ???
So i pulled the top tins, the fan & fan housing and tilted the engine up by the front end & pulled off the oil pump cover (type 1 pump) there was NO oil in the pump gear cavity WTF !! How in the hell can this be, all oil galleries were clean and free, only think I could think of was i had not installed the oil pick-up tube so it engaged into the feed hole in the case. However, test assembling my spare split case with an oil pick-up assy, there's no firkin way to assemble it wrong. I capped the oil pump, tilted the engine up on it's nose and pulled the oil strainer cover off & the aluminum oil strainer out. Test fitting this strainer into my spare split case it looked like the center of the strainer sat up pretty far. A quick check with the calipers showed that it was up against the end of the suction tube effectivly blocking oil from entering the pick-up tube. Somehow I had acquired 3 of these oil strainers and used the best one in my build. Looking at another one, the center bit was not pushed up as far as the one i had used, unfortunately it was junk so a little blacksmithing on my only good strainer pushed the center bit down further and a further inspection in the spare case confirmed now clearance between strainer center bit and the end of the pick-up tube. In the type 4 the nut that caps the oil strainer cover does not contact the center of the strainer, can't remember what the Beetle situation is (way too many years ago) OK, now with the strainer cover torqued back on, motor tilted back down horizontal and after 5 sec of cranking, NOW SEE OIL PRESSURE, halla-frikin-luya !! I was so concerned that i was gonna have to tear the whole thing apart & split the case to see what went wrong. Beware there may be differences in oil strainers, make sure you've got the right one !!!! |
|
|
|
| 76-914 |
Jan 6 2018, 08:28 PM
Post
#11
|
|
Repeat Offender & Resident Subaru Antagonist Group: Members Posts: 13,870 Joined: 23-January 09 From: Temecula, CA Member No.: 9,964 Region Association: Southern California |
It's a good idea to loosen the oil filter, crank until oil starts to seep out then tighten the filter. Nice work! (IMG:style_emoticons/default/beerchug.gif)
|
|
|
|
|
1 User(s) are reading this topic (1 Guests and 0 Anonymous Users)
0 Members:

|
Lo-Fi Version | Time is now: 14th March 2026 - 04:57 AM |
Invision Power Board
v9.1.4 © 2026 IPS, Inc.