|
|
|
Porsche, and the Porsche crest are registered trademarks of Dr. Ing. h.c. F. Porsche AG.
This site is not affiliated with Porsche in any way. Its only purpose is to provide an online forum for car enthusiasts. All other trademarks are property of their respective owners. |
|
|


| bbrock |
 Jan 31 2018, 08:50 AM Jan 31 2018, 08:50 AM
Post
#1
|
|
914 Guru  Group: Members Posts: 5,269 Joined: 17-February 17 From: Montana Member No.: 20,845 Region Association: Rocky Mountains |
Sorry for posting a thread that probably only Cary (or maybe Mark Whitesell can answer, but I thought others might run into this issue later and hopefully find an answer here.
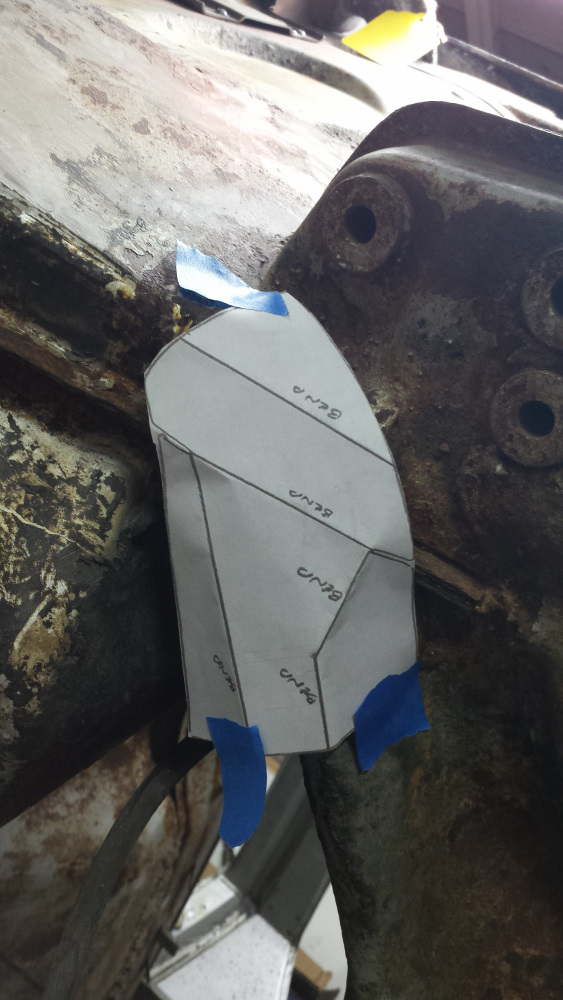
I bought the first set of the MiddleMotors LLC designed gussets sold by 914rubber so I'm probably the first person other than Cary to install them. (IMG:http://www.914world.com/bbs2/uploads/post-20845-1507174131.jpg) I think I figured out the two-piece side and got them installed right. The only question here is whether those holes are intended to be plug welded. (IMG:http://www.914world.com/bbs2/uploads/post-20845-1517379931.jpg) The other piece is more of a problem. After trying every possible position and comparing with the matching gusset on the other side, I'm pretty sure this is the correct orientation. The problem is that the slots for the longitude flange are running the wrong way. That will be easy enough to fix, but I didn't want to start welding and hammering without confirmation from the expert to make sure I'm not missing something here. (IMG:http://www.914world.com/bbs2/uploads/post-20845-1517380139.jpg) |
   |

 
|
  |
Replies(1 - 12)
| cary |
Jan 31 2018, 09:29 AM
Post
#2
|
|
Advanced Member Group: Members Posts: 3,900 Joined: 26-January 04 From: Sherwood Oregon Member No.: 1,608 Region Association: Pacific Northwest |
I'll have to look at the mock up tomorrow when I'm out at Forest Grove.
I haven't used a set yet. First one will be on Taylor's car. Yes on the holes being plug welded. |
|
|
|
| cary |
Jan 31 2018, 09:34 AM
Post
#3
|
|
Advanced Member Group: Members Posts: 3,900 Joined: 26-January 04 From: Sherwood Oregon Member No.: 1,608 Region Association: Pacific Northwest |
 |
|
|
|
| ChrisFoley |
Jan 31 2018, 10:14 AM
Post
#4
|
|
I am Tangerine Racing Group: Members Posts: 7,935 Joined: 29-January 03 From: Bolton, CT Member No.: 209 Region Association: None |
I've been making these reinforcements for years to put on customer cars in the shop.
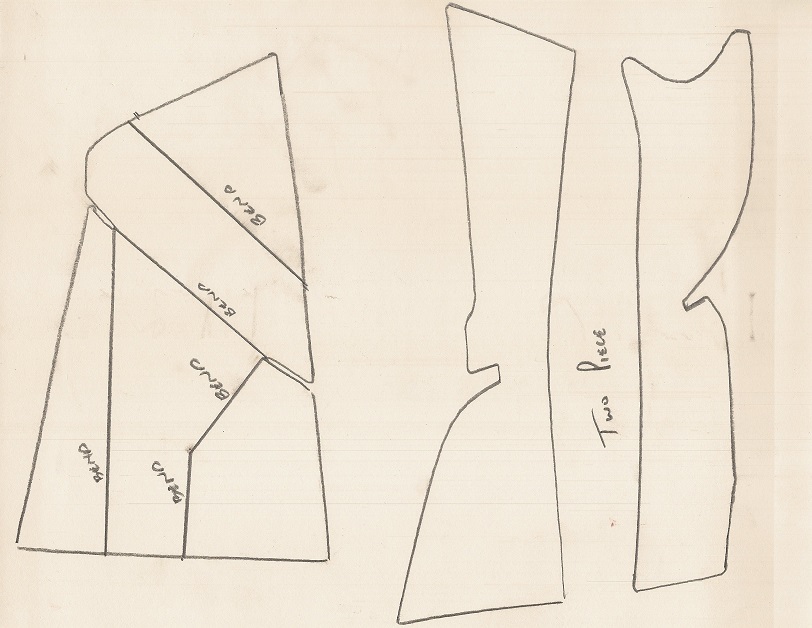
The only reason I haven't marketed them to the general public is my feeling that they really need to be fully pre-shaped or most people won't be able to properly complete the installation. When made in the same thickness as oem they are way too stiff for hand hammering into place. I shape them off the car using a variety of tools but it isn't easy. I'll eventually make a set of press dies to form them so they fit right out of the box. I was going to post a picture of my orignal paper templates but don't have a digital copy available. So I grabbed pieces off my shelf to compare. Mine a little bit differently shaped than Cary's but without looking at an original still on a car I can't tell what about his might need to be altered so they fit better. |
|
|
|
| bbrock |
Jan 31 2018, 06:50 PM
Post
#5
|
|
914 Guru Group: Members Posts: 5,269 Joined: 17-February 17 From: Montana Member No.: 20,845 Region Association: Rocky Mountains |
Figured it out. That template diagram was the key. I ended up rescaling your image as close as I could get to actual size and printing it out. Then folded it up and fit it to the driver's side. Worked great.
 Then reversed the folds and fit to the pass side. Fits great! 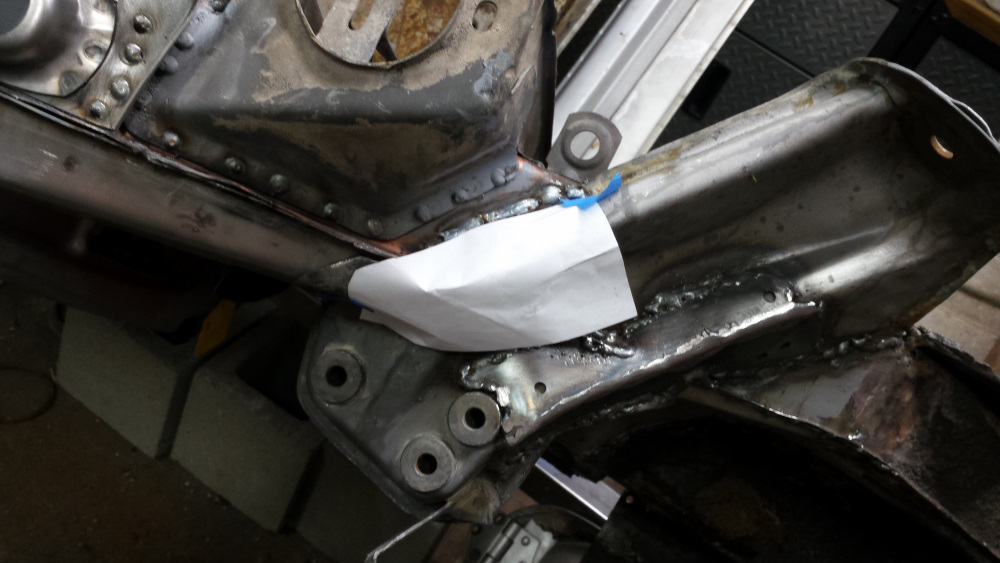 What threw me was the shape of Cary's piece is different from original where it laps over the outer console. Cary's extends farther down. It looked like it wouldn't fit, but with the template, I was able to confirm that it does. Now I have to figure out how to bend this thing. Chris confirmed my fears about bending this think piece of steel. I think I can do it, but we'll soon find out. |
|
|
|
| tygaboy |
Jan 31 2018, 06:58 PM
Post
#6
|
|
914 Guru Group: Members Posts: 5,319 Joined: 6-October 15 From: Petaluma, CA Member No.: 19,241 Region Association: Northern California |
I have complete faith in you quickly figuring out how to bend that bad boy to your will! (IMG:style_emoticons/default/aktion035.gif)
Any chance you could work up a die of some sort and use a hydraulic press? |
 |
|
| bbrock |
Jan 31 2018, 07:04 PM
Post
#7
|
|
914 Guru Group: Members Posts: 5,269 Joined: 17-February 17 From: Montana Member No.: 20,845 Region Association: Rocky Mountains |
QUOTE(tygaboy @ Jan 31 2018, 05:58 PM)  I have complete faith in you quickly figuring out how to bend that bad boy to your will! (IMG:style_emoticons/default/aktion035.gif) Any chance you could work up a die of some sort and use a hydraulic press? You overestimate my abilities sir. (IMG:style_emoticons/default/smile.gif) I'd try using a press if I had one. Actually, I did have one for a couple days before I decided it was too small for my needs and I don't have space for a bigger one. I don't know what metal Cary specified on these, but it looks to be 3/16" thick but very ductile. So I'm hoping I can get most of it done with the vice and a BFH. The nice thing is that it doesn't have to look pretty. (IMG:style_emoticons/default/beerchug.gif) |
|
|
|
| 914werke |
Jan 31 2018, 07:50 PM
Post
#8
|
|
"I got blisters on me fingers" Group: Members Posts: 10,146 Joined: 22-March 03 From: USofA Member No.: 453 Region Association: Pacific Northwest |
Not to (IMG:style_emoticons/default/hijacked.gif) but I recall a post by RD a short while ago showing a set of NOS
gussets they acquired. Weren't they planing to replicate them perhaps in the heavier gauge Chris suggests? |
|
|
|
| cary |
Jan 31 2018, 07:58 PM
Post
#9
|
|
Advanced Member Group: Members Posts: 3,900 Joined: 26-January 04 From: Sherwood Oregon Member No.: 1,608 Region Association: Pacific Northwest |
* Yep ................. BFH
*You got it. Super In Law said you just reverse the bends for the other side * 12ga is what comes to mind. * I'll find the original drawing for Mark to send out with the parts. * Yes I remember Pete talking about RD forming the part. That would be nice. |
|
|
|
| ChrisFoley |
Jan 31 2018, 07:58 PM
Post
#10
|
|
I am Tangerine Racing Group: Members Posts: 7,935 Joined: 29-January 03 From: Bolton, CT Member No.: 209 Region Association: None |
I think mine are 13 ga.
|
|
|
|
| bbrock |
Jan 31 2018, 08:19 PM
Post
#11
|
|
914 Guru Group: Members Posts: 5,269 Joined: 17-February 17 From: Montana Member No.: 20,845 Region Association: Rocky Mountains |
Transferred the bend lines to the piece and spent just a few minutes on the vice with BFH to start shaping. I already knew I'd need to open up the slots a little but this looks doable. I'm probably going to deviate a little from the bend pattern to match the look of the other side. But I don't think I'll work on it anymore tonight.
 Preformed pieces would be super cool. Thanks for all the help! |
|
|
|
| bbrock |
Feb 3 2018, 12:20 AM
Post
#12
|
|
914 Guru Group: Members Posts: 5,269 Joined: 17-February 17 From: Montana Member No.: 20,845 Region Association: Rocky Mountains |
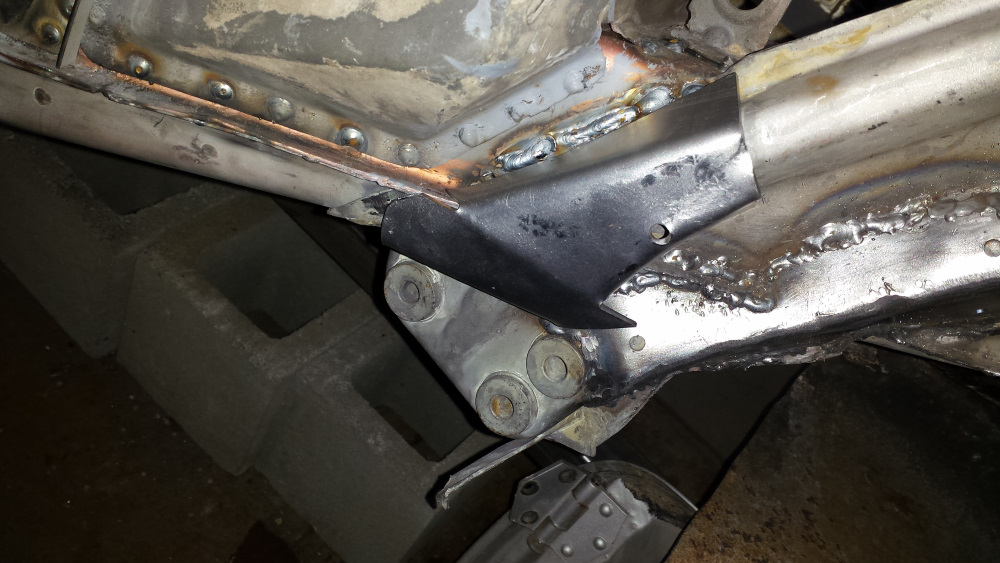
Update, I wound up modifying the gusset piece a fair amount from the original design, but I'm happy with the result... (IMG:style_emoticons/default/shades.gif)
(IMG:http://www.914world.com/bbs2/uploads/post-20845-1517638106.jpg) I posted more details of what I did on my build thread: http://www.914world.com/bbs2/index.php?s=&...t&p=2574576 |
|
|
|
| 914werke |
Feb 3 2018, 01:02 AM
Post
#13
|
|
"I got blisters on me fingers" Group: Members Posts: 10,146 Joined: 22-March 03 From: USofA Member No.: 453 Region Association: Pacific Northwest |
Solid!
|
|
|
|
|
1 User(s) are reading this topic (1 Guests and 0 Anonymous Users)
0 Members:

|
Lo-Fi Version | Time is now: 11th June 2024 - 01:45 PM |
Invision Power Board
v9.1.4 © 2024 IPS, Inc.