|
|
|
Porsche, and the Porsche crest are registered trademarks of Dr. Ing. h.c. F. Porsche AG.
This site is not affiliated with Porsche in any way. Its only purpose is to provide an online forum for car enthusiasts. All other trademarks are property of their respective owners. |
|
|


| Medtner3 |
 Oct 4 2020, 07:49 AM Oct 4 2020, 07:49 AM
Post
#1
|
|
Member  Group: Members Posts: 187 Joined: 7-July 20 From: Cedar Park Member No.: 24,467 Region Association: None |
Just rebuilt my rear calipers with seals from PMB Performance. Using a vacuum brake bleeder I started with the right rear caliper lower bleeder screw ( I have two screws) and initially pulled about an inch of brake fluid with lots of bubbles and then zip. I get zero brake fluid now.
What could cause this? I have no signs of any leaks and the brakes were not bad before I rebuilt the calipers. I read somewhere that I might need to bleed the proportioning valve or even pump into the caliper some brake fluid through the top bleeder ? I ordered a Motive pressure bleeder which arrives in a few days Attached image(s) 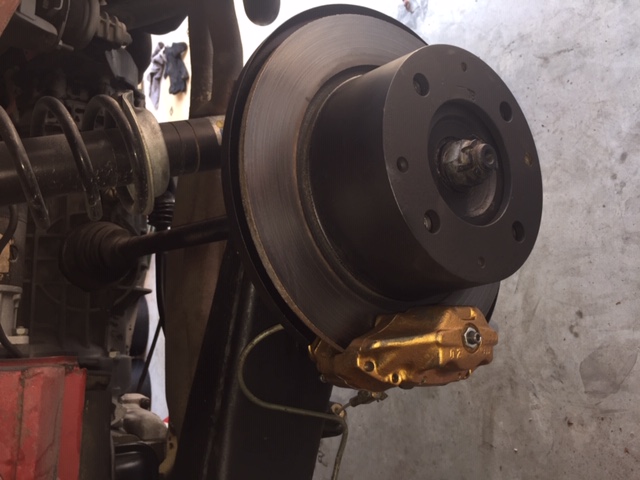 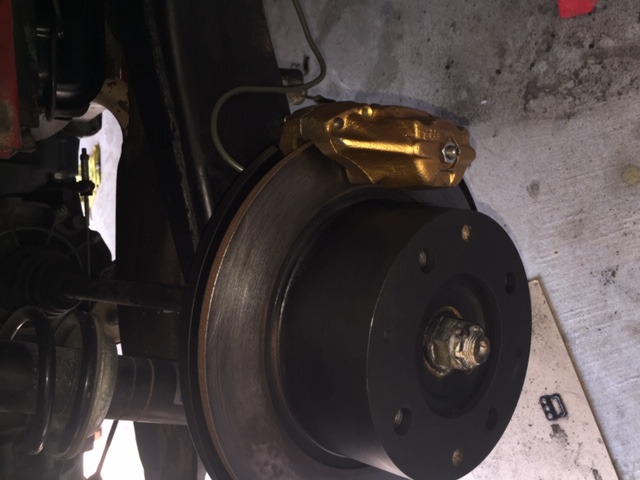 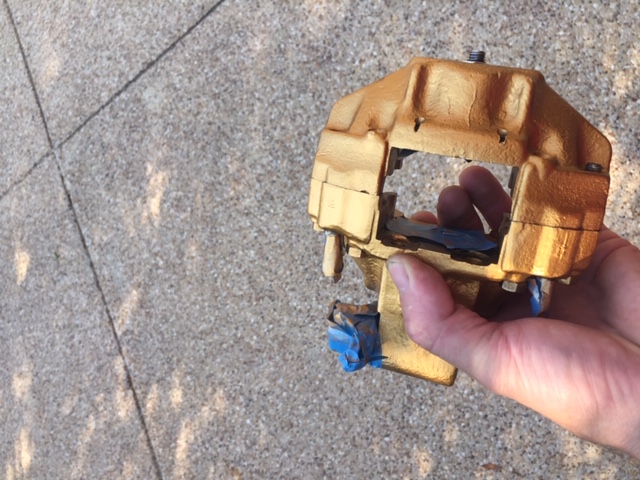
|
   |

 
|
  |
Replies(1 - 19)
| mlindner |
Oct 4 2020, 08:06 AM
Post
#2
|
|
Senior Member Group: Members Posts: 1,691 Joined: 11-November 11 From: Merrimac, WI Member No.: 13,770 Region Association: Upper MidWest |
Chances are the brake fluid drained out of the master cylinder. I had that, had to pressurize the fluid reservoir and have someone pump the brake at the same time. Problem solved. Maybe try it on the front calipper first just to take the proportion valve out of the mix. Best, Mark
|
|
|
|
| Medtner3 |
Oct 4 2020, 08:25 AM
Post
#3
|
|
Member Group: Members Posts: 187 Joined: 7-July 20 From: Cedar Park Member No.: 24,467 Region Association: None |
QUOTE(mlindner @ Oct 4 2020, 09:06 AM)  Chances are the brake fluid drained out of the master cylinder. I had that, had to pressurize the fluid reservoir and have someone pump the brake at the same time. Problem solved. Maybe try it on the front calipper first just to take the proportion valve out of the mix. Best, Mark could you elaborate? I had a full Master cylinder reservoir. How do you "pressurize" do I need to have a pressure bleeder Are you saying also do front calipers first? |
|
|
|
| mlindner |
Oct 4 2020, 08:36 AM
Post
#4
|
|
Senior Member Group: Members Posts: 1,691 Joined: 11-November 11 From: Merrimac, WI Member No.: 13,770 Region Association: Upper MidWest |
Yes I would try the fronts first...I know that is not the correct way, but just to get fluid coming out. I did not have a pressure bleeder so I just carefully covered everything up around the reservoir, wrapped a rag around the top of it and shot some air in (air compressor) while my buddy pumped the brake peddle.
|
|
|
|
| Medtner3 |
Oct 4 2020, 08:42 AM
Post
#5
|
|
Member Group: Members Posts: 187 Joined: 7-July 20 From: Cedar Park Member No.: 24,467 Region Association: None |
QUOTE(mlindner @ Oct 4 2020, 09:36 AM) Yes I would try the fronts first...I know that is not the correct way, but just to get fluid coming out. I did not have a pressure bleeder so I just carefully covered everything up around the reservoir, wrapped a rag around the top of it and shot some air in (air compressor) while my buddy pumped the brake peddle. Okay I will try fronts first I have the Motive pressure bleeder ordered so if it does not work I can try pressurizing the Master my air compressor is not available at the moment Thanks |
|
|
|
| davep |
Oct 4 2020, 08:55 AM
Post
#6
|
|
914 Historian Group: Benefactors Posts: 5,300 Joined: 13-October 03 From: Burford, ON, N0E 1A0 Member No.: 1,244 Region Association: Canada |
On a caliper with two bleed nipples, the top is the bleed, and the bottom is a drain; only bleed with the top nipple. Air bubbles rise you know.
When bleeding the system, keep checking the reservoir to be sure it is full by removing the cap and looking down inside. The reservoir is divided by a half barrier into front & rear so an external glance may not reveal that the other half is empty. If a half does empty, then you will have to do a long bleed to ensure any air introduced at the reservoir is removed. Pedal bleeding ensures that high pressure is able to be achieved, and it also crushes bubbles and helps them move through the system; keeping them from being trapped within things like the pressure regulator. So I like to finish a bleed with pedal bleeding after using either a vacuum bleed or an air pressure bleed method. |
 |
|
| Tdskip |
Oct 4 2020, 10:55 AM
Post
#7
|
|
Advanced Member Group: Members Posts: 3,737 Joined: 1-December 17 From: soCal Member No.: 21,666 Region Association: None |
The other thing that I would add is that for whatever reason pumping the brakes seems to work better in situations like this then using a handheld vacuum pump. If you don’t have access to a system that will pressurize it then offer to buy someone a pizza and have them actually the brake pedal.
|
|
|
|
| iankarr |
Oct 4 2020, 11:12 AM
Post
#8
|
|
The wrencher formerly known as Cuddy_K Group: Members Posts: 2,567 Joined: 22-May 15 From: Heber City, UT Member No.: 18,749 Region Association: Intermountain Region |
I like to use pressure (motive @ 5-10 psi) followed by pedal bleeding. You can also replace the bleed screws with speed bleeders to make things a one-person job. Some people say you shouldn't use speed bleeders with the motive, but it's worked fine for me. Here are two videos which may help as well...
"Bench bleeding" master cylinder while in the car: https://youtu.be/OOSer774NqM Bleeding brakes: https://youtu.be/ymHHD6uKhfc |
|
|
|
| Medtner3 |
Oct 4 2020, 11:51 AM
Post
#9
|
|
Member Group: Members Posts: 187 Joined: 7-July 20 From: Cedar Park Member No.: 24,467 Region Association: None |
QUOTE(davep @ Oct 4 2020, 09:55 AM) On a caliper with two bleed nipples, the top is the bleed, and the bottom is a drain; only bleed with the top nipple. Air bubbles rise you know. When bleeding the system, keep checking the reservoir to be sure it is full by removing the cap and looking down inside. The reservoir is divided by a half barrier into front & rear so an external glance may not reveal that the other half is empty. If a half does empty, then you will have to do a long bleed to ensure any air introduced at the reservoir is removed. Pedal bleeding ensures that high pressure is able to be achieved, and it also crushes bubbles and helps them move through the system; keeping them from being trapped within things like the pressure regulator. So I like to finish a bleed with pedal bleeding after using either a vacuum bleed or an air pressure bleed method. Okay the first problem was my master went dry because it was so discolored from ATE super blue that I thought it had fluid. How do I bleed now .. do I need to bleed the master? |
|
|
|
| rhodyguy |
Oct 4 2020, 12:05 PM
Post
#10
|
|
Chimp Sanctuary NW. Check it out. Group: Members Posts: 22,249 Joined: 2-March 03 From: Orion's Bell. The BELL! Member No.: 378 Region Association: Galt's Gulch |
Get some speed bleeders. One for each caliper. Installed in the upper holes. A LONG piece of clear tubing and a catch jar.
|
|
|
|
| iankarr |
Oct 4 2020, 12:08 PM
Post
#11
|
|
The wrencher formerly known as Cuddy_K Group: Members Posts: 2,567 Joined: 22-May 15 From: Heber City, UT Member No.: 18,749 Region Association: Intermountain Region |
QUOTE(Medtner3 @ Oct 4 2020, 01:51 PM) QUOTE(davep @ Oct 4 2020, 09:55 AM) On a caliper with two bleed nipples, the top is the bleed, and the bottom is a drain; only bleed with the top nipple. Air bubbles rise you know. When bleeding the system, keep checking the reservoir to be sure it is full by removing the cap and looking down inside. The reservoir is divided by a half barrier into front & rear so an external glance may not reveal that the other half is empty. If a half does empty, then you will have to do a long bleed to ensure any air introduced at the reservoir is removed. Pedal bleeding ensures that high pressure is able to be achieved, and it also crushes bubbles and helps them move through the system; keeping them from being trapped within things like the pressure regulator. So I like to finish a bleed with pedal bleeding after using either a vacuum bleed or an air pressure bleed method. Okay the first problem was my master went dry because it was so discolored from ATE super blue that I thought it had fluid. How do I bleed now .. do I need to bleed the master? I would. Since it's gone dry, i'd just start from scratch... – Bleed the master (in the car is fine...see video link above). Use pedal only...and put a block or something down to make sure you don't hyper-extend the pedal and damage the seals inside the MC). When no bubbles are coming through... – Put a quart of fluid in the motive, hook it up and pressurize to 5-10 PSI. Use a rubber mallet to rap on the caliper and dislodge air bubbles while bleeding. – Bleed from the top screws LR, RR, RF, LF. – Finish with a pedal bleed all the way around. If you don't have a firm pedal, do it again until you do. If it's firm enough to drive, but not perfect, that's kind of typical. Just carefully drive it on a bumpy road for a bit, then bleed again. Good luck and be safe! |
|
|
|
| Medtner3 |
Oct 4 2020, 01:42 PM
Post
#12
|
|
Member Group: Members Posts: 187 Joined: 7-July 20 From: Cedar Park Member No.: 24,467 Region Association: None |
QUOTE(iankarr @ Oct 4 2020, 01:08 PM) QUOTE(Medtner3 @ Oct 4 2020, 01:51 PM) QUOTE(davep @ Oct 4 2020, 09:55 AM) On a caliper with two bleed nipples, the top is the bleed, and the bottom is a drain; only bleed with the top nipple. Air bubbles rise you know. When bleeding the system, keep checking the reservoir to be sure it is full by removing the cap and looking down inside. The reservoir is divided by a half barrier into front & rear so an external glance may not reveal that the other half is empty. If a half does empty, then you will have to do a long bleed to ensure any air introduced at the reservoir is removed. Pedal bleeding ensures that high pressure is able to be achieved, and it also crushes bubbles and helps them move through the system; keeping them from being trapped within things like the pressure regulator. So I like to finish a bleed with pedal bleeding after using either a vacuum bleed or an air pressure bleed method. Okay the first problem was my master went dry because it was so discolored from ATE super blue that I thought it had fluid. How do I bleed now .. do I need to bleed the master? I would. Since it's gone dry, i'd just start from scratch... – Bleed the master (in the car is fine...see video link above). Use pedal only...and put a block or something down to make sure you don't hyper-extend the pedal and damage the seals inside the MC). When no bubbles are coming through... – Put a quart of fluid in the motive, hook it up and pressurize to 5-10 PSI. Use a rubber mallet to rap on the caliper and dislodge air bubbles while bleeding. – Bleed from the top screws LR, RR, RF, LF. – Finish with a pedal bleed all the way around. If you don't have a firm pedal, do it again until you do. If it's firm enough to drive, but not perfect, that's kind of typical. Just carefully drive it on a bumpy road for a bit, then bleed again. Good luck and be safe! Thanks, Ian! Keep the videos coming they're great btw! |
|
|
|
| Medtner3 |
Oct 6 2020, 04:28 PM
Post
#13
|
|
Member Group: Members Posts: 187 Joined: 7-July 20 From: Cedar Park Member No.: 24,467 Region Association: None |
QUOTE(iankarr @ Oct 4 2020, 01:08 PM) QUOTE(Medtner3 @ Oct 4 2020, 01:51 PM) QUOTE(davep @ Oct 4 2020, 09:55 AM) On a caliper with two bleed nipples, the top is the bleed, and the bottom is a drain; only bleed with the top nipple. Air bubbles rise you know. When bleeding the system, keep checking the reservoir to be sure it is full by removing the cap and looking down inside. The reservoir is divided by a half barrier into front & rear so an external glance may not reveal that the other half is empty. If a half does empty, then you will have to do a long bleed to ensure any air introduced at the reservoir is removed. Pedal bleeding ensures that high pressure is able to be achieved, and it also crushes bubbles and helps them move through the system; keeping them from being trapped within things like the pressure regulator. So I like to finish a bleed with pedal bleeding after using either a vacuum bleed or an air pressure bleed method. Okay the first problem was my master went dry because it was so discolored from ATE super blue that I thought it had fluid. How do I bleed now .. do I need to bleed the master? I would. Since it's gone dry, i'd just start from scratch... – Bleed the master (in the car is fine...see video link above). Use pedal only...and put a block or something down to make sure you don't hyper-extend the pedal and damage the seals inside the MC). When no bubbles are coming through... – Put a quart of fluid in the motive, hook it up and pressurize to 5-10 PSI. Use a rubber mallet to rap on the caliper and dislodge air bubbles while bleeding. – Bleed from the top screws LR, RR, RF, LF. – Finish with a pedal bleed all the way around. If you don't have a firm pedal, do it again until you do. If it's firm enough to drive, but not perfect, that's kind of typical. Just carefully drive it on a bumpy road for a bit, then bleed again. Good luck and be safe! I bled the Master using your video as a guide. Then I bled with the Motive pressure bleeder and very few air bubbles came out. My pedal is firm but not hard. I have not pedal bled yet. I was thinking test drive around then bleed again with the Motive pressure bleeder. It only pressurizes to 5-6 psi I wonder if that is 914 specific or whether mine is defective although seemed to work |
|
|
|
| Gint |
Oct 6 2020, 04:45 PM
Post
#14
|
|
Mike Ginter Group: Admin Posts: 16,098 Joined: 26-December 02 From: Denver CO. Member No.: 20 Region Association: Rocky Mountains |
QUOTE(rhodyguy @ Oct 4 2020, 11:05 AM) Get some speed bleeders. One for each caliper. Installed in the upper holes. A LONG piece of clear tubing and a catch jar. And make damn sure when you're doing all of this you don't let the fluid go low in the master cylinder reservoir. Keep it topped up as the fluid level gets low.I tried a motive bleeder on a 914 once and didn't have much luck with it. That may just be me. Operator error, who knows. I prefer the old fashioned two person method. |
|
|
|
| Amphicar770 |
Oct 6 2020, 05:19 PM
Post
#15
|
|
Senior Member Group: Members Posts: 1,219 Joined: 20-April 10 From: PA, USA Member No.: 11,639 Region Association: MidAtlantic Region |
I had no luck vacuum bleeding the 914, couldn't get past the proportioning valve for rear. Pressure bleeder or 2nd person does the trick.
|
|
|
|
| Olympic 914 |
Oct 6 2020, 06:42 PM
Post
#16
|
|
Group: Members Posts: 1,745 Joined: 7-July 11 From: Pittsburgh PA Member No.: 13,287 Region Association: North East States |
QUOTE(Medtner3 @ Oct 6 2020, 06:28 PM) It only pressurizes to 5-6 psi I wonder if that is 914 specific or whether mine is defective although seemed to work Are you pressurizing the Motive bottle before opening the bleeder screw? or opening the screw then pumping the Motive handle. I usually pump up to 7-10 lbs then open the bleeder. The reason you should not pump it to more than 10 lbs is that the lines from the reservoir to the master are attached with hose clamps on rubber hoses and can blow off under high pressure. |
|
|
|
| Medtner3 |
Oct 6 2020, 06:47 PM
Post
#17
|
|
Member Group: Members Posts: 187 Joined: 7-July 20 From: Cedar Park Member No.: 24,467 Region Association: None |
QUOTE(Olympic 914 @ Oct 6 2020, 07:42 PM) QUOTE(Medtner3 @ Oct 6 2020, 06:28 PM) It only pressurizes to 5-6 psi I wonder if that is 914 specific or whether mine is defective although seemed to work Are you pressurizing the Motive bottle before opening the bleeder screw? or opening the screw then pumping the Motive handle. I usually pump up to 7-10 lbs then open the bleeder. The reason you should not pump it to more than 10 lbs is that the lines from the reservoir to the master are attached with hose clamps on rubber hoses and can blow off under high pressure. I have the bleeders closed and it goes to about 6 psi have not tied to pump it much higher it stalls there |
|
|
|
| Medtner3 |
Oct 6 2020, 06:49 PM
Post
#18
|
|
Member Group: Members Posts: 187 Joined: 7-July 20 From: Cedar Park Member No.: 24,467 Region Association: None |
QUOTE(Amphicar770 @ Oct 6 2020, 06:19 PM) I had no luck vacuum bleeding the 914, couldn't get past the proportioning valve for rear. Pressure bleeder or 2nd person does the trick. I could not get the vacuum bleeding to work either |
|
|
|
| iankarr |
Oct 6 2020, 07:59 PM
Post
#19
|
|
The wrencher formerly known as Cuddy_K Group: Members Posts: 2,567 Joined: 22-May 15 From: Heber City, UT Member No.: 18,749 Region Association: Intermountain Region |
QUOTE(Medtner3 @ Oct 6 2020, 08:47 PM) QUOTE(Olympic 914 @ Oct 6 2020, 07:42 PM) QUOTE(Medtner3 @ Oct 6 2020, 06:28 PM) It only pressurizes to 5-6 psi I wonder if that is 914 specific or whether mine is defective although seemed to work Are you pressurizing the Motive bottle before opening the bleeder screw? or opening the screw then pumping the Motive handle. I usually pump up to 7-10 lbs then open the bleeder. The reason you should not pump it to more than 10 lbs is that the lines from the reservoir to the master are attached with hose clamps on rubber hoses and can blow off under high pressure. I have the bleeders closed and it goes to about 6 psi have not tied to pump it much higher it stalls there Your lines from the reservoir to the MC are probably not tight enough to hold more than 6 PSI. They weren’t designed to be pressurized. But 5 PSi gets the job done on my cars. |
|
|
|
| rjames |
Oct 7 2020, 11:07 AM
Post
#20
|
|
I'm made of metal Group: Members Posts: 4,327 Joined: 24-July 05 From: Shoreline, WA Member No.: 4,467 Region Association: Pacific Northwest |
I could never get the brakes bled properly until I installed speed bleeders.
Those combined with using the motive at the reservoir to pressurize the system followed by a pedal bleed was the ticket for me. If you've got all of the old fluid out you could run clear tubing from the bleeder all the way back to to the reservoir. That way you're not wasting fluid, you're just circulating it until the air is out. Run the tubing such that you can see it while you're pumping the brake so you know when the air bubble are gone. |
|
|
|
|
1 User(s) are reading this topic (1 Guests and 0 Anonymous Users)
0 Members:

|
Lo-Fi Version | Time is now: 31st July 2025 - 04:31 PM |
Invision Power Board
v9.1.4 © 2025 IPS, Inc.