|
|
|
Porsche, and the Porsche crest are registered trademarks of Dr. Ing. h.c. F. Porsche AG.
This site is not affiliated with Porsche in any way. Its only purpose is to provide an online forum for car enthusiasts. All other trademarks are property of their respective owners. |
|
|


| vintage914racer |
 Nov 6 2021, 10:08 PM Nov 6 2021, 10:08 PM
Post
#1
|
|
Member  Group: Members Posts: 429 Joined: 28-December 03 From: Minneapolis, MN Member No.: 1,473 |
Looming winter in MN means it's time to button the cars up in the garage and dive into winter projects. I need to upgrade the seat on my race car, which kicks off a slippery slope of activities. My seat location has always been compromised (a hair too far from the wheel) due to the floor pan crossbar being in the way. So, in preparation for a new seat, I decided to remove the crossbar.
Naturally digging in I was reminded how bent, beat up and hole-y my floor pan is. So...I want to repair the gnarly, albeit not too rusty except where the crossbar was, pan while I'm in there. 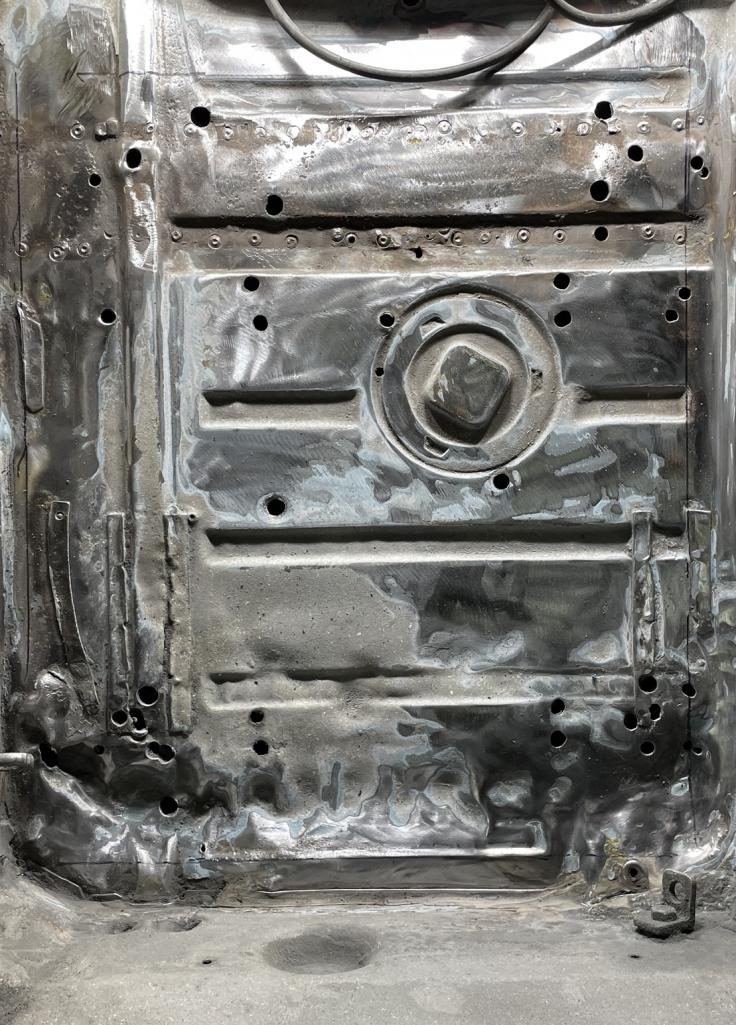 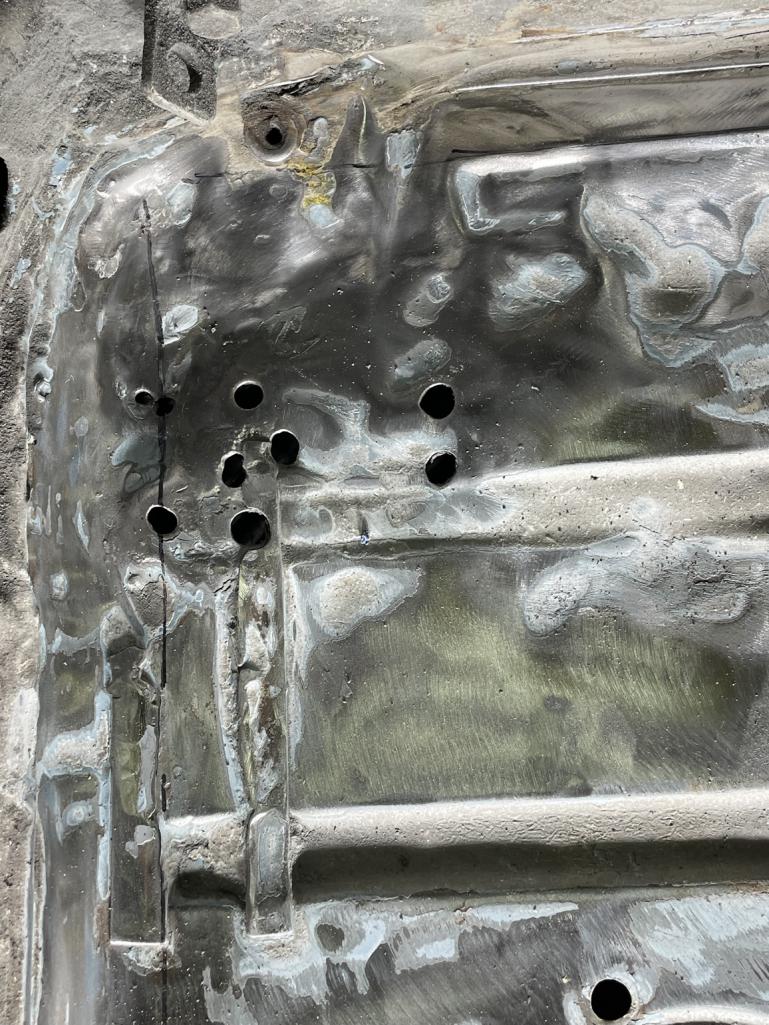 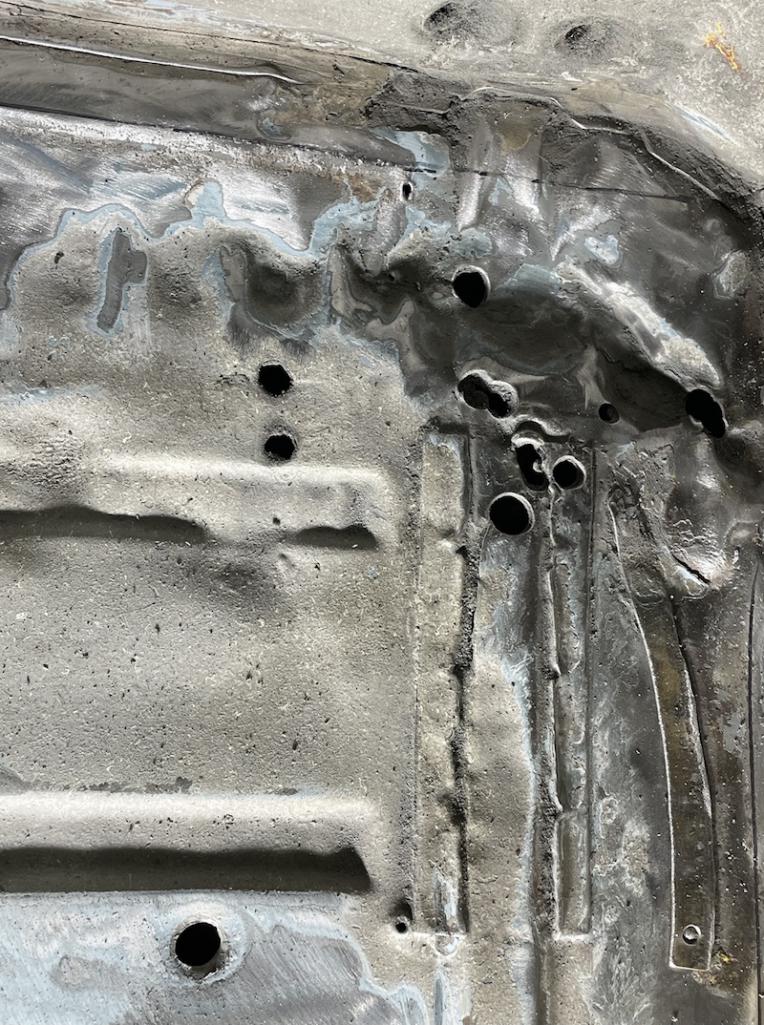 If you can tell in the pictures, the LR and RR corners of the passenger pan are mangled, either from horribly wrong jack placement, someone taking a sledge to fit a race seat in (not me, I promise) or some combination thereof. Anyway, I'm trying to determine the best way to do it. Given the rearmost corners are so mangled, I don't see myself patching into those spots, as it would take too much metal shaping. In other words, replacing the full width (long to center console) seems to make more sense. I had so much fun drilling the crossbar spot welds that I'm not too keen on using a full-width patch the full length, however, if I don't have to. Rather, my thinking is that I cut an inch or so in from either side (long on left, console on right) up to the mangled section where I'll go full width and drill out the spot welds from below. Hopefully, the highlighted image makes more sense. 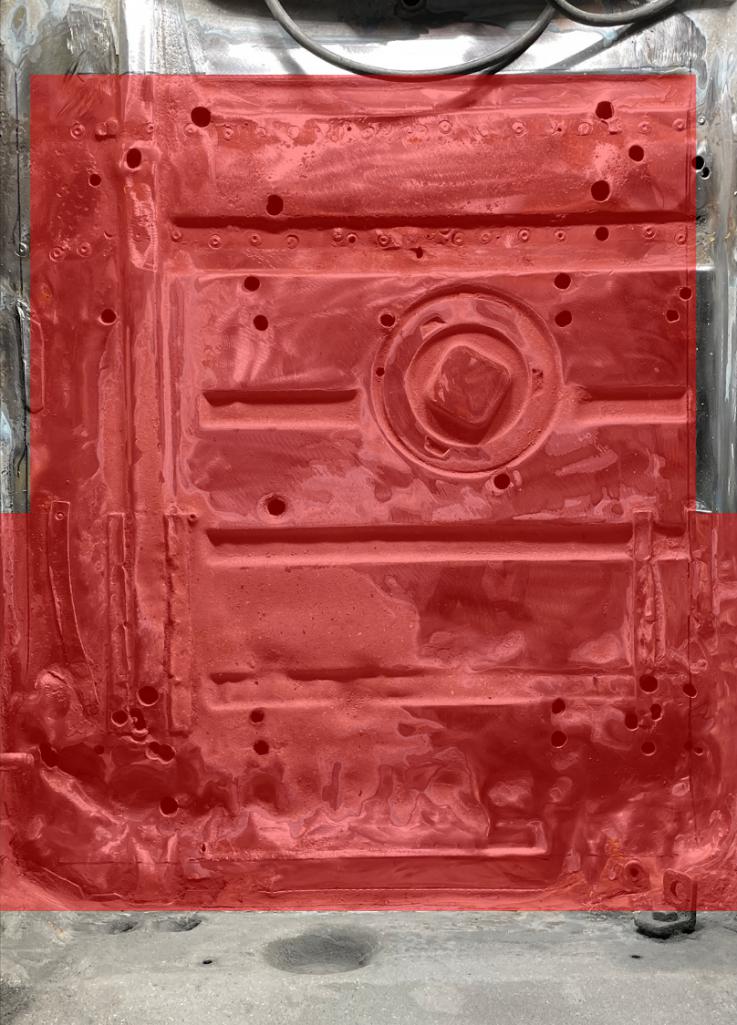 Is my logic flawed? Is there a better way to tackle it? I definitely don't want to half ass it. I'm certainly not an expert in this space, although I did carefully observe the expert work @rick 918-2 did repairing my six streetcar (here for reference). |
   |

 
|
  |
Replies(1 - 10)
| rjames |
Nov 7 2021, 01:44 AM
Post
#2
|
|
I'm made of metal Group: Members Posts: 3,948 Joined: 24-July 05 From: Shoreline, WA Member No.: 4,467 Region Association: Pacific Northwest |
I had to do something similar. Wasn’t too hard. Used a sawzall to cut the bad part of the pan out and then just welded in the new.
Before: 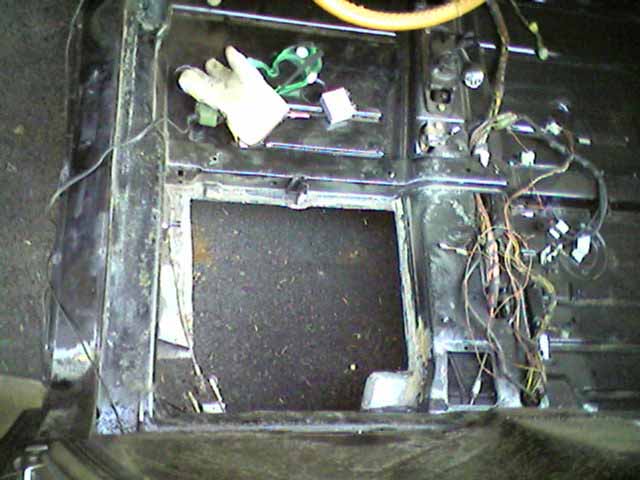 After: 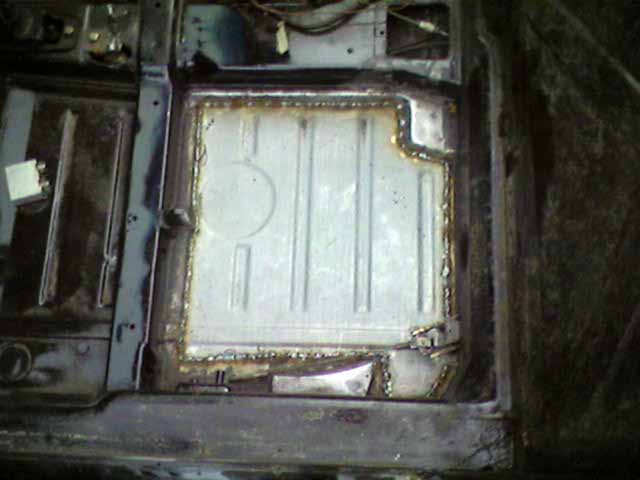 |
|
|
|
| vintage914racer |
Nov 7 2021, 08:30 AM
Post
#3
|
|
Member Group: Members Posts: 429 Joined: 28-December 03 From: Minneapolis, MN Member No.: 1,473 |
QUOTE(rjames @ Nov 7 2021, 12:44 AM)  I had to do something similar. Wasn’t too hard. Used a sawzall to cut the bad part of the pan out and then just welded in the new. Before: After: I think I saw a post of your repair when I was searching the forums. Given the way the rear corners of my pan are mangled out of shape, I don’t think I can do as straightforward of a cut as yours. Ideally I’d trim right ahead of the upward stamping bulge in the right rear like you did, but in my car that’s actually a downward bulge in its current state. Hence, my thinking that I “should” remove spotwelds and go back to the firewall to do it right without having to do a lot of metal shaping the recreate where the new bulge meets the old, non existent one. |
|
|
|
| Superhawk996 |
Nov 7 2021, 08:41 AM
Post
#4
|
|
914 Guru Group: Members Posts: 5,875 Joined: 25-August 18 From: Woods of N. Idaho Member No.: 22,428 Region Association: Galt's Gulch |
Buy new sheetmetal.
Buy a good body hammer and several dolly's. The shape of what you have is sort of irrelevant. Good hammer and dolly work along with careful trim work will net you two surfaces that meet and can be welded appropriately. The quicker solution may very well be to buy a whole new rear 1/2 and just go back to the firewall. Be sure to put that crossmember back in albiet in an adjusted position to suit your seat and seating position. It is needed for structural purposes: To tie left long to the right long, and to support the very long section of floorpan that runs from footwell to firewall. |
 |
|
| Tdskip |
Nov 7 2021, 08:43 AM
Post
#5
|
|
Advanced Member Group: Members Posts: 3,686 Joined: 1-December 17 From: soCal Member No.: 21,666 Region Association: None |
Depends what you are going for - if just a driver/racer you could always just weld plugs into the holes and keep it simple.
|
|
|
|
| vintage914racer |
Nov 7 2021, 09:05 AM
Post
#6
|
|
Member Group: Members Posts: 429 Joined: 28-December 03 From: Minneapolis, MN Member No.: 1,473 |
QUOTE(Superhawk996 @ Nov 7 2021, 06:41 AM) Buy new sheetmetal. Buy a good body hammer and several dolly's. The shape of what you have is sort of irrelevant. Good hammer and dolly work along with careful trim work will net you two surfaces that meet and can be welded appropriately. The quicker solution may very well be to buy a whole new rear 1/2 and just go back to the firewall. Be sure to put that crossmember back in albiet in an adjusted position to suit your seat and seating position. It is needed for structural purposes: To tie left long to the right long, and to support the very long section of floorpan that runs from footwell to firewall. QUOTE(Tdskip @ Nov 7 2021, 06:43 AM) Depends what you are going for - if just a driver/racer you could always just weld plugs into the holes and keep it simple. I have a whole, new driver’s rear pan half so I’m good there. I suppose if the hammer and dolly approach doesn’t pan out (pardon the pun) I can take the other approach. Although the car is a race car, I’d rather fix it right while I’m in there. To that end I will install a relocated cross member. |
|
|
|
| Superhawk996 |
Nov 7 2021, 09:23 AM
Post
#7
|
|
914 Guru Group: Members Posts: 5,875 Joined: 25-August 18 From: Woods of N. Idaho Member No.: 22,428 Region Association: Galt's Gulch |
QUOTE(vintage914racer @ Nov 7 2021, 10:05 AM) Although the car is a race car, I’d rather fix it right while I’m in there. To that end I will install a relocated cross member. Structural integrity is most important in a race car. Do it right and you'll never be sorry! (IMG:style_emoticons/default/smilie_pokal.gif) pride in a job well done and done properly is endangered. |
|
|
|
| SirAndy |
Nov 7 2021, 09:52 AM
Post
#8
|
|
Resident German Group: Admin Posts: 41,669 Joined: 21-January 03 From: Oakland, Kalifornia Member No.: 179 Region Association: Northern California |
QUOTE(vintage914racer @ Nov 7 2021, 07:30 AM) Given the way the rear corners of my pan are mangled out of shape, I don’t think I can do as straightforward of a cut as yours. The pans from RD have all the corner pieces. You can literally drill out the spot-welds for the pan itself from underneath and replace the whole rear part in one go. (IMG:style_emoticons/default/sawzall-smiley.gif) (IMG:style_emoticons/default/smash.gif) (IMG:style_emoticons/default/welder.gif) (IMG:style_emoticons/default/driving.gif) https://www.restoration-design.com/store/product/PP345 (IMG:http://www.914world.com/bbs2/uploads_offsite/www.restoration-design.com-179-1636300352.1.jpg) |
|
|
|
| rick 918-S |
Nov 7 2021, 03:52 PM
Post
#9
|
|
Hey nice rack! -Celette Group: Members Posts: 20,471 Joined: 30-December 02 From: Now in Superior WI Member No.: 43 Region Association: Northstar Region |
I see now what you are up against. That pan looks like swiss cheese. I have a left pan section and a cross member if you want to move it forward. Did you want to lower the pan slighty also? Do you have a welder and an air compressor? I may be able to help over a weekend. Looks like a one day job to get you going in the right direction.
|
|
|
|
| vintage914racer |
Nov 7 2021, 04:18 PM
Post
#10
|
|
Member Group: Members Posts: 429 Joined: 28-December 03 From: Minneapolis, MN Member No.: 1,473 |
QUOTE(rick 918-S @ Nov 7 2021, 01:52 PM) I see now what you are up against. That pan looks like swiss cheese. I have a left pan section and a cross member if you want to move it forward. Did you want to lower the pan slighty also? Do you have a welder and an air compressor? I may be able to help over a weekend. Looks like a one day job to get you going in the right direction. Yep, lots of holes and what looks like brute force bludgeoning. I have a left side pan, so I’m good there. I don’t need to lower the pan, really just need the cross-member moved forward a few inches to get clearance for my race seat mounts. I have a compressor and welder. I know you’re up to your elbows in work, but I’d welcome your help if you do have an open day on the horizon some weekend. |
|
|
|
| burton73 |
Nov 9 2021, 12:42 PM
Post
#11
|
|
burton73 Group: Members Posts: 3,538 Joined: 2-January 07 From: Los Angeles Member No.: 7,414 Region Association: Southern California |
QUOTE(SirAndy @ Nov 7 2021, 07:52 AM) QUOTE(vintage914racer @ Nov 7 2021, 07:30 AM) Given the way the rear corners of my pan are mangled out of shape, I don’t think I can do as straightforward of a cut as yours. The pans from RD have all the corner pieces. You can literally drill out the spot-welds for the pan itself from underneath and replace the whole rear part in one go. (IMG:style_emoticons/default/sawzall-smiley.gif) (IMG:style_emoticons/default/smash.gif) (IMG:style_emoticons/default/welder.gif) (IMG:style_emoticons/default/driving.gif) https://www.restoration-design.com/store/product/PP345 (IMG:http://www.914world.com/bbs2/uploads_offsite/www.restoration-design.com-179-1636300352.1.jpg) Do it right or do not do it. Your metal looks like it has been Bondo ed all over. Look at what I did on my 6. Drill out the welds and just plug weld it in place. Bob B 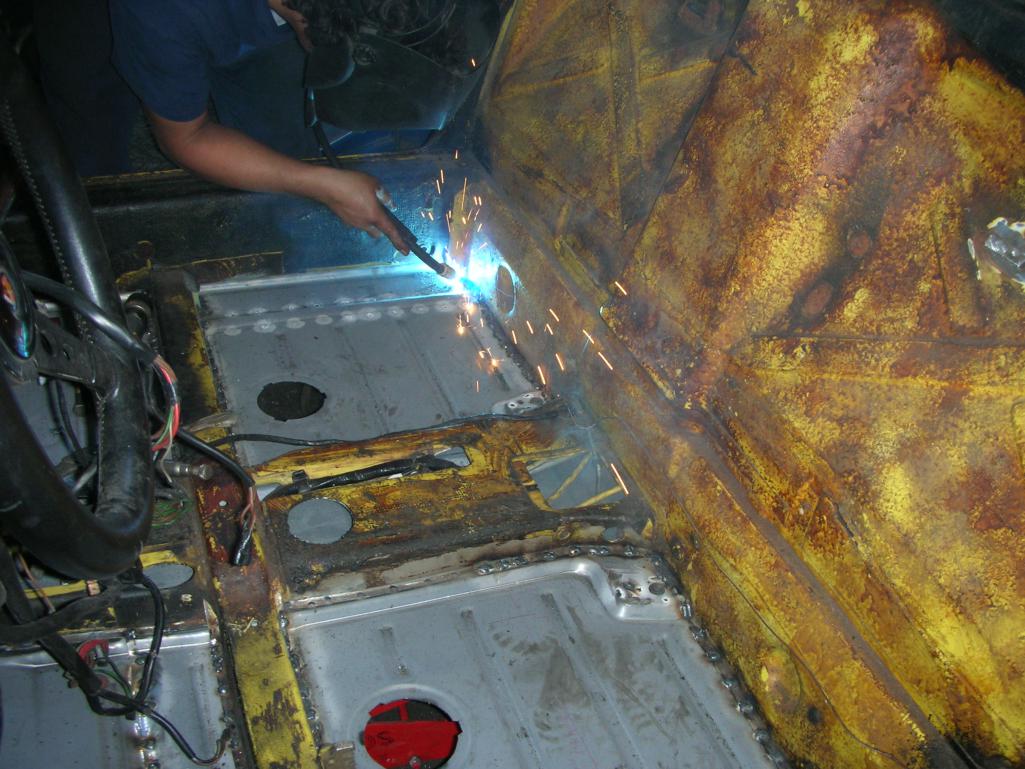 |
|
|
|
|
1 User(s) are reading this topic (1 Guests and 0 Anonymous Users)
0 Members:

|
Lo-Fi Version | Time is now: 1st June 2024 - 05:32 AM |
Invision Power Board
v9.1.4 © 2024 IPS, Inc.