|
|
|
Porsche, and the Porsche crest are registered trademarks of Dr. Ing. h.c. F. Porsche AG.
This site is not affiliated with Porsche in any way. Its only purpose is to provide an online forum for car enthusiasts. All other trademarks are property of their respective owners. |
|
|


| anderssj |
 Mar 3 2023, 12:46 PM Mar 3 2023, 12:46 PM
Post
#1
|
|
Dog is my copilot...  Group: Members Posts: 1,793 Joined: 28-January 03 From: VA Member No.: 207 Region Association: MidAtlantic Region |
During a headlight check before a sanity drive a couple of weeks ago, I found that our car's headlights would not light up at all. The fuses checked good, but I couldn't hear the relay click and there was no power to the fuses themselves.
The relay sits on top of the fuse panel: 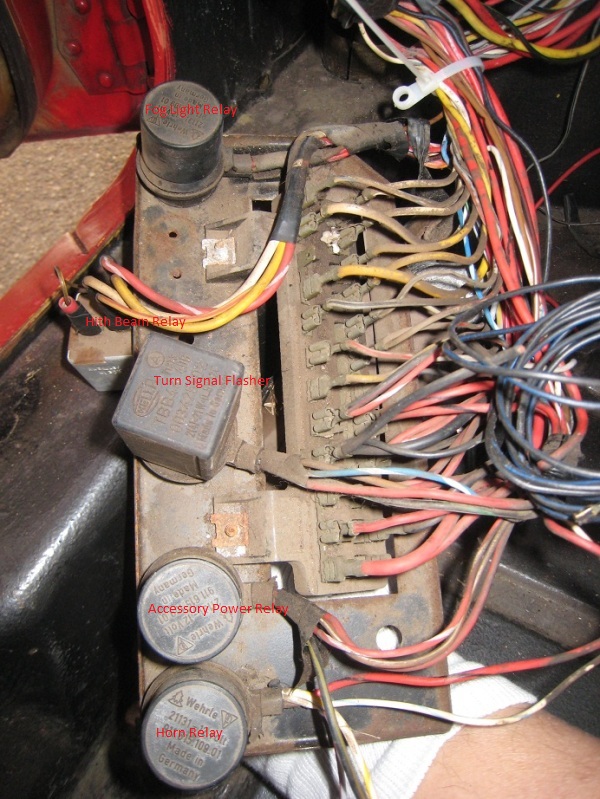 (picture courtesy of malcolm2 in this thread: http://www.914world.com/bbs2/index.php?showtopic=339629) Our car is a 1972 914/4 and uses a 4-pin headlight/combination relay. Because it can be accessed more easily than the column switch, I decided to check the relay first. 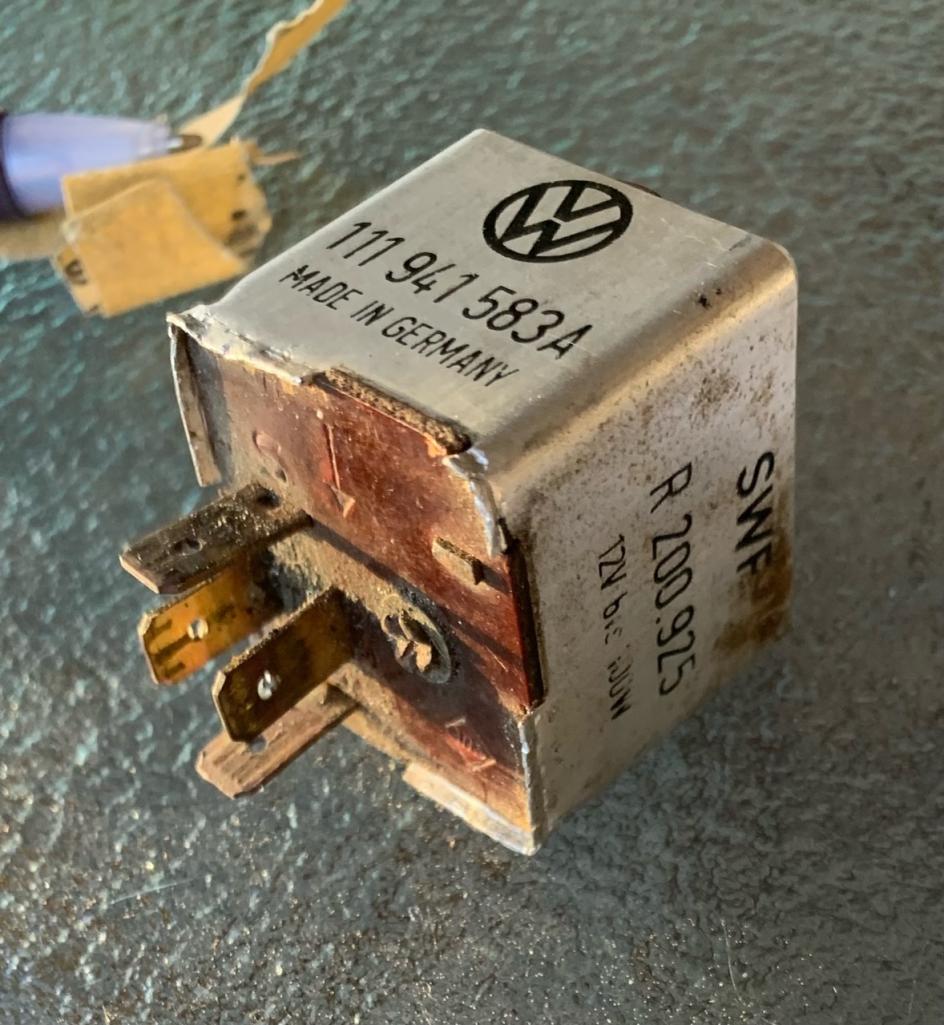 In addition to all the schmutz, this picture shows the 4 pins/terminals: "56" (+ from 56 on the headlight switch), "S" (momentary ground "signal" when the steering column switch is pulled back), "56a" (switched + to fuses 3 and 4 for low beams), and "F" (switched + to fuses 1 and 2 for high beams). If this relay is working, it stays ("latches") in one position until it is momentarily "signaled," then it switches--and stays--in the new position until it is signaled a second time. You can check the relay with 9V battery (like the one in your smoke alarm) and a multi-meter that reads ohm's (resistance) 1) place one lead of the multi-meter on terminal 56 2) place the other lead on terminal 56a - read the result on your multimeter 3) remove the lead from terminal 56a and put it on terminal F - read the result on your multimeter One of two things will happen. Either 56 -> 56a will show continuity (~0) or no continuity (~1), or 56 -> F will read 1 or 0. If 56a shows continuity, then F should read no continuity. If pin 56a reads no continuity, then F should show continuity. Next, momentarily touch two posts of the 9V battery to relay terminals 56 and pin S. You should hear/feel a click as the relay switches and latches. Use the test leads again. You should get exactly the OPPOSITE reading from what you received in the first pass. If this happens, your relay is fine and you have a problem somewhere in the wiring. If you don't get the exact opposite readings, you have a problem with your relay...just like I did. In my case, the relay didn't always click (switch), and I got no continuity between 56 and either 56a or F--even after cleaning up the cruddy terminals (IMG:style_emoticons/default/barf.gif) If the relay doesn't work, it's time to open it up. Note where the terminals are in relation to the cover, then peel back the cover's bottom edges. Gently withdraw the guts and take a look:  This picture shows the relay latched in the "up" position. When energized/signaled, the silver loopy thing is pulled down and latches the relay in the "down" position, opening the upper contacts: 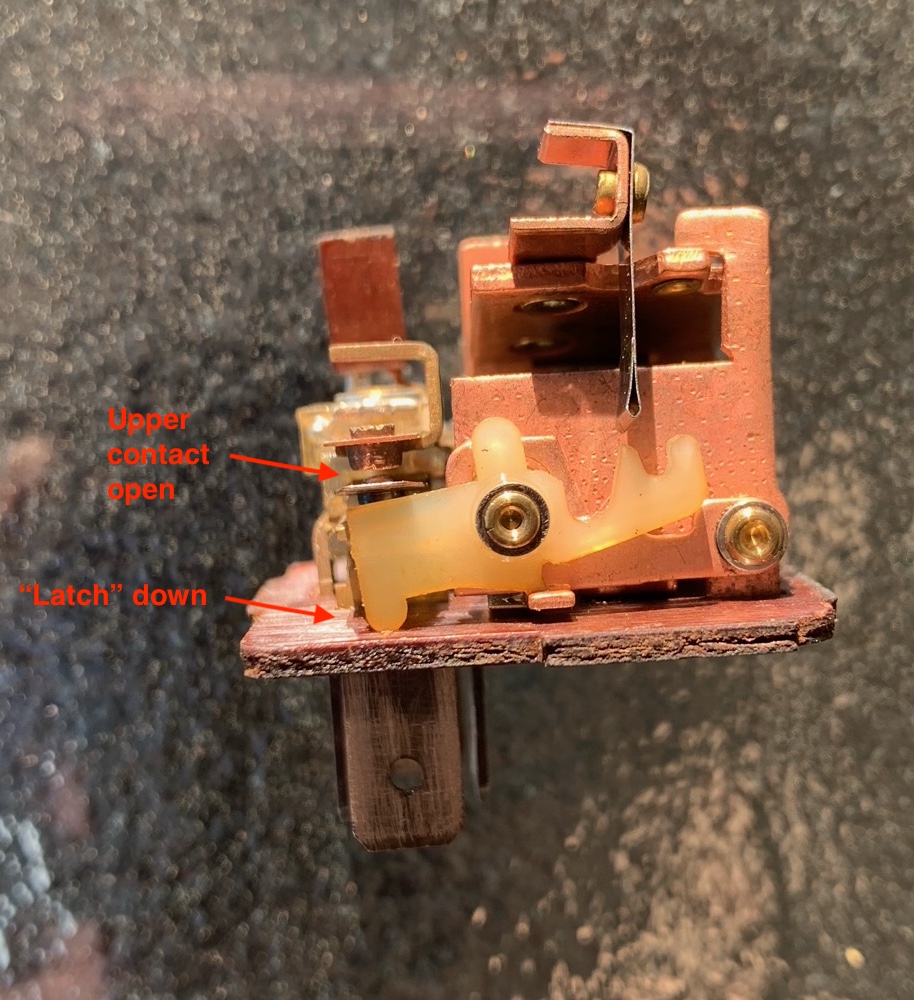 Looking at it from the side, you can see how the lower set of contacts are closed when the latch is down. 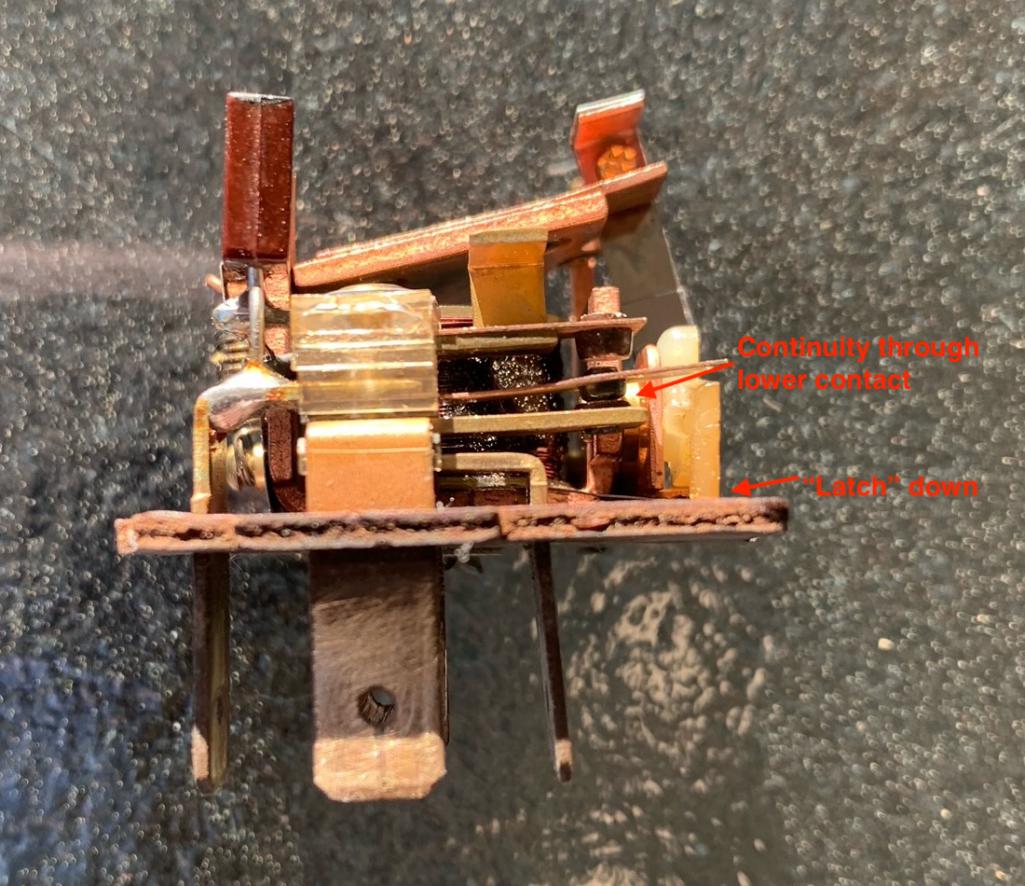 There should be continuity between 56 and 56a when the relay is in this position...but none in my case. Dressing up the contacts with a tiny piece of wet-or-dry sandpaper fixed mine. When the relay's latch is up, you'll have a similar view, except now the upper contacts are closed:  There should be continuity between 56 and F...but once again, none in my case. Another gentle application of wet-or-dry sandpaper and it was OK. AFAIK, this is my car's original headlight relay--and only the second time it's failed in almost 51 years and nearly 245,000 miles (last time was in 2004). Pretty high MTBF--and it's repairable! Hope this helps! |
   |

 
|
  |
Replies(1 - 19)
| Superhawk996 |
Mar 3 2023, 02:18 PM
Post
#2
|
|
914 Guru Group: Members Posts: 7,921 Joined: 25-August 18 From: Woods of N. Idaho Member No.: 22,428 Region Association: Galt's Gulch |
(IMG:style_emoticons/default/aktion035.gif)
Nice write up. That’s the charm of these cars - so easy to fix stuff. In a modern car, that would now be a black box module with SMD components. When it fails it would be tossed and a new one will cost a ridiculous amount of money for what little is in the black box. |
|
|
|
| jim_hoyland |
Aug 14 2024, 08:08 PM
Post
#3
|
|
Get that VIN ? Group: Members Posts: 10,092 Joined: 1-May 03 From: Sunset Beach, CA Member No.: 643 Region Association: Southern California |
Excellent ; thanks Steve.
One issue I have is identifying the spades. The relay isn’t labeled to show 56, 56A, etc I known the two middle spades connect to the fuse panel ( high and low beams) |
|
|
|
| anderssj |
Aug 14 2024, 10:29 PM
Post
#4
|
|
Dog is my copilot... Group: Members Posts: 1,793 Joined: 28-January 03 From: VA Member No.: 207 Region Association: MidAtlantic Region |
Sorry, I’m about 1400 miles from my car, otherwise I could shoot a picture of the underside of the relay. I’ll look on my computer too, just in case.
|
|
|
|
| fixer34 |
Aug 15 2024, 08:00 PM
Post
#5
|
|
Senior Member Group: Members Posts: 1,446 Joined: 16-September 14 From: Chicago area Member No.: 17,908 Region Association: Upper MidWest |
Well you just solved a mystery for me (I think). I've had some assorted relays in my parts box for 30+ years, one of them is a silver cube about 3 cm on a side. the part number on it is 321 941 583 whici I think means it came out of a VW Type 3 (I used to have a bunch of them). Pin descriptions look the same, wonder if it would work as a replacement if needed.
|
|
|
|
| JeffBowlsby |
Aug 15 2024, 10:45 PM
Post
#6
|
|
914 Wiring Harnesses & Beekeeper Group: Members Posts: 9,295 Joined: 7-January 03 From: San Ramon CA Member No.: 104 Region Association: None |
I have a few used 4 pin 111 541 583a relays available if anyone needs them. Will test before shipment.
Found NOS in Germany for $70.+ shipping. USPS flat rate shipping is $10.50 so I’m thinking $50. ea incl CONUS shipping. PM me if interested. PayPal or checks accepted. |
 |
|
| fixer34 |
Aug 16 2024, 06:56 AM
Post
#7
|
|
Senior Member Group: Members Posts: 1,446 Joined: 16-September 14 From: Chicago area Member No.: 17,908 Region Association: Upper MidWest |
QUOTE(fixer34 @ Aug 15 2024, 09:00 PM)  Well you just solved a mystery for me (I think). I've had some assorted relays in my parts box for 30+ years, one of them is a silver cube about 3 cm on a side. the part number on it is 321 941 583 whici I think means it came out of a VW Type 3 (I used to have a bunch of them). Pin descriptions look the same, wonder if it would work as a replacement if needed. Well, maybe not. Read the description again and instead of an 'F' terminal, mine has a 56b. So most likely a 'standard' relay which is what the picture on the can seems to indicate. But WHY would they use the same number deignation for two seemlngly different style relays?? |
|
|
|
| Superhawk996 |
Aug 16 2024, 07:52 AM
Post
#8
|
|
914 Guru Group: Members Posts: 7,921 Joined: 25-August 18 From: Woods of N. Idaho Member No.: 22,428 Region Association: Galt's Gulch |
QUOTE(fixer34 @ Aug 16 2024, 08:56 AM) QUOTE(fixer34 @ Aug 15 2024, 09:00 PM) Well you just solved a mystery for me (I think). I've had some assorted relays in my parts box for 30+ years, one of them is a silver cube about 3 cm on a side. the part number on it is 321 941 583 whici I think means it came out of a VW Type 3 (I used to have a bunch of them). Pin descriptions look the same, wonder if it would work as a replacement if needed. Well, maybe not. Read the description again and instead of an 'F' terminal, mine has a 56b. So most likely a 'standard' relay which is what the picture on the can seems to indicate. But WHY would they use the same number deignation for two seemlngly different style relays?? @fixer34 Can you post picture of p/n and the relay schematic on the can? If the schematic is the same, it really doesn’t matter what the terminal nomenclature is. My best guess is early vs late, or VW vs Porsche/Audi 924 relay maybe. Also could be European (with flash to pass) vs US without? |
|
|
|
| Superhawk996 |
Aug 16 2024, 08:50 AM
Post
#9
|
|
914 Guru Group: Members Posts: 7,921 Joined: 25-August 18 From: Woods of N. Idaho Member No.: 22,428 Region Association: Galt's Gulch |
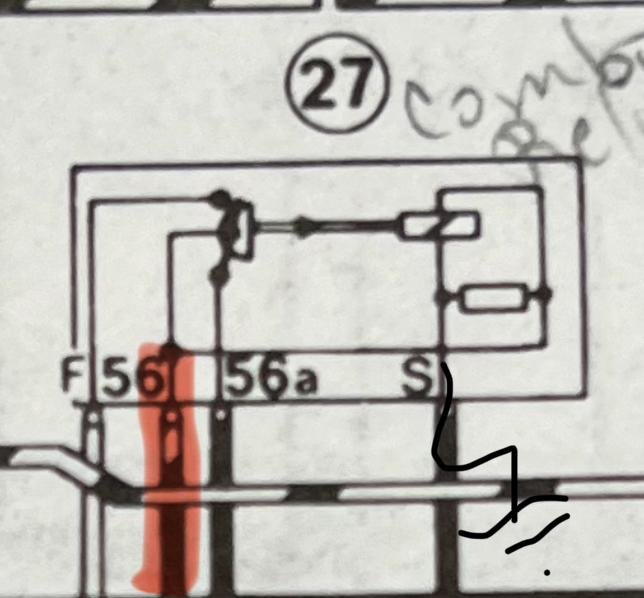
Adding wiring schematic to this thread.
 |
|
|
|
| fixer34 |
Aug 17 2024, 12:43 PM
Post
#10
|
|
Senior Member Group: Members Posts: 1,446 Joined: 16-September 14 From: Chicago area Member No.: 17,908 Region Association: Upper MidWest |
QUOTE(Superhawk996 @ Aug 16 2024, 08:52 AM) QUOTE(fixer34 @ Aug 16 2024, 08:56 AM) QUOTE(fixer34 @ Aug 15 2024, 09:00 PM) Well you just solved a mystery for me (I think). I've had some assorted relays in my parts box for 30+ years, one of them is a silver cube about 3 cm on a side. the part number on it is 321 941 583 whici I think means it came out of a VW Type 3 (I used to have a bunch of them). Pin descriptions look the same, wonder if it would work as a replacement if needed. Well, maybe not. Read the description again and instead of an 'F' terminal, mine has a 56b. So most likely a 'standard' relay which is what the picture on the can seems to indicate. But WHY would they use the same number deignation for two seemlngly different style relays?? @fixer34 Can you post picture of p/n and the relay schematic on the can? If the schematic is the same, it really doesn’t matter what the terminal nomenclature is. My best guess is early vs late, or VW vs Porsche/Audi 924 relay maybe. Also could be European (with flash to pass) vs US without? I saw in a followon thread that the old 'F' notation was possibly changed to 56B, so I pulled the can off mine to see what was actually inside. Appears to be a latching relay. 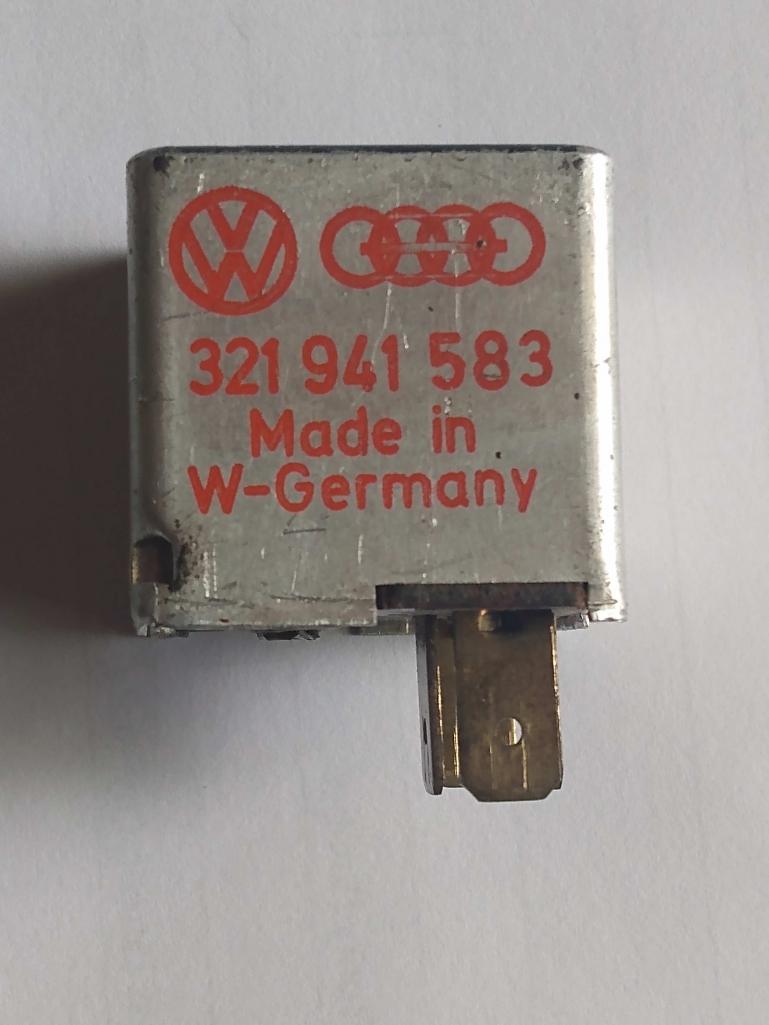 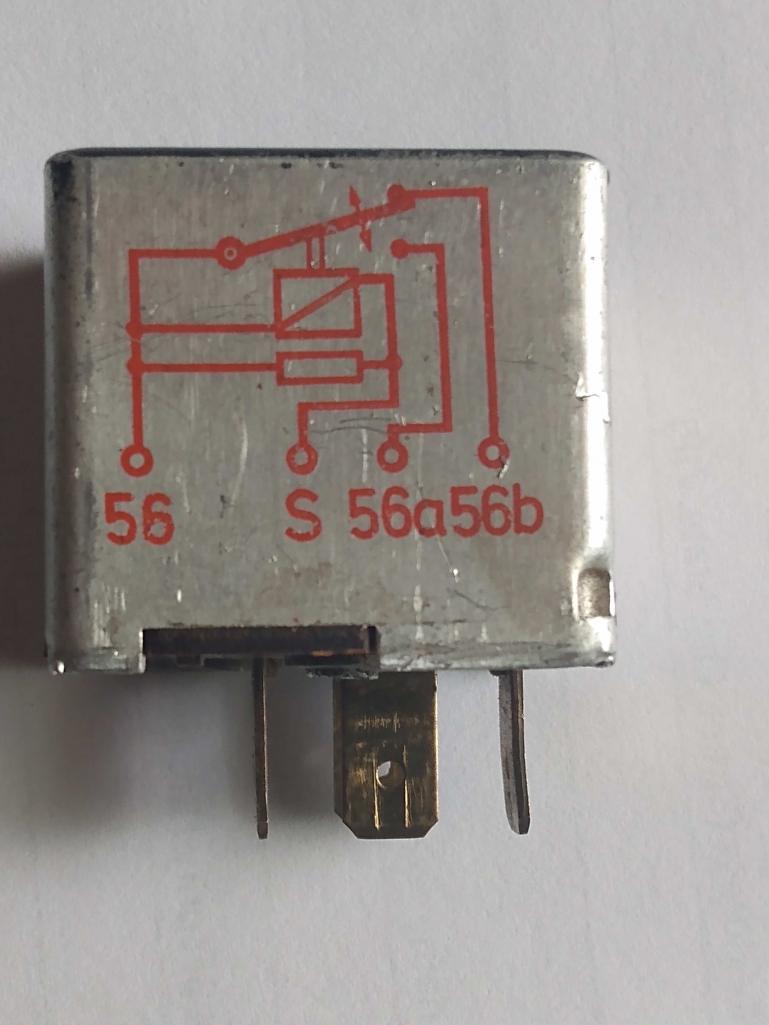 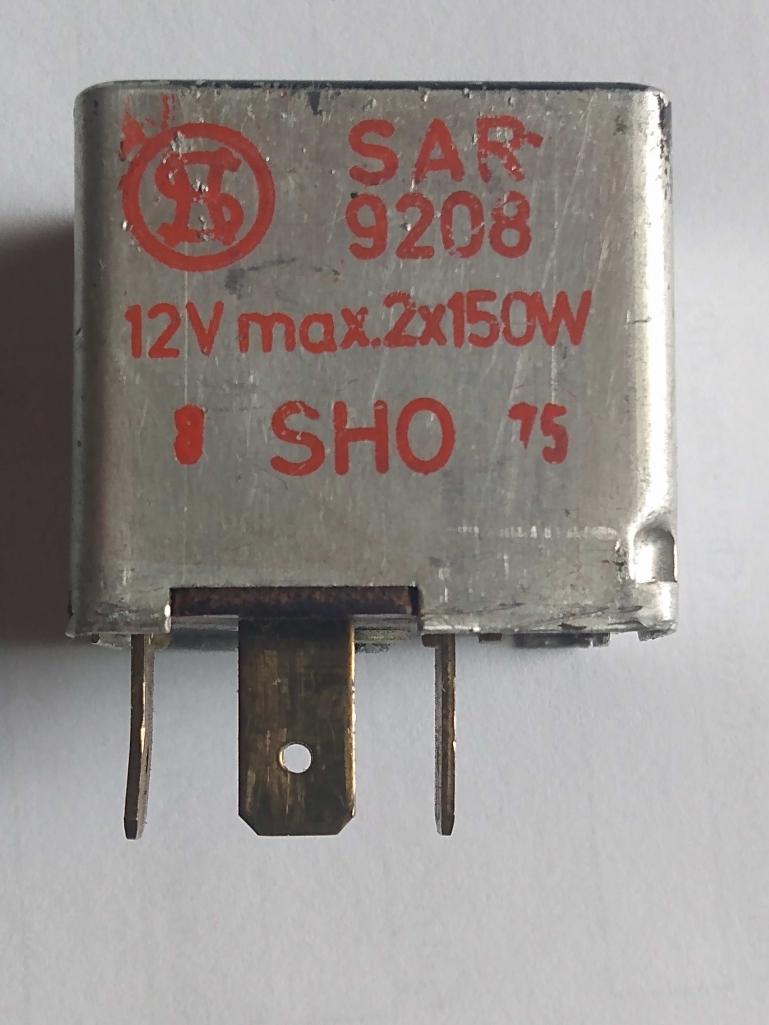 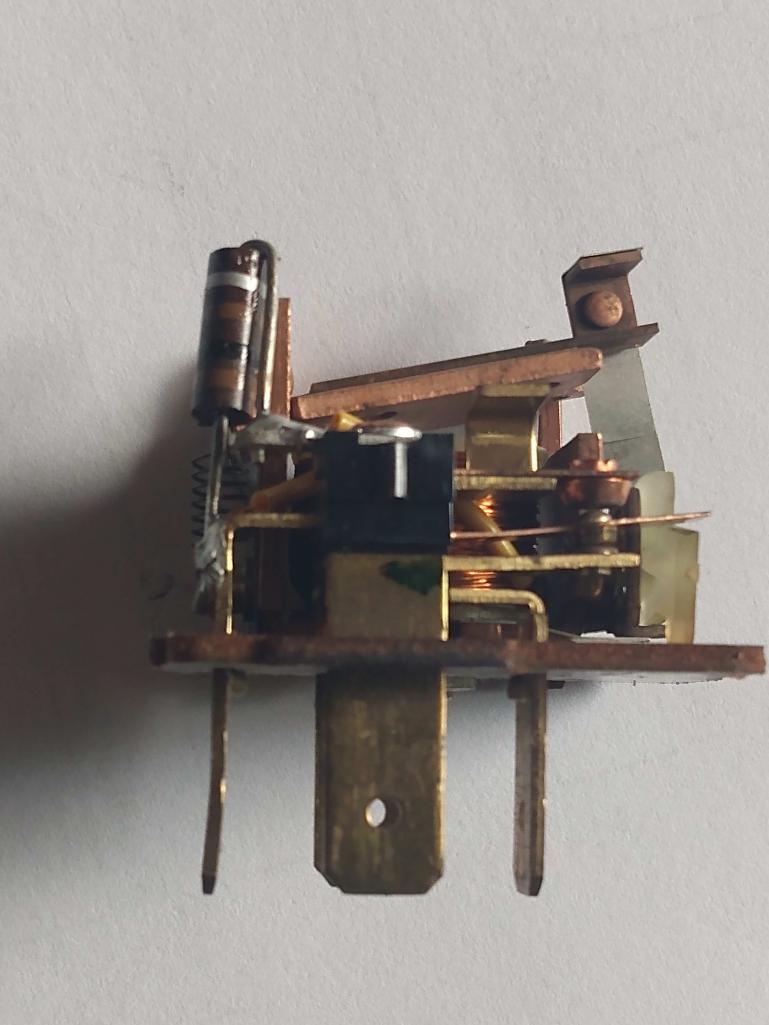 [attachmentid=919 [attachmentid=919770] 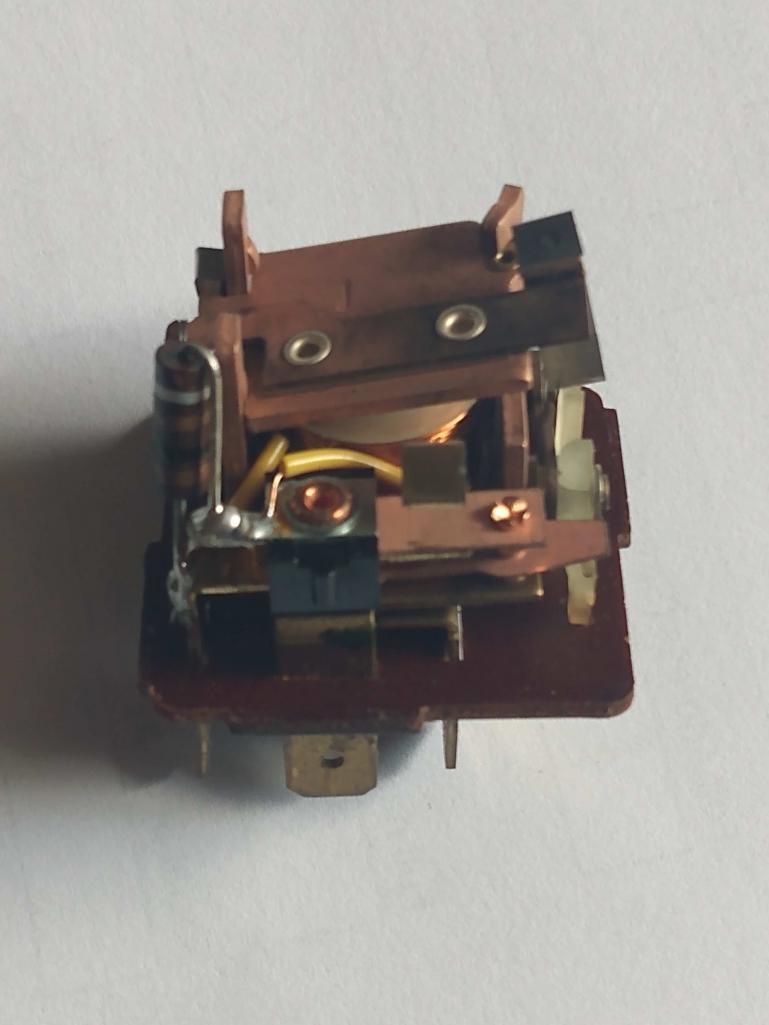 Attached thumbnail(s) 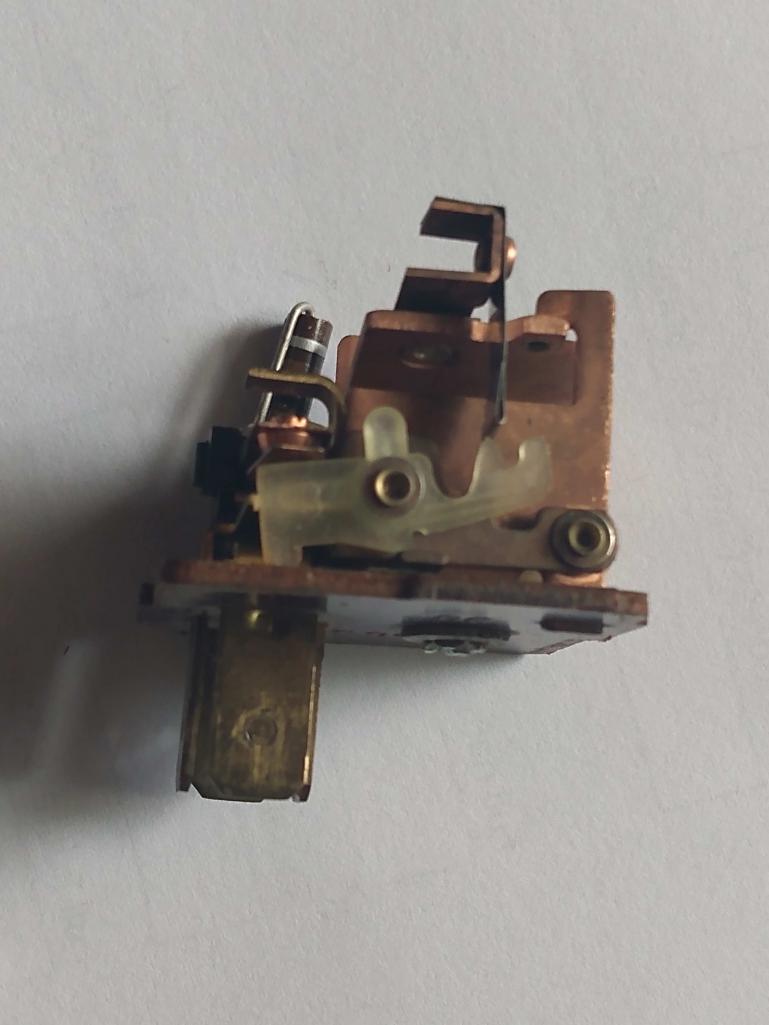
|
|
|
|
| Superhawk996 |
Aug 17 2024, 01:37 PM
Post
#11
|
|
914 Guru Group: Members Posts: 7,921 Joined: 25-August 18 From: Woods of N. Idaho Member No.: 22,428 Region Association: Galt's Gulch |
QUOTE(fixer34 @ Aug 17 2024, 02:43 PM) I saw in a followon thread that the old 'F' notation was possibly changed to 56B Based on schematic on really that’s all it is, a labeling change. |
|
|
|
| worn |
Aug 17 2024, 07:13 PM
Post
#12
|
|
Winner of the Utah Twisted Joint Award Group: Members Posts: 3,615 Joined: 3-June 11 From: Madison, WI and North Bend WA Member No.: 13,152 Region Association: Upper MidWest |
Very nice description. Nowadays they would probably use a few transistors or an IC, but it is fun to see mechanical relays work so well.
|
|
|
|
| fixer34 |
Aug 17 2024, 09:38 PM
Post
#13
|
|
Senior Member Group: Members Posts: 1,446 Joined: 16-September 14 From: Chicago area Member No.: 17,908 Region Association: Upper MidWest |
So after all that, I was driving tonight and it dawned on me. I have a -6 with the front/back lever position for hi/low beams. Does my car even use the latching relay or is that only for a -4??
So been carrying around a spare part for 40 yrs that I couldn't even use? |
|
|
|
| anderssj |
Aug 18 2024, 02:47 PM
Post
#14
|
|
Dog is my copilot... Group: Members Posts: 1,793 Joined: 28-January 03 From: VA Member No.: 207 Region Association: MidAtlantic Region |
And now for a "while I'm in there" moment...
When I was fooling with the latching relay, I got to thinking about taking the electrical load off of the headlight switch and the latching relay by using a couple of additional relays (so the headlight switch and latching relay only carry enough current to trip the new/additional relays--current for the headlights runs thru the new relays). I also remembered somebody here used the JWest Engineering headlight relay kit to do that for their -6. After reading the descriptions and instructions on the JWest site, I figured the "Early 911 Headlight Relay Kit (65-73)" was the best match. JWest instructions are here: https://www.jwestengineering.com/assets/ima...11_HL_relay.pdf Good news: It's a very nice kit, and it was pretty easy to adapt it to my '72 914 (IMG:style_emoticons/default/piratenanner.gif) (NOTE: some 1972 and earlier 914s have a "hot +" screw-type junction block behind the fuse panel--if your car is newer, you'll have to find a different "hot +" source). Bad news: I forgot to take pictures of my work. (IMG:style_emoticons/default/dry.gif) Installation details follow, just in case anyone else wants to try this (all the usual warnings and disclaimers apply): - Always disconnect battery BEFORE starting work. - Insulate all exposed parts of the terminals with heat-shrink tubing, particularly the female terminals that were pulled from the fuse panel. - Use 1/4" female push-on terminals on the kit's blue and green wires; they replace the car's white and yellow wires (respectively) at the fuse panel. (NOTE: On my '1972 car, the white and yellow wires are at fuses #2 and #4 on the "input" side--check the appropriate wiring diagram(s) to make sure what's right for your car). - Put 1/4" male push-on terminals on the relay kit's white and yellow wires; connect them to the car's white and yellow wires that were pulled from the fuse panel in step 2. (FWIW, on my car these wires come from the "latching relay," listed as #27, "combination relay" in Haynes manual, Figure 9.73). - Install a ring terminal on the relay kit's red wire, then add it to the "hot" screw-type junction behind the fuse box. (NOTE: I didn't add an in-line fuse between the junction block and the relay because I have the wires between the battery and junction fused at the battery. If that junction is always "hot" in your car, you may want to consider adding a fuse between the junction and the JWest relay kit.) - Put a ring terminal on the kit's brown wire and add to an existing ground. Hope this helps! PS. The JWest Engineering 914 foglight-flasher relay works really well too! PPS. Always disconnect battery BEFORE starting work. (IMG:style_emoticons/default/bye1.gif) |
|
|
|
| jim_hoyland |
Aug 18 2024, 05:54 PM
Post
#15
|
|
Get that VIN ? Group: Members Posts: 10,092 Joined: 1-May 03 From: Sunset Beach, CA Member No.: 643 Region Association: Southern California |
Did you add this to the JWest fog light flasher module ?
And where does the new module get located ? Seems like it’s already a tight space |
|
|
|
| anderssj |
Aug 19 2024, 02:48 PM
Post
#16
|
|
Dog is my copilot... Group: Members Posts: 1,793 Joined: 28-January 03 From: VA Member No.: 207 Region Association: MidAtlantic Region |
Yes, I have both JWest fog light relay and headlight relay kits installed. And yes, pretty tight as you said. Fortunately the wires on the headlight relay kit were quite long and allowed me to move the relays out of the way. Again, sorry that I’m 1400 miles away from the car and that I didn’t take any pictures of the install. (IMG:style_emoticons/default/headbang.gif)
|
|
|
|
| jim_hoyland |
Aug 25 2024, 05:37 PM
Post
#17
|
|
Get that VIN ? Group: Members Posts: 10,092 Joined: 1-May 03 From: Sunset Beach, CA Member No.: 643 Region Association: Southern California |
I removed the case on the old non-working relay. I’m not clear where you use the sandpaper
Can you add an arrow or pointer to show the exact area to sand. Attached image(s)  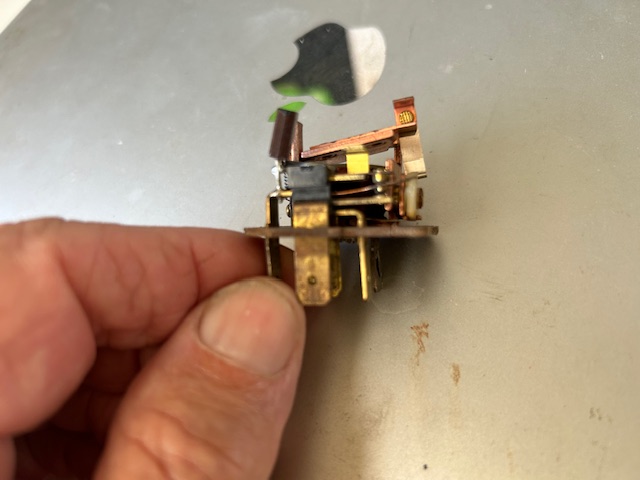
|
|
|
|
| fixer34 |
Aug 25 2024, 07:55 PM
Post
#18
|
|
Senior Member Group: Members Posts: 1,446 Joined: 16-September 14 From: Chicago area Member No.: 17,908 Region Association: Upper MidWest |
QUOTE(jim_hoyland @ Aug 25 2024, 06:37 PM) I removed the case on the old non-working relay. I’m not clear where you use the sandpaper Can you add an arrow or pointer to show the exact area to sand. I'm not good at marking up pictures so I'll try 'splainin'. First, are we sure the non-working relay is due to bad contacts instead of a bad coil? If it is a contact issue, we want to clean the little buttons on the strap piece. If you press down on the coil arm at the top, you will see the strap move, that's the one we are talking about. Ideally you want to use a 'points file' (remember those?) Thin metal strip with a very fine abrasive on it. We aren't looking to remove a lot, just buff off any corrosion/burnt surface. |
|
|
|
| fixer34 |
Aug 25 2024, 07:57 PM
Post
#19
|
|
Senior Member Group: Members Posts: 1,446 Joined: 16-September 14 From: Chicago area Member No.: 17,908 Region Association: Upper MidWest |
QUOTE(fixer34 @ Aug 25 2024, 08:55 PM) QUOTE(jim_hoyland @ Aug 25 2024, 06:37 PM) I removed the case on the old non-working relay. I’m not clear where you use the sandpaper Can you add an arrow or pointer to show the exact area to sand. I'm not good at marking up pictures so I'll try 'splainin'. First, are we sure the non-working relay is due to bad contacts instead of a bad coil? If it is a contact issue, we want to clean the little buttons on the strap piece. If you press down on the coil arm at the top, you will see the strap move, that's the one we are talking about. Ideally you want to use a 'points file' (remember those?) Thin metal strip with a very fine abrasive on it. We aren't looking to remove a lot, just buff off any corrosion/burnt surface. Actually, the 5th and 6th pictures at the beginning of this thread show the contacts that need to be checked/cleaned. |
|
|
|
| jim_hoyland |
Aug 26 2024, 05:47 AM
Post
#20
|
|
Get that VIN ? Group: Members Posts: 10,092 Joined: 1-May 03 From: Sunset Beach, CA Member No.: 643 Region Association: Southern California |
How can I test the coil ?
|
|
|
|
|
2 User(s) are reading this topic (2 Guests and 0 Anonymous Users)
0 Members:

|
Lo-Fi Version | Time is now: 29th June 2026 - 11:05 AM |
Invision Power Board
v9.1.4 © 2026 IPS, Inc.