|
|
|
Porsche, and the Porsche crest are registered trademarks of Dr. Ing. h.c. F. Porsche AG.
This site is not affiliated with Porsche in any way. Its only purpose is to provide an online forum for car enthusiasts. All other trademarks are property of their respective owners. |
|
|


| seanpaulmc |
 Mar 11 2023, 07:26 PM Mar 11 2023, 07:26 PM
Post
#1
|
|
Member  Group: Members Posts: 445 Joined: 6-December 16 From: Orlando, FL Member No.: 20,649 Region Association: South East States |
After the hell hole repair, I have the engine shelf to repair/replace. Question for those of you who have done this before, I’m trying to decide on splicing in a short repair section or trying to extract the remaining original panel and install the whole new RD panel. The latter being the most work.
Not a special car in terms of rarity, options, or other. Been doing lots of rust repair. Just not sure how to tackle it yet. Thanks 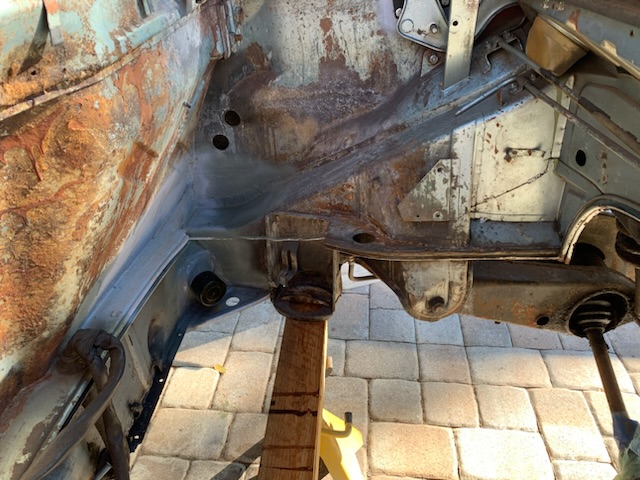 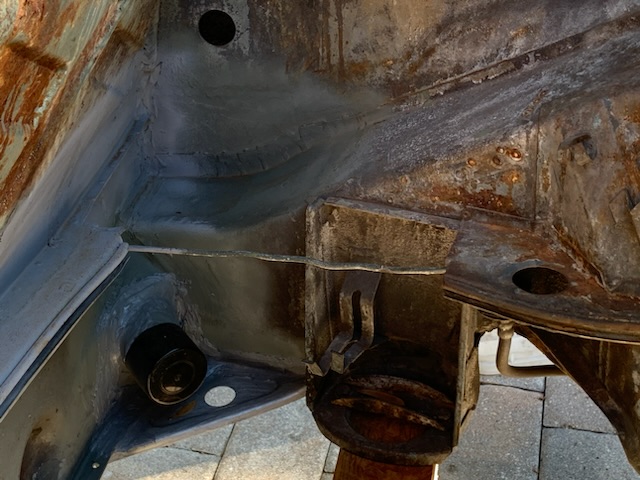 Look forward to hearing your feedback. |
   |

 
|
  |
Replies(1 - 8)
| 914werke |
Mar 11 2023, 07:57 PM
Post
#2
|
|
"I got blisters on me fingers" Group: Members Posts: 11,624 Joined: 22-March 03 From: USofA Member No.: 453 Region Association: Pacific Northwest |
Done it both ways.
Actually there are 3 ways... Complete R&R. Patch it & replace the seal rail whole and, Patch it & try to splice the seal rail as well. Since most of the shelfs now come with rail attached I tend to R&R complete. |
|
|
|
| Dlee6205 |
Mar 11 2023, 08:04 PM
Post
#3
|
|
Member Group: Members Posts: 91 Joined: 9-December 22 From: Burnsville, NC Member No.: 27,017 Region Association: South East States |
I typically splice it right at the rear of the suspension ear but not the channel, I replace that fully.
|
|
|
|
| windforfun |
Mar 11 2023, 08:05 PM
Post
#4
|
|
Advanced Member Group: Members Posts: 2,098 Joined: 17-December 07 From: Blackhawk, CA Member No.: 8,476 Region Association: None |
QUOTE(914werke @ Mar 11 2023, 05:57 PM)  Done it both ways. Actually there are 3 ways... Complete R&R. Patch it & replace the seal rail whole and, Patch it & try to splice the seal rail as well. Since most of the shelfs now come with rail attached I tend to R&R complete. (IMG:style_emoticons/default/agree.gif) (IMG:style_emoticons/default/agree.gif) (IMG:style_emoticons/default/agree.gif) And after all your previous work... |
|
|
|
| bkrantz |
Mar 11 2023, 08:45 PM
Post
#5
|
|
914 Guru Group: Members Posts: 8,656 Joined: 3-August 19 From: SW Colorado Member No.: 23,343 Region Association: Rocky Mountains |
I spliced a section of shelf, about where yours is cut off.
|
|
|
|
| seanpaulmc |
Mar 11 2023, 08:54 PM
Post
#6
|
|
Member Group: Members Posts: 445 Joined: 6-December 16 From: Orlando, FL Member No.: 20,649 Region Association: South East States |
QUOTE(Dlee6205 @ Mar 11 2023, 09:04 PM) I typically splice it right at the rear of the suspension ear but not the channel, I replace that fully. Kind of what I was thinking to do. But how do you find the spot welds in the old channel to get it removed? |
|
|
|
| Dlee6205 |
Mar 12 2023, 08:22 AM
Post
#7
|
|
Member Group: Members Posts: 91 Joined: 9-December 22 From: Burnsville, NC Member No.: 27,017 Region Association: South East States |
QUOTE(seanpaulmc @ Mar 11 2023, 10:54 PM) QUOTE(Dlee6205 @ Mar 11 2023, 09:04 PM) I typically splice it right at the rear of the suspension ear but not the channel, I replace that fully. Kind of what I was thinking to do. But how do you find the spot welds in the old channel to get it removed? I use a small wire wheel on a drill to expose what I can. |
|
|
|
| Ishley |
Mar 12 2023, 12:02 PM
Post
#8
|
|
Member Group: Members Posts: 339 Joined: 4-October 21 From: Clarendon Hills Il Member No.: 25,957 Region Association: Upper MidWest |
Just to be clear…
You don’t just replace the channel for rubber. Go to restoration design and you’ll see a picture of the whole engine shelf with the channel already attached. On mine I replaced almost all of it… but made a cut near the rear and butt welded that back part. Not sure if this clears it up. Also… restoration design has a video about installing the shelf. |
|
|
|
| seanpaulmc |
Mar 12 2023, 12:30 PM
Post
#9
|
|
Member Group: Members Posts: 445 Joined: 6-December 16 From: Orlando, FL Member No.: 20,649 Region Association: South East States |
QUOTE(Ishley @ Mar 12 2023, 02:02 PM) Just to be clear… You don’t just replace the channel for rubber. Go to restoration design and you’ll see a picture of the whole engine shelf with the channel already attached. On mine I replaced almost all of it… but made a cut near the rear and butt welded that back part. Not sure if this clears it up. Also… restoration design has a video about installing the shelf. I appreciate the explanation. Yes, I already have RD part in hand. It’s so well made which is why I was thinking of attempting to do the whole part. However, splicing in the forward portion where the engine shelf is the most narrow seems like a good alternative to tearing into the rear portion where it is solid and in good shape…and has paint. Again, I appreciate the feedback. Thanks |
|
|
|
|
1 User(s) are reading this topic (1 Guests and 0 Anonymous Users)
0 Members:

|
Lo-Fi Version | Time is now: 16th April 2026 - 09:29 AM |
Invision Power Board
v9.1.4 © 2026 IPS, Inc.