|
|
|
Porsche, and the Porsche crest are registered trademarks of Dr. Ing. h.c. F. Porsche AG.
This site is not affiliated with Porsche in any way. Its only purpose is to provide an online forum for car enthusiasts. All other trademarks are property of their respective owners. |
|
|


| emerygt350 |
 Feb 2 2025, 12:35 PM Feb 2 2025, 12:35 PM
Post
#1
|
|
Advanced Member  Group: Members Posts: 3,068 Joined: 20-July 21 From: Upstate, NY Member No.: 25,740 Region Association: North East States |
Been playing with many different approaches to a 3d printed hockey puck. I gave up on the leather texture and instead have gone for a nod to the original but one that instead looks good and prints easily. That means two pieces and a larger emblem.
I have it as two pieces now so the detail of the emblem is good on a filament printer (you need to print it at an angle with supports but the puck sides are printed flat on the board for best results with no supports needed. I have not uploaded these to my collection on thingiverse yet. I will provide instructions on printing when I do. If you have a resin printer the single piece form with the smaller emblem will work fine. https://www.thingiverse.com/thing:6238862 These were printed at low resolution. I will print a high resolution form, paint and assemble when I get a chance. 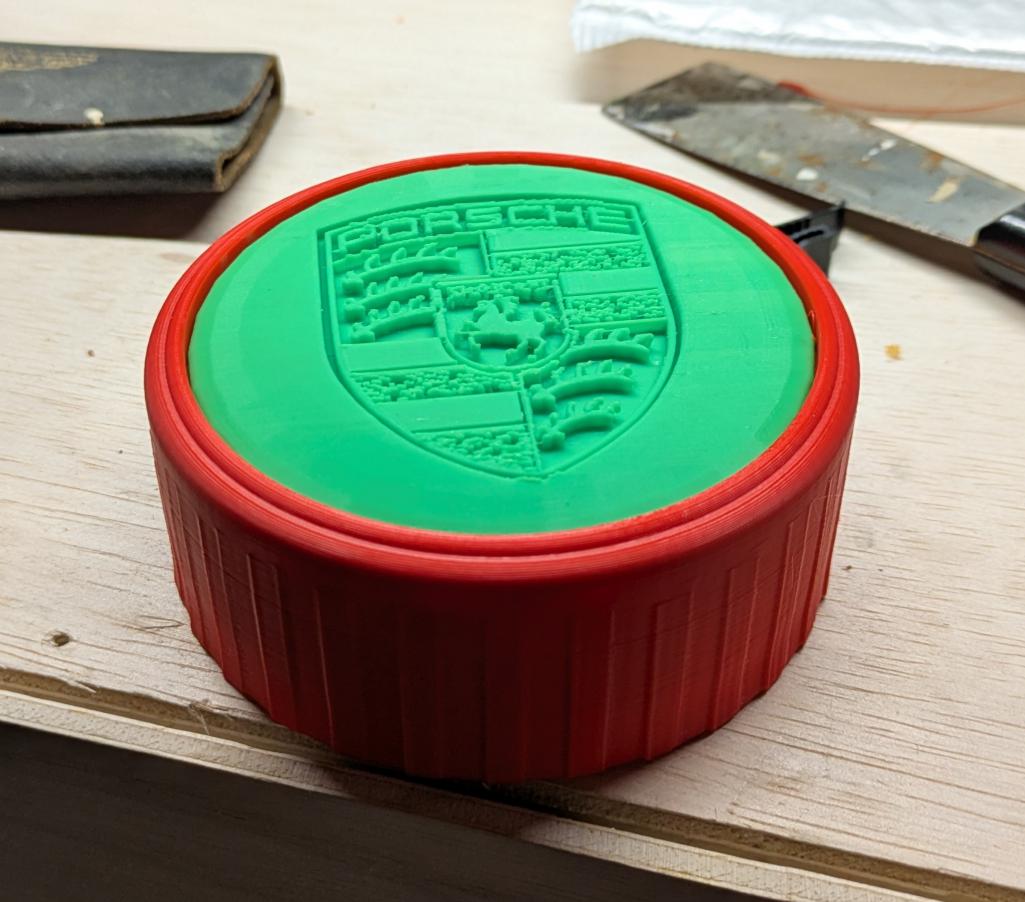 |
   |

 
|
  |
Replies(1 - 19)
| 914sgofast2 |
Feb 2 2025, 04:06 PM
Post
#2
|
|
Senior Member Group: Members Posts: 741 Joined: 10-May 13 From: El Dorado Hills, CA Member No.: 15,855 Region Association: None |
That's very nice!
|
|
|
|
| emerygt350 |
Feb 18 2025, 11:12 AM
Post
#3
|
|
Advanced Member Group: Members Posts: 3,068 Joined: 20-July 21 From: Upstate, NY Member No.: 25,740 Region Association: North East States |
Well, I think I have gotten it to where I am happy.
Raw off the printer: 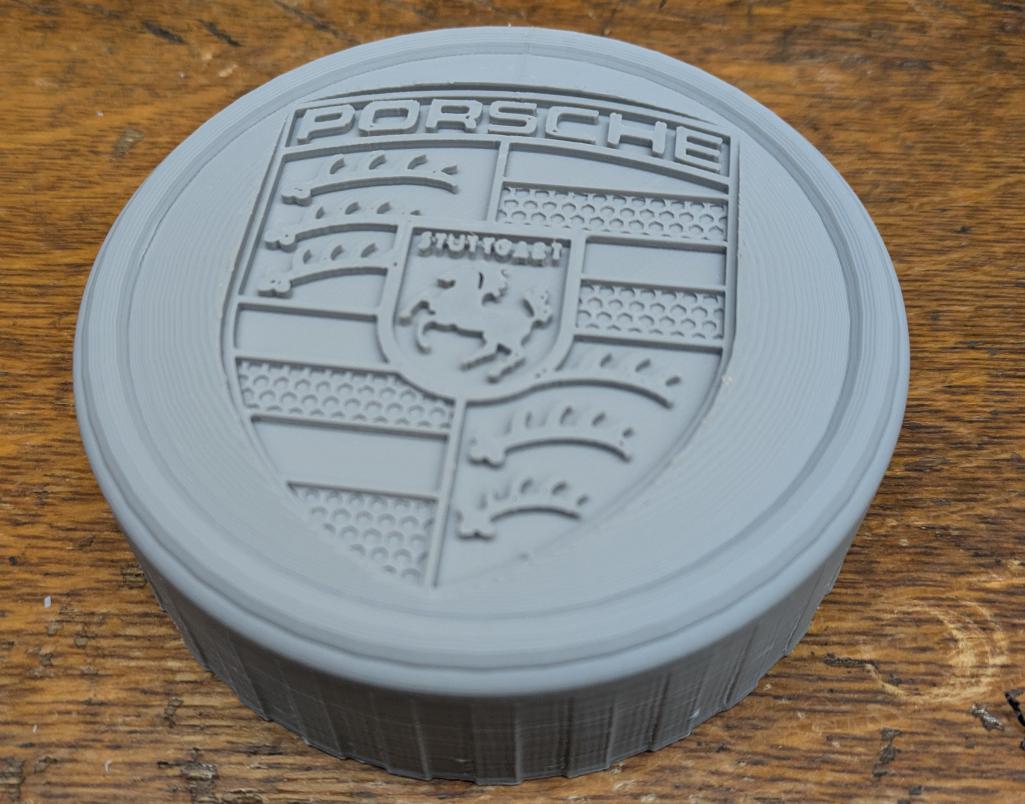 and here it is painted. 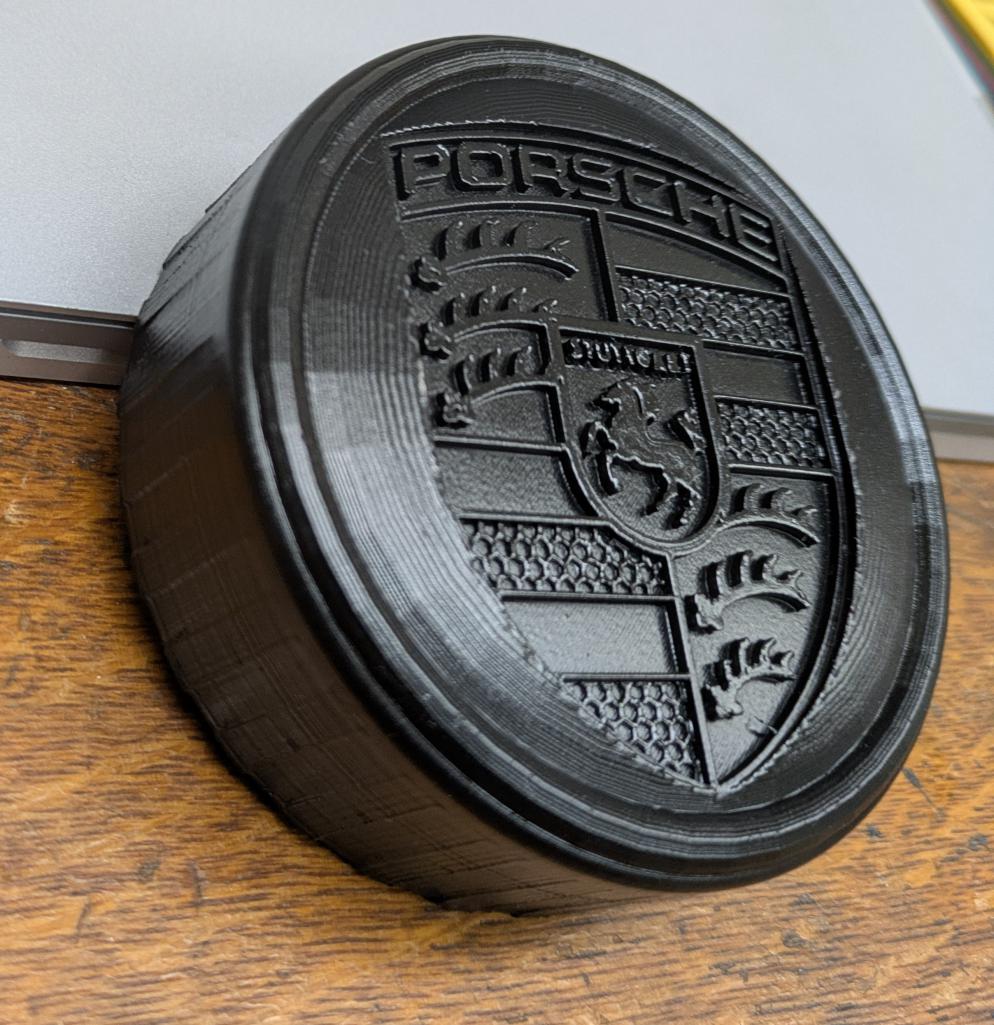 |
|
|
|
| emerygt350 |
Feb 18 2025, 11:15 AM
Post
#4
|
|
Advanced Member Group: Members Posts: 3,068 Joined: 20-July 21 From: Upstate, NY Member No.: 25,740 Region Association: North East States |
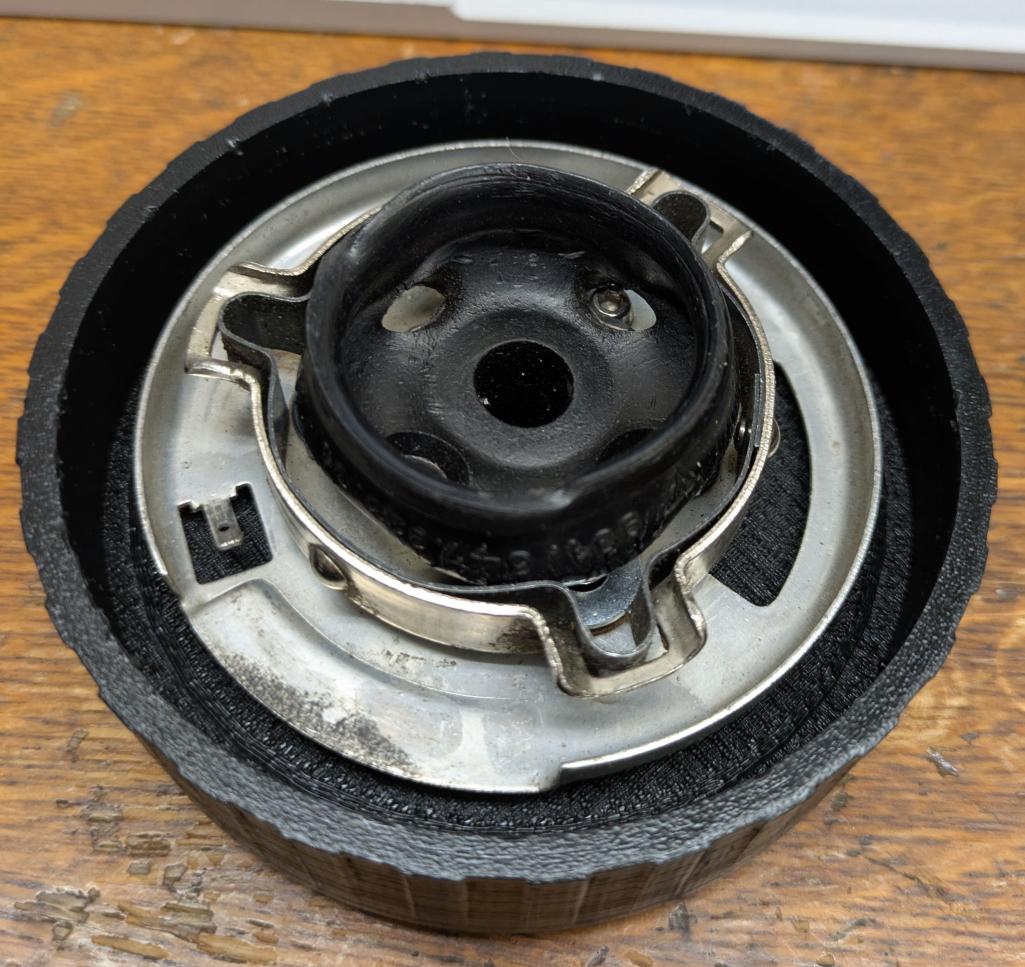
This is the '6.3-biggerhole' stl on my thingiverse.com page (that refers to the indent on the inside for the rubber bumper).
https://www.thingiverse.com/thing:6238862 This is a good compromise between ease of print and 'faithfulness' to the original design. I figured a single print design would be better for everyone and this does just that. This was printed at .12 with a .4 nozzle on a longer lk5 pro. It looks pretty good on my anycubic kobra 2 neo as well, same settings. |
|
|
|
| emerygt350 |
Feb 18 2025, 01:37 PM
Post
#5
|
|
Advanced Member Group: Members Posts: 3,068 Joined: 20-July 21 From: Upstate, NY Member No.: 25,740 Region Association: North East States |
I have two models set, one for just screwing straight into, and another setup for threaded brass inserts (the better way).
 |
|
|
|
| emerygt350 |
Feb 20 2025, 11:05 AM
Post
#6
|
|
Advanced Member Group: Members Posts: 3,068 Joined: 20-July 21 From: Upstate, NY Member No.: 25,740 Region Association: North East States |
Popped it on the garage bound car today. Could be just a hair larger in circumference but otherwise worked great. I have just bumped up the diameter to 105 from 100. Will have to print another one I guess...
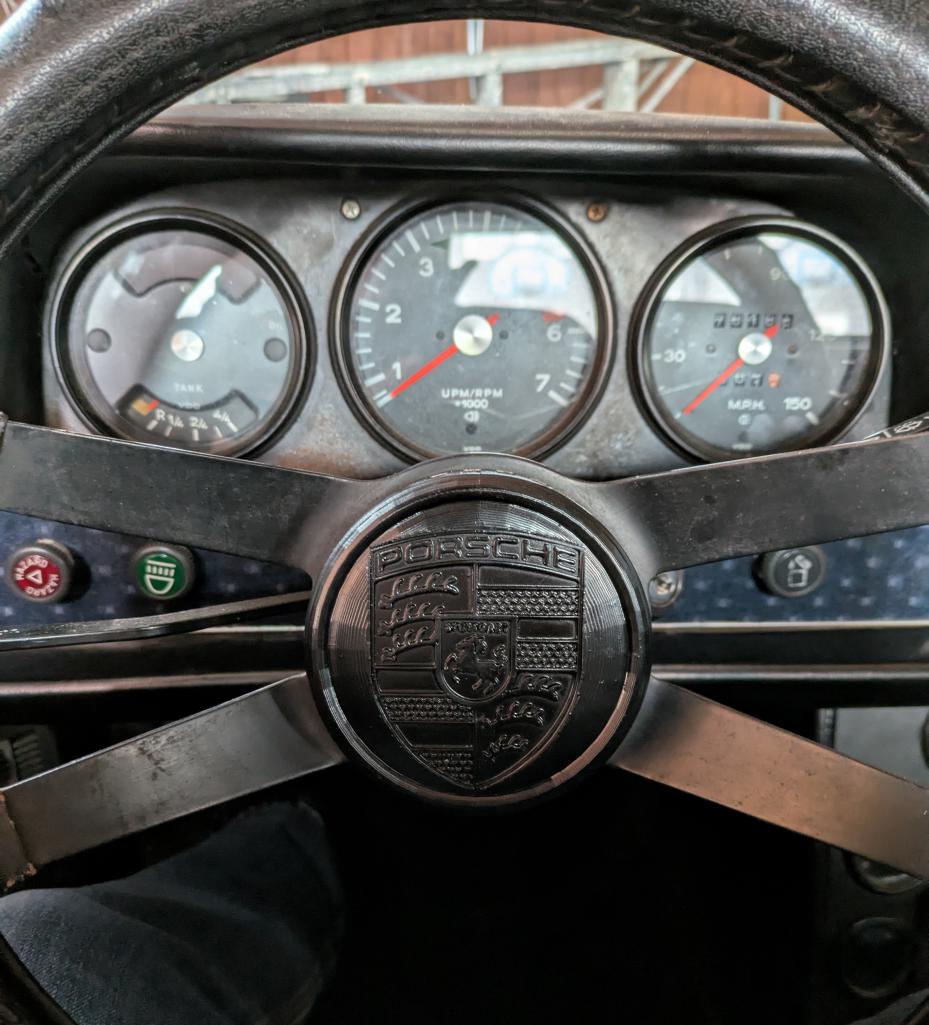 |
|
|
|
| Shivers |
Feb 20 2025, 11:38 AM
Post
#7
|
|
Senior Member Group: Members Posts: 3,108 Joined: 19-October 20 From: La Quinta, CA Member No.: 24,781 Region Association: Southern California |
That’s cool dude
|
 |
|
| slowrodent |
Feb 20 2025, 12:31 PM
Post
#8
|
|
Member Group: Members Posts: 198 Joined: 29-February 20 From: Tucson/Oro Valley Member No.: 23,981 Region Association: Southwest Region |
|
|
|
|
| burton73 |
Feb 20 2025, 02:20 PM
Post
#9
|
|
Senior member, and old dude Group: Members Posts: 3,868 Joined: 2-January 07 From: Los Angeles Member No.: 7,414 Region Association: Southern California |
I love the work but just an idea. I think if the crest was the same size as the factory used, I think the proportions, IMHO I think it would look better. Also, color filling and sanding may look very cool.
Shown is a real factory puck. Used it was like $450. On Ebay 15 years ago. I also had to try a few different leather puck faces till we got one that was good enough. Best Bob B Best Bob B 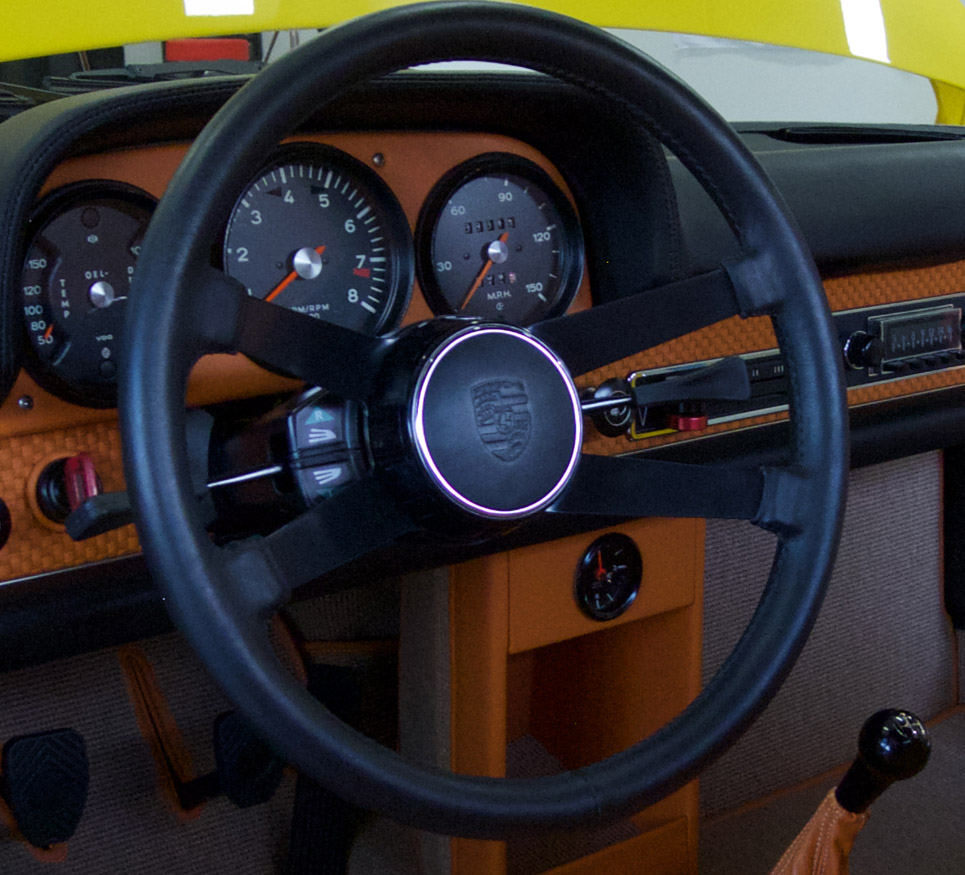 |
|
|
|
| sixnotfour |
Feb 20 2025, 02:30 PM
Post
#10
|
|
914 Wizard Group: Members Posts: 10,919 Joined: 12-September 04 From: Life Elevated..planet UT. Member No.: 2,744 Region Association: Rocky Mountains |
Pretty amazing , what can be done , modern times...
Here is a pic of an OG Puck... The dia. at the top of stripes is 98.50mm and tapers to 108.550 at the base of stripes, Stripes are 1.0mm tall at the base of puck ... The second pic is of the First version and the Last version... Note the insert was only a press fit,The Later had tabs to bend over to retian leather ... (IMG:style_emoticons/default/beerchug.gif) Attached image(s) 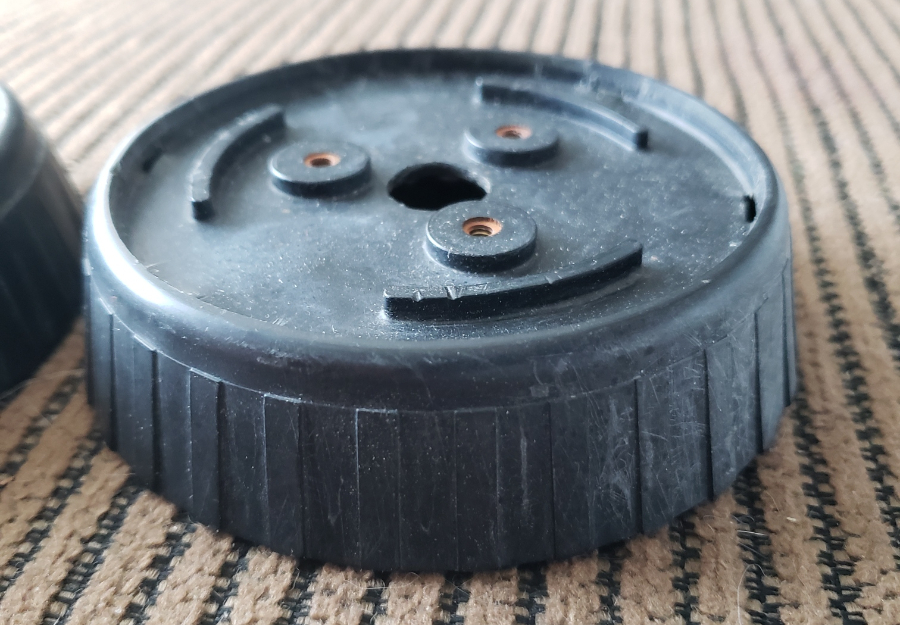 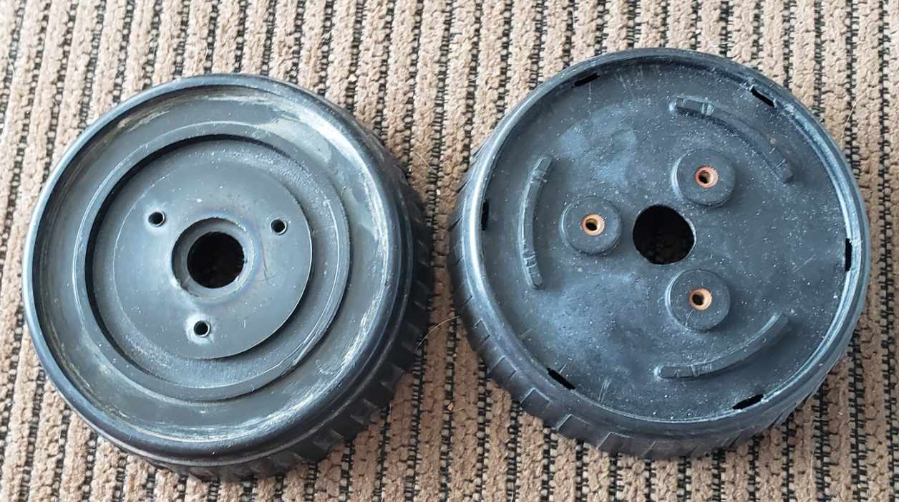
|
|
|
|
| sixnotfour |
Feb 20 2025, 02:53 PM
Post
#11
|
|
914 Wizard Group: Members Posts: 10,919 Joined: 12-September 04 From: Life Elevated..planet UT. Member No.: 2,744 Region Association: Rocky Mountains |
Well Its Snowing ...So,, Early Versus Late...Early on right,,
Here are the dimensions and visual between the two.. OD at top of stripes, 99.00mm, and the Bottom 110.00mm, Stripes are 1.50mm tall at the base of puck ... (IMG:style_emoticons/default/beer.gif) (IMG:style_emoticons/default/beerchug.gif) (IMG:style_emoticons/default/popcorn[1].gif) Attached image(s) 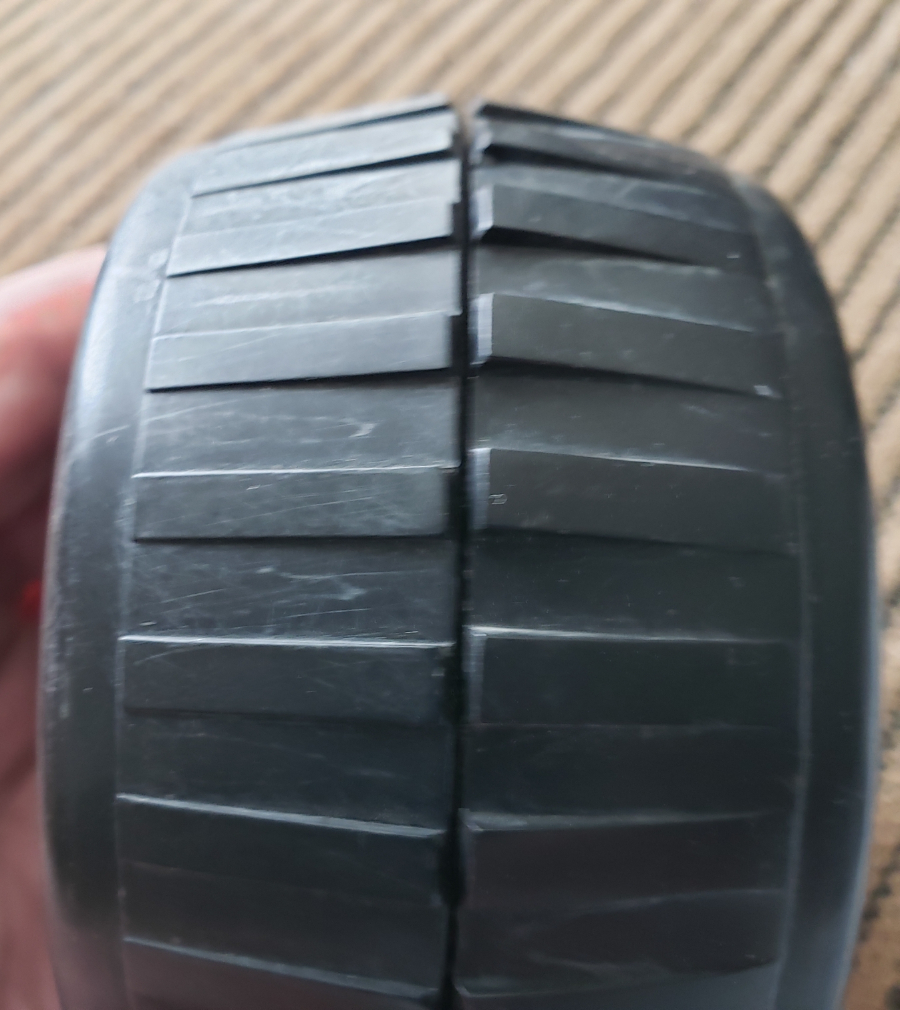
|
|
|
|
| burton73 |
Feb 20 2025, 02:53 PM
Post
#12
|
|
Senior member, and old dude Group: Members Posts: 3,868 Joined: 2-January 07 From: Los Angeles Member No.: 7,414 Region Association: Southern California |
QUOTE(sixnotfour @ Feb 20 2025, 12:30 PM)  Pretty amazing , what can be done , modern times... Here is a pic of an OG Puck... The dia. at the top of stripes is 98.50mm and tapers to 108.550 at the base of stripes, Stripes are 1.0mm tall at the base of puck ... The second pic is of the First version and the Last version... Note the insert was only a press fit,The Later had tabs to bend over to retian leather ... (IMG:style_emoticons/default/beerchug.gif) Pictures of OG puck used for my built. Just for reference Best Bob B 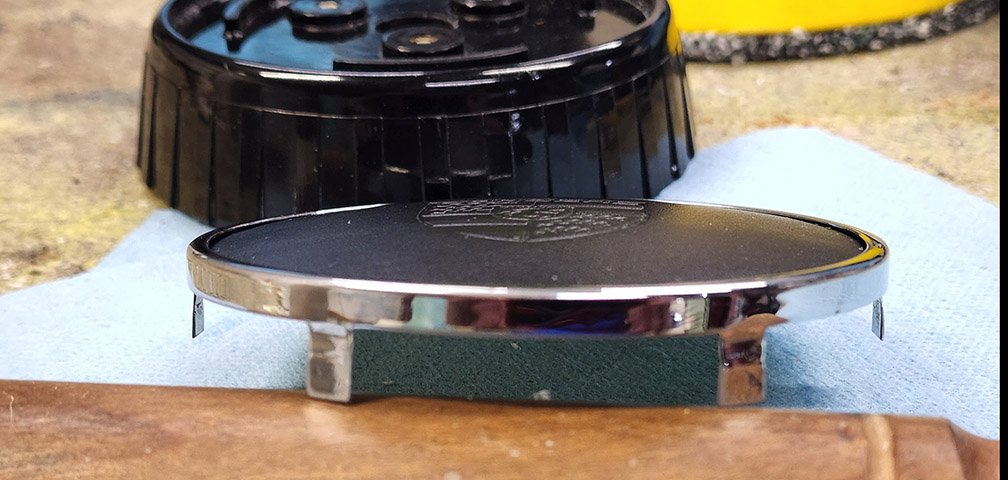 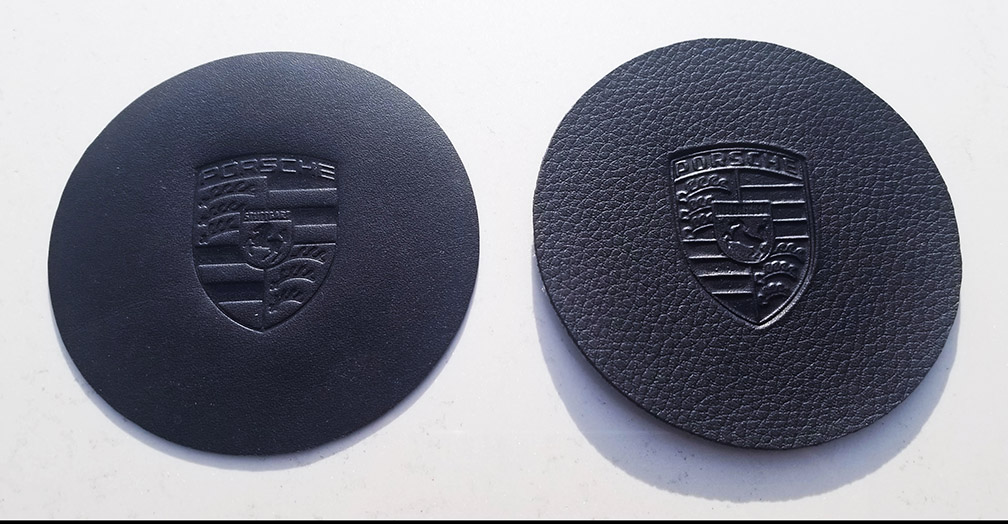 |
|
|
|
| sixnotfour |
Feb 20 2025, 03:14 PM
Post
#13
|
|
914 Wizard Group: Members Posts: 10,919 Joined: 12-September 04 From: Life Elevated..planet UT. Member No.: 2,744 Region Association: Rocky Mountains |
Very Nice Bob B.
As found,, Yrs ago... (IMG:style_emoticons/default/hissyfit.gif) Attached image(s) 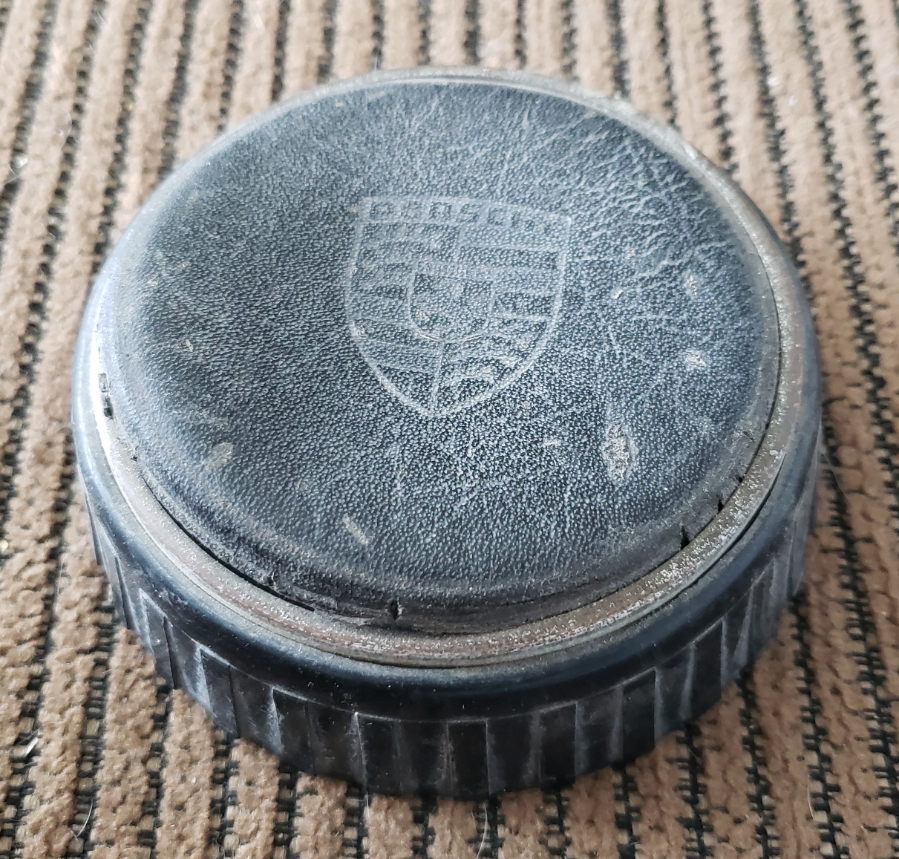
|
|
|
|
| emerygt350 |
Feb 20 2025, 08:35 PM
Post
#14
|
|
Advanced Member Group: Members Posts: 3,068 Joined: 20-July 21 From: Upstate, NY Member No.: 25,740 Region Association: North East States |
Awesome! Thanks for those measurements. I knew I was getting closer but now I can hit it dead on. Sadly the crest has to stay unusually large for the average printer to handle the detail and print on one go. Eventually I might create a normal sized crest version again but I don't want people trying to print it and getting terrible results. My mission here is a good looking nod to the original that anyone can print. If someone could give me a measurement of the crest top to bottom side to side, that would be great too.
|
|
|
|
| Spoke |
Feb 20 2025, 09:01 PM
Post
#15
|
|
Jerry Group: Members Posts: 7,202 Joined: 29-October 04 From: Allentown, PA Member No.: 3,031 Region Association: None |
@emerygt350
That emblem looks great. What layer thickness are you using? Did you do any post processing like sanding or trimming? |
|
|
|
| emerygt350 |
Feb 21 2025, 07:43 AM
Post
#16
|
|
Advanced Member Group: Members Posts: 3,068 Joined: 20-July 21 From: Upstate, NY Member No.: 25,740 Region Association: North East States |
QUOTE(Spoke @ Feb 20 2025, 10:01 PM) @emerygt350 That emblem looks great. What layer thickness are you using? Did you do any post processing like sanding or trimming? These were done at .12 with a .4 nozzle. Ultimaker 5.9 and a longer lkr5 pro. No post processing at all besides removing the internal supports. I tried an acetone wash on one, but it didn't do anything I liked. |
|
|
|
| emerygt350 |
Feb 21 2025, 07:43 AM
Post
#17
|
|
Advanced Member Group: Members Posts: 3,068 Joined: 20-July 21 From: Upstate, NY Member No.: 25,740 Region Association: North East States |
Is that 110 the diameter of the puck or the diameter of the 'bumps' at the base?
I think I like the look of the early version more. Here we go again... 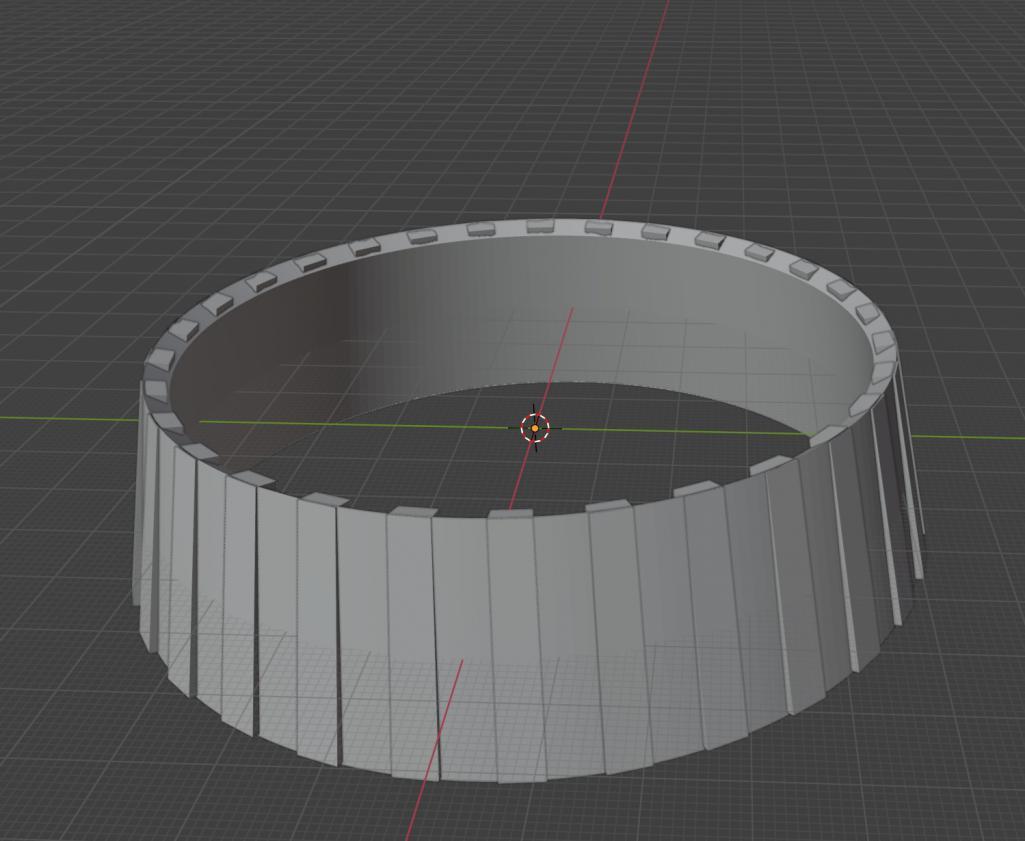 |
|
|
|
| sixnotfour |
Feb 21 2025, 09:40 AM
Post
#18
|
|
914 Wizard Group: Members Posts: 10,919 Joined: 12-September 04 From: Life Elevated..planet UT. Member No.: 2,744 Region Association: Rocky Mountains |
yes, dia. of bumps... I can Get you any measurement you need,, later today..
|
|
|
|
| emerygt350 |
Feb 21 2025, 10:36 AM
Post
#19
|
|
Advanced Member Group: Members Posts: 3,068 Joined: 20-July 21 From: Upstate, NY Member No.: 25,740 Region Association: North East States |
QUOTE(sixnotfour @ Feb 21 2025, 10:40 AM) yes, dia. of bumps... I can Get you any measurement you need,, later today.. Sweet, so then the cylinder diameter at the base must be 109.5? The other measure I would like is the height from the top of the 'bumps' to the top of the bevel. 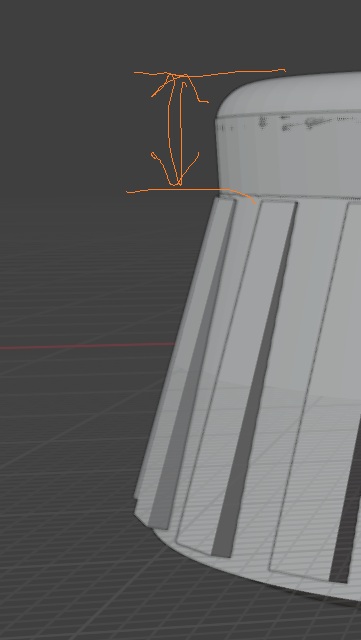 |
|
|
|
| emerygt350 |
Feb 21 2025, 12:01 PM
Post
#20
|
|
Advanced Member Group: Members Posts: 3,068 Joined: 20-July 21 From: Upstate, NY Member No.: 25,740 Region Association: North East States |
Well, here is a small logo version of the new design with the flared base.
Gonna print it and see how it goes...  |
|
|
|
|
1 User(s) are reading this topic (1 Guests and 0 Anonymous Users)
0 Members:

|
Lo-Fi Version | Time is now: 31st July 2025 - 05:35 PM |
Invision Power Board
v9.1.4 © 2025 IPS, Inc.