|
|
|
Porsche, and the Porsche crest are registered trademarks of Dr. Ing. h.c. F. Porsche AG.
This site is not affiliated with Porsche in any way. Its only purpose is to provide an online forum for car enthusiasts. All other trademarks are property of their respective owners. |
|
|


| SpecialK |
 Oct 17 2005, 10:01 AM Oct 17 2005, 10:01 AM
Post
#1
|
|
aircraft surgeon  Group: Benefactors Posts: 3,211 Joined: 15-March 04 From: Pacific, MO Member No.: 1,797 |
Okay, after the Heinnies wore off, I glanced at my reply to Larry's "baseball stitch" thread for recovering steering wheels..... (IMG:http://www.914world.com/bbs2/html/emoticons/ohmy.gif) , and I made an error in my instructions, so don't do it that way. Funny how when I'm just "doing it", it's simple, but when I had to think about what I was doing I got it all "f'ed" up. I've got two wheels to do, and the first one has to be done today, so no time for pics. Plus I wanted to have some pics of beginning and ending the stitch, including what all I did to the horn button, and metal spokes.....give me a couple of weeks and I'll have a better "how to", with better pics (hopefully (IMG:http://www.914world.com/bbs2/html/emoticons/wink.gif) ).
Here's a quick one of the horn button, not a before and after per se, but an example of the condition the restored one prior to refurb (actually, the rubber part of the "refurbed" button was in much worse condition filth-wise, than the "un-refurbed" one shown). The paint on the refurbed one isn't really as shiny as the pic shows (it's semi-gloss), must've been the flash. So in closing.........disregard what said the first time (IMG:http://www.914world.com/bbs2/html/emoticons/drunk.gif) |
   |

 
|
  |
Replies(1 - 8)
| SpecialK |
Oct 17 2005, 10:03 AM
Post
#2
|
|
aircraft surgeon Group: Benefactors Posts: 3,211 Joined: 15-March 04 From: Pacific, MO Member No.: 1,797 |
Jeezus! forgot the pic! (IMG:http://www.914world.com/bbs2/html/emoticons/slap.gif)
Attached image(s) 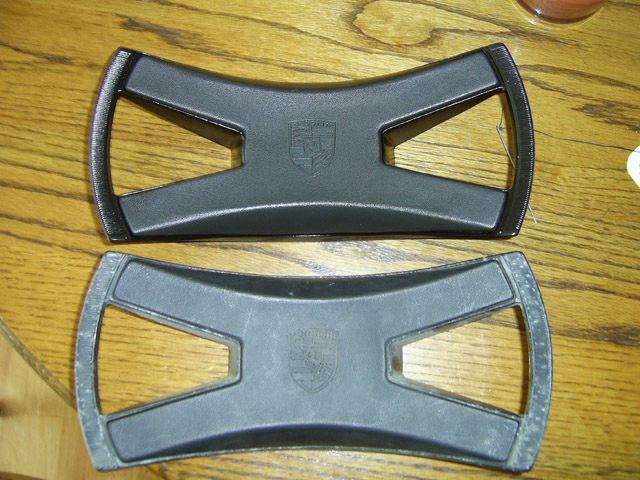
|
|
|
|
| spare time toys |
Oct 17 2005, 10:12 AM
Post
#3
|
|
hooked on grilling food. Group: Members Posts: 4,059 Joined: 3-April 04 From: West Plano Tx Member No.: 1,884 Region Association: Southwest Region |
Im down and out for a couple of days. I got the bug thats going around (IMG:http://www.914world.com/bbs2/html/emoticons/barf.gif) I dont think its that bird one. Ill watch for the update. If your using a kit can you measure how close to the edge the holes for the stich are and what the spacing is. Im starting from scratch.
|
|
|
|
| jsteele22 |
Oct 17 2005, 11:01 AM
Post
#4
|
|
Senior Member Group: Members Posts: 727 Joined: 24-August 05 From: Colorado Springs, CO Member No.: 4,653 |
Hey Kevin, If the Heinnies are still worn off (IMG:http://www.914world.com/bbs2/html/emoticons/happy11.gif) I've got a couple of questions. That horn button looks awesome. It's hard to tell from the pic, but is it covered w/ leather on the edges ? Also, are you gonna share your cleaning/painting tips with us ? Finally, if I just go to a leather place, is there a certain weight or category of leather to ask for ? Thx |
|
|
|
| SpecialK |
Oct 17 2005, 01:19 PM
Post
#5
|
||
|
aircraft surgeon Group: Benefactors Posts: 3,211 Joined: 15-March 04 From: Pacific, MO Member No.: 1,797 |
Nope, it's the stock rubber. Okay, here's a quick rundown on what was involved: 1). Separate the rubber center from the metal. I used a metal machinist scale (a thin metal 6" ruler), but a hacksaw blade with the teeth ground off would work good also. From the backside of the button, work the blade back and forth between the rubber and metal to release the glue.... take your time, if you put too much outward pressure, particularly towards the outer end of the rubber, it will crack. (IMG:http://www.914world.com/bbs2/html/emoticons/headbang.gif) . It's hard to tell from the photo, but in the lower righthand spoke of the horn button, there's an alignment post cast into the metal about 3/4" in from the edge (and corresponding hole in the rubber button). So when doing that particular section, keep in mind you'll have to go to the right and left of it to get to the glue. Narrowing the hacksaw blade a bit will help in getting to the outer part of that section............Wah-Lah.......rubber is off.....take a swig of your beer that's been getting warm while you were messing with it. (IMG:http://www.914world.com/bbs2/html/emoticons/beer.gif) 2). The metal part. DO NOT REMOVE THE OLD PAINT MECHANICALLY!! The reason for this is that the tiny ribs on the outer part of the horn button will be gone before you'll get paint between them removed, and if you leave any paint inbetween them, they'll disappear when you go to prime and repaint (read: look like crap when you're done). I used Aircraft Stripper (from the FLAPS...absolutley wear protective gloves, and a face shield....wicked stuff), and it worked fantastic, it even got the old glue residue off. A small brass brush also helps get the stubborn bits of paint out from between the little ridges. Thoroughly rinse the stripper from the horn button (garden hose and brass brush), let dry completely, lightly prime, and paint semi-gloss black (I fed bailing wire through two of the screw holes in the center of the button so I could spray all sides at the same time, and hung it to cure)......another swig of beer is in order...you deserve it! (IMG:http://www.914world.com/bbs2/html/emoticons/beerchug.gif) 3). The rubber button was filthy, but uncracked... ...so I thought that a good scrubbing in liquid detergent and water would do the trick. Scrubbed it three times, and it still looked dull and dirty when it dried (IMG:http://www.914world.com/bbs2/html/emoticons/headbang.gif) . I finally got it clean by using GOOP handcleaner and a toothbrush to get down into the grain (what I use on my Nikes to get the work grime off of them). I was absolutely shocked by how much more crap came off with the cleaner, even after 3 scrubbings in soap and water (IMG:http://www.914world.com/bbs2/html/emoticons/ohmy.gif) . I got a clean rag, and buffed it like it was Aladin's Lamp until all of the cleaner was removed, and Shazam! Looks friggin' new, but not ArmorAll shiny. (IMG:http://www.914world.com/bbs2/html/emoticons/smilie_pokal.gif) Note: Keep the GOOP off of the backside of the button, you don't want the lanolin in the cleaner to interfere with the glue when you put it back together. 4). After the paint is completely cured, apply a thin coat of rubber cement to the bottom contact points of the metal and rubber pieces. You don't want any glue on the sides or you may get "sqeeze out" of the glue, and ruin the beauty of your newly refurbed horn button....crack a new beer, 'cause that one you opened at the beginning of this refurb is piss warm by now (IMG:http://www.914world.com/bbs2/html/emoticons/icon8.gif) , and you deserve a "cold one" ! There you have it.... When I get to redoing the other leather wheel and horn button, I'll get the whole process in pics. Larry: The stitching should be approx. 1/8" back from the edge of the leather, and 3/16"-1/4" apart. When you measure the circumference of the grip, subtract about an 1/8" from that measurement and "stretch" the leather together with the stitching, or you'll end up with a much nicer looking seam, and no puckering. Attached image(s) 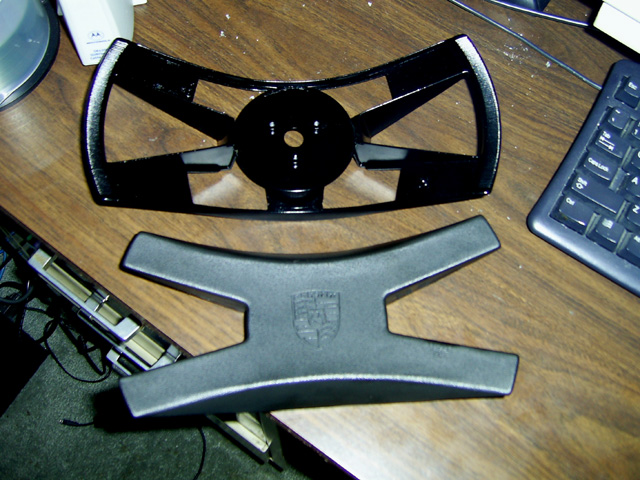
|
||
|
|
|
||
| spare time toys |
Oct 17 2005, 03:38 PM
Post
#6
|
|
hooked on grilling food. Group: Members Posts: 4,059 Joined: 3-April 04 From: West Plano Tx Member No.: 1,884 Region Association: Southwest Region |
Here it the wheel and leather Im going to try doing (IMG:http://www.914world.com/bbs2/html/emoticons/smile.gif) Like I said before I can mess up a time or two. I have some grey Im going to use on the top for a centering stripe (IMG:http://www.914world.com/bbs2/html/emoticons/wink.gif)
Attached image(s) 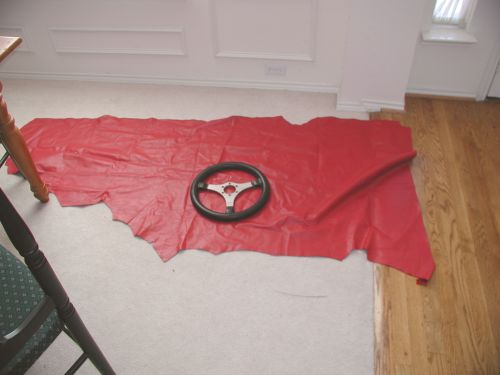
|
|
|
|
| spare time toys |
Oct 17 2005, 03:40 PM
Post
#7
|
|
hooked on grilling food. Group: Members Posts: 4,059 Joined: 3-April 04 From: West Plano Tx Member No.: 1,884 Region Association: Southwest Region |
They do the spokes sorta goofy. Its almost like this is just wrapped and glued here
Attached image(s) 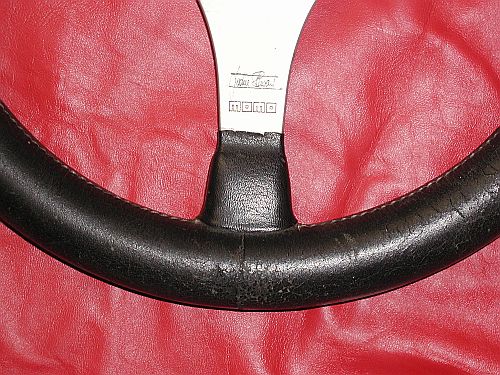
|
|
|
|
| Hammy |
Oct 17 2005, 05:25 PM
Post
#8
|
|
mr. Wonderful Group: Members Posts: 1,827 Joined: 20-October 04 From: Columbia, CA./ Tuolumne Member No.: 2,978 Region Association: Northern California |
Kevin, looks good. I'm thinking of doing this because my wheel and horn looks like crap. (IMG:http://www.914world.com/bbs2/html/emoticons/icon8.gif)
Question about the rubber horn part, when you say yours wasn't cracked, do you mean not majorly cracked or not cracked at all? Mine has very small cracks in the top and bottom center area. |
|
|
|
| SpecialK |
Oct 17 2005, 08:54 PM
Post
#9
|
||
|
aircraft surgeon Group: Benefactors Posts: 3,211 Joined: 15-March 04 From: Pacific, MO Member No.: 1,797 |
Not cracked at all....it's actually Garolds wheel, that's getting redone for a door prize at the FFC. I've got some horn buttons layin' around and could check for a good canidate for a refurb if yours is too far gone. PM me if you need one. Larry, I see your plan, should look pretty cool when you get it done! (IMG:http://www.914world.com/bbs2/html/emoticons/smilie_pokal.gif) I think I would try to get the original cover off in one piece, and use it for a pattern for the new leather (making it slightly undersize width-wise to make sure the leather gets a good stretch), and include the spokes in the pattern to make it a one-piece cover. Looking forward to seeing the finished wheel! |
||
|
|
|
||
|
1 User(s) are reading this topic (1 Guests and 0 Anonymous Users)
0 Members:

|
Lo-Fi Version | Time is now: 4th July 2025 - 03:34 PM |
Invision Power Board
v9.1.4 © 2025 IPS, Inc.