|
|
|
Porsche, and the Porsche crest are registered trademarks of Dr. Ing. h.c. F. Porsche AG.
This site is not affiliated with Porsche in any way. Its only purpose is to provide an online forum for car enthusiasts. All other trademarks are property of their respective owners. |
|
|


| DNHunt |
 Nov 23 2005, 01:28 PM Nov 23 2005, 01:28 PM
Post
#1
|
|
914 Wizard? No way. I got too much to learn.  Group: Members Posts: 4,099 Joined: 21-April 03 From: Gig Harbor, WA Member No.: 598 |
Time to get this thing done so, here's how I pulled the gears on the crank and replaced the #3 main bearing.
First I drilled a countersink into the top of an 8 mm bolt to protect the threads in the nose of the crank thtat secures the fan hub. Attached image(s) 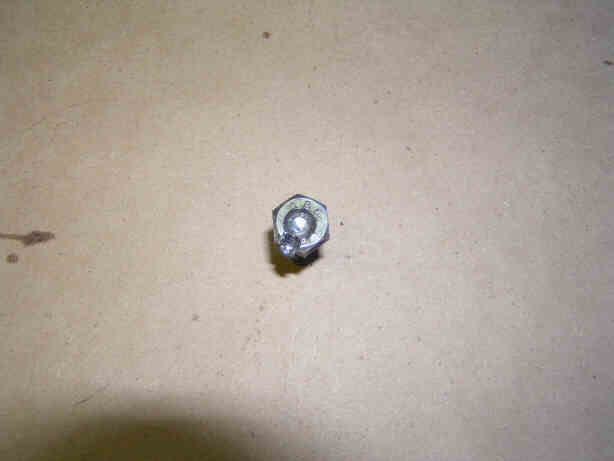
|
   |

 
|
  |
Replies(1 - 19)
| DNHunt |
Nov 23 2005, 01:30 PM
Post
#2
|
|
914 Wizard? No way. I got too much to learn. Group: Members Posts: 4,099 Joined: 21-April 03 From: Gig Harbor, WA Member No.: 598 |
I threaded that bolt into the nose of the crank then started applying tension with a puller. Oh ya, you need heat to expand the gears.
Attached image(s) 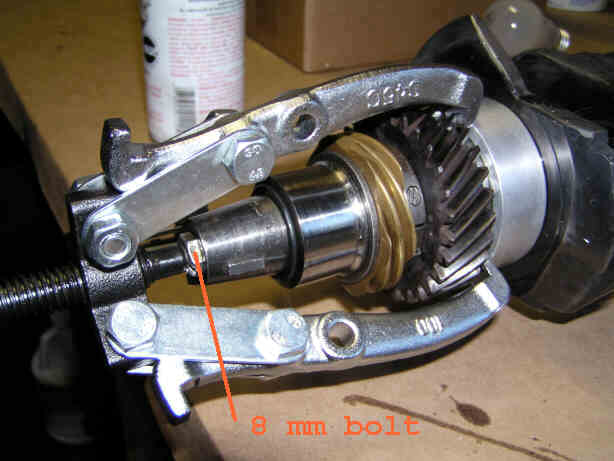
|
|
|
|
| DNHunt |
Nov 23 2005, 01:34 PM
Post
#3
|
|
914 Wizard? No way. I got too much to learn. Group: Members Posts: 4,099 Joined: 21-April 03 From: Gig Harbor, WA Member No.: 598 |
You end up with a bare crankshaft that you can get checked and cleaned up. This got a little polishing.
Attached image(s) 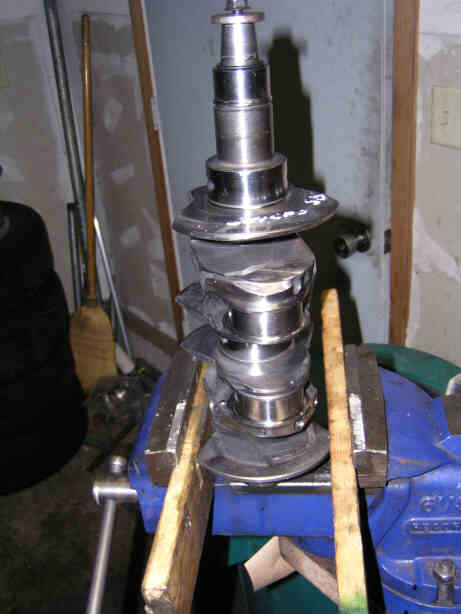
|
|
|
|
| DNHunt |
Nov 23 2005, 01:35 PM
Post
#4
|
|
914 Wizard? No way. I got too much to learn. Group: Members Posts: 4,099 Joined: 21-April 03 From: Gig Harbor, WA Member No.: 598 |
You end up with these bits
Attached image(s) 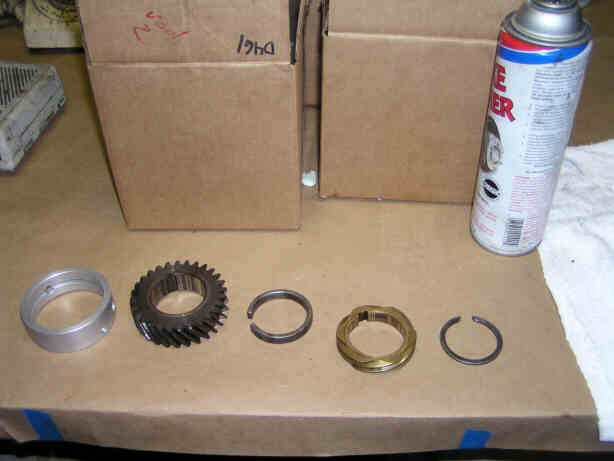
|
|
|
|
| DNHunt |
Nov 23 2005, 01:39 PM
Post
#5
|
|
914 Wizard? No way. I got too much to learn. Group: Members Posts: 4,099 Joined: 21-April 03 From: Gig Harbor, WA Member No.: 598 |
Clean and lube up the journal and put the bearing on. The hole for the dowel goes toward the flywheel end of the crank.
Attached image(s) 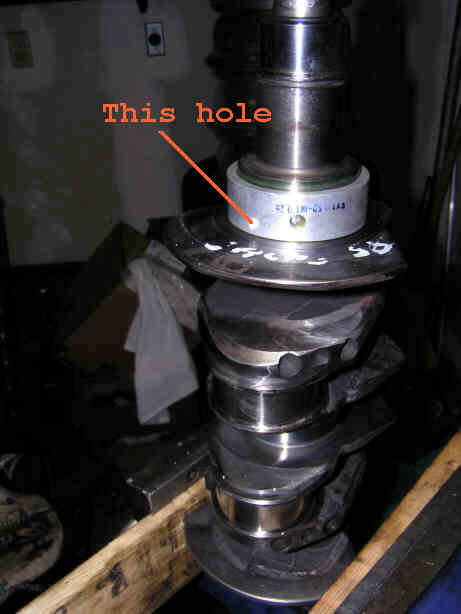
|
|
|
|
| DNHunt |
Nov 23 2005, 01:45 PM
Post
#6
|
|
914 Wizard? No way. I got too much to learn. Group: Members Posts: 4,099 Joined: 21-April 03 From: Gig Harbor, WA Member No.: 598 |
Heat up the gears to expand them. I got away with this because my wife was at work today.
Attached image(s) 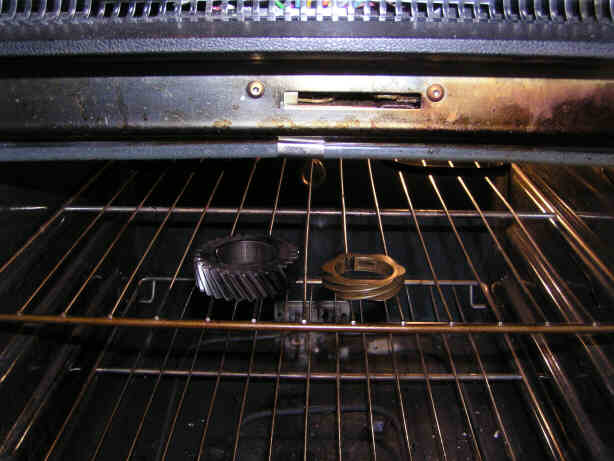
|
|
|
|
| Allan |
Nov 23 2005, 01:48 PM
Post
#7
|
|
Teenerless Weenie Group: Members Posts: 8,373 Joined: 5-July 04 From: Western Mesopotamia Member No.: 2,304 Region Association: Southern California |
I used a toaster oven for my gears. Once they are hot they just seem to fall into place.
|
|
|
|
| DNHunt |
Nov 23 2005, 01:48 PM
Post
#8
|
|
914 Wizard? No way. I got too much to learn. Group: Members Posts: 4,099 Joined: 21-April 03 From: Gig Harbor, WA Member No.: 598 |
Drop the gear on, line up the slot with the Woodruff key and give it a little persuasion. This one just took a light tap.
Attached image(s) 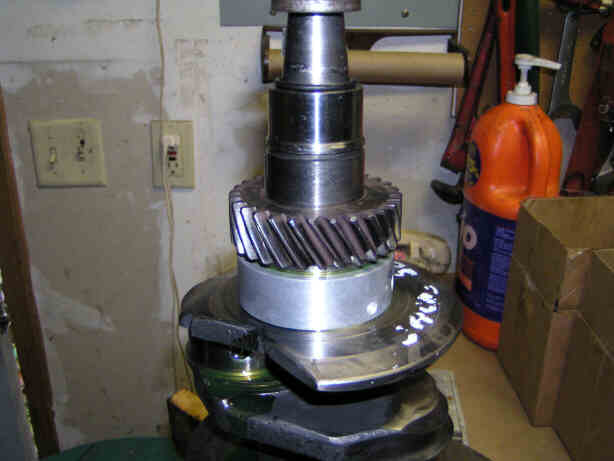
|
|
|
|
| DNHunt |
Nov 23 2005, 01:50 PM
Post
#9
|
|
914 Wizard? No way. I got too much to learn. Group: Members Posts: 4,099 Joined: 21-April 03 From: Gig Harbor, WA Member No.: 598 |
Next comes a spacer with the VW logo.
Attached image(s) 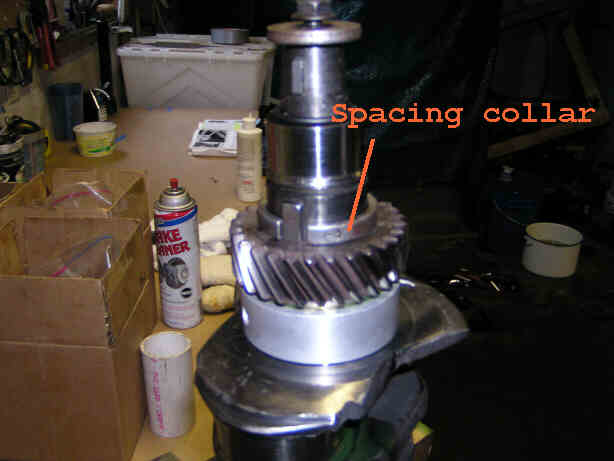
|
|
|
|
| DNHunt |
Nov 23 2005, 01:52 PM
Post
#10
|
|
914 Wizard? No way. I got too much to learn. Group: Members Posts: 4,099 Joined: 21-April 03 From: Gig Harbor, WA Member No.: 598 |
Next comes the dizzy drive gear. Line it up with the key.
Attached image(s) 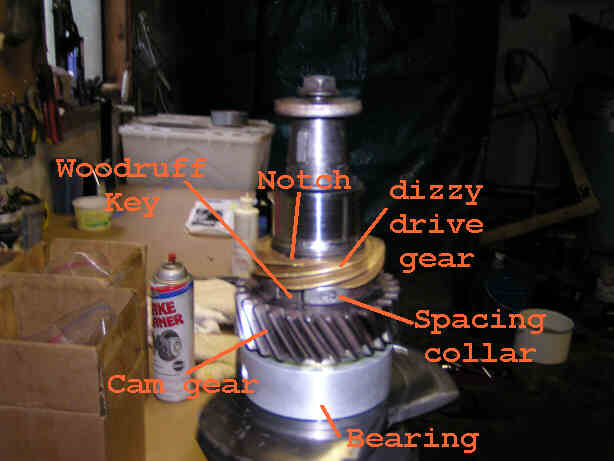
|
|
|
|
| DNHunt |
Nov 23 2005, 01:58 PM
Post
#11
|
|
914 Wizard? No way. I got too much to learn. Group: Members Posts: 4,099 Joined: 21-April 03 From: Gig Harbor, WA Member No.: 598 |
Here's my persuader. I love PVC pipe. I have a bunch of different sizes for this kind of stuff.
Attached image(s) 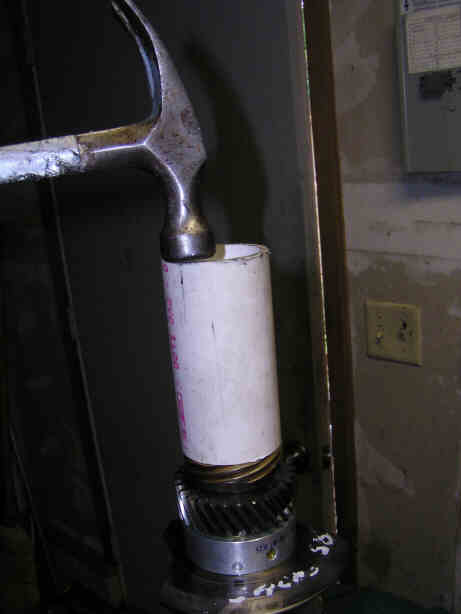
|
|
|
|
| DNHunt |
Nov 23 2005, 01:59 PM
Post
#12
|
|
914 Wizard? No way. I got too much to learn. Group: Members Posts: 4,099 Joined: 21-April 03 From: Gig Harbor, WA Member No.: 598 |
Lastly, there is a retaining ring which can be a bitch to get on. My solution was to use piston ring expanders to slip it on. Ready for rods on Friday.
Attached image(s) 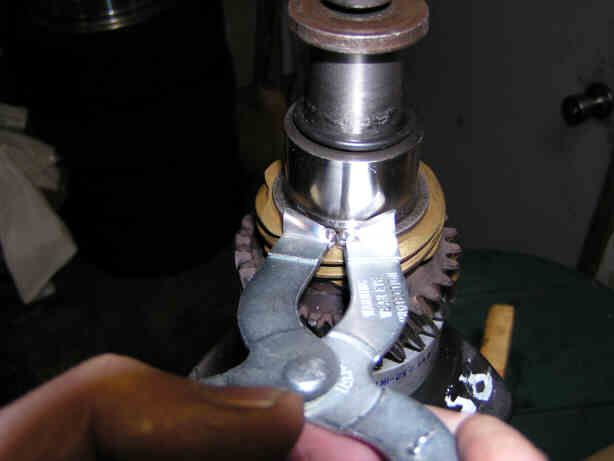
|
|
|
|
| maf914 |
Nov 23 2005, 02:38 PM
Post
#13
|
|
Not a Guru! Group: Members Posts: 3,049 Joined: 30-April 03 From: Central Florida Member No.: 632 Region Association: None |
Dave,
What are you building now? Didn't you already do the 2270 rebuild and put it into your car? By the way, how is it running? |
|
|
|
| thesey914 |
Nov 23 2005, 02:41 PM
Post
#14
|
|
Senior Member Group: Benefactors Posts: 1,155 Joined: 1-January 03 From: Staffordshire -England Member No.: 66 |
Dave is this another teardown of your four? I thought it was all sorted after the rings went tits-up?
|
|
|
|
| Mark Henry |
Nov 23 2005, 02:54 PM
Post
#15
|
|
that's what I do! Group: Members Posts: 20,065 Joined: 27-December 02 From: Port Hope, Ontario Member No.: 26 Region Association: Canada |
yeh...what he said (IMG:http://www.914world.com/bbs2/html/emoticons/huh.gif)
|
|
|
|
| Jake Raby |
Nov 23 2005, 02:57 PM
Post
#16
|
|
Engine Surgeon Group: Members Posts: 9,398 Joined: 31-August 03 From: Lost Member No.: 1,095 Region Association: South East States |
Dave has involuntarily been a guinea pig for Charles and I!
The issue was with his Nickies/JE pistons and JE piston rings compatibility. This issue has only shown up with Dave's engine and one of my test engines and none of the other dozen+ of my engines using the exact same rings/piston/cylinder combo have had the issue... Not even after thousands of miles on a few of them. Charles from LN has the answers he is the guy tyhat did all the homework on the problem along with a consultant that he hired that has had similar issues with 911 engines and JE pistons. Dave has been a real sport through this- a truely great customer! When it occured I offered to have the engine shipped here, tear it down, get to the bottom of it and then reassemble and dyno it (free of charge). This was because I felt bad about it happeneing AND that I wanted to see what happened to it first hand and then terrorize it on the dyno afterward to ensure it was right. Dave chose to suck it up and do it himself so I supplied him with the parts while Charles and JE went a few rounds on the issue. A few weeks and a chunk of change later the issue was found to be a flaw of sorts with the JE oiling ring package. The oiling rings were replaced with an alternate part and Dave is reassembling. At the same time I'm finishing another engine that has the same specs and cylinders/pistons and using the improved oiling ring with it as well for test purposes to ensure things are taken care of once and for all.. This is the joy of my position.... Having weird, unexplained issues that have no solution without a lot of effort! FYI- 96mm Nickies were used in BOTH instances that we had an issue with, none of the other engines have ever had this issue with Nickies.. We honestly think it was a very isolated issue since my pistons/rings and etc for the test engine were purchased at the same time I supplied the pistons to Dave in his kit... Dave, thanks again for the understanding and perseverence- if you have questions -call me (and I don't give a damn if it's Thanksgiving or not!) you have the number. |
|
|
|
| DNHunt |
Nov 23 2005, 03:35 PM
Post
#17
|
|
914 Wizard? No way. I got too much to learn. Group: Members Posts: 4,099 Joined: 21-April 03 From: Gig Harbor, WA Member No.: 598 |
This is the same engine. I had the same problems the second time around. The oil control rings failed and the cam showed some wear.
I guess now's the time to air things out. Tabs on the oil control rings failed, all four cylinders. It's hard to know why. This ring set certainly was delicate. Tension was minimal. It isn't clear whether I damaged them on insertion or they broke while in use. At any rate we've change oil control rings and I've been assured the new ones will work. The cam is interesting. The exhaust side wore. It appears that the second one was misground and the ramp rate was extreme. the smaller base circle probably contributed. So I'm going for a different cam. A little more duration and a litlle less lift. Valves open a little more early and late and there isn't as much change near full open. Now, this has certainly been a pain in the butt. However, both Jake and Charles have stood behind their products to the extreme. It would have been easy for them to blame this on the builder (me) but, they have both spent time and I suspect a good deal of money trying to sort this out. For instance, the pistons and cylinders have been all over and finally ended up with Bob Cousimano at CMW Motorsports. He suggested a different ring which I am going to use. I can't begin to imagine what that cost but, I'm sure the profit is gone. After I tore it down Jake offered to rebuild it and break it in on the dyno at no charge. Even though I'm sure they are eating it on this engine they are still very helpful and friendly. These guys STAND BEHIND THEIR STUFF. You are going to pay for it but you won't be left high and dry. Anyway my son and I are going to see this through. Dave Attached image(s) 
|
|
|
|
| davep |
Nov 23 2005, 04:10 PM
Post
#18
|
|
914 Historian Group: Benefactors Posts: 5,291 Joined: 13-October 03 From: Burford, ON, N0E 1A0 Member No.: 1,244 Region Association: Canada |
Bravo, and the best of luck this time around.
|
|
|
|
| Carrera916 |
Nov 23 2005, 04:38 PM
Post
#19
|
|
Member Group: Members Posts: 292 Joined: 9-February 03 From: Pleasanton, CA Member No.: 273 |
wow!
KUDOS to these guys for sharing the info with us! (IMG:http://www.914world.com/bbs2/html/emoticons/smilie_pokal.gif) I'm curious to know what got your attention to stop and strip the engine down? The sound of scrapping in the piston/cylinder areas while running or was it smoking badly when you ran it due to bad oil rings? I figured it would be the smoke part but do tell us anyhow! Hope this time would work out better for you, Dave! Jerry |
|
|
|
| thesey914 |
Nov 23 2005, 04:56 PM
Post
#20
|
|
Senior Member Group: Benefactors Posts: 1,155 Joined: 1-January 03 From: Staffordshire -England Member No.: 66 |
I'm just waiting for JP or Trek to chime 'get a six..'
(IMG:http://www.914world.com/bbs2/html/emoticons/poke.gif) (IMG:http://www.914world.com/bbs2/html/emoticons/hide.gif) |
|
|
|
|
1 User(s) are reading this topic (1 Guests and 0 Anonymous Users)
0 Members:

|
Lo-Fi Version | Time is now: 11th July 2025 - 02:51 PM |
Invision Power Board
v9.1.4 © 2025 IPS, Inc.