|
|
|
Porsche, and the Porsche crest are registered trademarks of Dr. Ing. h.c. F. Porsche AG.
This site is not affiliated with Porsche in any way. Its only purpose is to provide an online forum for car enthusiasts. All other trademarks are property of their respective owners. |
|
|


| Brando |
 Jan 8 2006, 02:33 PM Jan 8 2006, 02:33 PM
Post
#1
|
|
BUY MY SPARE KIDNEY!!!  Group: Members Posts: 3,935 Joined: 29-August 04 From: Santa Ana, CA Member No.: 2,648 Region Association: Southern California |
Friday I dropped the teener off for new tiars and 4-wheel alignment. My rear-right is having issues matching the rear-left. At first I thought I may have a bent trailing arm, but Aaron and I think that the part where the trailing arm meets up to the ears/mounts may be ovaled out on the passenger's side, in-board towards the engine.
My understanding is that you just weld it up and drill a new hole that's the right size, then have it re-aligned... But I don't want it to oval out again. Is there some sort of extra bracing or support I can put in there to prevent this... without having to swap my rear traling arm or machine it. Does anyone have some small bent pieces of 1/8" or ¼" steel that I could weld right in there for extra support? I plan on dropping the engine within the next month or two for a 1911cc conversion and I've got a shitlist a mile long for "while i'm in there"... But this might be a major issue if left un-attended, and I would like to prevent it from happening again. Any suggestions are apprecieated... except for cutting it out and going with a complete monoball/heim join setup with custom traling arms ... i plainly don't have the cash for that-- as enticing as it is. Thankyous! |
   |

 
|
  |
Replies(1 - 16)
| Eric_Shea |
Jan 8 2006, 03:20 PM
Post
#2
|
||
|
PMB Performance Group: Admin Posts: 19,278 Joined: 3-September 03 From: Salt Lake City, UT Member No.: 1,110 Region Association: Rocky Mountains |
The part you're talking about doesn't have anything to do with the arm. If it's ovaled out it's the suspension mount on the body. The fix is to weld a proper size washer on there. |
||
|
|
|
||
| Aaron Cox |
Jan 8 2006, 03:22 PM
Post
#3
|
||||
|
Professional Lawn Dart Group: Retired Admin Posts: 24,541 Joined: 1-February 03 From: OC Member No.: 219 Region Association: Southern California |
werd... didnt think about the washer..but thats a great idea. gives you a new hole... and lots of places to weld it. and the alignment guy is SURE its not a bent arm? coolio... pull the arm and have a looksee at the INNER body mount take pics (IMG:http://www.914world.com/bbs2/html/emoticons/smile.gif) AA |
||||
|
|
|
||||
| TravisNeff |
Jan 8 2006, 03:46 PM
Post
#4
|
|
914 Guru Group: Members Posts: 5,082 Joined: 20-March 03 From: Mesa, AZ Member No.: 447 Region Association: Southwest Region |
I thought the washer trick was a problem as the axle shaft threads are not getting full engagement, no?
|
|
|
|
| Aaron Cox |
Jan 8 2006, 03:48 PM
Post
#5
|
||
|
Professional Lawn Dart Group: Retired Admin Posts: 24,541 Joined: 1-February 03 From: OC Member No.: 219 Region Association: Southern California |
and you cant put it on the inside because you would compress the bushings.... hmmmm good point trav |
||
|
|
|
||
| TravisNeff |
Jan 8 2006, 03:52 PM
Post
#6
|
|
914 Guru Group: Members Posts: 5,082 Joined: 20-March 03 From: Mesa, AZ Member No.: 447 Region Association: Southwest Region |
I guess on the inside would work with cutting the same off the side of the bushing. You could also backfill the hole after the washer and grind it flat for some extra strength. I would be worried about the HAZ too, not much meat around the periphery of the hole.
|
|
|
|
| McMark |
Jan 8 2006, 03:56 PM
Post
#7
|
|
914 Freak! Group: Retired Admin Posts: 20,179 Joined: 13-March 03 From: Grand Rapids, MI Member No.: 419 Region Association: None |
Trim the washer to fit into the divot. That's what I'd do.
|
|
|
|
| Brando |
Jan 8 2006, 04:00 PM
Post
#8
|
|
BUY MY SPARE KIDNEY!!! Group: Members Posts: 3,935 Joined: 29-August 04 From: Santa Ana, CA Member No.: 2,648 Region Association: Southern California |
I was thinking of welding a 1/8" piece on the inside (engine side) and drilling a hole that's the proper size, then running the bolt through. Maybe a longer bolt, if necessary? Is there anything that can be done to re-inforce the part where it mounts to the body?
|
|
|
|
| McMark |
Jan 8 2006, 04:02 PM
Post
#9
|
|
914 Freak! Group: Retired Admin Posts: 20,179 Joined: 13-March 03 From: Grand Rapids, MI Member No.: 419 Region Association: None |
I have to say that I doubt you'll end up seeing this problem again. Your welds will be stronger than the sheet metal you're replacing, so you're already "beefing" up that area.
|
|
|
|
| Aaron Cox |
Jan 8 2006, 04:04 PM
Post
#10
|
||
|
Professional Lawn Dart Group: Retired Admin Posts: 24,541 Joined: 1-February 03 From: OC Member No.: 219 Region Association: Southern California |
how you gonna use a bolt? the trailing arms have "studs" sticking out... and you do is put a nut on them |
||
|
|
|
||
| pek771 |
Jan 8 2006, 04:18 PM
Post
#11
|
|
Member Group: Members Posts: 273 Joined: 23-November 05 From: Conover, NC Member No.: 5,175 Region Association: None |
As I just pulled out my trailing arms yesterday, cut out the right side suspension console, and just disassembled the trailing arms, I have this observation:
It looks like a washer can be welded in and you would still have enough engagement for the nut on the inner stud. I have a rotted suspension console on the left side also which I will need to fab a repair for, and weld on a washer. I have no choice but to repair this, since a right side suspension console doesn't seem to be available. Looking at the construction of the ear portion of the suspension console, I can see how ovaling of the hole could definitely present a structural problem. I'll go take a picture of the cut up suspension console and post it, or put it on the link in my signature. Pat |
|
|
|
| wertygrog |
Jan 8 2006, 05:07 PM
Post
#12
|
|
wertygrog Group: Members Posts: 428 Joined: 12-November 05 From: Long Beach, CA Member No.: 5,114 Region Association: Southern California |
omg pat i just looked through your signature link and i saw more rust than i though possible! I don't know how you can keep going on that thing...
good luck! brent |
|
|
|
| Eric_Shea |
Jan 8 2006, 05:49 PM
Post
#13
|
||||
|
PMB Performance Group: Admin Posts: 19,278 Joined: 3-September 03 From: Salt Lake City, UT Member No.: 1,110 Region Association: Rocky Mountains |
I'm with Pat. I don't think it's going to be that much of a problem however. If I were to do it, I would weld, grind and work it so that there's no or minimal heigth difference. There's plenty of thread available. Nothing that a washer will hurt... of course it depends on the washer. One idea would be to have the hammer there while welding and tap it in as you weld around it. It should be hot enough to tap in easily and should sit flush. Finish it off with a bit of grinding and you'll be back up and running in no time.
You on that crack stuff boy? (IMG:http://www.914world.com/bbs2/html/emoticons/biggrin.gif) The engine side is the outside of that mount, where the nut screws on to your trailing arm shaft (but I know what ya mean). Trailing arm shafts only come in one size (IMG:http://www.914world.com/bbs2/html/emoticons/wink.gif) What Mark said... you'l be reinforcing it by welding in the washer. You'll see what we're talking about when you dig into it. BTW, do we know that this is the problem? (IMG:http://www.914world.com/bbs2/html/emoticons/confused24.gif) |
||||
|
|
|
||||
| Brando |
Jan 8 2006, 07:06 PM
Post
#14
|
||||||
|
BUY MY SPARE KIDNEY!!! Group: Members Posts: 3,935 Joined: 29-August 04 From: Santa Ana, CA Member No.: 2,648 Region Association: Southern California |
I won't know for certain if the suspension ear is the problem until I get the trailing arm out. Then I will be able to look at the mounting areas and see if there is damage, and can compare to a known good traling arm to see if it's bent. I'll take your words for it... like you said, I won't know until I get my head under there with everything out. |
||||||
|
|
|
||||||
| Brando |
Jan 8 2006, 07:19 PM
Post
#15
|
|
BUY MY SPARE KIDNEY!!! Group: Members Posts: 3,935 Joined: 29-August 04 From: Santa Ana, CA Member No.: 2,648 Region Association: Southern California |
Oh yeah, here are the specs on my alignment.
BEFORE: 195/65/15 Bridgestone Potenzas, broken 914 (rubber) tierods and alignment: LEFT FRONT Camber: -1 3/4º Caster: 5 3/8º Toe: 1 15/16º RIGHT FRONT Camber -1 7/8º Caster: 6º Toe: 1 15/16º Total Toe: 3 7/8º Steer Ahead: 0.01º LEFT REAR Camber: -2 1/4º Toe: 3/4º RIGHT REAR Camber: -2 1/8º Toe: -1 9/16º Total Toe: -13/16º Thrust Angle: 1.13º ====================== AFTER: 195/55/15 Fuzions, 930 tierods and alignment: LEFT FRONT Camber: -1 3/8º Caster: 1 5/8º Toe: 3/16º RIGHT FRONT Camber: -1 3/8º Caster: 5 1/2º Toe: 1/8º Total Toe: -11/16º Steer Ahead: 0.02º LEFT REAR Camber: -2 1/8º Toe: 11/16º RIGHT REAR: Camber: -1 7/8º Toe: -1 3/8º Total Toe: -11/16º Thrust Angle: 1.05º ====================== So... anyone care to translate? heh... |
|
|
|
| pek771 |
Jan 8 2006, 07:49 PM
Post
#16
|
|
Member Group: Members Posts: 273 Joined: 23-November 05 From: Conover, NC Member No.: 5,175 Region Association: None |
Ok, here's some pix of the inside of the suspension console. You can see that the mating surfaces of the two pieces of sheet metal which form the ear are actually the shape of a two frustrums of cones (sorry to be geeky; approximately hourglass shaped). So, I suppose when the hole gets wallowed out a bit, you lose some structural integrity. Iwould also imagine that the hing would make a god-awful noise when you hit some bumps and unloaded the spring.
Brent, that rust is just a bit of minor oxidation which was made a bit worse by the 8 jillion patches the PO put in. I'll start a thread on this one soon. Pat Attached image(s) 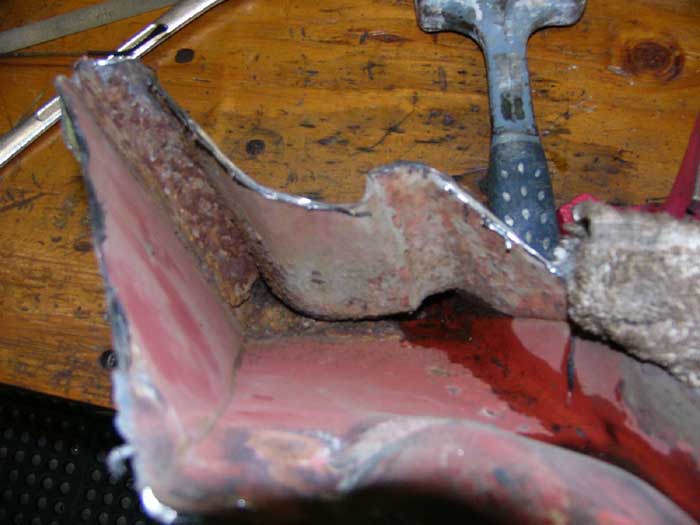
|
|
|
|
| pek771 |
Jan 8 2006, 07:51 PM
Post
#17
|
|
Member Group: Members Posts: 273 Joined: 23-November 05 From: Conover, NC Member No.: 5,175 Region Association: None |
That was a crappy picture. Maybe this one is better
Attached image(s) 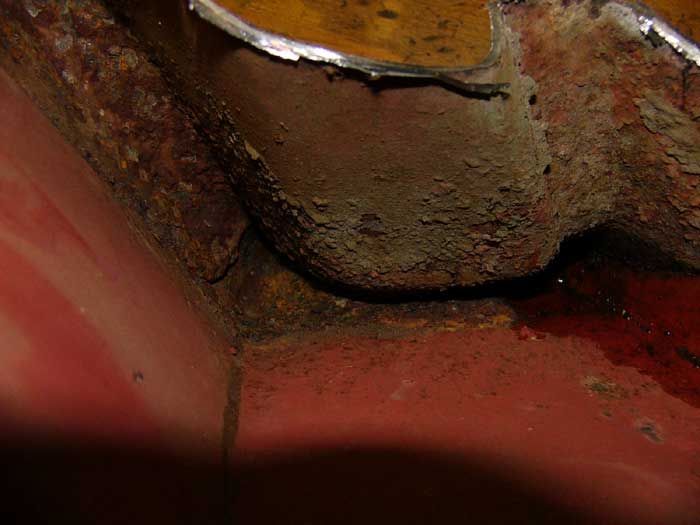
|
|
|
|
|
1 User(s) are reading this topic (1 Guests and 0 Anonymous Users)
0 Members:

|
Lo-Fi Version | Time is now: 1st June 2024 - 05:58 AM |
Invision Power Board
v9.1.4 © 2024 IPS, Inc.