|
|
|
Porsche, and the Porsche crest are registered trademarks of Dr. Ing. h.c. F. Porsche AG.
This site is not affiliated with Porsche in any way. Its only purpose is to provide an online forum for car enthusiasts. All other trademarks are property of their respective owners. |
|
|


| PeeGreen 914 |
 Apr 29 2009, 11:22 PM Apr 29 2009, 11:22 PM
Post
#1
|
|
Just when you think you're done...wait, there is more..lol  Group: Members Posts: 10,219 Joined: 21-September 06 From: Seattle, WA... actually Everett Member No.: 6,884 Region Association: Pacific Northwest |
So I am at the stage where it is time to put everything back together and get it in my car. I have a new Rich Johnson accelerator linkage but I can't figure out how to get it on there. I have seen pictures of some people boxes but mine intermediate plate has something there's didn't. What do I do?
I know I need to drill and tap where I circled in green. The yellow I know is where it slips on the stud. The red/ pink (or whatever color it is) is the area I don't see on other boxes. Attached image(s) 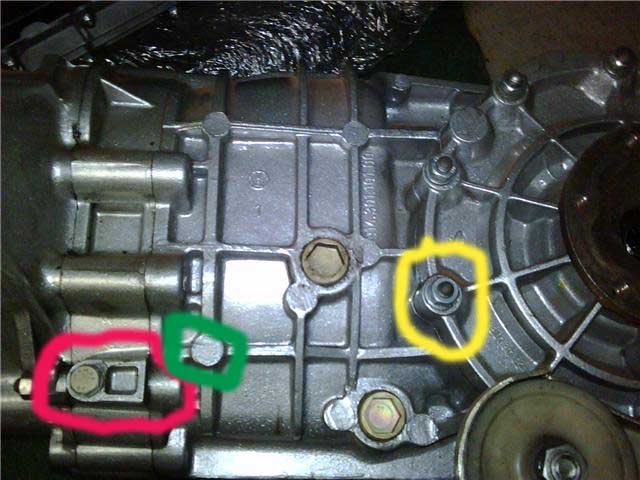
|
   |

 
|
  |
Replies(1 - 8)
| jt914-6 |
Apr 30 2009, 04:25 AM
Post
#2
|
|
Driving & working on teeners 41 years Group: Members Posts: 1,786 Joined: 3-May 08 From: Bryant, Arkansas Member No.: 9,003 Region Association: South East States |
Jon, the area in green does not get tapped out. It's the area in pink, but is that a bolt head I see in the pic? If so, it is already tapped out if it has a bolt there. The pic of mine is from an orignal six converted to side shift........
 |
|
|
|
| sixnotfour |
Apr 30 2009, 05:07 AM
Post
#3
|
|
914 Wizard Group: Members Posts: 10,433 Joined: 12-September 04 From: Life Elevated..planet UT. Member No.: 2,744 Region Association: Rocky Mountains |
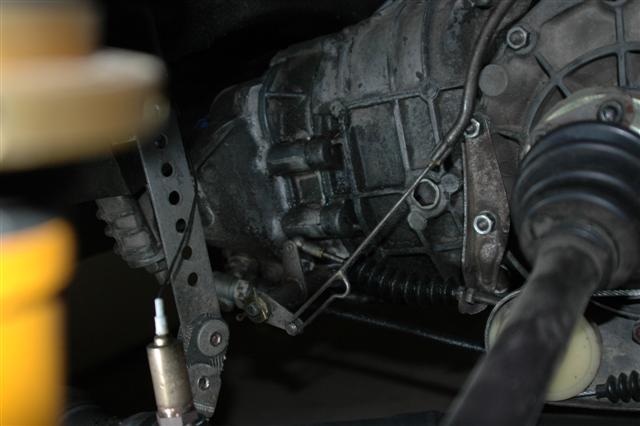
Maybe the pivot stud on Rich's will thread into the boss, then you wont need to drill and tap . If not remove the bolt for clearance and follow the directions below.
Rich's instructions. 1. Find the transmission side cover stud that is positioned at 8 o'clock. This will be the forward mounting stud for the bell-crank bracket. Double jamb-nut it and remove it. Use some Locktite 242 (blue) and reinstall it so it has a length of 18mm (aprox 11/16") exposed. 2. Locate the stud boss on the side of the transmission that is in-line with the 8 o'clock stud and the center of the transmission's output flange. This is the boss that will be used to mount the stud provided with the kit. It will be the rear mounting point of the bracket. Reference the picture if you have any questions. 3. Center punch the boss. Use a 3/16" drill and mark it 5/8" from its tip with a felt marker. This will be used to reference how deep you will be drilling into the trans. case. Carefully (soft alloy) drill the case with the 3/16's" bit making sure you drill square to the case. This is important so the stud installs correctly. Carefully (soft alloy) re-drill the hole with a 17/64" drill. Tap the hole with an 8mm X 1.25 tap. 4. Use the stud provided (8mm X 1.25) and install it to the 1/2 hole depth using some Locktite 242 to keep it in. Install the spacer nut. 5. Mount the bell-crank bracket and adjust. Attached image(s) 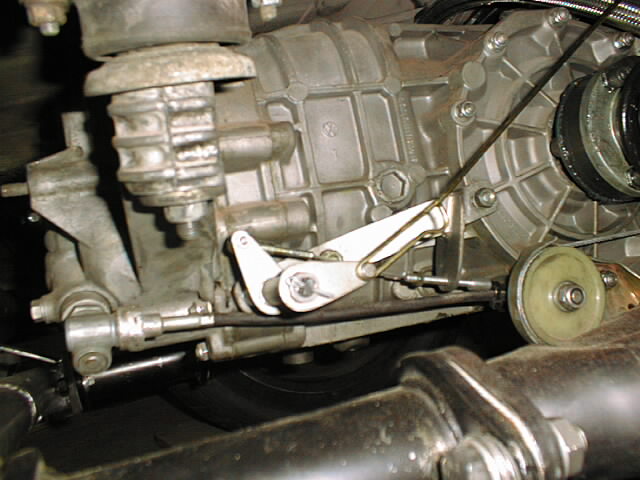
|
|
|
|
| PeeGreen 914 |
Apr 30 2009, 10:10 AM
Post
#4
|
|
Just when you think you're done...wait, there is more..lol Group: Members Posts: 10,219 Joined: 21-September 06 From: Seattle, WA... actually Everett Member No.: 6,884 Region Association: Pacific Northwest |
Thanks Jeff (IMG:style_emoticons/default/piratenanner.gif) I knew you'd have the answer.
|
|
|
|
| PeeGreen 914 |
Apr 30 2009, 04:09 PM
Post
#5
|
|
Just when you think you're done...wait, there is more..lol Group: Members Posts: 10,219 Joined: 21-September 06 From: Seattle, WA... actually Everett Member No.: 6,884 Region Association: Pacific Northwest |
So does this mean I actually have a 6 billet plate?
|
|
|
|
| thesey914 |
Apr 30 2009, 04:27 PM
Post
#6
|
|
Senior Member Group: Benefactors Posts: 1,155 Joined: 1-January 03 From: Staffordshire -England Member No.: 66 |
From what I've read some of the 4cyl's were tapped also. Mine wasn't, so I tapped it and made my own post.
(IMG:http://thesey.com/pictures/bellcrank20.jpg) (IMG:http://thesey.com/pictures/bellcrank21.jpg) (IMG:http://thesey.com/pictures/bellcrank23.jpg) (IMG:http://thesey.com/pictures/bellcrank22.jpg) (IMG:http://thesey.com/pictures/bellcrank24.jpg) |
|
|
|
| PeeGreen 914 |
Apr 30 2009, 04:35 PM
Post
#7
|
|
Just when you think you're done...wait, there is more..lol Group: Members Posts: 10,219 Joined: 21-September 06 From: Seattle, WA... actually Everett Member No.: 6,884 Region Association: Pacific Northwest |
So can I just helicoil it then if it is stripped? I can see it goes to where the stud goes through but there is no fluid travel in the area back there right? (IMG:style_emoticons/default/confused24.gif)
|
|
|
|
| carr914 |
Apr 30 2009, 07:47 PM
Post
#8
|
|
Racer from Birth Group: Members Posts: 118,899 Joined: 2-February 04 From: Tampa,FL Member No.: 1,623 Region Association: South East States |
QUOTE(Phoenix 914-6GT @ Apr 30 2009, 06:09 PM)  So does this mean I actually have a 6 billet plate? According to Dr Evil, all early 914s had the boss in the intermediate plate. Only the -6s utilized it. T.C. |
|
|
|
| thesey914 |
May 1 2009, 01:40 AM
Post
#9
|
|
Senior Member Group: Benefactors Posts: 1,155 Joined: 1-January 03 From: Staffordshire -England Member No.: 66 |
There is a cavity behind the thread, but no oil will leak and you will not expose your oil to metal swarf.
If you keep going you'll get through to the oil eventually (IMG:style_emoticons/default/wink.gif) |
|
|
|
|
1 User(s) are reading this topic (1 Guests and 0 Anonymous Users)
0 Members:

|
Lo-Fi Version | Time is now: 31st May 2024 - 11:32 PM |
Invision Power Board
v9.1.4 © 2024 IPS, Inc.