|
|
|
Porsche, and the Porsche crest are registered trademarks of Dr. Ing. h.c. F. Porsche AG.
This site is not affiliated with Porsche in any way. Its only purpose is to provide an online forum for car enthusiasts. All other trademarks are property of their respective owners. |
|
|


| MrKona |
 Dec 14 2007, 09:19 PM Dec 14 2007, 09:19 PM
Post
#1
|
|
Senior Member  Group: Members Posts: 597 Joined: 25-July 05 From: Santa Rosa, CA Member No.: 4,469 Region Association: None |
I talked about building up a 2.0 last winter, and now I'm finally going to do it. This is my first engine build, hence it'll be conservative and relatively stock. My only plan with the car is to have a nice, reliable, well constructed engine. I thought about a 2056, but I finally decided to stay with 94mm cylinders. I really don't want to have to tweak with FI or fiddle with cam selection right now. I've read that Jake's 9550 cam is excellent, but also that it produced dirty emissions. I'd like to keep this engine as clean as a type 4 can be. I'm also a little confused if Jake is even selling cams at the moment, so I've just decided to go with a stock grind.
My current engine is a PO rebuilt 1.8 with hydraulic lifters (with one that won't prime, sounds horrible, I can't wait to be done with them). Highlights: GA case Stock displacement (with new Euro spec pistons) Stock grind Webcam and with solid lifters (both new) For now, I'm going to cannibalize the rebuilt 1.8 heads from my current engine, unless I find a deal on decent rebuild 2.0 heads during the build. I would love to buy a pair of Raby heads, just can't swallow the extra two grand at the moment. L-jet fuel injection from my 1.8. (I have some issues to work out here, running really rich. No vacuum leaks that I can find. I have to check the fuel pressure - I'm thinking either AFM or pressure regulator as next areas to check). From what I've read on many threads here and other sites, the L-jet can handle up to a 2056 displacement. I'll keep this thread updated this winter as I work through this rebuild. I don't know how long a project this will be or how quickly I may get it done. Current progress: Jake Raby rebuild DVD - Check. Tom Wilson's book - Check. I've split the case and and planning on bringing the case, crank, and rods for reconditioning to Dan Hall's Machine Shop here in Portland. After reading various forums, this appears to be the Type IV specialist in this area. Brand new Euro-spec P/C set - Check! (IMG:style_emoticons/default/smile.gif) So now for my first question: Regarding the existing cylinder studs, Tom Wilson writes, "Unless you're installing case savers, don't remove the cylinder studs from the case. Doing so has no purpose, but does wear the potentially troublesome case threads, takes time, and stresses the studs" (p. 76). In the assembly section, he states "If the cylinder studs were removed for some reason, install them now. Apply Permatex 3H to their threads to stop oil leaks" (p. 120). I don't know the history of this case. I don't know if there was leakage at the head studs. Should I remove the studs, and reinstall with Permatex (after the case comes back from the machine shop, obviously) as a precaution to prevent potential leakage? Or should I just leave them be as is? Does it really put that much stress on the case to remove them, or is Wilson referring primarily to the Type I-III magnesium cases? I am leaning to toward remove and reinstall, as I strongly intend for this engine to be leak-free. Lastly, as I work through this process, I welcome and encourage comments. Please, if you see something I'm doing wrong, or have advice for me, give it to me! I can probably use it! (IMG:style_emoticons/default/rolleyes.gif) Attached image(s) 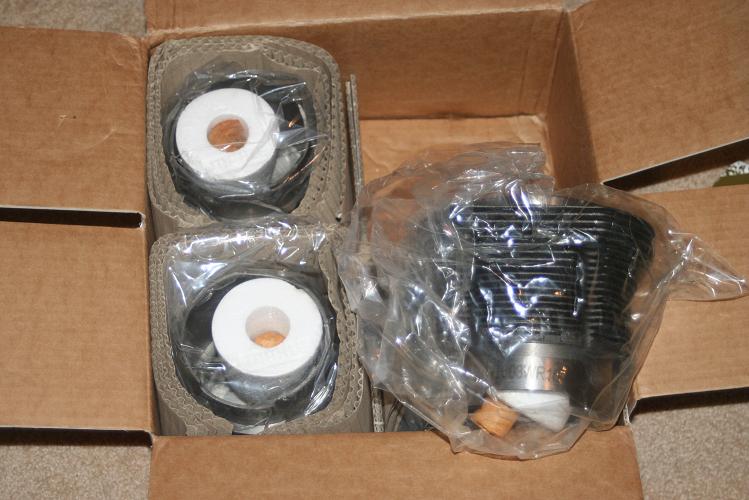 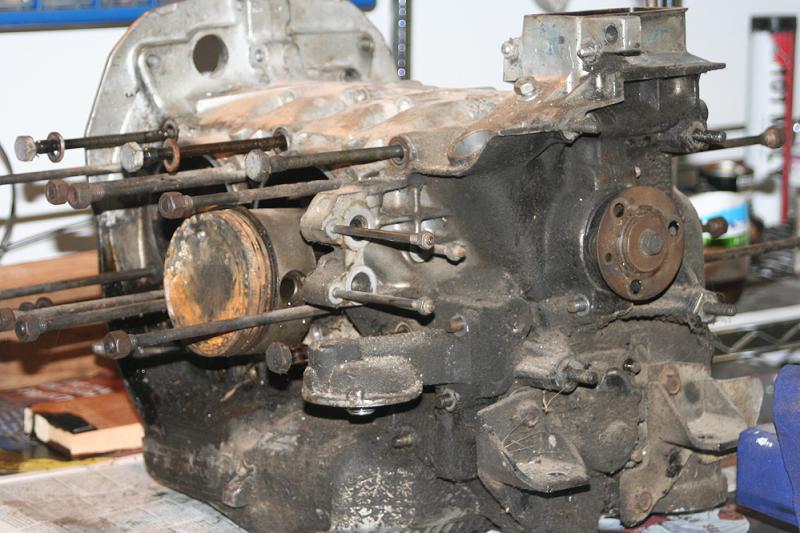
|
   |

 
|
  |
Replies
| MrKona |
May 26 2008, 01:06 AM
Post
#2
|
|
Senior Member Group: Members Posts: 597 Joined: 25-July 05 From: Santa Rosa, CA Member No.: 4,469 Region Association: None |
A little setback tonight, due to what looks design flaw with my engine stand mount. Although before I can say for sure, please take a look at these pictures and tell me if I'm missing something here...
I installed p/c #4 first so that I could drive the piston pin toward the fan side of the engine, due to the oil cooler mount. Next is #3. However, as I slide the p/c assembly on, the piston pin hits my engine stand. (IMG:style_emoticons/default/WTF.gif) I looked at pictures of other stands, and I notice that they have an indentation cut out at that spot, for what I assume is the #3 piston pin. They are thicker, from the looks of it to maintain strength despite the cut-out indentation. I picked this stand up on Ebay from a local USA made company with really good feedback. I have a hard time believing that I'm the first person to notice this "flaw". Am I just not seeing the obvious, or do I really need to remove this engine from the stand just to install the #3 piston pin? (IMG:style_emoticons/default/blink.gif) Attached thumbnail(s) 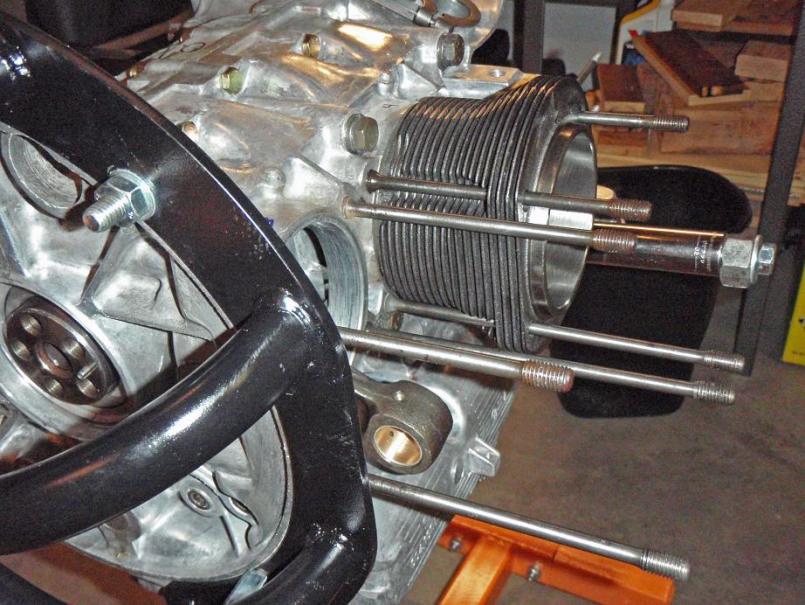 Attached image(s) 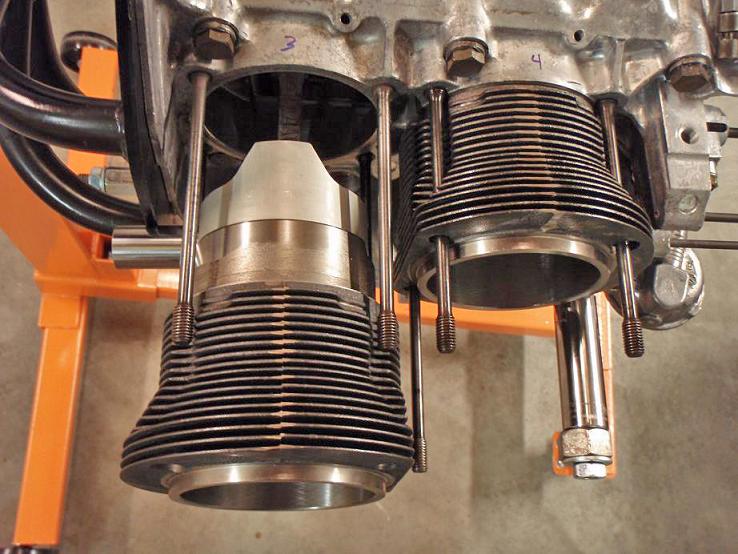
|
|
|
|
Posts in this topic
 MrKona The start of my 2.0 build Dec 14 2007, 09:19 PM
 MrKona Oh yeah, forgot to mention that I bought the case ... Dec 14 2007, 09:25 PM toon1 Where did you hear the 9550 cam put out "dirt... Dec 14 2007, 10:12 PM
 MrKona
Where did you hear the 9550 cam put out "dir... Dec 14 2007, 11:16 PM Dan (Almaden Valley) I built a 2056 last winter.
Mahle 94 MM barrels p... Dec 14 2007, 10:25 PM MrKona
I built a 2056 last winter.
Mahle 94 MM barrels ... Dec 14 2007, 11:21 PM Jake Raby
Cool.. But the stock combo certainly isn't th... Dec 14 2007, 11:31 PM blitZ I did my first engine rebuild the summer of 76 wit... Dec 15 2007, 08:15 PM Bleyseng
I did my first engine rebuild the summer of 76 wi... Dec 15 2007, 11:53 PM MrKona Small progress update.
Parts - I'm buying a r... Dec 24 2007, 05:57 PM hydroliftin
I plan on sticking with my already acquired 94mm... Dec 24 2007, 07:04 PM MrKona
I plan on sticking with my already acquired 94m... Dec 24 2007, 07:32 PM MrKona Update on my engine build... The case, crank, and ... Mar 19 2008, 12:10 AM MrKona More... Mar 19 2008, 12:12 AM MrKona More... Mar 19 2008, 12:15 AM craig downs Looks like your on the way to have a good running ... Mar 19 2008, 12:38 AM PBritain what did you use to clean the case?
looks incredi... Mar 19 2008, 12:49 AM MrKona
what did you use to clean the case?
looks incred... Mar 19 2008, 09:11 AM Jake Raby Lookin good!
I like the cleaned threads on th... Mar 19 2008, 09:15 AM MrKona
Lookin good!
I like the cleaned threads on t... Mar 19 2008, 09:19 AM Jake Raby Excelent..
Stay away from shop rags filled with l... Mar 19 2008, 09:29 AM Vacca Rabite That crank bracket is brilliant. I wish that I ha... Mar 19 2008, 10:14 AM 6freak
That crank bracket is brilliant. I wish that I h... May 29 2008, 01:27 PM MrKona So tonight was a good night, after months of amass... Mar 22 2008, 01:15 AM MrKona More... Mar 22 2008, 01:16 AM Gint Cool thread. Thanks for taking the time to post y... Mar 22 2008, 08:36 AM MrKona
Cool thread. Thanks for taking the time to post ... Mar 23 2008, 12:34 AM MrKona A little more progress tonight. I fastened the cam... Mar 23 2008, 12:47 AM Walter Cool! What cam did ou end up with?
I like the ... Mar 23 2008, 07:17 AM MrKona
Cool! What cam did ou end up with?
I like the... Mar 23 2008, 11:46 AM MrKona Slowly, but surely, progress marches on, and it... Apr 3 2008, 11:54 PM Todd Enlund Looking killer, dude! :headbanger: Apr 4 2008, 01:00 AM MrKona Today I installed the oil pump (modified type 1), ... Apr 6 2008, 01:08 AM MrKona Beauty shots... Apr 6 2008, 01:10 AM JRust Hard to believe that was the engine I sold you. Im... Apr 19 2008, 06:23 AM MrKona
Hard to believe that was the engine I sold you. I... Apr 19 2008, 10:33 AM powdercoater Now that you will that killer rebuild, have you co... Apr 19 2008, 10:25 AM MrKona
Now that you will that killer rebuild, have you c... Apr 19 2008, 10:52 AM powdercoater For the tin if you want to have it factory looking... Apr 19 2008, 12:41 PM MrKona
For the tin if you want to have it factory lookin... Apr 19 2008, 01:50 PM MrKona It's been just over a month since I've pos... May 23 2008, 06:32 PM MrKona More... May 23 2008, 06:34 PM MrKona More... May 23 2008, 06:34 PM rhodyguy bryan, powdercoating for the duct pieces, warm air... May 23 2008, 10:22 PM MrKona
bryan, powdercoating for the duct pieces, warm ai... May 23 2008, 11:11 PM Jake Raby Even I am impressed with how sterile the engine is... May 24 2008, 06:19 AM MrKona
Even I am impressed with how sterile the engine i... May 24 2008, 12:11 PM MrKona Problem solved... I had to remove the engine from ... May 27 2008, 12:20 AM MrKona Tonight I experienced the thrill of victory, which... May 27 2008, 12:27 AM jmill Great thread. Thanks for sharing. I'm planni... May 27 2008, 02:04 PM MrKona
Great thread. Thanks for sharing. I'm plann... May 28 2008, 12:07 AM Jake Raby
And I do go over that in detail, in my TIV engin... May 28 2008, 06:23 AM MrKona
And I do go over that in detail, in my TIV engi... May 30 2008, 12:12 AM purple Nice thread....has me really wanting to build my o... May 28 2008, 10:21 AM MrKona
Nice thread....has me really wanting to build my ... May 30 2008, 12:07 AM Phoenix914 Your engine looks fantastic. Please keep us updat... May 30 2008, 06:24 AM MrKona I have got to spend a few hours on the engine toda... Jun 1 2008, 01:47 AM MrKona And on went the cylinders. It was easy to install ... Jun 1 2008, 01:54 AM MrKona Pistons/Cylinders... Jun 1 2008, 01:55 AM MrKona Next up was the installation of the cylinder heads... Jun 1 2008, 02:06 AM MrKona Next was the pushrod tube installation. As everyon... Jun 1 2008, 02:12 AM MrKona And that's all for tonight! Jun 1 2008, 02:16 AM SGB looks great! Jun 1 2008, 10:37 PM MrKona It's been awhile since I posted any progress. ... Aug 4 2008, 02:03 AM MrKona More... Aug 4 2008, 02:05 AM MrKona Last ones. Aug 4 2008, 02:06 AM MrKona Valves installed and adjusted. I've come as fa... Aug 6 2008, 08:34 PM Rav914 Great thread. I've been following closely as ... Aug 6 2008, 09:38 PM MrKona Gotta keep this thread alive... Just a tiny bit of... Feb 7 2009, 01:27 AM MrKona Also blasted and painted the thermostat mount and ... Feb 7 2009, 01:33 AM type47 i enjoy reading your thread of the build up and as... Feb 7 2009, 06:33 AM MrKona
i enjoy reading your thread of the build up and a... Feb 7 2009, 06:27 PM FourBlades Wow, your engine looks great.
Your photos are so ... Feb 7 2009, 10:12 PM MrKona
Wow, your engine looks great.
Your photos are so... Dec 27 2009, 08:29 PM bobhasissues
Can you show how to set the valve clearance?
A... Feb 26 2010, 08:48 PM MrKona The engine is off the stand and tin and FI compone... Dec 27 2009, 08:01 PM MrKona Then the fan shroud and fan.
You may want to temp... Dec 27 2009, 08:03 PM MrKona Then I attached the cooling flaps and thermostat c... Dec 27 2009, 08:11 PM MrKona And then the top tins! I had to remove the dis... Dec 27 2009, 08:16 PM MrKona And this is where my momentum stopped... I acquire... Dec 27 2009, 08:19 PM MrKona But they don't fit the intake housing! :a... Dec 27 2009, 08:23 PM Cevan
But they don't fit the intake housing! :... Feb 26 2010, 01:35 PM Thomas J Bliznik
But they don't fit the intake housing! ... Feb 26 2010, 01:51 PM Thomas J Bliznik
[quote name='Cevan' post='1279461' date='Feb 26 2... Feb 26 2010, 03:10 PM enikolayev Regarding the oil galley plugs, before you tap the... Jan 30 2010, 08:40 PM MrKona I'm back after having worked on "project ... Mar 22 2010, 02:44 PM MrKona And one more of both runners installed..
http://w... Mar 22 2010, 02:54 PM MrKona An update of the latest status of my engine rebuil... Apr 18 2010, 10:28 PM MrKona A couple more shots of the engine before it goes i... Apr 18 2010, 10:30 PM Phoenix914 Your engine is a work of art, my friend. :headbang... Apr 19 2010, 09:00 AM rwilner I am unearthing this thread for 2 reasons
1) this... Sep 26 2011, 07:08 PM
MrKona
Where did you hear the 9550 cam put out "dir... Dec 14 2007, 11:16 PM Dan (Almaden Valley) I built a 2056 last winter.
Mahle 94 MM barrels p... Dec 14 2007, 10:25 PM MrKona
I built a 2056 last winter.
Mahle 94 MM barrels ... Dec 14 2007, 11:21 PM Jake Raby
Cool.. But the stock combo certainly isn't th... Dec 14 2007, 11:31 PM blitZ I did my first engine rebuild the summer of 76 wit... Dec 15 2007, 08:15 PM Bleyseng
I did my first engine rebuild the summer of 76 wi... Dec 15 2007, 11:53 PM MrKona Small progress update.
Parts - I'm buying a r... Dec 24 2007, 05:57 PM hydroliftin
I plan on sticking with my already acquired 94mm... Dec 24 2007, 07:04 PM MrKona
I plan on sticking with my already acquired 94m... Dec 24 2007, 07:32 PM MrKona Update on my engine build... The case, crank, and ... Mar 19 2008, 12:10 AM MrKona More... Mar 19 2008, 12:12 AM MrKona More... Mar 19 2008, 12:15 AM craig downs Looks like your on the way to have a good running ... Mar 19 2008, 12:38 AM PBritain what did you use to clean the case?
looks incredi... Mar 19 2008, 12:49 AM MrKona
what did you use to clean the case?
looks incred... Mar 19 2008, 09:11 AM Jake Raby Lookin good!
I like the cleaned threads on th... Mar 19 2008, 09:15 AM MrKona
Lookin good!
I like the cleaned threads on t... Mar 19 2008, 09:19 AM Jake Raby Excelent..
Stay away from shop rags filled with l... Mar 19 2008, 09:29 AM Vacca Rabite That crank bracket is brilliant. I wish that I ha... Mar 19 2008, 10:14 AM 6freak
That crank bracket is brilliant. I wish that I h... May 29 2008, 01:27 PM MrKona So tonight was a good night, after months of amass... Mar 22 2008, 01:15 AM MrKona More... Mar 22 2008, 01:16 AM Gint Cool thread. Thanks for taking the time to post y... Mar 22 2008, 08:36 AM MrKona
Cool thread. Thanks for taking the time to post ... Mar 23 2008, 12:34 AM MrKona A little more progress tonight. I fastened the cam... Mar 23 2008, 12:47 AM Walter Cool! What cam did ou end up with?
I like the ... Mar 23 2008, 07:17 AM MrKona
Cool! What cam did ou end up with?
I like the... Mar 23 2008, 11:46 AM MrKona Slowly, but surely, progress marches on, and it... Apr 3 2008, 11:54 PM Todd Enlund Looking killer, dude! :headbanger: Apr 4 2008, 01:00 AM MrKona Today I installed the oil pump (modified type 1), ... Apr 6 2008, 01:08 AM MrKona Beauty shots... Apr 6 2008, 01:10 AM JRust Hard to believe that was the engine I sold you. Im... Apr 19 2008, 06:23 AM MrKona
Hard to believe that was the engine I sold you. I... Apr 19 2008, 10:33 AM powdercoater Now that you will that killer rebuild, have you co... Apr 19 2008, 10:25 AM MrKona
Now that you will that killer rebuild, have you c... Apr 19 2008, 10:52 AM powdercoater For the tin if you want to have it factory looking... Apr 19 2008, 12:41 PM MrKona
For the tin if you want to have it factory lookin... Apr 19 2008, 01:50 PM MrKona It's been just over a month since I've pos... May 23 2008, 06:32 PM MrKona More... May 23 2008, 06:34 PM MrKona More... May 23 2008, 06:34 PM rhodyguy bryan, powdercoating for the duct pieces, warm air... May 23 2008, 10:22 PM MrKona
bryan, powdercoating for the duct pieces, warm ai... May 23 2008, 11:11 PM Jake Raby Even I am impressed with how sterile the engine is... May 24 2008, 06:19 AM MrKona
Even I am impressed with how sterile the engine i... May 24 2008, 12:11 PM MrKona Problem solved... I had to remove the engine from ... May 27 2008, 12:20 AM MrKona Tonight I experienced the thrill of victory, which... May 27 2008, 12:27 AM jmill Great thread. Thanks for sharing. I'm planni... May 27 2008, 02:04 PM MrKona
Great thread. Thanks for sharing. I'm plann... May 28 2008, 12:07 AM Jake Raby
And I do go over that in detail, in my TIV engin... May 28 2008, 06:23 AM MrKona
And I do go over that in detail, in my TIV engi... May 30 2008, 12:12 AM purple Nice thread....has me really wanting to build my o... May 28 2008, 10:21 AM MrKona
Nice thread....has me really wanting to build my ... May 30 2008, 12:07 AM Phoenix914 Your engine looks fantastic. Please keep us updat... May 30 2008, 06:24 AM MrKona I have got to spend a few hours on the engine toda... Jun 1 2008, 01:47 AM MrKona And on went the cylinders. It was easy to install ... Jun 1 2008, 01:54 AM MrKona Pistons/Cylinders... Jun 1 2008, 01:55 AM MrKona Next up was the installation of the cylinder heads... Jun 1 2008, 02:06 AM MrKona Next was the pushrod tube installation. As everyon... Jun 1 2008, 02:12 AM MrKona And that's all for tonight! Jun 1 2008, 02:16 AM SGB looks great! Jun 1 2008, 10:37 PM MrKona It's been awhile since I posted any progress. ... Aug 4 2008, 02:03 AM MrKona More... Aug 4 2008, 02:05 AM MrKona Last ones. Aug 4 2008, 02:06 AM MrKona Valves installed and adjusted. I've come as fa... Aug 6 2008, 08:34 PM Rav914 Great thread. I've been following closely as ... Aug 6 2008, 09:38 PM MrKona Gotta keep this thread alive... Just a tiny bit of... Feb 7 2009, 01:27 AM MrKona Also blasted and painted the thermostat mount and ... Feb 7 2009, 01:33 AM type47 i enjoy reading your thread of the build up and as... Feb 7 2009, 06:33 AM MrKona
i enjoy reading your thread of the build up and a... Feb 7 2009, 06:27 PM FourBlades Wow, your engine looks great.
Your photos are so ... Feb 7 2009, 10:12 PM MrKona
Wow, your engine looks great.
Your photos are so... Dec 27 2009, 08:29 PM bobhasissues
Can you show how to set the valve clearance?
A... Feb 26 2010, 08:48 PM MrKona The engine is off the stand and tin and FI compone... Dec 27 2009, 08:01 PM MrKona Then the fan shroud and fan.
You may want to temp... Dec 27 2009, 08:03 PM MrKona Then I attached the cooling flaps and thermostat c... Dec 27 2009, 08:11 PM MrKona And then the top tins! I had to remove the dis... Dec 27 2009, 08:16 PM MrKona And this is where my momentum stopped... I acquire... Dec 27 2009, 08:19 PM MrKona But they don't fit the intake housing! :a... Dec 27 2009, 08:23 PM Cevan
But they don't fit the intake housing! :... Feb 26 2010, 01:35 PM Thomas J Bliznik
But they don't fit the intake housing! ... Feb 26 2010, 01:51 PM Thomas J Bliznik
[quote name='Cevan' post='1279461' date='Feb 26 2... Feb 26 2010, 03:10 PM enikolayev Regarding the oil galley plugs, before you tap the... Jan 30 2010, 08:40 PM MrKona I'm back after having worked on "project ... Mar 22 2010, 02:44 PM MrKona And one more of both runners installed..
http://w... Mar 22 2010, 02:54 PM MrKona An update of the latest status of my engine rebuil... Apr 18 2010, 10:28 PM MrKona A couple more shots of the engine before it goes i... Apr 18 2010, 10:30 PM Phoenix914 Your engine is a work of art, my friend. :headbang... Apr 19 2010, 09:00 AM rwilner I am unearthing this thread for 2 reasons
1) this... Sep 26 2011, 07:08 PM |
1 User(s) are reading this topic (1 Guests and 0 Anonymous Users)
0 Members:

|
Lo-Fi Version | Time is now: 2nd April 2026 - 09:43 AM |
Invision Power Board
v9.1.4 © 2026 IPS, Inc.