|
|
|
Porsche, and the Porsche crest are registered trademarks of Dr. Ing. h.c. F. Porsche AG.
This site is not affiliated with Porsche in any way. Its only purpose is to provide an online forum for car enthusiasts. All other trademarks are property of their respective owners. |
|
|


| Gudhjem |
 Aug 28 2010, 04:59 PM Aug 28 2010, 04:59 PM
Post
#1
|
|
Member  Group: Members Posts: 133 Joined: 29-March 07 From: Castro Valley, CA Member No.: 7,629 Region Association: Northern California |
I've had bubbling showing through on both sides of the fender-cowl seem, which was welded together by the PO. So I knew I had some problems, and finally started digging in. Here are a few pics of what I found:
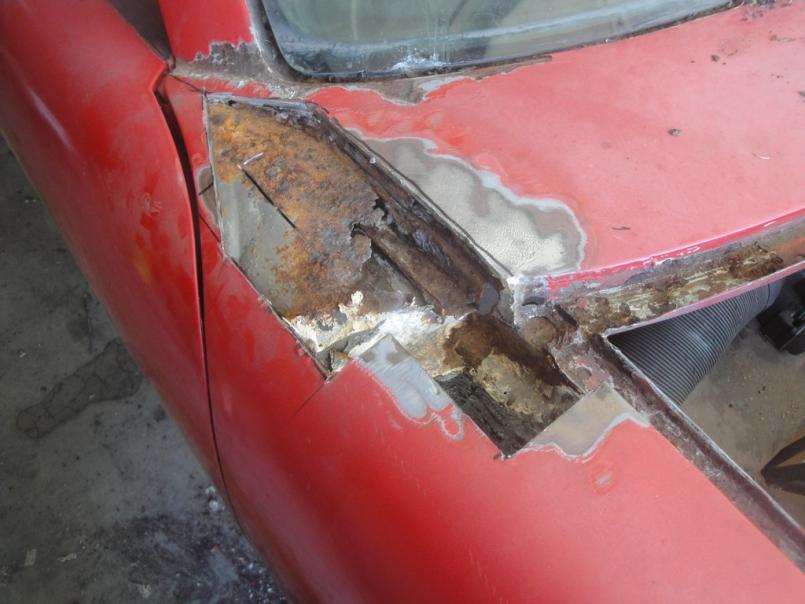 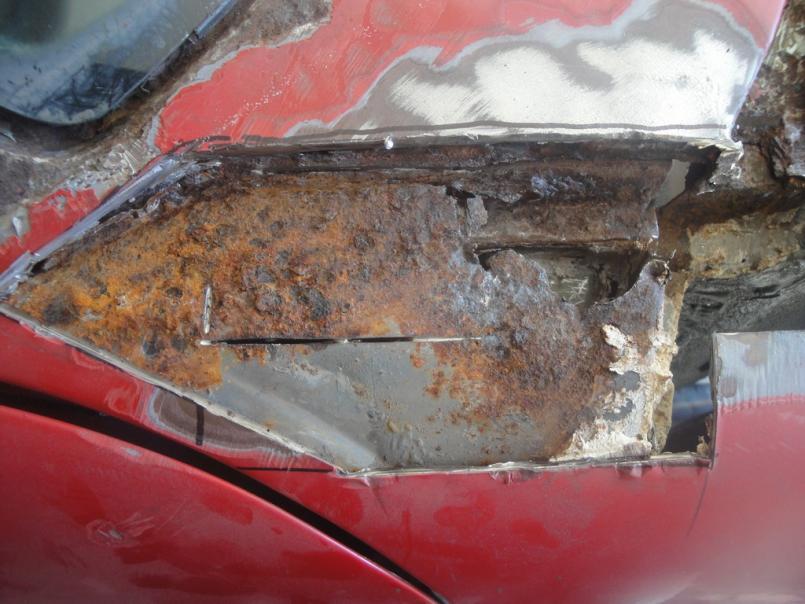 I know. (IMG:style_emoticons/default/barf.gif) It's not quite as bad as those pics make it look (I hope) since the rust seems to be localized to the area right at the former cowl seems, which look like they were welded shut without treating existing rust underneath. Other than right in the corners, the hood channels, etc. look pretty good. I've been working out how to go about rebuilding this area all week. I'd like to reconstruct the channel, not reweld it closed, and I'd like to do it right, not just cover the problem. Several pieces come together here, and it's not clear to me how it's even possible to weld all of these together, even with the fender removed. How, for example, does one fully-weld the drain channel so that it doesn't invite water seeping in the seams that are left? I've scoured the sites for rebuild threads that include this area, and found several good ones with helpful pics of the area (Michelko's Digging into Hell, Bringing out the Dead, among others). I haven't been able to figure out exactly how all these restoration heroes went about this fix. I'm wondering if anyone has pics of this area that clearly show the construction. I think I have it deciphered, but not 100% sure since mine was already repaired and welded shut. Maybe someone can share some wisdom on how to go about the reconstruction? Specifically what to weld to what, etc. (IMG:style_emoticons/default/welder.gif) --Steve |
   |

 
|
  |
Replies
| MLedesma |
Aug 29 2010, 09:24 PM
Post
#2
|
|
Member Group: Members Posts: 52 Joined: 13-October 06 From: Elizabeth, CO Member No.: 7,036 Region Association: Rocky Mountains |
I too am working this area on my car. Let this be a warning not to use body filler in this area! The car was painted a while back and they used filler which cracked and allowed moisture in, and the resulting rust.
Please be careful and use proper protective eauipment when grinding, welding, or sanding here. I don't know if it is because I have an early car (71) or not, but I have lead filler in the cowl area. From what I have read most people melt and wire brush it to remove. I thought my metal was in good shape till I removed some of the lead. In my pictures the blue circle is where I have found lead, and the red circle is the step down to the area in which some of it has been removed. Picture of the passenger side. 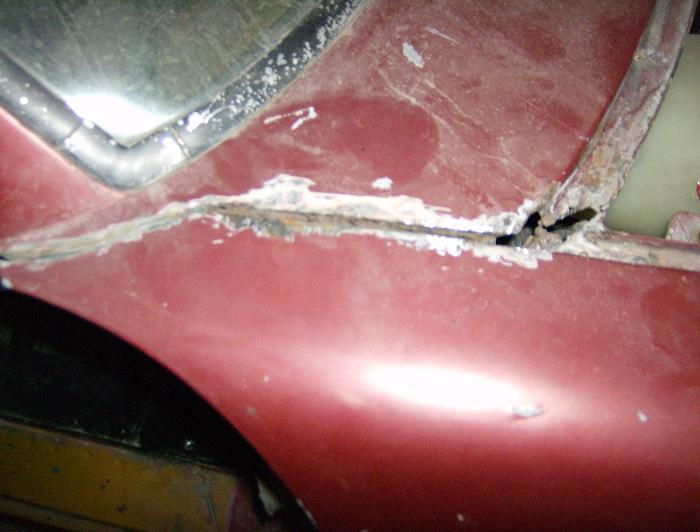 Where I am at now. 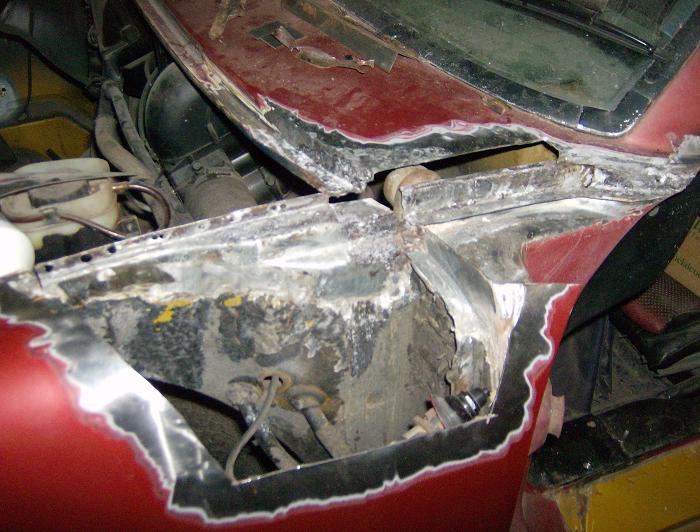 Little detail on the leaded area. 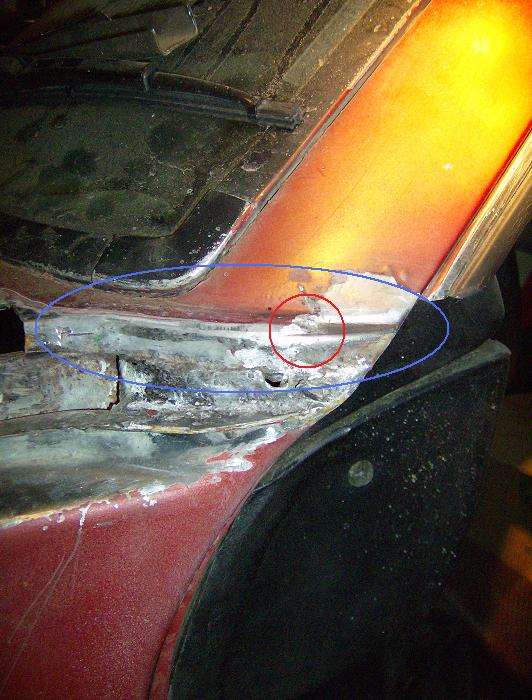 |
|
|
|
Posts in this topic
 Gudhjem Fender-Cowl repair. Advice needed! Aug 28 2010, 04:59 PM
 Jeff Hail This guy has been there......
http://www.914worl... Aug 28 2010, 05:26 PM tomeric914 Me too...
http://www.914world.com/bbs2/index.php?... Aug 28 2010, 06:00 PM dlee6204 Me three... HERE Aug 28 2010, 06:17 PM strawman Me too! See post #116 at:
http://www.914world... Aug 28 2010, 09:57 PM Gudhjem Great stuff, thanks for the replies. Some of the ... Aug 29 2010, 12:14 AM dlee6204 :huh: :blink: :wacko:
Hopefully i understand ... Aug 29 2010, 08:13 AM patssle Nice drawing, helps since the fender removal is im... Aug 29 2010, 09:47 AM sean_v8_914 this is the difinitive cowl rebuild reference. the... Aug 29 2010, 09:58 AM Gudhjem Thanks Doug.
Your diagram shows that the gap belo... Aug 29 2010, 10:52 AM strawman If memory serves, it was a factory goober/snot wel... Aug 29 2010, 11:29 AM davesprinkle That channel is a real problem, on two levels -- i... Aug 29 2010, 11:48 AM MLedesma Sorry Gudhjem, I didn't mean to partially hija... Aug 29 2010, 09:45 PM charliew I agree in that if the area has rusted I would tak... Aug 30 2010, 04:21 PM
Jeff Hail This guy has been there......
http://www.914worl... Aug 28 2010, 05:26 PM tomeric914 Me too...
http://www.914world.com/bbs2/index.php?... Aug 28 2010, 06:00 PM dlee6204 Me three... HERE Aug 28 2010, 06:17 PM strawman Me too! See post #116 at:
http://www.914world... Aug 28 2010, 09:57 PM Gudhjem Great stuff, thanks for the replies. Some of the ... Aug 29 2010, 12:14 AM dlee6204 :huh: :blink: :wacko:
Hopefully i understand ... Aug 29 2010, 08:13 AM patssle Nice drawing, helps since the fender removal is im... Aug 29 2010, 09:47 AM sean_v8_914 this is the difinitive cowl rebuild reference. the... Aug 29 2010, 09:58 AM Gudhjem Thanks Doug.
Your diagram shows that the gap belo... Aug 29 2010, 10:52 AM strawman If memory serves, it was a factory goober/snot wel... Aug 29 2010, 11:29 AM davesprinkle That channel is a real problem, on two levels -- i... Aug 29 2010, 11:48 AM MLedesma Sorry Gudhjem, I didn't mean to partially hija... Aug 29 2010, 09:45 PM charliew I agree in that if the area has rusted I would tak... Aug 30 2010, 04:21 PM Gudhjem My plan was to do as Geoff did - replace the metal... Aug 31 2010, 10:27 AM
 |
1 User(s) are reading this topic (1 Guests and 0 Anonymous Users)
0 Members:

|
Lo-Fi Version | Time is now: 2nd April 2026 - 12:00 PM |
Invision Power Board
v9.1.4 © 2026 IPS, Inc.