|
|
|
Porsche, and the Porsche crest are registered trademarks of Dr. Ing. h.c. F. Porsche AG.
This site is not affiliated with Porsche in any way. Its only purpose is to provide an online forum for car enthusiasts. All other trademarks are property of their respective owners. |
|
|


| Bleyseng |
 Mar 28 2004, 07:13 PM Mar 28 2004, 07:13 PM
Post
#1
|
|
Aircooled Baby!  Group: Members Posts: 13,035 Joined: 27-December 02 From: Seattle, Washington (for now) Member No.: 24 Region Association: Pacific Northwest |
Check this out, can you spot the "special" gauge I finally got to work. All OEM 914 stuff no aftermarkter stuff for me!
Attached image(s) 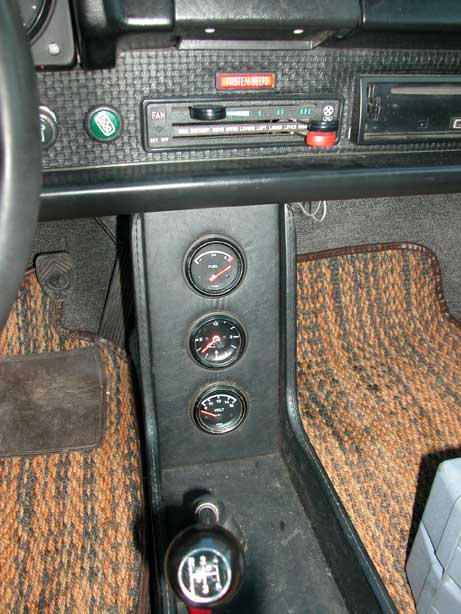
|
   |

 
|
  |
Replies
| Bleyseng |
Mar 28 2004, 07:36 PM
Post
#2
|
|
Aircooled Baby! Group: Members Posts: 13,035 Joined: 27-December 02 From: Seattle, Washington (for now) Member No.: 24 Region Association: Pacific Northwest |
Took me half of the day! I have tried three aftermarket fuel gauges that were supposed to work. I even called and ordered one from AA, nope didn't work. Of course I gave up trying to get my $$ back. SSOOOOOoooo this is how I did it.
1. Take apart your stock fuel gauge and carefully remove all the guts, including the needle without damaging anything. This takes lots of time! 2. Mark on the sensor where + is on it with it felt pen. 3. Take apart your oil temp gauge, note how the sensor is mounted. The fuel sensor needs to be mounted upside down so the needle sweeps right. Install the terminal connection on the back noting where the + is so it lines up. 4.Use this pic to glue over the gauge face after cutting out the holes for the screws and the needle peg is. Carefully as it shows. 5. Install the needle ever so carefully just beyond the E. 6. Install glass and case cover 7. Install in car 8. Extend the wires down to the console good to go. Geoff Oh, to make this face I just scaned it and then Photoshopped it adding the right info and deleting the words "TEMP". I used a high grade brochure paper which glues onto the face plate with spray glue. Attached image(s) 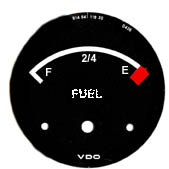
|
|
|
|
Posts in this topic
 Bleyseng Finally got my gauges to all work Mar 28 2004, 07:13 PM
 Bleyseng I needed it so these would work with these. Mar 28 2004, 07:14 PM Qarl Fuel gauge in console Mar 28 2004, 07:15 PM Aaron Cox that is exactly what im doing on my car!!... Mar 28 2004, 07:16 PM Curvie Roadlover :trophy: Mar 28 2004, 07:17 PM Qarl Geoff,
Did you just run an extra wire for the oil... Mar 28 2004, 07:33 PM Bleyseng I use the stock oem oil idiot light wire for the p... Mar 28 2004, 07:40 PM Qarl Are there TWO wires in the stock harness for oil p... Mar 28 2004, 08:12 PM Bleyseng Yes, there are two wires for oil temp and pressure... Mar 28 2004, 08:28 PM rhodyguy "bought from AA" , "gave up..." :rolleyes: . they ... Mar 28 2004, 08:35 PM Bleyseng thats so Monique feels at home, runs around 100... Mar 28 2004, 09:00 PM Bleyseng here is another gauge face Mar 28 2004, 09:27 PM ChrisReale This is a classic thread. I might end up doing th... Mar 28 2004, 10:12 PM Lawrence I agree. Truly classic. :trophy:
Any other inpu... Mar 29 2004, 06:08 AM
Bleyseng I needed it so these would work with these. Mar 28 2004, 07:14 PM Qarl Fuel gauge in console Mar 28 2004, 07:15 PM Aaron Cox that is exactly what im doing on my car!!... Mar 28 2004, 07:16 PM Curvie Roadlover :trophy: Mar 28 2004, 07:17 PM Qarl Geoff,
Did you just run an extra wire for the oil... Mar 28 2004, 07:33 PM Bleyseng I use the stock oem oil idiot light wire for the p... Mar 28 2004, 07:40 PM Qarl Are there TWO wires in the stock harness for oil p... Mar 28 2004, 08:12 PM Bleyseng Yes, there are two wires for oil temp and pressure... Mar 28 2004, 08:28 PM rhodyguy "bought from AA" , "gave up..." :rolleyes: . they ... Mar 28 2004, 08:35 PM Bleyseng thats so Monique feels at home, runs around 100... Mar 28 2004, 09:00 PM Bleyseng here is another gauge face Mar 28 2004, 09:27 PM ChrisReale This is a classic thread. I might end up doing th... Mar 28 2004, 10:12 PM Lawrence I agree. Truly classic. :trophy:
Any other inpu... Mar 29 2004, 06:08 AM Bleyseng Anyone can do it and its easy but also pretty hard... Mar 29 2004, 08:40 AM
 |
1 User(s) are reading this topic (1 Guests and 0 Anonymous Users)
0 Members:

|
Lo-Fi Version | Time is now: 13th June 2024 - 12:38 AM |
Invision Power Board
v9.1.4 © 2024 IPS, Inc.