|
|
|
Porsche, and the Porsche crest are registered trademarks of Dr. Ing. h.c. F. Porsche AG.
This site is not affiliated with Porsche in any way. Its only purpose is to provide an online forum for car enthusiasts. All other trademarks are property of their respective owners. |
|
|


| ruby914 |
 Jan 24 2012, 12:31 PM Jan 24 2012, 12:31 PM
Post
#1
|
|
Senior Member  Group: Members Posts: 720 Joined: 26-April 09 From: Hawthorne, Ca Member No.: 10,305 Region Association: None |
I am now installing my flares and hoped to use very little body filler.
I located the flares, sheet metal screwed, marked off with a sharpie, started the cut with a cutoff wheel, finished with a body saw keeping tabs at the screws, removed paint on both sides, tacked between the tabs and tacked until I could cut off the tabs with a good fit. I continued to tack until about every 3/4". Never ran a weld over 1/2" at a time. I tried to move my welds around to reduce heat. I was happy with my work feeling the flare had more die marks than warping from my welding. So standing back I see something I am not sure I like. This may not just be a welding question but what a factory 914 GT looks like? What I am seeing is, before the flare, flares out, the fender pulls in. I see this mostly in the back of the front flare. I have only cut the 2nd front fender off and I see the remaining fender has pulled in before any welding. This is a first time for me and I am sure there is a lot to be learned with many years in the business. So is the pulling in the norm? In all the beautiful photos of clean lines, how much body filler is reasonable. Is there ways to limit this from the start or is this normally fixed with hammer and dolly as you go? I will try to add a photo of where it is pulling in. Thanks Attached thumbnail(s) 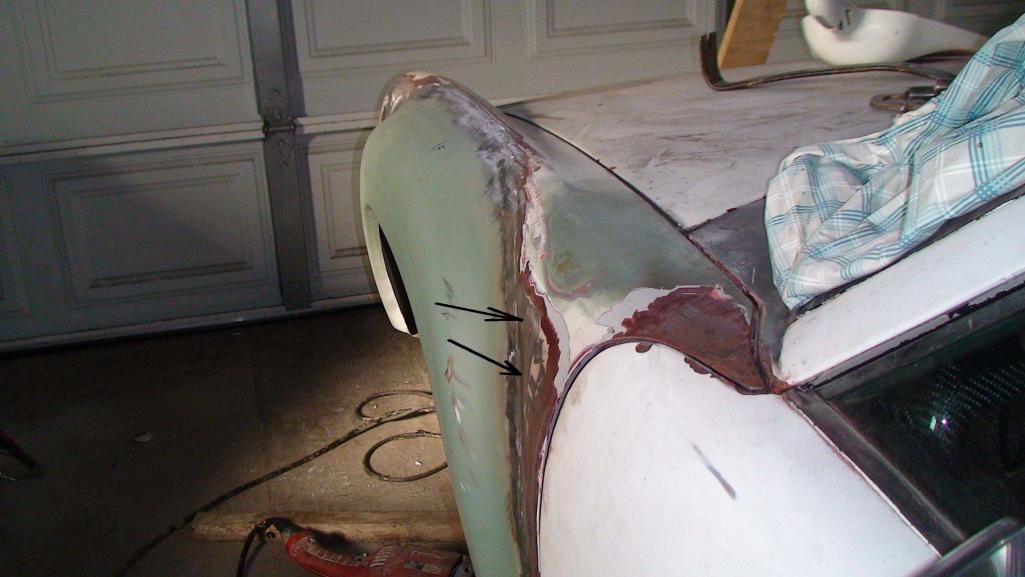
|
   |

 
|
  |
Replies
| scotty b |
Jan 24 2012, 08:12 PM
Post
#2
|
|
rust free you say ? Group: Members Posts: 16,375 Joined: 7-January 05 From: richmond, Va. Member No.: 3,419 Region Association: None |
Your fender most likely was already a little buckled, or you got it a bit hot when welding and sucked in. These flares are not a " perfect " fit but are a damn good start. The way you proceeded is a god way to go. I always keep my hammer and dolly by my side and work the seam as I am welding. I also do not run beads. I just connect spot/tack welds. This way I can get it set in place, then work the gap shut, add another tack, work the gap back together etc.
Attached thumbnail(s) 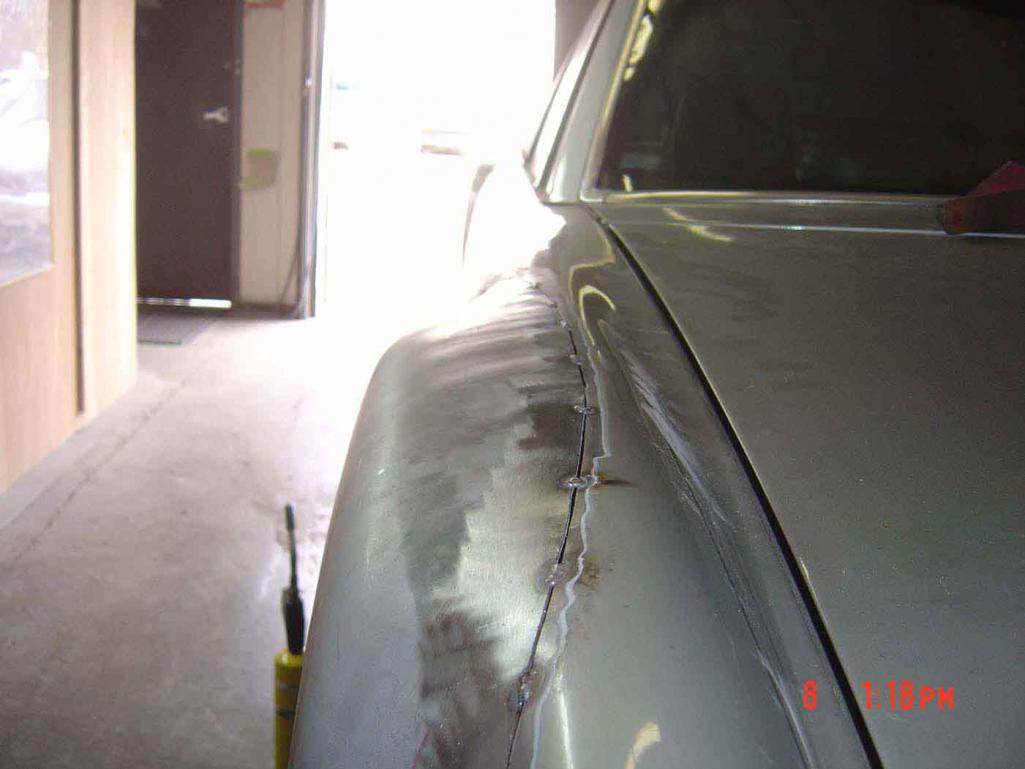 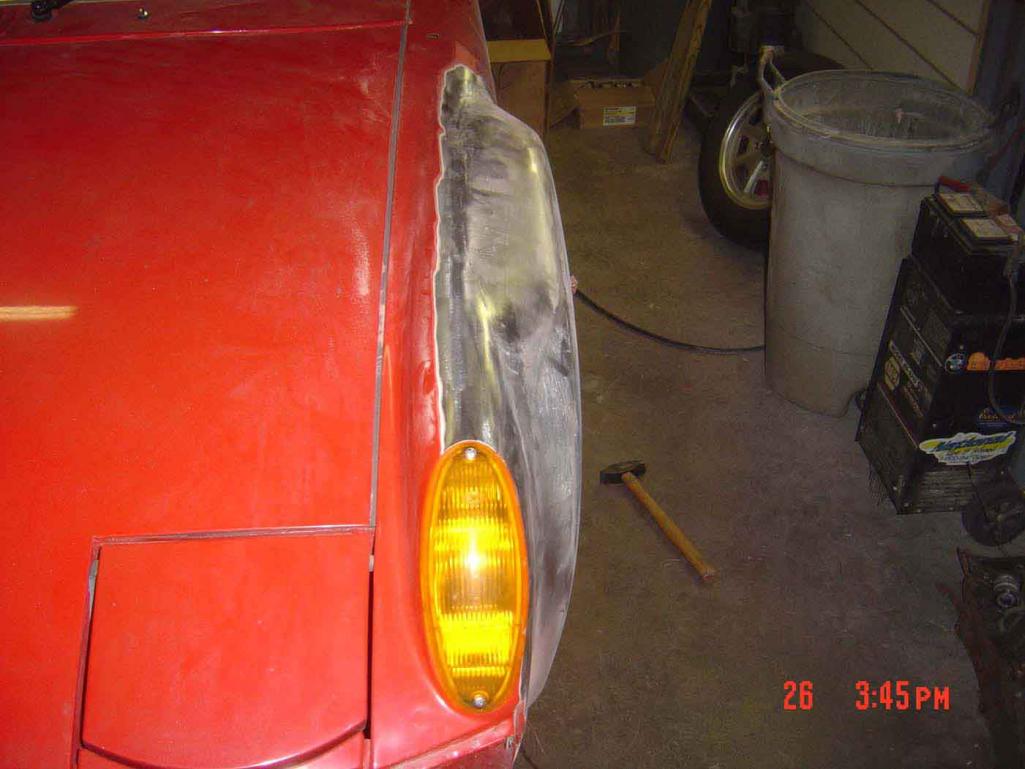
|
|
|
|
| ruby914 |
Jan 25 2012, 03:06 AM
Post
#3
|
|
Senior Member Group: Members Posts: 720 Joined: 26-April 09 From: Hawthorne, Ca Member No.: 10,305 Region Association: None |
QUOTE(scotty b @ Jan 24 2012, 06:12 PM)  Your fender most likely was already a little buckled, or you got it a bit hot when welding and sucked in. These flares are not a " perfect " fit but are a damn good start. The way you proceeded is a god way to go. I always keep my hammer and dolly by my side and work the seam as I am welding. I also do not run beads. I just connect spot/tack welds. This way I can get it set in place, then work the gap shut, add another tack, work the gap back together etc. Sometimes it is not easy for the grasshopper to see the forest through the trees. Both of my front 1/4 panels had been replaced by PO. For the most part it was not bad work. Some smaller things I wish were better but it is what it is and I am getting the chance to clean up some old repairs. Scotty you and Rick were spot on. That was body filler, you can see how I removed most and thought I had something reasonable to work with but I am sure that added to what I have now. The other side will be tacks, no 1/2 beads, only tacks. After welding, I found the door gap larger. I found where the PO brazed the aft end of the 1/4 panel top and bottom had snapped. With out that tacked the metal was free to draw in. I managed to pull it back and re-weld it with a reasonable door gap. Now, I am working on pulling that dip out. I saw a propane torch in a photo? In an effort to pull that dip out I have tried heating it with a map gas torch. That seems to be working with the help of small bottle jacks against the inner fender pushing out on the area. Wet sponge for strategic cooling. I will be back at it tomorrow so if any of that sounds (IMG:style_emoticons/default/screwy.gif) let me know. thanks all and Scotty (IMG:style_emoticons/default/pray.gif) |
|
|
|
| pdlightning |
Jan 25 2012, 05:29 AM
Post
#4
|
|
Pdlightning Group: Members Posts: 211 Joined: 4-February 11 From: Santa Clarita Member No.: 12,660 Region Association: Southern California |
QUOTE(ruby914 @ Jan 25 2012, 01:06 AM) QUOTE(scotty b @ Jan 24 2012, 06:12 PM) Your fender most likely was already a little buckled, or you got it a bit hot when welding and sucked in. These flares are not a " perfect " fit but are a damn good start. The way you proceeded is a god way to go. I always keep my hammer and dolly by my side and work the seam as I am welding. I also do not run beads. I just connect spot/tack welds. This way I can get it set in place, then work the gap shut, add another tack, work the gap back together etc. Sometimes it is not easy for the grasshopper to see the forest through the trees. Both of my front 1/4 panels had been replaced by PO. For the most part it was not bad work. Some smaller things I wish were better but it is what it is and I am getting the chance to clean up some old repairs. Scotty you and Rick were spot on. That was body filler, you can see how I removed most and thought I had something reasonable to work with but I am sure that added to what I have now. The other side will be tacks, no 1/2 beads, only tacks. After welding, I found the door gap larger. I found where the PO brazed the aft end of the 1/4 panel top and bottom had snapped. With out that tacked the metal was free to draw in. I managed to pull it back and re-weld it with a reasonable door gap. Now, I am working on pulling that dip out. I saw a propane torch in a photo? In an effort to pull that dip out I have tried heating it with a map gas torch. That seems to be working with the help of small bottle jacks against the inner fender pushing out on the area. Wet sponge for strategic cooling. I will be back at it tomorrow so if any of that sounds (IMG:style_emoticons/default/screwy.gif) let me know. thanks all and Scotty (IMG:style_emoticons/default/pray.gif) Although still in the early stages of planning with my steel flair install, I purchased these. http://www.eastwood.com/intergrip-panel-clamps-set-of-4.html They were cheap especially at Eastwood during a Christmas sale for 5.99 a set They hold both planes plumb and level. My fabricator buddy mentioned using them, tig welding and then leading the panels in. Old school, but cool if you know how to do it. Anyone here done that recently? |
|
|
|
Posts in this topic
 ruby914 Installing flares Jan 24 2012, 12:31 PM
 dlestep spend some hours staring at this guys work...for c... Jan 24 2012, 02:04 PM
 SirAndy The factory used full fenders.
Nope. They butt-wel... Jan 24 2012, 08:56 PM
SirAndy The factory used full fenders.
Nope. They butt-wel... Jan 24 2012, 08:56 PM ruby914
spend some hours staring at this guys work...for ... Jan 25 2012, 02:07 AM gothspeed When I get around to installing mine, I want to kn... Jan 24 2012, 08:39 PM mepstein "The factory used full fenders." - I don... Jan 24 2012, 08:51 PM scotty b Early 930's were welded on, on all four corner... Jan 24 2012, 08:58 PM rick 918-S I agree with Scotty, I can see body filler in a cr... Jan 24 2012, 09:21 PM jmill Lots and lots of little spot welds. Tack around t... Jan 24 2012, 09:47 PM bulitt Here is a thread documenting many prior threads on... Jan 25 2012, 07:04 AM ruby914
Here is a thread documenting many prior threads o... Jan 25 2012, 10:45 AM dlestep I believed that M471 option was a full fender, did... Jan 25 2012, 09:50 AM gothspeed
Early 930's were welded on, on all four corne... Jan 25 2012, 10:01 AM Madswede
I would still like to see more pictures fo that b... Jan 25 2012, 10:40 AM ruby914 One more on how I did it. Jan 25 2012, 10:52 AM gothspeed Thanks for posting Ruby :beer2: !! Jan 25 2012, 11:21 AM RiqueMar Might have already covered this, but did you have ... Jan 25 2012, 01:50 PM ruby914
Might have already covered this, but did you have... Jan 25 2012, 02:35 PM McMark I position the flares to match the narrow body whe... Jan 25 2012, 06:26 PM sean_v8_914 GT flare mysteries:
im about to get into a flare i... Jan 26 2012, 10:26 AM sean_v8_914 I see that even teh 911 flare has that flat secti... Jan 26 2012, 10:29 AM mepstein Remake the mold? It won't happen. Jan 26 2012, 10:43 AM sean_v8_914 sometimes a correction is possible in the dies...y... Jan 26 2012, 10:51 AM
ruby914
spend some hours staring at this guys work...for ... Jan 25 2012, 02:07 AM gothspeed When I get around to installing mine, I want to kn... Jan 24 2012, 08:39 PM mepstein "The factory used full fenders." - I don... Jan 24 2012, 08:51 PM scotty b Early 930's were welded on, on all four corner... Jan 24 2012, 08:58 PM rick 918-S I agree with Scotty, I can see body filler in a cr... Jan 24 2012, 09:21 PM jmill Lots and lots of little spot welds. Tack around t... Jan 24 2012, 09:47 PM bulitt Here is a thread documenting many prior threads on... Jan 25 2012, 07:04 AM ruby914
Here is a thread documenting many prior threads o... Jan 25 2012, 10:45 AM dlestep I believed that M471 option was a full fender, did... Jan 25 2012, 09:50 AM gothspeed
Early 930's were welded on, on all four corne... Jan 25 2012, 10:01 AM Madswede
I would still like to see more pictures fo that b... Jan 25 2012, 10:40 AM ruby914 One more on how I did it. Jan 25 2012, 10:52 AM gothspeed Thanks for posting Ruby :beer2: !! Jan 25 2012, 11:21 AM RiqueMar Might have already covered this, but did you have ... Jan 25 2012, 01:50 PM ruby914
Might have already covered this, but did you have... Jan 25 2012, 02:35 PM McMark I position the flares to match the narrow body whe... Jan 25 2012, 06:26 PM sean_v8_914 GT flare mysteries:
im about to get into a flare i... Jan 26 2012, 10:26 AM sean_v8_914 I see that even teh 911 flare has that flat secti... Jan 26 2012, 10:29 AM mepstein Remake the mold? It won't happen. Jan 26 2012, 10:43 AM sean_v8_914 sometimes a correction is possible in the dies...y... Jan 26 2012, 10:51 AM |
1 User(s) are reading this topic (1 Guests and 0 Anonymous Users)
0 Members:

|
Lo-Fi Version | Time is now: 2nd April 2026 - 01:48 PM |
Invision Power Board
v9.1.4 © 2026 IPS, Inc.