|
|
|
Porsche, and the Porsche crest are registered trademarks of Dr. Ing. h.c. F. Porsche AG.
This site is not affiliated with Porsche in any way. Its only purpose is to provide an online forum for car enthusiasts. All other trademarks are property of their respective owners. |
|
|


| ONTHEGRIND |
 Nov 16 2012, 11:07 AM Nov 16 2012, 11:07 AM
Post
#81
|
|
Member  Group: Members Posts: 286 Joined: 10-November 08 From: California Member No.: 9,738 Region Association: None |
Going to widen the rear flare and repaint looks like a little more work then expected
Attached image(s) 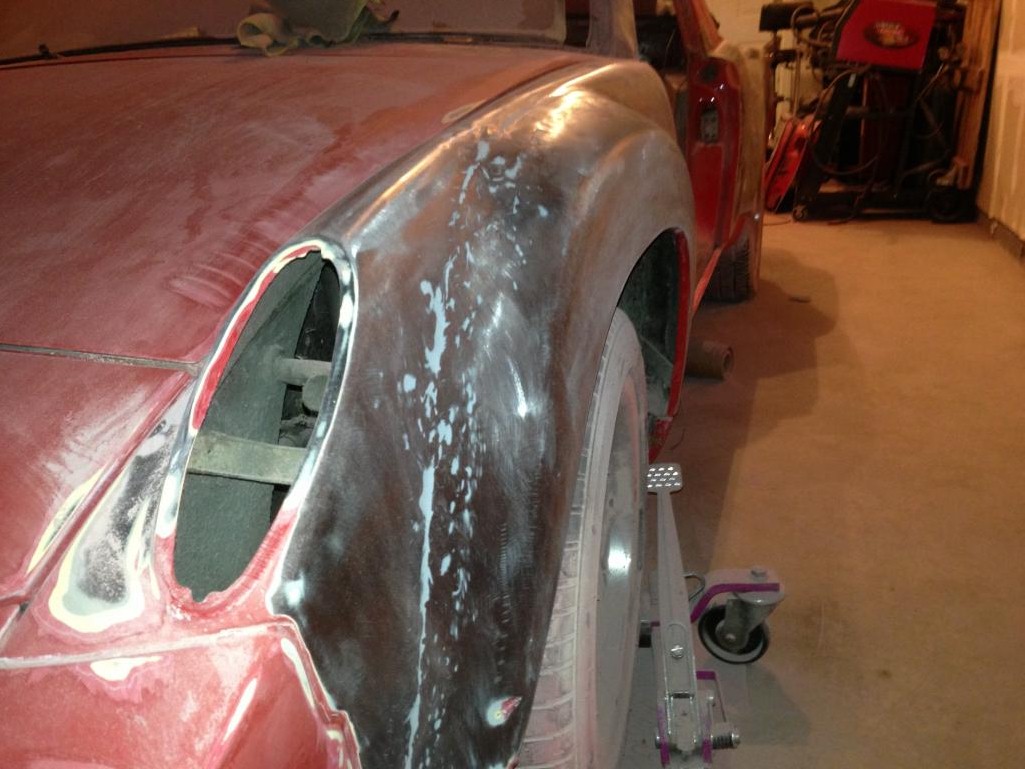 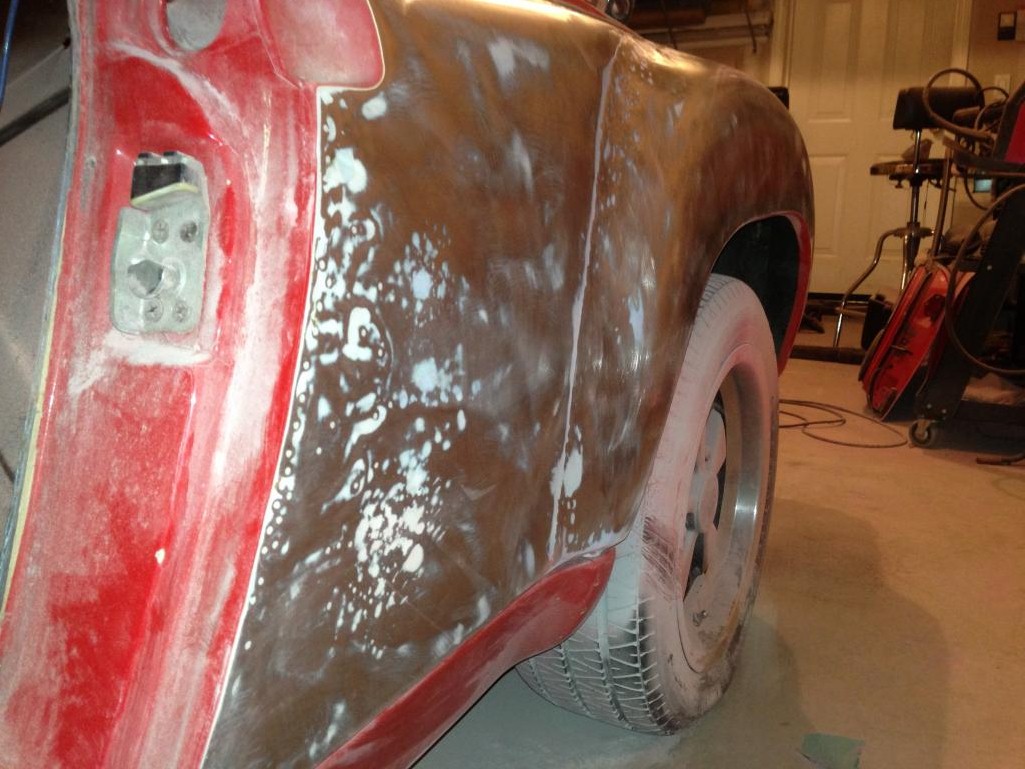
|
   |

 
|
  |
Replies
| gothspeed |
Dec 7 2013, 02:09 PM
Post
#82
|
|
Senior Member Group: Members Posts: 1,539 Joined: 3-February 09 From: SoCal Member No.: 10,019 Region Association: None |
You are doing an amazing job!! (IMG:style_emoticons/default/smash.gif) you are making great progress for only an hour a day (IMG:style_emoticons/default/beerchug.gif)
I widened my rear steel flares a little, mostly to get the upper flat panel of the rear flare closer to the verticalish angle of the front. This was because after i installed them, i noticed the rear outer flat part tilted inboard as the panel went up. Whereas the same flat part on the front flares were near vertical. I widened the rear by cutting along the top of the rears about 5/8" inboard of the top tangent point of the top outer fender bend. Then cut all the way around stopping about 5 -6 inches from the bottom on each side. As i went down the sides i reduced the 5/8" to about 1/2". I then spaced out the outer part of the flare with wood spacers. I used 1/2" thick wood strips and located them about 10 and 2 oclock. After this you wil find the outer 'pushed out' part of the flare no longer matches the seam where it was cut from. I corrected this by making perpendicular cuts, 1" on the outer and 1.5" long on the inner part of the flare, about 5" apart from each other along the length of the first long cut. This allows the inboard part of the flare to be reconciled with the outer. By forming the now independent tabs to match each other across the 1/2" opening. Then i made card stock paper templates of the 1/2" gap, cut them out in steel and butt welded them in. Then hammered and flattened the interface. The overall shape of the rear flares now look like the way they 'should have been'. (IMG:style_emoticons/default/smilie_pokal.gif) I think this method can work well with the 1" that you want to add to the rears. If i were to do this again i would have gone 3/4" to 1" instead of the 1/2" i went with. But it looks far better now than it would have, had I not widened them at all. (IMG:style_emoticons/default/biggrin.gif) If you are interested, i can dig up some pics i took of this process. (IMG:style_emoticons/default/smash.gif) |
|
|
|
Posts in this topic
 ONTHEGRIND Project 1 hour a day 916 wannabe Nov 16 2012, 11:07 AM
 ONTHEGRIND Not sure why the pics are upside down taken with t... Nov 16 2012, 11:09 AM ConeDodger :rotfl: When viewed on my iPad it stays upside dow... Nov 16 2012, 11:14 AM mettelman you have to stand on your head to take iphone phot... Nov 16 2012, 11:14 AM timothy_nd28 RE: Project 1 hour a day 916 wannabe Nov 16 2012, 11:35 AM ONTHEGRIND Thanks for. Flipping the pics pretty ugly don... Nov 16 2012, 12:44 PM brant I don't see what is so bad about them?
all of... Nov 16 2012, 12:49 PM LotusJoe The real question is how did you get the car to st... Nov 16 2012, 12:53 PM 914itis He forgot to read the instructions . Nov 16 2012, 02:08 PM Andyrew The flares look just sub par of a good body tech, ... Nov 16 2012, 02:47 PM ONTHEGRIND Unfortunately I'm not a body guy but I do happ... Nov 16 2012, 03:04 PM ONTHEGRIND Yeah I was just looking for rust gonna hammer and ... Nov 16 2012, 03:07 PM boogie_man That doesn't look too bad at all, weld up and ... Nov 16 2012, 04:09 PM mr914 Body man is blowing up your skirt. :miles:
Tryi... Nov 16 2012, 04:36 PM ONTHEGRIND The body guy at my shop doesn't think it's... Nov 16 2012, 05:05 PM
ONTHEGRIND Not sure why the pics are upside down taken with t... Nov 16 2012, 11:09 AM ConeDodger :rotfl: When viewed on my iPad it stays upside dow... Nov 16 2012, 11:14 AM mettelman you have to stand on your head to take iphone phot... Nov 16 2012, 11:14 AM timothy_nd28 RE: Project 1 hour a day 916 wannabe Nov 16 2012, 11:35 AM ONTHEGRIND Thanks for. Flipping the pics pretty ugly don... Nov 16 2012, 12:44 PM brant I don't see what is so bad about them?
all of... Nov 16 2012, 12:49 PM LotusJoe The real question is how did you get the car to st... Nov 16 2012, 12:53 PM 914itis He forgot to read the instructions . Nov 16 2012, 02:08 PM Andyrew The flares look just sub par of a good body tech, ... Nov 16 2012, 02:47 PM ONTHEGRIND Unfortunately I'm not a body guy but I do happ... Nov 16 2012, 03:04 PM ONTHEGRIND Yeah I was just looking for rust gonna hammer and ... Nov 16 2012, 03:07 PM boogie_man That doesn't look too bad at all, weld up and ... Nov 16 2012, 04:09 PM mr914 Body man is blowing up your skirt. :miles:
Tryi... Nov 16 2012, 04:36 PM ONTHEGRIND The body guy at my shop doesn't think it's... Nov 16 2012, 05:05 PM
 dpires914
The body guy at my shop doesn't think it... Nov 16 2012, 08:50 PM brant take a grinder to a 930 turbo from 1976- 1980-ish.... Nov 16 2012, 05:08 PM ONTHEGRIND Well got rained out I was supposed to work at Infi... Nov 17 2012, 12:00 AM Andyrew Just got to keep at it! I painted Peter's ... Nov 17 2012, 07:59 AM ONTHEGRIND I was thinking about widening the rear flares abou... Nov 17 2012, 11:30 AM bulitt Check out the blog made by member
Ron S Nov 17 2012, 04:13 PM ONTHEGRIND so i got a little lazy and only did about an h... Nov 18 2012, 07:25 PM ONTHEGRIND this is the ugly part looks like the p/o hamme... Nov 18 2012, 07:30 PM ONTHEGRIND firewall Nov 18 2012, 07:30 PM ONTHEGRIND door jam had alot of bondo.. Nov 18 2012, 07:32 PM ONTHEGRIND Little rust repair Nov 19 2012, 09:28 AM ONTHEGRIND well worked on it for about an hour got the windsh... Nov 23 2012, 03:18 PM ONTHEGRIND more pics Nov 23 2012, 03:20 PM ONTHEGRIND one more until after my lunch Nov 23 2012, 03:21 PM SUNAB914 Welcome to the club, it like a box of chocolates... Nov 23 2012, 05:12 PM ONTHEGRIND Stripped the good today and the left front 1/4 goi... Nov 24 2012, 05:45 PM ONTHEGRIND one more Nov 24 2012, 06:12 PM Andyrew What grit are you using to strip it? Looks like it... Nov 24 2012, 07:31 PM ONTHEGRIND Using 3m green 80 grit 8 Inch disc on a soft pads ... Nov 25 2012, 11:10 AM ONTHEGRIND Well ran out if time an hour a day.. was going to... Nov 25 2012, 10:51 PM ONTHEGRIND Few more Nov 25 2012, 10:55 PM SirAndy Where is your bracing? :huh:
I wouldn't rem... Nov 26 2012, 12:43 AM ONTHEGRIND Was going fab up something at the shop tomarrow I ... Nov 26 2012, 01:52 AM sixnotfour
So where you work you have cellete bench is it th... Nov 26 2012, 03:01 AM ONTHEGRIND Campbell ca... Nov 26 2012, 08:33 AM ONTHEGRIND I was looking at door braces last night, I think I... Nov 26 2012, 09:04 AM r_towle well.
The front part hangs off a flexible area tha... Nov 26 2012, 04:19 PM ONTHEGRIND Any pics ? Nov 26 2012, 04:29 PM SirAndy
Any pics ?
A simple search for "+floor +br... Nov 26 2012, 05:09 PM ONTHEGRIND I'm only removing the inner firewall skin you ... Nov 26 2012, 04:32 PM SirAndy I'm only removing the inner firewall skin you ... Nov 26 2012, 04:58 PM ONTHEGRIND Well this was a tough to get off in an hour also ... Nov 26 2012, 10:06 PM SirAndy Anyone have a nice inner fire wall piece ..?
htt... Nov 26 2012, 10:09 PM ONTHEGRIND Yeah wasn't sure is someone had a clean one lo... Nov 26 2012, 10:19 PM ONTHEGRIND Anyone know the the bolt size for the upper seat b... Nov 27 2012, 12:25 AM Jon H.
Anyone know the the bolt size for the upper seat ... Nov 27 2012, 04:20 PM mr914 Looking good :beer2:
Question....
How did you ... Nov 27 2012, 04:35 PM ONTHEGRIND So I went to dinner last nite but did make some ... Nov 28 2012, 10:00 PM ONTHEGRIND So I haven't been slacking just haven't ta... Dec 1 2012, 02:03 AM Andyrew
So I haven't been slacking just haven't t... Dec 2 2012, 11:47 PM sixnotfour 7/16-20 Dec 1 2012, 02:59 AM ONTHEGRIND Any ideas on the color ? Dec 2 2012, 02:09 PM messix :drooley: what engine is that???????? Dec 2 2012, 02:24 PM LotusJoe
:drooley: what engine is that????????
Lycoming ... Dec 2 2012, 02:45 PM ONTHEGRIND oops let me delete that pic that would be a 908 ... Dec 2 2012, 06:44 PM ONTHEGRIND Howdy all Here Is a update In video Form.. I decid... Dec 3 2013, 08:15 PM effutuo101 Steady progress wins! I do the same thing on m... Dec 4 2013, 09:25 AM ONTHEGRIND Heres Some more video updates ..
http://www.yout... Dec 7 2013, 11:34 AM SirAndy How do I embed videos ?
http://www.914world.com... Dec 7 2013, 11:49 AM ONTHEGRIND Sweet I searched but couldn't find it than... Dec 7 2013, 12:12 PM SirAndy guessing you didn't go either..
Yeah, gotta... Dec 7 2013, 12:20 PM ONTHEGRIND Put in another hour today removed quite a bit o... Dec 7 2013, 03:29 PM gothspeed Here are some pics of my rear flare 'widen... Dec 7 2013, 04:25 PM ONTHEGRIND I'd take the deck lid but I'm too far. I l... Dec 7 2013, 07:03 PM gothspeed Now that the filler and one coat of primer is on, ... Dec 7 2013, 08:33 PM ONTHEGRIND http://www.youtube.com/watch?v=5NHL_TIwV-o...etQ... Dec 10 2013, 12:55 AM Blue6 Pm sent on decklid.. Dec 10 2013, 01:31 AM ONTHEGRIND Few more Updates.. I was helping prep a 997 RSR... Dec 10 2013, 11:26 PM vw505 What products are you using to remove the paint? Dec 11 2013, 10:39 AM ONTHEGRIND Well got into the hell hole area removed the ... Dec 11 2013, 10:39 PM ONTHEGRIND Here were the tools of the day
http://www.914w... Dec 11 2013, 10:42 PM ONTHEGRIND http://www.914world.com/bbs2/uploads_offsite/img.p... Dec 12 2013, 11:18 PM gothspeed Great work!! .... :beer2: Dec 13 2013, 11:38 AM ONTHEGRIND What should I spray inside the longs before I weld... Dec 14 2013, 12:14 PM Krieger 3M had a product called Weld Thru II that is suppo... Dec 14 2013, 12:47 PM ONTHEGRIND Sweet I will try that. Dec 14 2013, 01:23 PM gothspeed I think Napa has 'weldable primer' on the ... Dec 14 2013, 09:08 PM ONTHEGRIND I have some weldable primer but was thinking about... Dec 14 2013, 11:32 PM gothspeed
I have some weldable primer but was thinking abou... Dec 15 2013, 02:32 AM ONTHEGRIND bolted up the floor then trimmed the existing p... Dec 15 2013, 08:38 PM gothspeed Looks fantastic :)!!! ....... maybe ro... Dec 15 2013, 08:53 PM ONTHEGRIND yeah I made a few of those patches I going to see ... Dec 15 2013, 11:27 PM ONTHEGRIND This car is now for sale still in the current cond... Mar 2 2014, 05:42 PM Mike Bellis :idea:
What does it look like now? Mar 2 2014, 07:13 PM ONTHEGRIND Same as it did in the last photos Mar 2 2014, 07:15 PM
dpires914
The body guy at my shop doesn't think it... Nov 16 2012, 08:50 PM brant take a grinder to a 930 turbo from 1976- 1980-ish.... Nov 16 2012, 05:08 PM ONTHEGRIND Well got rained out I was supposed to work at Infi... Nov 17 2012, 12:00 AM Andyrew Just got to keep at it! I painted Peter's ... Nov 17 2012, 07:59 AM ONTHEGRIND I was thinking about widening the rear flares abou... Nov 17 2012, 11:30 AM bulitt Check out the blog made by member
Ron S Nov 17 2012, 04:13 PM ONTHEGRIND so i got a little lazy and only did about an h... Nov 18 2012, 07:25 PM ONTHEGRIND this is the ugly part looks like the p/o hamme... Nov 18 2012, 07:30 PM ONTHEGRIND firewall Nov 18 2012, 07:30 PM ONTHEGRIND door jam had alot of bondo.. Nov 18 2012, 07:32 PM ONTHEGRIND Little rust repair Nov 19 2012, 09:28 AM ONTHEGRIND well worked on it for about an hour got the windsh... Nov 23 2012, 03:18 PM ONTHEGRIND more pics Nov 23 2012, 03:20 PM ONTHEGRIND one more until after my lunch Nov 23 2012, 03:21 PM SUNAB914 Welcome to the club, it like a box of chocolates... Nov 23 2012, 05:12 PM ONTHEGRIND Stripped the good today and the left front 1/4 goi... Nov 24 2012, 05:45 PM ONTHEGRIND one more Nov 24 2012, 06:12 PM Andyrew What grit are you using to strip it? Looks like it... Nov 24 2012, 07:31 PM ONTHEGRIND Using 3m green 80 grit 8 Inch disc on a soft pads ... Nov 25 2012, 11:10 AM ONTHEGRIND Well ran out if time an hour a day.. was going to... Nov 25 2012, 10:51 PM ONTHEGRIND Few more Nov 25 2012, 10:55 PM SirAndy Where is your bracing? :huh:
I wouldn't rem... Nov 26 2012, 12:43 AM ONTHEGRIND Was going fab up something at the shop tomarrow I ... Nov 26 2012, 01:52 AM sixnotfour
So where you work you have cellete bench is it th... Nov 26 2012, 03:01 AM ONTHEGRIND Campbell ca... Nov 26 2012, 08:33 AM ONTHEGRIND I was looking at door braces last night, I think I... Nov 26 2012, 09:04 AM r_towle well.
The front part hangs off a flexible area tha... Nov 26 2012, 04:19 PM ONTHEGRIND Any pics ? Nov 26 2012, 04:29 PM SirAndy
Any pics ?
A simple search for "+floor +br... Nov 26 2012, 05:09 PM ONTHEGRIND I'm only removing the inner firewall skin you ... Nov 26 2012, 04:32 PM SirAndy I'm only removing the inner firewall skin you ... Nov 26 2012, 04:58 PM ONTHEGRIND Well this was a tough to get off in an hour also ... Nov 26 2012, 10:06 PM SirAndy Anyone have a nice inner fire wall piece ..?
htt... Nov 26 2012, 10:09 PM ONTHEGRIND Yeah wasn't sure is someone had a clean one lo... Nov 26 2012, 10:19 PM ONTHEGRIND Anyone know the the bolt size for the upper seat b... Nov 27 2012, 12:25 AM Jon H.
Anyone know the the bolt size for the upper seat ... Nov 27 2012, 04:20 PM mr914 Looking good :beer2:
Question....
How did you ... Nov 27 2012, 04:35 PM ONTHEGRIND So I went to dinner last nite but did make some ... Nov 28 2012, 10:00 PM ONTHEGRIND So I haven't been slacking just haven't ta... Dec 1 2012, 02:03 AM Andyrew
So I haven't been slacking just haven't t... Dec 2 2012, 11:47 PM sixnotfour 7/16-20 Dec 1 2012, 02:59 AM ONTHEGRIND Any ideas on the color ? Dec 2 2012, 02:09 PM messix :drooley: what engine is that???????? Dec 2 2012, 02:24 PM LotusJoe
:drooley: what engine is that????????
Lycoming ... Dec 2 2012, 02:45 PM ONTHEGRIND oops let me delete that pic that would be a 908 ... Dec 2 2012, 06:44 PM ONTHEGRIND Howdy all Here Is a update In video Form.. I decid... Dec 3 2013, 08:15 PM effutuo101 Steady progress wins! I do the same thing on m... Dec 4 2013, 09:25 AM ONTHEGRIND Heres Some more video updates ..
http://www.yout... Dec 7 2013, 11:34 AM SirAndy How do I embed videos ?
http://www.914world.com... Dec 7 2013, 11:49 AM ONTHEGRIND Sweet I searched but couldn't find it than... Dec 7 2013, 12:12 PM SirAndy guessing you didn't go either..
Yeah, gotta... Dec 7 2013, 12:20 PM ONTHEGRIND Put in another hour today removed quite a bit o... Dec 7 2013, 03:29 PM gothspeed Here are some pics of my rear flare 'widen... Dec 7 2013, 04:25 PM ONTHEGRIND I'd take the deck lid but I'm too far. I l... Dec 7 2013, 07:03 PM gothspeed Now that the filler and one coat of primer is on, ... Dec 7 2013, 08:33 PM ONTHEGRIND http://www.youtube.com/watch?v=5NHL_TIwV-o...etQ... Dec 10 2013, 12:55 AM Blue6 Pm sent on decklid.. Dec 10 2013, 01:31 AM ONTHEGRIND Few more Updates.. I was helping prep a 997 RSR... Dec 10 2013, 11:26 PM vw505 What products are you using to remove the paint? Dec 11 2013, 10:39 AM ONTHEGRIND Well got into the hell hole area removed the ... Dec 11 2013, 10:39 PM ONTHEGRIND Here were the tools of the day
http://www.914w... Dec 11 2013, 10:42 PM ONTHEGRIND http://www.914world.com/bbs2/uploads_offsite/img.p... Dec 12 2013, 11:18 PM gothspeed Great work!! .... :beer2: Dec 13 2013, 11:38 AM ONTHEGRIND What should I spray inside the longs before I weld... Dec 14 2013, 12:14 PM Krieger 3M had a product called Weld Thru II that is suppo... Dec 14 2013, 12:47 PM ONTHEGRIND Sweet I will try that. Dec 14 2013, 01:23 PM gothspeed I think Napa has 'weldable primer' on the ... Dec 14 2013, 09:08 PM ONTHEGRIND I have some weldable primer but was thinking about... Dec 14 2013, 11:32 PM gothspeed
I have some weldable primer but was thinking abou... Dec 15 2013, 02:32 AM ONTHEGRIND bolted up the floor then trimmed the existing p... Dec 15 2013, 08:38 PM gothspeed Looks fantastic :)!!! ....... maybe ro... Dec 15 2013, 08:53 PM ONTHEGRIND yeah I made a few of those patches I going to see ... Dec 15 2013, 11:27 PM ONTHEGRIND This car is now for sale still in the current cond... Mar 2 2014, 05:42 PM Mike Bellis :idea:
What does it look like now? Mar 2 2014, 07:13 PM ONTHEGRIND Same as it did in the last photos Mar 2 2014, 07:15 PM |
1 User(s) are reading this topic (1 Guests and 0 Anonymous Users)
0 Members:

|
Lo-Fi Version | Time is now: 8th June 2024 - 09:25 AM |
Invision Power Board
v9.1.4 © 2024 IPS, Inc.