|
|
|
Porsche, and the Porsche crest are registered trademarks of Dr. Ing. h.c. F. Porsche AG.
This site is not affiliated with Porsche in any way. Its only purpose is to provide an online forum for car enthusiasts. All other trademarks are property of their respective owners. |
|
|


| ThePaintedMan |
 Mar 27 2013, 08:48 PM Mar 27 2013, 08:48 PM
Post
#1
|
|
Advanced Member  Group: Members Posts: 3,887 Joined: 6-September 11 From: St. Petersburg, FL Member No.: 13,527 Region Association: South East States |
Awhile back, Randy (RoadGlue) gave me the opportunity to rebuild his Weber 40 IDFs, and I thought I'd take the opportunity to document the process. I'm also going to try give a little insight on some of the tips and tricks I have learned along the way. Keep in mind, this thread is a work in progress, as Randy and I are still tracking down some of the parts these carbs were missing.
Now, I understand for most people, the process is fairly straightforward and many of you will think it unnecessary to give a step-by-step. After all, most rebuild kits only include a handful of parts and the location and function of most pieces are obvious. But there are some important additional steps that one can take to truly ensure the rebuild process goes smooth and that you won't have to do this over again immediately after reinstalling the carbs. Here it goes! First, I would like to outline the fact that not all Webers are the same. Not only are there different models of IDFs (the 36, the 40, the 44 and the much rarer 48), but there are "early" style carbs and "later" ones. I'll try to list some of the most obvious differences, which are to the best of my knowledge true in most cases, but may not hold true in all of them. Here are the tools you'll need for the job: -Carburetor rebuild kits (CB Performance or Redline are the most common) -8mm open/closed end wrench -10mm open/closed end wrench -11mm open/closed end wrench -19mm open/closed end wrench -Smaller flat tip screwdriver -Large flat tip screwdriver -Brass brush -Paint gun brush cleaning set -Small hammer -Brass punch set -Razor blade -Carb cleaner -B-12 Carb dip -Anti-seize -Shop towels -Compressed air source (preferably) -Clean workspace, preferably with white background Optional: - (4) 3/8 x 24 Brass Hex grub/set screws - Allen keys -SAE Tap and Die set Below is a picture of an early and late set of Weber 40 IDFs. 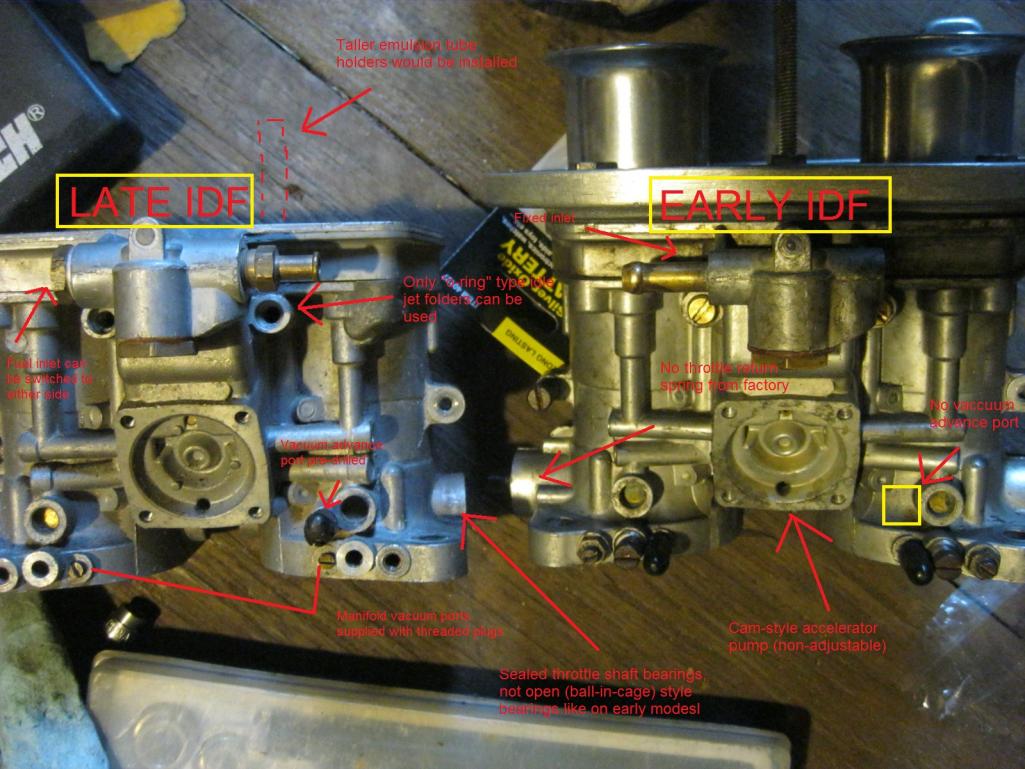 Some of the characteristics of EARLY versions are: -Short emulsion tube holders -Short throttle shafts with little overhang outside of the carb body -Non-sealed, ball-in-cage style throttle shaft bearings -Cam-actuated, non-adjustable accelerator pump assembly -No ports for "ported" vacuum (still has 2 "manifold" vacuum ports) -76 degree bevel throttle plates (this may or may not hold true for every set of early carbs) -No throttle return springs installed from factory (thanks Kevin for clarification) -Most (all?) were made in Italy and are stamped as such Later style Weber 40 IDFs (Weber 40 XEs) are usually characterized by: -Taller emulsion tube holders which extend above the carb top -Longer throttle shafts -Sealed black throttle shaft bearings -Adjustable, spring cushioned accelerator pump assembly -One pre-drilled ported vacuum port in addition to two threaded manifold vacuum ports -78 degree bevel throttle plates -Factory installed throttle return springs -Made in Spain, but potentially also Italy and Brazil Please note that most of these instructions to follow are also true for 44s and 48s as well. The main difference being the way that the secondary venturis are designed. |
   |

 
|
  |
Replies
| ThePaintedMan |
Dec 17 2013, 05:57 PM
Post
#2
|
|
Advanced Member Group: Members Posts: 3,887 Joined: 6-September 11 From: St. Petersburg, FL Member No.: 13,527 Region Association: South East States |
Just about done. Here is a housekeeping trick that I learned. The casting and drilling/manufacturing process of Webers means that a number of lead plugs are used to seal off several circuits of the carb. Often these plugs will leak or weep even minute amounts of gas over time. While it would be nice to replace all of these lead plugs, I don't feel that it's necessary. Instead, I take the time to use a small punch and peen these plugs in, hopefully mushrooming them out a little bit to prevent leaks. It's much easier to do this while they're out of the car rather than bending over and trying to stop them from leaking after you've got it all together.
 Now is a good time to reassemble the main jet stacks as well. Pretty simple, but each component must be there to serve it's function. Below is a picture of the stack, with main jet, emulsion tube, air correction jet and main jet holder. These are later style main jet holders which "snorkel" above the top of the carb body, in comparison to the lower, early jet holders. Note: if you want to see a cool trick, check out Van Svenson's video on Youtube where he explains how to ensure that the main jets are seating properly. Once they're complete, go ahead and install them. Finally, if you have an earlier style IDF without the adjustable accelerator pump rod, be sure to throw a little grease on the cam and the roller that actuates the accelerator pump rod. Attached thumbnail(s) 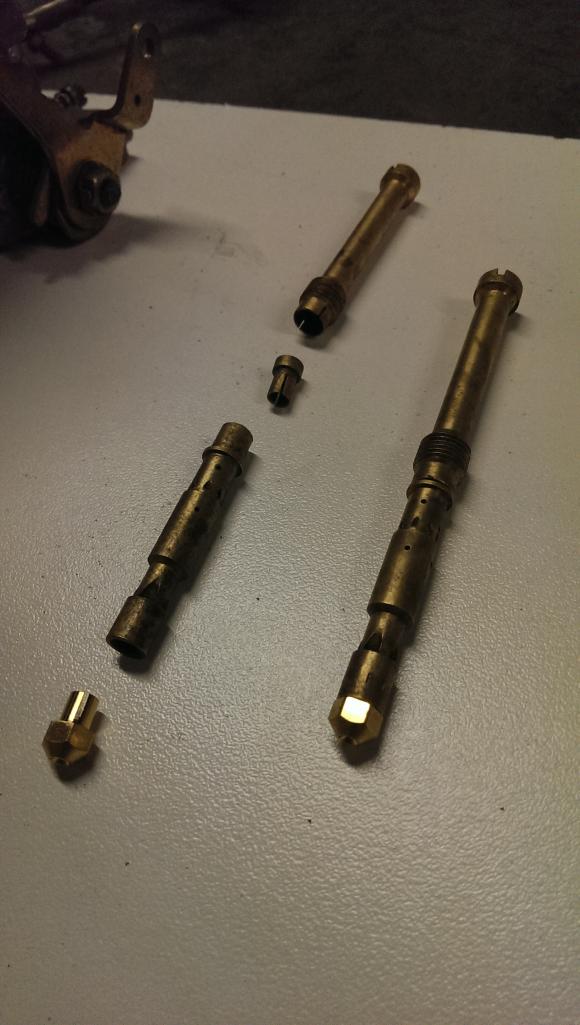
|
|
|
|
| nolift914 |
Dec 17 2013, 06:21 PM
Post
#3
|
|
Autoxer Group: Members Posts: 186 Joined: 24-May 09 From: Rockaway Beach NY Member No.: 10,399 Region Association: None |
QUOTE(ThePaintedMan @ Dec 17 2013, 04:57 PM)  Just about done. Here is a housekeeping trick that I learned. The casting and drilling/manufacturing process of Webers means that a number of lead plugs are used to seal off several circuits of the carb. Often these plugs will leak or weep even minute amounts of gas over time. While it would be nice to replace all of these lead plugs, I don't feel that it's necessary. Instead, I take the time to use a small punch and peen these plugs in, hopefully mushrooming them out a little bit to prevent leaks. It's much easier to do this while they're out of the car rather than bending over and trying to stop them from leaking after you've got it all together. Now is a good time to reassemble the main jet stacks as well. Pretty simple, but each component must be there to serve it's function. Below is a picture of the stack, with main jet, emulsion tube, air correction jet and main jet holder. These are later style main jet holders which "snorkel" above the top of the carb body, in comparison to the lower, early jet holders. Note: if you want to see a cool trick, check out Van Svenson's video on Youtube where he explains how to ensure that the main jets are seating properly. Once they're complete, go ahead and install them. I had one of these plugs completely shoot out during a DE event at Watkins Glenn many years ago, which caused a 1/4" stream of fuel to pour out of the carb across a hot engine. Got Very Lucky that day. Since then I have covered the lead plugs with a two part epoxy. Great write up! (IMG:style_emoticons/default/beerchug.gif) |
|
|
|
Posts in this topic
 ThePaintedMan So you want to rebuild your Webers? Mar 27 2013, 08:48 PM
 ThePaintedMan This is Randy's set of later style, Spanish-ma... Mar 27 2013, 08:57 PM ThePaintedMan Here are the throttle plates from underneath. Note... Mar 27 2013, 08:59 PM ThePaintedMan The best way is probably to use an ultrasonic clea... Apr 8 2013, 09:14 PM ThePaintedMan Don't forget to remove these plates that cover... Apr 8 2013, 09:21 PM
 Mark Henry
The enrichment circuits have a washer, plunger,... Apr 10 2013, 07:07 AM Cairo94507 I no longer have Webers on my car but I thoroughly... Apr 8 2013, 09:51 PM rhodyguy good thread. well written and ++ for the pictures.... Apr 9 2013, 07:44 AM euro911 Nice work George ... now finish them :lol:
I did... Apr 10 2013, 02:56 AM FourBlades I like the closeup pictures.
Nice work! :be... Apr 10 2013, 06:37 AM ThePaintedMan Thanks guys,
The carbs are actually much furthe... Apr 10 2013, 07:13 AM Mark Henry
Thanks guys,
The carbs are actually much furth... Apr 10 2013, 08:10 AM ThePaintedMan
Personally the circuit sucks big time, if they ev... Apr 10 2013, 08:12 AM RoadGlue Okay! I'll stop lurking. George, I really ... Apr 10 2013, 08:29 AM Mark Henry Just be careful tapping that you don't put too... Apr 10 2013, 10:49 AM URY914 You can pick up a cheap sonic cleaners at Harbour ... Apr 10 2013, 12:31 PM ThePaintedMan Finishing up where I left off...
Once you have re... Dec 17 2013, 11:49 AM ThePaintedMan Now you're ready to start tapping. First, plug... Dec 17 2013, 11:59 AM ThePaintedMan Once both sides are done, remove your packing mate... Dec 17 2013, 12:03 PM ThePaintedMan Finally, you should be ready for reassembly. Blow ... Dec 17 2013, 12:12 PM ThePaintedMan Next, move on to installing the accelerator pump j... Dec 17 2013, 12:19 PM ThePaintedMan Next, begin installing the remaining hardware on t... Dec 17 2013, 12:28 PM ThePaintedMan Now move on to the accelerator pump cover.
Note ... Dec 17 2013, 12:37 PM RoadGlue Great work George! This may be a candidate for... Dec 17 2013, 01:21 PM ThePaintedMan Next, move on to the top of the carb. Remove the 1... Dec 17 2013, 05:05 PM ThePaintedMan Now comes the art of setting the float level. Thou... Dec 17 2013, 05:22 PM rhodyguy nice write up george. don't forget to mention ... Dec 17 2013, 05:25 PM ThePaintedMan Next, turn the carb top over and allow the float t... Dec 17 2013, 05:26 PM ThePaintedMan Now we need to install the linkage arms and associ... Dec 17 2013, 05:42 PM ThePaintedMan
[I had one of these plugs completely shoot out du... Dec 17 2013, 09:49 PM timothy_nd28 +1 on making this a classic thread Dec 17 2013, 06:00 PM ThePaintedMan That just about does it! You should have a nic... Dec 17 2013, 06:16 PM nathansnathan Nice job. I just read through your thread.
The p... Dec 28 2013, 08:55 AM rhodyguy lost one of those plugs once while driving. engine... Dec 28 2013, 09:10 AM
Mark Henry
The enrichment circuits have a washer, plunger,... Apr 10 2013, 07:07 AM Cairo94507 I no longer have Webers on my car but I thoroughly... Apr 8 2013, 09:51 PM rhodyguy good thread. well written and ++ for the pictures.... Apr 9 2013, 07:44 AM euro911 Nice work George ... now finish them :lol:
I did... Apr 10 2013, 02:56 AM FourBlades I like the closeup pictures.
Nice work! :be... Apr 10 2013, 06:37 AM ThePaintedMan Thanks guys,
The carbs are actually much furthe... Apr 10 2013, 07:13 AM Mark Henry
Thanks guys,
The carbs are actually much furth... Apr 10 2013, 08:10 AM ThePaintedMan
Personally the circuit sucks big time, if they ev... Apr 10 2013, 08:12 AM RoadGlue Okay! I'll stop lurking. George, I really ... Apr 10 2013, 08:29 AM Mark Henry Just be careful tapping that you don't put too... Apr 10 2013, 10:49 AM URY914 You can pick up a cheap sonic cleaners at Harbour ... Apr 10 2013, 12:31 PM ThePaintedMan Finishing up where I left off...
Once you have re... Dec 17 2013, 11:49 AM ThePaintedMan Now you're ready to start tapping. First, plug... Dec 17 2013, 11:59 AM ThePaintedMan Once both sides are done, remove your packing mate... Dec 17 2013, 12:03 PM ThePaintedMan Finally, you should be ready for reassembly. Blow ... Dec 17 2013, 12:12 PM ThePaintedMan Next, move on to installing the accelerator pump j... Dec 17 2013, 12:19 PM ThePaintedMan Next, begin installing the remaining hardware on t... Dec 17 2013, 12:28 PM ThePaintedMan Now move on to the accelerator pump cover.
Note ... Dec 17 2013, 12:37 PM RoadGlue Great work George! This may be a candidate for... Dec 17 2013, 01:21 PM ThePaintedMan Next, move on to the top of the carb. Remove the 1... Dec 17 2013, 05:05 PM ThePaintedMan Now comes the art of setting the float level. Thou... Dec 17 2013, 05:22 PM rhodyguy nice write up george. don't forget to mention ... Dec 17 2013, 05:25 PM ThePaintedMan Next, turn the carb top over and allow the float t... Dec 17 2013, 05:26 PM ThePaintedMan Now we need to install the linkage arms and associ... Dec 17 2013, 05:42 PM ThePaintedMan
[I had one of these plugs completely shoot out du... Dec 17 2013, 09:49 PM timothy_nd28 +1 on making this a classic thread Dec 17 2013, 06:00 PM ThePaintedMan That just about does it! You should have a nic... Dec 17 2013, 06:16 PM nathansnathan Nice job. I just read through your thread.
The p... Dec 28 2013, 08:55 AM rhodyguy lost one of those plugs once while driving. engine... Dec 28 2013, 09:10 AM |
1 User(s) are reading this topic (1 Guests and 0 Anonymous Users)
0 Members:

|
Lo-Fi Version | Time is now: 2nd April 2026 - 07:07 PM |
Invision Power Board
v9.1.4 © 2026 IPS, Inc.