|
|
|
Porsche, and the Porsche crest are registered trademarks of Dr. Ing. h.c. F. Porsche AG.
This site is not affiliated with Porsche in any way. Its only purpose is to provide an online forum for car enthusiasts. All other trademarks are property of their respective owners. |
|
|


| Dr Evil |
 Jun 12 2012, 05:54 PM Jun 12 2012, 05:54 PM
Post
#1
|
|
Send me your transmission!  Group: Members Posts: 23,044 Joined: 21-November 03 From: Loveland, OH 45140 Member No.: 1,372 Region Association: MidAtlantic Region |
From my 31 pages of notes that I have been emailing a lot of copies of lately because I cant seem to post them here in PDF format.
Adjusting your shifter Concept: Before you can easily adjust your shifter you need to conceptualize what is happening. I can only do so well with words and diagrams, but once you get the concept you will be surprised how easy it is to adjust the shifter perfectly in a very short amount of time. For this explanation, reference figures 2, 3, and 4 below. Figure 2 is the conceptual depiction of how the shifter should be when aligned correctly. The black outline is where you would like the shift pattern to be, and is where the stick-shift actually can travel. The red lines represent where the shift pattern actually is. Stay with me, and make sure you get this concept. Now a common issue is that people end up with only some gears, but not all. Refer to figure 3. You will notice that the red lines are to the right and up from the desired location of the shifter. In this setup you would only be able to select 1st and 3rd gears, but 1st would be near where 3rd should be and 3rd would be near where 5th should be. About now I hope you are having that “ah ha!” moment. Adjustment: 1. Select a gear. In using figure 3 it would be wisest to select 3rd. You can determine that it is 3rd that you are selecting because there will be no gears past the middle (1st) and 3rd is the next over on the bottom. Also, you would have no upper gears. 2. Loosen the pinch bolt under the stick shift 3. Stabilize the shift rod in the tunnel so it doesn’t move, this way you are only moving the stick-shift and not the rod, thus not changing the fact that the gear box is in third. 4. Move the shifter to where 3rd should be. Second and 3rd are the only gears to use as they lie on the plane of the spring plate and you can use the shifters spring plate to guide you to where 2 and 3 should be. 5. Tighten pinch bolt and see if you can get all gears. The short answer is, put transmission into known 2nd or 3rd gear, then move the stick to where that gear is supposed to be. Now use this concept on Figure 4. In figure 4 you would only have gears 1, 3, and 5 as R, 2, 4 would be out of reach of your current adjustment. To fix this scenario you would follow the same steps as stated above. I hope this clarifies this simple procedure. It is a bit more difficult to explain in prose. Fig 2 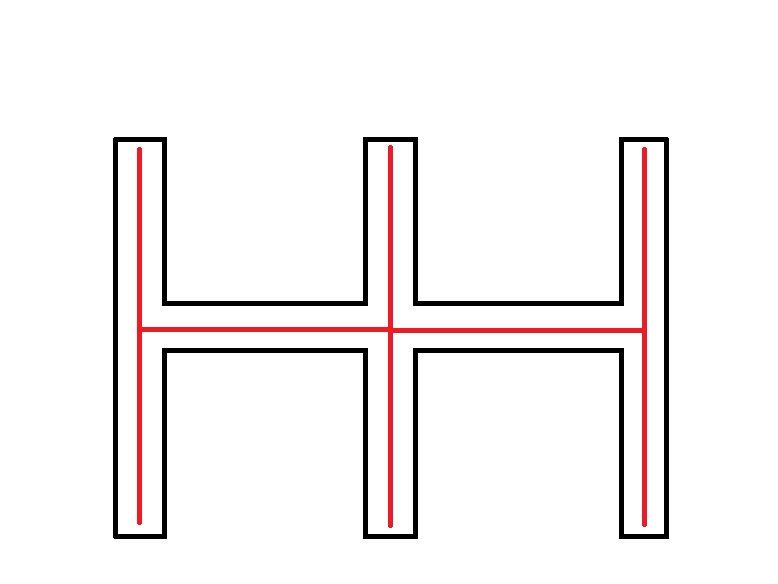 Fig 3 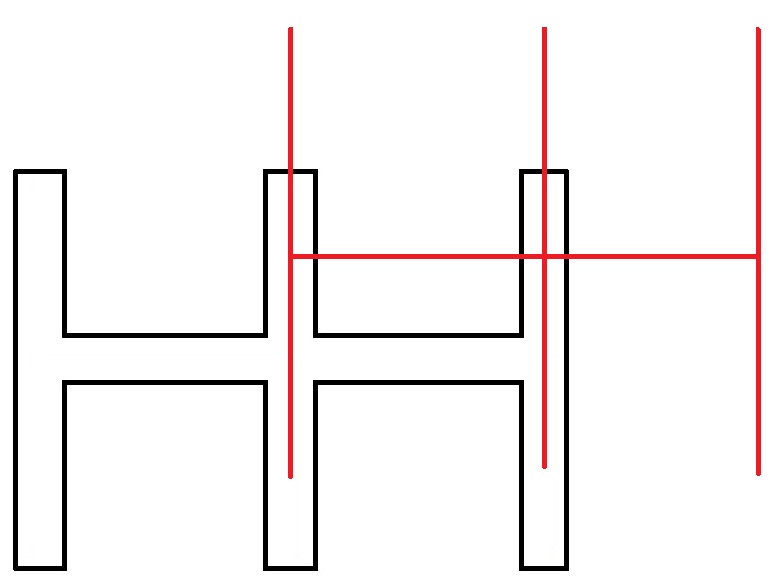 Fig 4 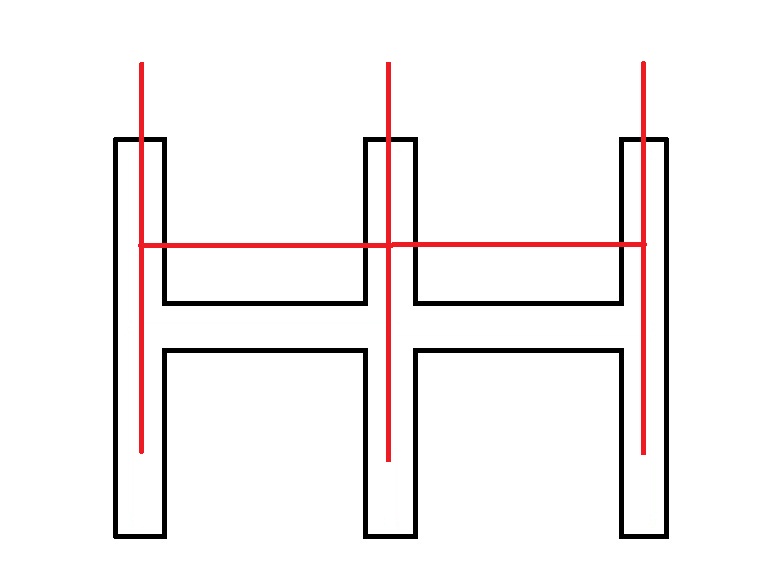 |
   |

 
|
  |
Replies
| stugray |
Jun 8 2014, 11:35 AM
Post
#2
|
|
Advanced Member Group: Members Posts: 3,825 Joined: 17-September 09 From: Longmont, CO Member No.: 10,819 Region Association: None |
Another trick I learned after doing this about a hundered times:
Put a dab of white paint (I use good ole white out) on the joint where you make adjustments. Then put a pen mark on the white paint to register the position of the shaft (both in/out & twist) before you start making adjustments. One of the hardest parts is: as you are messing with it, guaranteed you will go "Wait did that just move? Which way did it move?" With the starting marks you can tell which way you are going. By using the white out, you can just knock it all off with a wire brush and start again with new marks. |
|
|
|
| HalfMoon |
Jun 8 2014, 08:38 PM
Post
#3
|
|
Senior Member Group: Members Posts: 828 Joined: 13-November 12 From: Shenandoah Junction, WV Member No.: 15,144 Region Association: MidAtlantic Region |
QUOTE(stugray @ Jun 8 2014, 01:35 PM)  Another trick I learned after doing this about a hundered times: Put a dab of white paint (I use good ole white out) on the joint where you make adjustments. Then put a pen mark on the white paint to register the position of the shaft (both in/out & twist) before you start making adjustments. One of the hardest parts is: as you are messing with it, guaranteed you will go "Wait did that just move? Which way did it move?" With the starting marks you can tell which way you are going. By using the white out, you can just knock it all off with a wire brush and start again with new marks. YES! This simple little piece of advice helped enormously the other day when I was making adjustments to regain my high gears. |
|
|
|
Posts in this topic
 Dr Evil Shifter adjustment instructions Jun 12 2012, 05:54 PM
 Dave_Darling Psst--this isn't clutch adjustment, this is ge... Jun 12 2012, 06:04 PM Dr Evil Damn, I need to change the title :doh: Jun 12 2012, 06:13 PM Dr Evil BTW, the concepts apply to side and tail, the only... Jun 12 2012, 06:14 PM rjames If shifting is pretty good most of the time, is it... Jun 12 2012, 10:40 PM Dr Evil If your shifting is basically as in Fig 2, you are... Jun 13 2012, 09:52 AM Scott S I worked on this for quite a while last week. I go... Jun 13 2012, 10:23 AM
 Dr Evil
I worked on this for quite a while last week. I g... Jun 13 2012, 11:25 AM 02loftsmoor Tip; if you go to the print tab you will have more... Jun 13 2012, 11:16 AM Dr Evil
Tip; if you go to the print tab you will have mor... Jun 13 2012, 11:23 AM Cory Any one can help? tried to adjust the linkage and ... Jun 7 2014, 02:38 PM Mblizzard
Any one can help? tried to adjust the linkage and... Jun 7 2014, 06:28 PM Cory
Any one can help? tried to adjust the linkage and... Jun 21 2014, 08:33 PM vw505 My shifter is out and I don't know what gear I... Jun 7 2014, 09:22 PM McMark I would pull away the cover over the shifter at th... Jun 8 2014, 09:08 AM bulitt Racer Chris procedure worked well for me.
http://... Jun 8 2014, 11:19 AM PThompson509 I just got through doing this, and ended up recrea... Jun 8 2014, 11:25 AM tessmar In my case it was a single setscrew which had back... Mar 24 2015, 04:05 PM Dutchdriver Thanks, I am gonna give Dr. Evil's procedure a... Jun 22 2016, 02:14 AM jkb944t Thanks! Perfect timing on this article since I... Jun 22 2016, 10:48 AM ThunderbirdDrive Thanks for all this info.
Im a new 914 owner and ... Jun 22 2016, 07:13 PM ThunderbirdDrive Problem all sorted out now.
Thanks this thread wa... Jun 24 2016, 03:31 PM PotterPorsche Chris technique worked perfect. Apr 1 2018, 07:04 PM
Dr Evil
I worked on this for quite a while last week. I g... Jun 13 2012, 11:25 AM 02loftsmoor Tip; if you go to the print tab you will have more... Jun 13 2012, 11:16 AM Dr Evil
Tip; if you go to the print tab you will have mor... Jun 13 2012, 11:23 AM Cory Any one can help? tried to adjust the linkage and ... Jun 7 2014, 02:38 PM Mblizzard
Any one can help? tried to adjust the linkage and... Jun 7 2014, 06:28 PM Cory
Any one can help? tried to adjust the linkage and... Jun 21 2014, 08:33 PM vw505 My shifter is out and I don't know what gear I... Jun 7 2014, 09:22 PM McMark I would pull away the cover over the shifter at th... Jun 8 2014, 09:08 AM bulitt Racer Chris procedure worked well for me.
http://... Jun 8 2014, 11:19 AM PThompson509 I just got through doing this, and ended up recrea... Jun 8 2014, 11:25 AM tessmar In my case it was a single setscrew which had back... Mar 24 2015, 04:05 PM Dutchdriver Thanks, I am gonna give Dr. Evil's procedure a... Jun 22 2016, 02:14 AM jkb944t Thanks! Perfect timing on this article since I... Jun 22 2016, 10:48 AM ThunderbirdDrive Thanks for all this info.
Im a new 914 owner and ... Jun 22 2016, 07:13 PM ThunderbirdDrive Problem all sorted out now.
Thanks this thread wa... Jun 24 2016, 03:31 PM PotterPorsche Chris technique worked perfect. Apr 1 2018, 07:04 PM |
2 User(s) are reading this topic (2 Guests and 0 Anonymous Users)
0 Members:

|
Lo-Fi Version | Time is now: 13th July 2026 - 09:46 PM |
Invision Power Board
v9.1.4 © 2026 IPS, Inc.