|
|
|
Porsche, and the Porsche crest are registered trademarks of Dr. Ing. h.c. F. Porsche AG.
This site is not affiliated with Porsche in any way. Its only purpose is to provide an online forum for car enthusiasts. All other trademarks are property of their respective owners. |
|
|


| worn |
 Nov 5 2013, 08:55 AM Nov 5 2013, 08:55 AM
Post
#1
|
|
Winner of the Utah Twisted Joint Award  Group: Members Posts: 3,621 Joined: 3-June 11 From: Madison, WI and North Bend WA Member No.: 13,152 Region Association: Upper MidWest |
It seems that a lot of the triple gauge business involves making new holes in the back of the can. I figured I could do that. Especially after watching the threads here over and over. Thanks to all.
My problem was the gauge face. I di not want a simple cut out for the gauges. I wanted it embossed in like stock. So here is what I came up with. 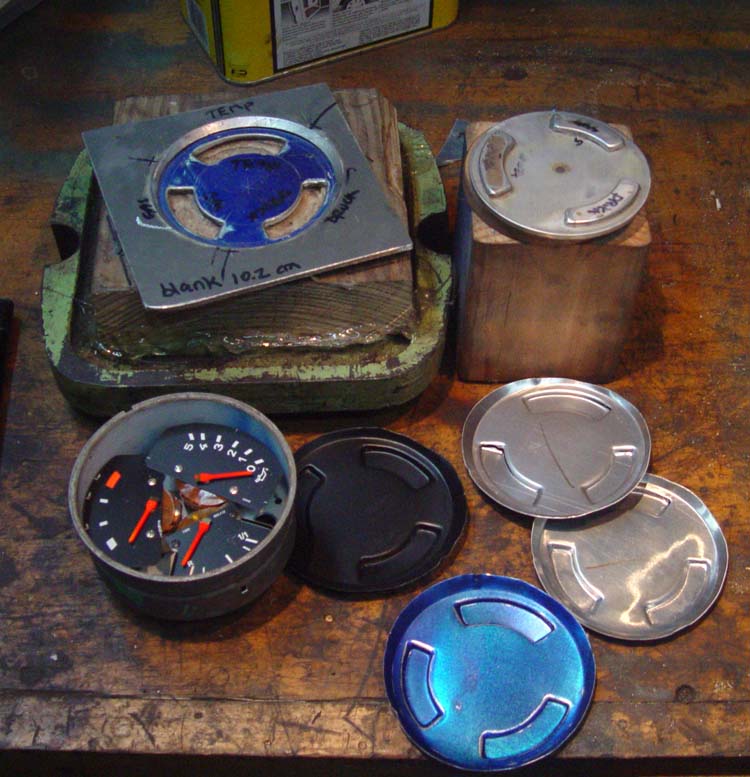 The dies fit in my old cast iron hydraulic press. You can see the bottom plate in the photo. I am having some tears, but generally they are about at the cut out line (IMG:style_emoticons/default/biggrin.gif) so maybe they are OK. I found that even with some silversmithing under my belt, I cannot do this by hand. The press makes it flat and even. A coat of high build primer, sanding for flat and trimming and a coat of satin black and I am done I think. Then I need to do some wiring. BTW, I am looking for some balled up otherwise useless harness wires so I can match the wire colors. |
   |

 
|
  |
Replies
| worn |
Jul 30 2015, 11:08 AM
Post
#2
|
|
Winner of the Utah Twisted Joint Award Group: Members Posts: 3,621 Joined: 3-June 11 From: Madison, WI and North Bend WA Member No.: 13,152 Region Association: Upper MidWest |
OK, triple gauge: take two for Warren
I decided to be more serious. Boy was that a long haul. Started with making real dies 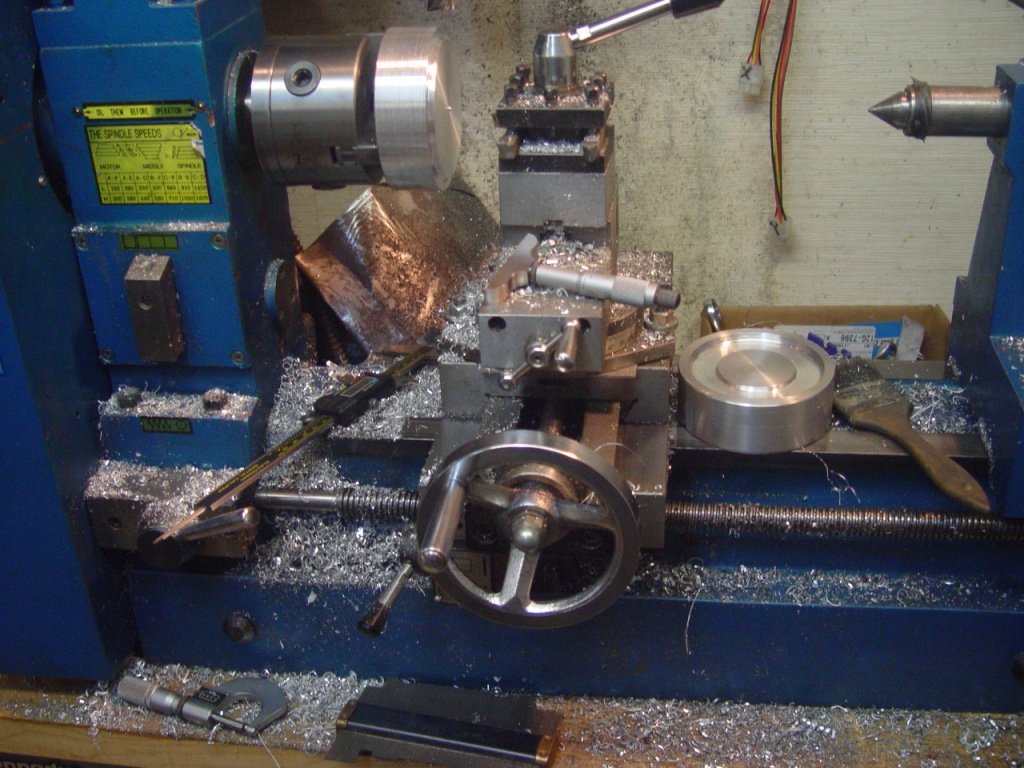 Then there was some milling and shaping 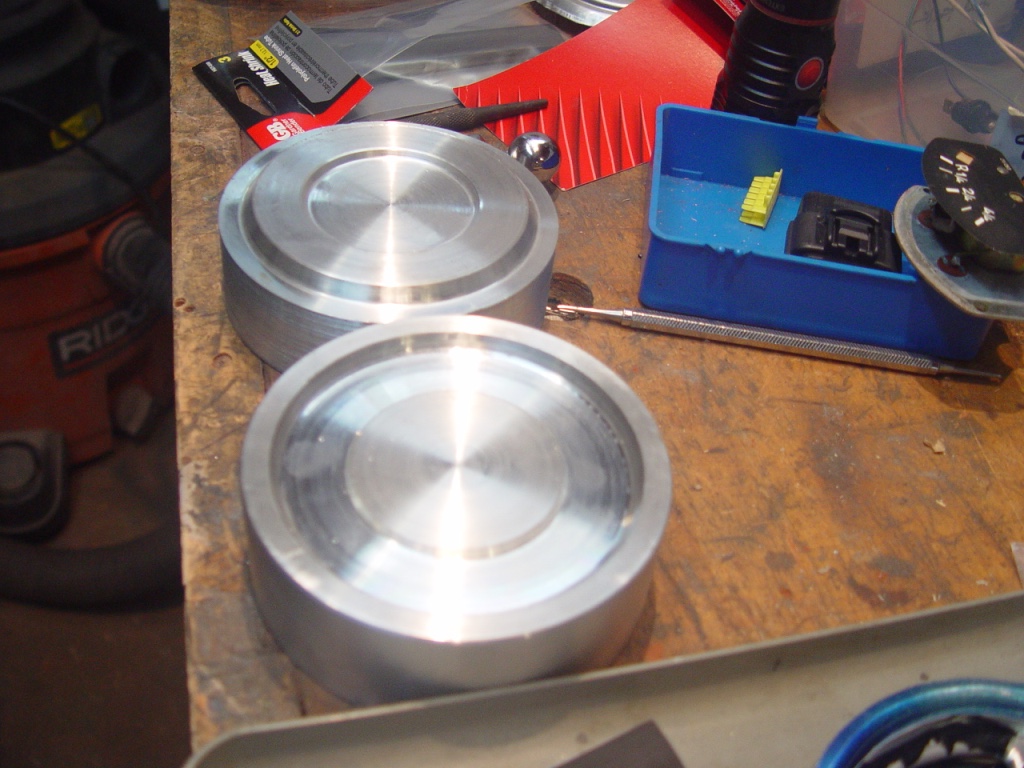 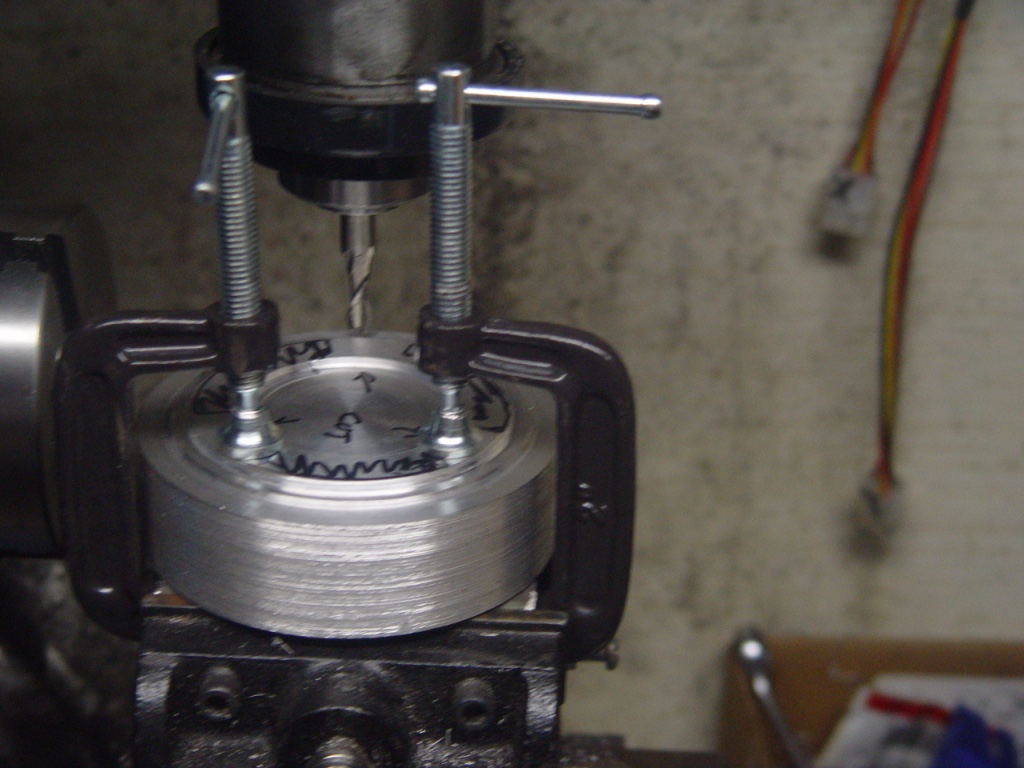 Then it was time to press - 016 aluminum sheet. Similar to original thickness   Then it suddenly got very very difficult. I had the blanks and I found that I could perfectly duplicate the letters with the laser printer. It went onto stick on vinyl.  This was one of the better ones. Getting things to stick and align and not show shiny edges was a nightmare. I tried real paper too. Either wrinkles bubbles or the ink would scratch off. Still the VDO was right where I wanted it... Onward anyhow  Lights with color anyway you like. I like plain blue-green white thank you. Sort of Stewart Warner look Then the gauge cans and rubber lights. 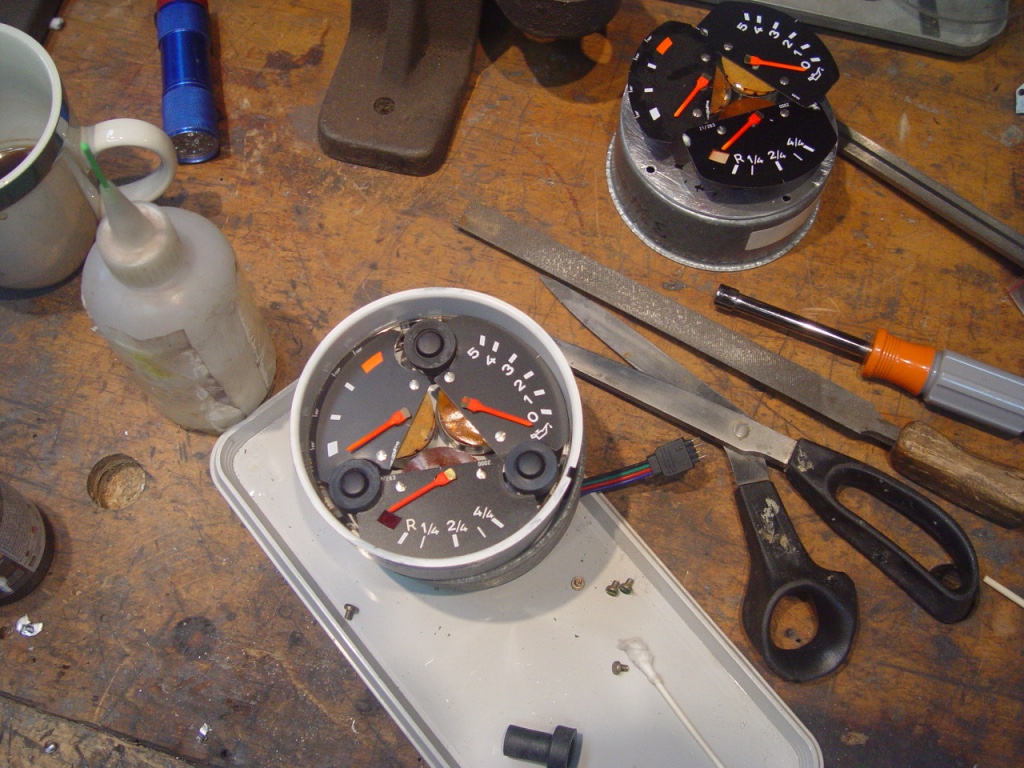 Wish it wasn't a plastic lens for these gauges, but I did polish it. 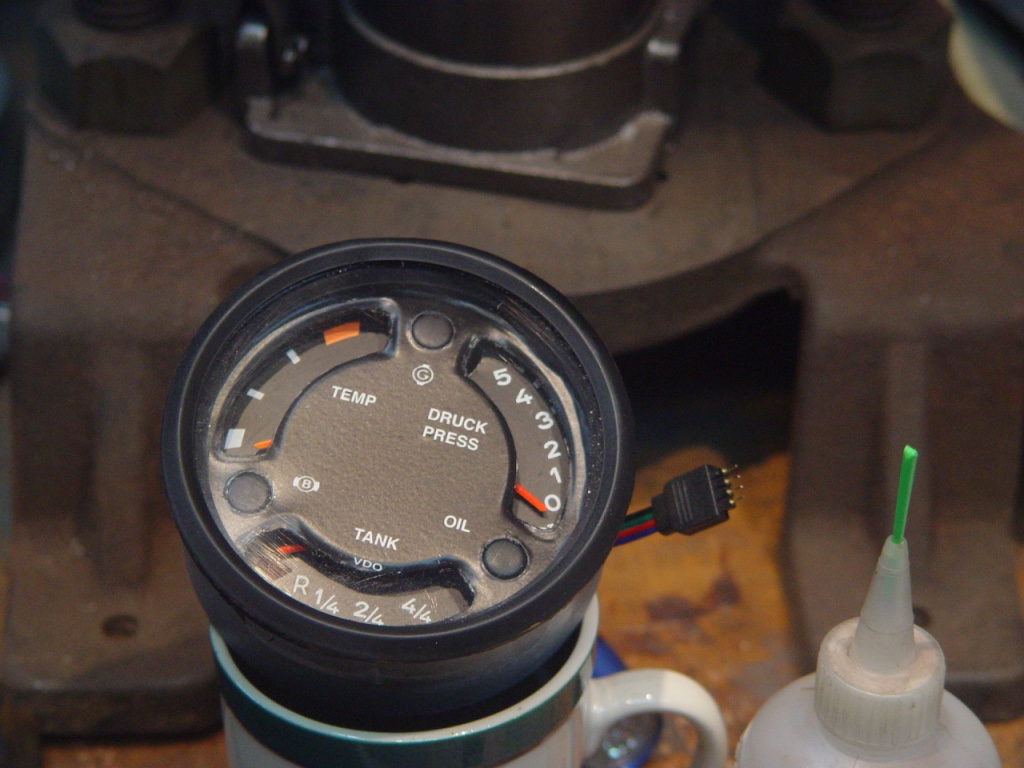 So there you have it: Take-2 I have a silk screen with the emulsion ready to expose, so maybe there will be a take 3. Two months of fiddling because this is the oil pressure gauge and I want to install the 3.2. Yes, it is an odd approach now that you mention it. Anyone with wisdom about lettering would be welcome to chime in. I know it isn't quite the thing. |
|
|
|
Posts in this topic
worn I figured on a triple gauge Take-2 see the end. Nov 5 2013, 08:55 AM timothy_nd28 Awesome, this is the exact way these should be don... Nov 5 2013, 09:03 AM timothy_nd28 Is there enough material to fold some tabs over?
Nov 5 2013, 09:09 AM
timothy_nd28 Awesome, this is the exact way these should be don... Nov 5 2013, 09:03 AM timothy_nd28 Is there enough material to fold some tabs over?
Nov 5 2013, 09:09 AM
 worn
Is there enough material to fold some tabs over?
... Nov 5 2013, 09:58 AM billh1963 Will these be available for purchase? Nov 5 2013, 10:11 AM Mark Henry
Will these be available for purchase?
Yes, I was... Nov 5 2013, 10:33 AM worn
Will these be available for purchase?
I have to... Nov 5 2013, 11:09 AM peteyd have you tried annealing the aluminum first? It sh... Nov 5 2013, 11:16 AM 914forme Way to improve on our original design. :headbang... Nov 5 2013, 11:18 AM Mblizzard Are you using any lubricant while pressing. That ... Nov 5 2013, 11:26 AM rdauenhauer Ive got a big ole box of old hacked harnesses LMK ... Nov 5 2013, 09:19 PM nsr-jamie We use very thin vinly plastic in the presses here... Nov 5 2013, 09:50 PM John Those are interesting indeed. Once upon a time I ... Nov 5 2013, 10:13 PM CptTripps GREAT project. Bravo.
...I have nothing to add p... Nov 6 2013, 08:02 AM arcadeforever beautiful job!! Nov 6 2013, 08:42 AM r_towle quad gauge please
temp
pressure
fuel
volts Nov 6 2013, 04:14 PM worn
quad gauge please
temp
pressure
fuel
volts
Tha... Nov 6 2013, 04:22 PM timothy_nd28 I could order you a furnace, and then have you pic... Nov 6 2013, 04:30 PM 914forme Oh nice and great job :first: I'll take one,... Jul 30 2015, 11:52 AM worn
Oh nice and great job :first: I'll take one... Jul 30 2015, 12:00 PM worn
[quote name='914forme' post='2216774' date='Jul 3... Aug 5 2015, 02:04 PM 914forme
[quote name='914forme' post='2216774' date='Jul 3... Aug 5 2015, 06:52 PM mepstein
[quote name='914forme' post='2216774' date='Jul ... Aug 5 2015, 07:31 PM 914forme
[quote name='914forme' post='2219318' date='Aug 5... Aug 6 2015, 04:43 AM worn
[quote name='914forme' post='2216774' date='Jul ... Aug 6 2015, 02:30 PM mepstein I'd like one. Jul 30 2015, 12:14 PM billh1963 Yep...if you decide to sell these put me on a list... Jul 30 2015, 12:20 PM Valy Wow! Great job! Jul 30 2015, 01:39 PM '73-914kid Please put me down for a piece as well. Been runni... Jul 30 2015, 01:50 PM mepstein Put me on your list. I have the 911 gauges ready t... Aug 5 2015, 03:44 PM
worn
Is there enough material to fold some tabs over?
... Nov 5 2013, 09:58 AM billh1963 Will these be available for purchase? Nov 5 2013, 10:11 AM Mark Henry
Will these be available for purchase?
Yes, I was... Nov 5 2013, 10:33 AM worn
Will these be available for purchase?
I have to... Nov 5 2013, 11:09 AM peteyd have you tried annealing the aluminum first? It sh... Nov 5 2013, 11:16 AM 914forme Way to improve on our original design. :headbang... Nov 5 2013, 11:18 AM Mblizzard Are you using any lubricant while pressing. That ... Nov 5 2013, 11:26 AM rdauenhauer Ive got a big ole box of old hacked harnesses LMK ... Nov 5 2013, 09:19 PM nsr-jamie We use very thin vinly plastic in the presses here... Nov 5 2013, 09:50 PM John Those are interesting indeed. Once upon a time I ... Nov 5 2013, 10:13 PM CptTripps GREAT project. Bravo.
...I have nothing to add p... Nov 6 2013, 08:02 AM arcadeforever beautiful job!! Nov 6 2013, 08:42 AM r_towle quad gauge please
temp
pressure
fuel
volts Nov 6 2013, 04:14 PM worn
quad gauge please
temp
pressure
fuel
volts
Tha... Nov 6 2013, 04:22 PM timothy_nd28 I could order you a furnace, and then have you pic... Nov 6 2013, 04:30 PM 914forme Oh nice and great job :first: I'll take one,... Jul 30 2015, 11:52 AM worn
Oh nice and great job :first: I'll take one... Jul 30 2015, 12:00 PM worn
[quote name='914forme' post='2216774' date='Jul 3... Aug 5 2015, 02:04 PM 914forme
[quote name='914forme' post='2216774' date='Jul 3... Aug 5 2015, 06:52 PM mepstein
[quote name='914forme' post='2216774' date='Jul ... Aug 5 2015, 07:31 PM 914forme
[quote name='914forme' post='2219318' date='Aug 5... Aug 6 2015, 04:43 AM worn
[quote name='914forme' post='2216774' date='Jul ... Aug 6 2015, 02:30 PM mepstein I'd like one. Jul 30 2015, 12:14 PM billh1963 Yep...if you decide to sell these put me on a list... Jul 30 2015, 12:20 PM Valy Wow! Great job! Jul 30 2015, 01:39 PM '73-914kid Please put me down for a piece as well. Been runni... Jul 30 2015, 01:50 PM mepstein Put me on your list. I have the 911 gauges ready t... Aug 5 2015, 03:44 PM |
1 User(s) are reading this topic (1 Guests and 0 Anonymous Users)
0 Members:

|
Lo-Fi Version | Time is now: 8th July 2026 - 03:33 PM |
Invision Power Board
v9.1.4 © 2026 IPS, Inc.