|
|
|
Porsche, and the Porsche crest are registered trademarks of Dr. Ing. h.c. F. Porsche AG.
This site is not affiliated with Porsche in any way. Its only purpose is to provide an online forum for car enthusiasts. All other trademarks are property of their respective owners. |
|
|


| worn |
 Mar 28 2018, 10:47 AM Mar 28 2018, 10:47 AM
Post
#1
|
|
Winner of the Utah Twisted Joint Award  Group: Members Posts: 3,574 Joined: 3-June 11 From: Madison, WI and North Bend WA Member No.: 13,152 Region Association: Upper MidWest |
I was hoping to have this put together but had an argument with a bag of concrete mix and now I have either a herniated disc or a stress fracture. L4 - my favorite. So, it is all I can do to sit at the computer for a half hour. I still am hoping to do WCR, but that is 4,000 miles for me in a 914. Heal faster (IMG:style_emoticons/default/piratenanner.gif)
Anyway here is what we got: Started with the dies from an earlier attempt. Smooth out the old and mill the new 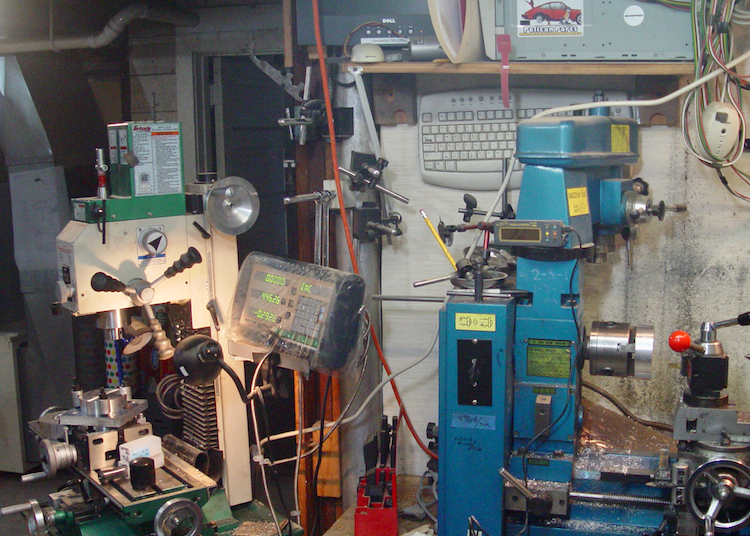 I bought a rotating table and the mill for this project. Well and other things too 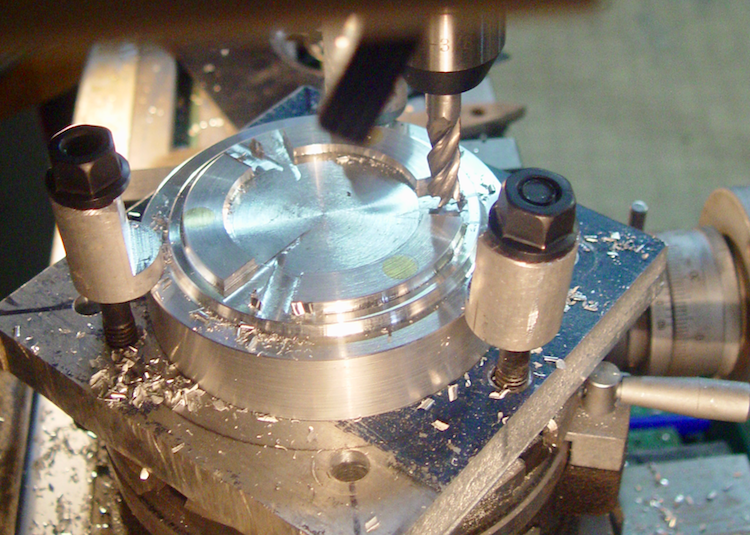 First step was making the clamps. I also made a punch so the I can start with the holes for lights and maintain registration 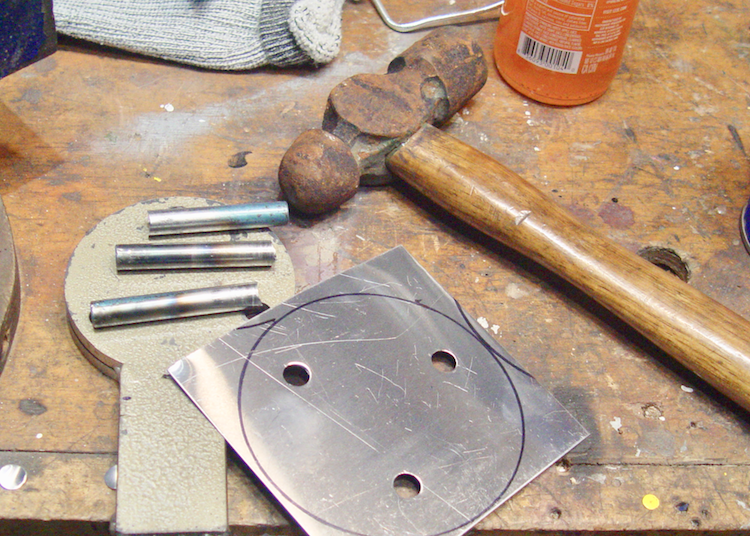 That gives me this: 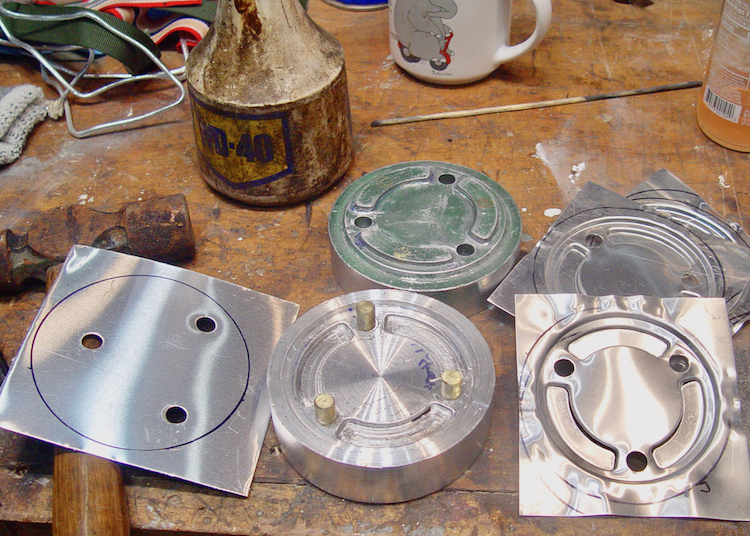 Ready to press. I spent a lot of time setting things up for a pin router to cut out the gauge windows, but that didn't work out. So I have the dies and the sheet ready to form. |
   |

 
|
  |
Replies
| John |
Mar 29 2018, 10:23 AM
Post
#2
|
|
member? what's a member? Group: Members Posts: 3,393 Joined: 30-January 04 From: Evansville, IN (SIRPCA) Member No.: 1,615 Region Association: None |
It takes a little more time to remove the bulb holders, but what I do is to cut the original baking plates close to the holders and then carefully break out the bulb holders. Once separated from the old destroyed backing plates, I insert a close fitting mandrel into the bulb holder and remove the original crimp from the bulb holders.
Then I simply insert the straightened out bulb holders into my new backing plates and re-crimp. What I use for a crimp is a home made tubular mandrel that the main bodies of the bulb holders fit into, then I expand the tail of the bulb holder with an appropriately shaped tool like a small 1/4" socket. This re-creates the crimped bulb holder into the backing plate. My backing plates are zinc plated steel similar in thickness to the original backing plates. I know the time I save by not soldering the tubes makes up for the extra time it takes to harvest the bulb holders from the donor gauge backing plates. I looked back at my timeline, and I guess I have been making my version of these things for close to 12 years. I never did inventory complete kits since everyone wants different things. |
|
|
|
Posts in this topic
worn triple progress Mar 28 2018, 10:47 AM 914Sixer Sweet ! Mar 28 2018, 10:57 AM worn From there it is a matter of opening the window se... Mar 28 2018, 10:59 AM
 worn So now it is a matter of assembly.
I decided to ... Mar 28 2018, 11:05 AM worn The light guides hold the face off the gauges, and... Mar 28 2018, 11:40 AM gothspeed Amazing work!! :trophy: Mar 28 2018, 01:14 PM mepstein We used to call it a 904 gauge Mar 28 2018, 01:47 PM worn
We used to call it a 904 gauge
That’s what I m... Mar 28 2018, 03:52 PM 914forme Your Welcome, sorry to hear about the back issues. Mar 28 2018, 03:40 PM worn
Your Welcome, sorry to hear about the back issues... Mar 28 2018, 03:54 PM John Good progress!
I tried soldering the tubes on... Mar 29 2018, 06:54 AM worn
Good progress!
I tried soldering the tubes o... Mar 29 2018, 09:43 AM worn Well, closing in on the first one that will go int... Apr 3 2018, 10:02 AM gereed75 Very well done! What did you ultimately use f... Apr 3 2018, 10:14 AM worn
Very well done! What did you ultimately use ... Apr 3 2018, 06:29 PM Mueller You sir are a genius! Great work.... Apr 3 2018, 11:23 AM Dr Evil Fantastic! Apr 3 2018, 01:13 PM mb911 Wow I want one of those. Nice job. Apr 3 2018, 03:29 PM 914forme Great Job, :Qarl: and you know I am on that list... Apr 3 2018, 06:36 PM worn
Great Job, :Qarl: and you know I am on that lis... Apr 4 2018, 04:46 PM John They do look nice with rotated numbers.
Apr 4 2018, 12:24 PM worn
They do look nice with rotated numbers.
They do ... Apr 4 2018, 04:48 PM worn
They do look nice with rotated numbers.
Yes the... Apr 13 2018, 09:51 AM worn More progress - I am feeling better. Still not a ... Apr 13 2018, 10:02 AM djway Nice work.
Being able to machine metal sure opens ... Apr 4 2018, 10:11 PM RickS You have mad skills sir. Very nice work.
Sorry t... Apr 4 2018, 11:15 PM douglastic If only I had a 914 to put one in!!
:cho... Apr 13 2018, 11:34 AM daytona Beautiful work.
I could definitely use one of thes... Apr 13 2018, 12:31 PM worn
Beautiful work.
I could definitely use one of the... Apr 13 2018, 01:35 PM 914Sixer I have a question. Why to two different scales. ... Apr 14 2018, 09:00 AM worn
I have a question. Why to two different scales. ... Apr 14 2018, 10:48 AM nditiz1 In for 1! wait is this a GB :D Apr 20 2018, 01:34 PM
worn So now it is a matter of assembly.
I decided to ... Mar 28 2018, 11:05 AM worn The light guides hold the face off the gauges, and... Mar 28 2018, 11:40 AM gothspeed Amazing work!! :trophy: Mar 28 2018, 01:14 PM mepstein We used to call it a 904 gauge Mar 28 2018, 01:47 PM worn
We used to call it a 904 gauge
That’s what I m... Mar 28 2018, 03:52 PM 914forme Your Welcome, sorry to hear about the back issues. Mar 28 2018, 03:40 PM worn
Your Welcome, sorry to hear about the back issues... Mar 28 2018, 03:54 PM John Good progress!
I tried soldering the tubes on... Mar 29 2018, 06:54 AM worn
Good progress!
I tried soldering the tubes o... Mar 29 2018, 09:43 AM worn Well, closing in on the first one that will go int... Apr 3 2018, 10:02 AM gereed75 Very well done! What did you ultimately use f... Apr 3 2018, 10:14 AM worn
Very well done! What did you ultimately use ... Apr 3 2018, 06:29 PM Mueller You sir are a genius! Great work.... Apr 3 2018, 11:23 AM Dr Evil Fantastic! Apr 3 2018, 01:13 PM mb911 Wow I want one of those. Nice job. Apr 3 2018, 03:29 PM 914forme Great Job, :Qarl: and you know I am on that list... Apr 3 2018, 06:36 PM worn
Great Job, :Qarl: and you know I am on that lis... Apr 4 2018, 04:46 PM John They do look nice with rotated numbers.
Apr 4 2018, 12:24 PM worn
They do look nice with rotated numbers.
They do ... Apr 4 2018, 04:48 PM worn
They do look nice with rotated numbers.
Yes the... Apr 13 2018, 09:51 AM worn More progress - I am feeling better. Still not a ... Apr 13 2018, 10:02 AM djway Nice work.
Being able to machine metal sure opens ... Apr 4 2018, 10:11 PM RickS You have mad skills sir. Very nice work.
Sorry t... Apr 4 2018, 11:15 PM douglastic If only I had a 914 to put one in!!
:cho... Apr 13 2018, 11:34 AM daytona Beautiful work.
I could definitely use one of thes... Apr 13 2018, 12:31 PM worn
Beautiful work.
I could definitely use one of the... Apr 13 2018, 01:35 PM 914Sixer I have a question. Why to two different scales. ... Apr 14 2018, 09:00 AM worn
I have a question. Why to two different scales. ... Apr 14 2018, 10:48 AM nditiz1 In for 1! wait is this a GB :D Apr 20 2018, 01:34 PM |
2 User(s) are reading this topic (2 Guests and 0 Anonymous Users)
0 Members:

|
Lo-Fi Version | Time is now: 6th May 2026 - 08:20 PM |
Invision Power Board
v9.1.4 © 2026 IPS, Inc.