|
|
|
Porsche, and the Porsche crest are registered trademarks of Dr. Ing. h.c. F. Porsche AG.
This site is not affiliated with Porsche in any way. Its only purpose is to provide an online forum for car enthusiasts. All other trademarks are property of their respective owners. |
|
|


| Retroracer |
 Nov 17 2018, 07:29 PM Nov 17 2018, 07:29 PM
Post
#1
|
|
Senior Member  Group: Members Posts: 654 Joined: 7-July 13 From: Bend OR Member No.: 16,100 Region Association: Pacific Northwest |
So this post builds on, and references Tim’s (timothy_nd28) awesome post here:
http://www.914world.com/bbs2/index.php?sho...719&hl=tach …which details the steps necessary to improve the original VDO tach performance and provide better transient and damping response, coupled with a more universal input. If you’re not familiar with this DIY tach upgrade, best read that first. Given the flexibility and performance upgrade of retrofitting the SunPro/Bosch innards into the VDO casing, I took on the challenge of seeing if a 10K racing tach could be constructed around an early 914-4 tach housing – with a target cost of $100. Read on if this piques your interest; move on if you don’t think this sort of thing is necessary or sensible. A 10K tachometer was an essential part of the GT cars (and other Porsche race cars too), which typically had no redline area indicated under the glass, such that the actual redline could be indicated with a marker or tape, to suit the particular engine build being run for that event. Original 10K VDO units appear for sale occasionally, but the prices are usually prohibitive. 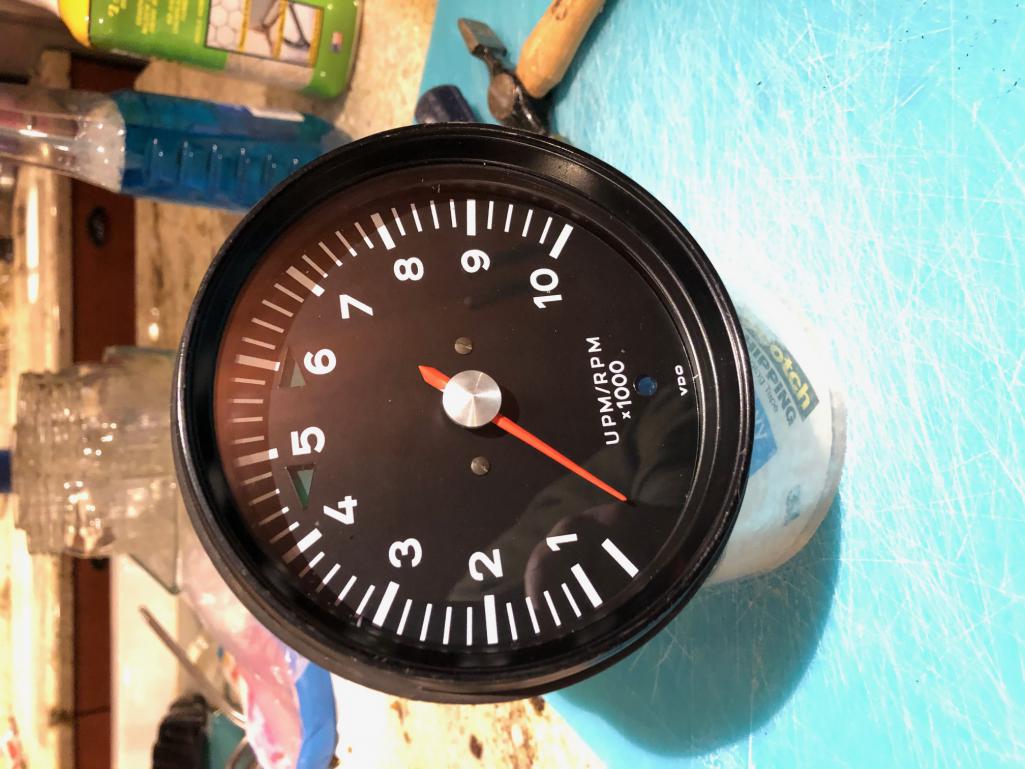 I ordered the Bosch version of the SunPro via Amazon, and disassembled it using Tim's post as suggested: 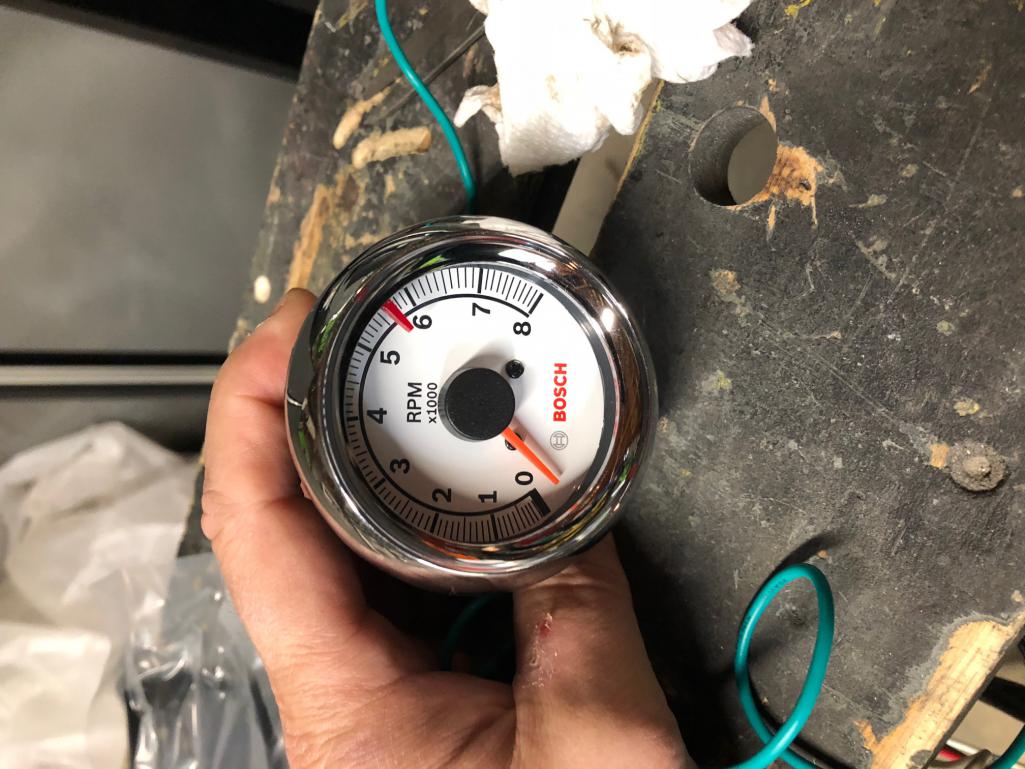 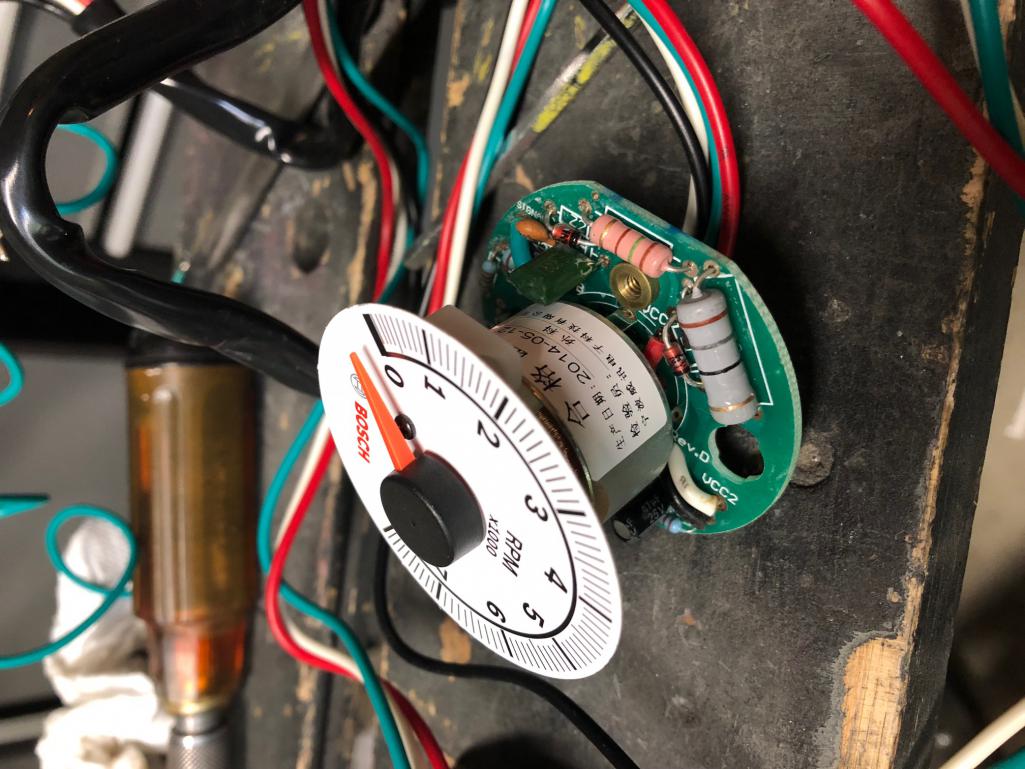 There is some metal fabrication necessary to get the donor VDO fascia to mate up to the new core. This is not difficult, the only thing you may not have around is the M2 tap. 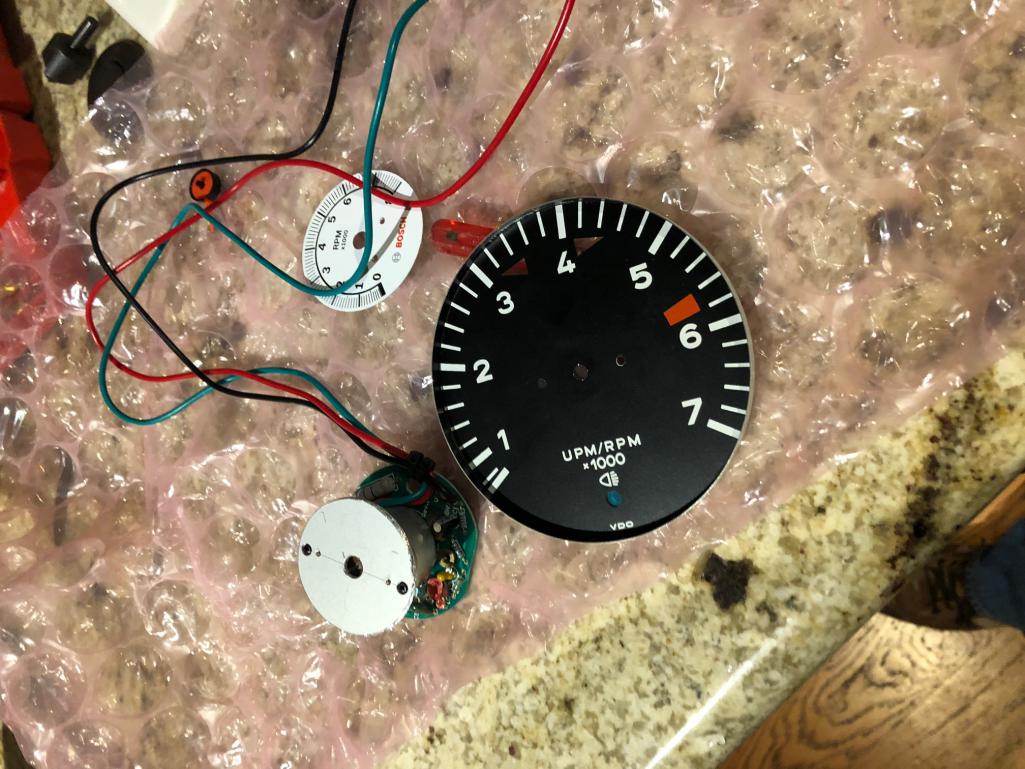 Getting the right fascia: So I toyed with idea of using a drawing or graphics package to replicate the 10K tach face, then somehow print a design on to vinyl, trim it, then glue that over the existing -4 face. Then I realized that I was never going to get round to doing that, so looked at other options. I ended up buying a printed and finished insert fascia from these guys: https://www.heiler-tachodesign.de/Tachomete...ithout-red-Area Not a cheap way to get a result, but they a) offer multiple choices to match various Porsche VDO tachs and other gauges, b) the quality of the fit, paint and graphics are exemplary and c) without the talent and tools for “rolling your own”, there are very few other options. They also allow you to pick custom colors and lettering if you so desire. It took about 2 weeks to arrive, I also ordered a 914-6 style temp gauge replacement at the same time, total cost for both gauge faces including shipping was about $93. 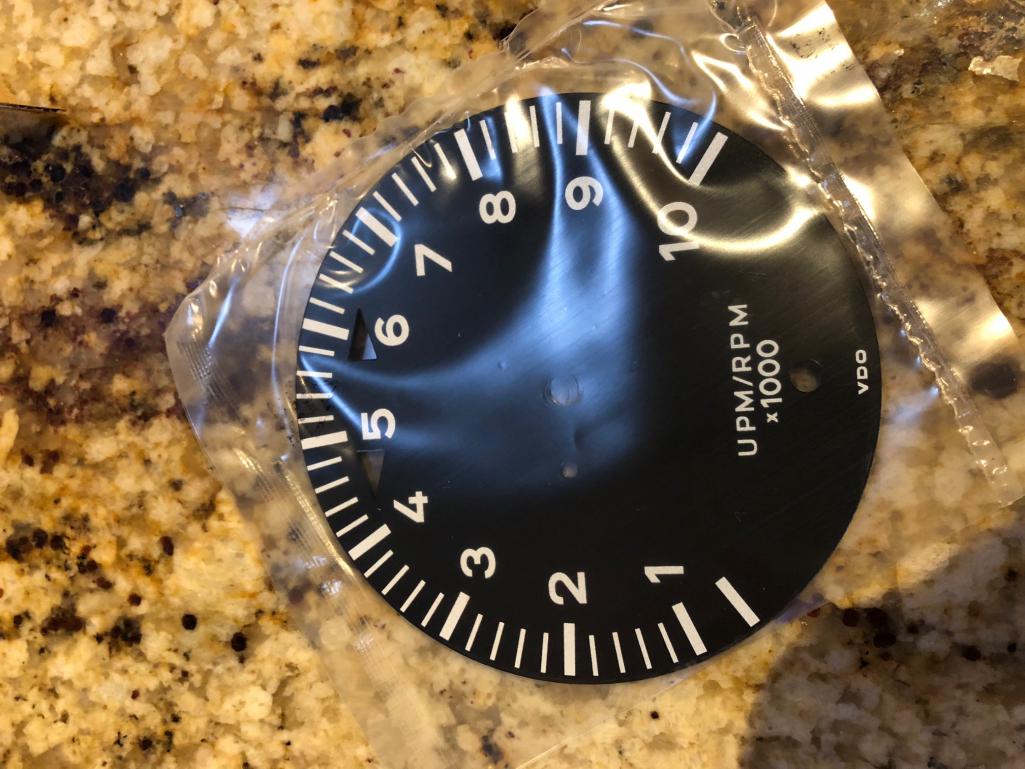 So, $100 target blown already - the tach core is around $35 - but still in the ball park. |
   |

 
|
  |
Replies
| 914forme |
Dec 27 2018, 09:43 AM
Post
#2
|
|
Times a wastin', get wrenchin'! Group: Members Posts: 3,899 Joined: 24-July 04 From: Dayton, Ohio Member No.: 2,388 Region Association: None |
(IMG:style_emoticons/default/lol-2.gif) You really want to know how easy it is (IMG:style_emoticons/default/av-943.gif)
You rotate the needle on the shaft to the proper new location. VDO tach have stops "rests" the Sunpro / Bosch do not, they will travel 360 degrees. More detailed version, many sets of step by steps have been written. Okay here it goes do not get to (IMG:style_emoticons/default/icon8.gif) knowing how it is done. 1. Remove bezel - write-ups can be found on how to do this. 2. Remove needle - well documented 3. Remove face - 2 screws removes the face If changing the guts to a "Modren" (IMG:style_emoticons/default/laugh.gif) tach then follow the write-ups 3a remove guts 3b install new guts - This thread, but Timothy did an excellent writeup on this process. 4. Install your new artwork with numbers in proper orientation 5. Install needles 6. Calibrate tach using a single generator, or tach tester, you can also connect the wires and fire up the car and gently put the needle on it where you digital tach says it goes. Analog tach are just a reference, something that sweeps to make people go wow I can rev and engine. VDO should not be used as a scientific instrument, (IMG:style_emoticons/default/av-943.gif) 7. Clean up and install glass and trim 8. Crimp trim to lock it onto the gauge. Done.... Install in the dash hook up the wires correctly and you're off and running again. Where this gets harder, but not impossible. If you are adding an extra gauge ala 930 style unit. Moving warning lights around, building a custom gauge like a triple, or a quad to the right of the tach. clocking the gauges or painting them, making custom colors and getting all the markings right. Installing a rebuilt speedo - the old mechanical ones can get tricky to setup right. No gauge work is beyond the scope of a reasonably skilled DIYer. Maybe I am not reasonably skilled (IMG:style_emoticons/default/confused24.gif) Custom artwork has all ways been the hardest part of gauge work for me. Old days we had to do it via a silk screen, then we got Alps printers, made life a bit better. Now I am working on two methods that show promise for getting these done, and making them easier to customize for various configurations. |
|
|
|
| djway |
Dec 27 2018, 09:12 PM
Post
#3
|
|
Senior Member Group: Members Posts: 787 Joined: 16-October 15 From: Riverside Member No.: 19,266 Region Association: Southern California |
QUOTE(914forme @ Dec 27 2018, 07:43 AM)  (IMG:style_emoticons/default/lol-2.gif) You really want to know how easy it is (IMG:style_emoticons/default/av-943.gif) You rotate the needle on the shaft to the proper new location. VDO tach have stops "rests" the Sunpro / Bosch do not, they will travel 360 degrees. More detailed version, many sets of step by steps have been written. Okay here it goes do not get to (IMG:style_emoticons/default/icon8.gif) knowing how it is done. 1. Remove bezel - write-ups can be found on how to do this. 2. Remove needle - well documented 3. Remove face - 2 screws removes the face If changing the guts to a "Modren" (IMG:style_emoticons/default/laugh.gif) tach then follow the write-ups 3a remove guts 3b install new guts - This thread, but Timothy did an excellent writeup on this process. 4. Install your new artwork with numbers in proper orientation 5. Install needles 6. Calibrate tach using a single generator, or tach tester, you can also connect the wires and fire up the car and gently put the needle on it where you digital tach says it goes. Analog tach are just a reference, something that sweeps to make people go wow I can rev and engine. VDO should not be used as a scientific instrument, (IMG:style_emoticons/default/av-943.gif) 7. Clean up and install glass and trim 8. Crimp trim to lock it onto the gauge. Done.... Install in the dash hook up the wires correctly and you're off and running again. Where this gets harder, but not impossible. If you are adding an extra gauge ala 930 style unit. Moving warning lights around, building a custom gauge like a triple, or a quad to the right of the tach. clocking the gauges or painting them, making custom colors and getting all the markings right. Installing a rebuilt speedo - the old mechanical ones can get tricky to setup right. No gauge work is beyond the scope of a reasonably skilled DIYer. Maybe I am not reasonably skilled (IMG:style_emoticons/default/confused24.gif) Custom artwork has all ways been the hardest part of gauge work for me. Old days we had to do it via a silk screen, then we got Alps printers, made life a bit better. Now I am working on two methods that show promise for getting these done, and making them easier to customize for various configurations. I miss my Alps |
|
|
|
Posts in this topic
Retroracer 10Krpm / 6-cyl chrome dot tach build Nov 17 2018, 07:29 PM Retroracer One of the key steps for the new tach to operate c... Nov 17 2018, 07:43 PM Retroracer BTW - if someone can please tell me how to rotate ... Nov 17 2018, 07:44 PM
 porschetub
BTW - if someone can please tell me how to rotate... Nov 17 2018, 08:42 PM 914forme Excellent job, and yes you did it all the right wa... Nov 17 2018, 08:06 PM campbellcj Really cool, thanks for the write-up! Nov 18 2018, 09:16 AM TravisNeff Great job Tony! I appreciate the how to. Now... Nov 18 2018, 09:28 AM Retroracer
Now to understand what this generator thingy is a... Nov 18 2018, 10:07 AM Retroracer And installed:
Not the best picture, lots of ... Nov 18 2018, 03:21 PM mepstein
And installed:
Not the best picture, lots of... Nov 19 2018, 06:35 AM larryM of course - this assumes a need for a 10K tach
-... Nov 18 2018, 09:29 PM timothy_nd28 I like it, great job! I'm not sure if my ... Nov 19 2018, 12:26 PM bahnzai Tony,
What would it take to reset the Zero & 6... Dec 27 2018, 09:00 AM Retroracer
Tony,
What would it take to reset the Zero & ... Dec 27 2018, 10:53 AM bahnzai Guys,
Thank you both for the responses.
Stephen, I... Dec 27 2018, 03:56 PM
porschetub
BTW - if someone can please tell me how to rotate... Nov 17 2018, 08:42 PM 914forme Excellent job, and yes you did it all the right wa... Nov 17 2018, 08:06 PM campbellcj Really cool, thanks for the write-up! Nov 18 2018, 09:16 AM TravisNeff Great job Tony! I appreciate the how to. Now... Nov 18 2018, 09:28 AM Retroracer
Now to understand what this generator thingy is a... Nov 18 2018, 10:07 AM Retroracer And installed:
Not the best picture, lots of ... Nov 18 2018, 03:21 PM mepstein
And installed:
Not the best picture, lots of... Nov 19 2018, 06:35 AM larryM of course - this assumes a need for a 10K tach
-... Nov 18 2018, 09:29 PM timothy_nd28 I like it, great job! I'm not sure if my ... Nov 19 2018, 12:26 PM bahnzai Tony,
What would it take to reset the Zero & 6... Dec 27 2018, 09:00 AM Retroracer
Tony,
What would it take to reset the Zero & ... Dec 27 2018, 10:53 AM bahnzai Guys,
Thank you both for the responses.
Stephen, I... Dec 27 2018, 03:56 PM |
1 User(s) are reading this topic (1 Guests and 0 Anonymous Users)
0 Members:

|
Lo-Fi Version | Time is now: 2nd April 2026 - 09:01 AM |
Invision Power Board
v9.1.4 © 2026 IPS, Inc.