|
|
|
Porsche, and the Porsche crest are registered trademarks of Dr. Ing. h.c. F. Porsche AG.
This site is not affiliated with Porsche in any way. Its only purpose is to provide an online forum for car enthusiasts. All other trademarks are property of their respective owners. |
|
|


| 914_7T3 |
 Mar 2 2019, 12:58 PM Mar 2 2019, 12:58 PM
Post
#1
|
|
Please forgive me, I'm new to all of this!  Group: Members Posts: 1,877 Joined: 3-April 17 From: Los Angeles, CA Member No.: 20,991 Region Association: Southern California |
Looking to have my seat frames powder coated and need to remove the non-painted handle assembly as it contains plastic bushings that will melt at high temperature.
Any idea on the correct procedure and tools required for removal? 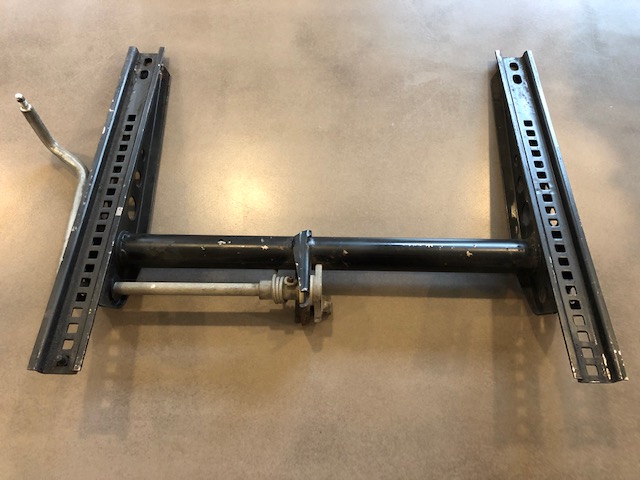 |
   |

 
|
  |
Replies
| bbrock |
Mar 17 2019, 07:36 PM
Post
#2
|
|
914 Guru Group: Members Posts: 5,269 Joined: 17-February 17 From: Montana Member No.: 20,845 Region Association: Rocky Mountains |
First. Make sure you have plenty of coins to put in the swear jar because you will use ALL of your words. Those little springs are almost as nasty as the trunk torsion bars and I damn near lost a thumb on the first one I did. Not sure if anyone has a better trick, but I wound up just using a needle nose vice grip on the hook part to reef it up around that pin. Hated to do it on a freshly replated spring but I tried many other approaches first, including the one that I think literally cracked the end of my thumb bone and another that resulted in a slipped screw driver and a nice scratch in my freshly painted frame.
On painting the handle, I'd also like to know how hard it is to take apart and put back together. I wound up leaving it on. I cleaned the rail really good and then masked it off to spray the handle satin black. It came out really nice. I'm guessing you could find a replacement rivet so you could just drill out the old one and separate the parts, but something about those rivets intimidates me. |
 |
|
| 914_7T3 |
Mar 17 2019, 08:13 PM
Post
#3
|
|
Please forgive me, I'm new to all of this! Group: Members Posts: 1,877 Joined: 3-April 17 From: Los Angeles, CA Member No.: 20,991 Region Association: Southern California |
QUOTE(bbrock @ Mar 17 2019, 06:36 PM)  First. Make sure you have plenty of coins to put in the swear jar because you will use ALL of your words. Those little springs are almost as nasty as the trunk torsion bars and I damn near lost a thumb on the first one I did. Not sure if anyone has a better trick, but I wound up just using a needle nose vice grip on the hook part to reef it up around that pin. Hated to do it on a freshly replated spring but I tried many other approaches first, including the one that I think literally cracked the end of my thumb bone and another that resulted in a slipped screw driver and a nice scratch in my freshly painted frame. On painting the handle, I'd also like to know how hard it is to take apart and put back together. I wound up leaving it on. I cleaned the rail really good and then masked it off to spray the handle satin black. It came out really nice. I'm guessing you could find a replacement rivet so you could just drill out the old one and separate the parts, but something about those rivets intimidates me. Ok, so does that mean securing the spring to the rail first and then wrapping it on the pin? You have to explain it like I'm 6 years old. I opted not to replate the hardware under the seat frame as they have a bit of a chrome finish. Used steel wool & oxalic acid and they came out pretty clean, but still shows their age. As for the handles, I will do same and not bother over complicating it. |
|
|
|
| bbrock |
Mar 17 2019, 09:24 PM
Post
#4
|
|
914 Guru Group: Members Posts: 5,269 Joined: 17-February 17 From: Montana Member No.: 20,845 Region Association: Rocky Mountains |
QUOTE(914_7T3 @ Mar 17 2019, 08:13 PM) Ok, so does that mean securing the spring to the rail first and then wrapping it on the pin? You have to explain it like I'm 6 years old. Yes, that's it. After you have it secured through the little hole in the rail, get a good bite on the hook that goes over the pin with the vice grips and brute force it into place. Have a screw driver or punch handy in case you need it to push the spring sideways over the pin. Be prepared to fail a few times and don't be a dumbass like me and let it bite your thumb. Mines still a little bruised a couple weeks later. QUOTE I opted not to replate the hardware under the seat frame as they have a bit of a chrome finish. Used steel wool & oxalic acid and they came out pretty clean, but still shows their age. As for the handles, I will do same and not bother over complicating it. I did pretty much the same thing. I scrubbed them well with a red scotch brite pad. The chrome finish on one seat was worse than the other so on that one I sprayed the rails with cold galvanizing. It looks nice but not factory so that see won't be as comfortable as the other. I could have gotten by without plating the spring and lever but since I can do it myself now, I had to do it. The lever was a challenge because it doesn't fit in my plating bucket. I plated half while bobbing it up and down to kind of feather the plating at the solution line, then flipped it over and did the other half. I was really happy with the result. 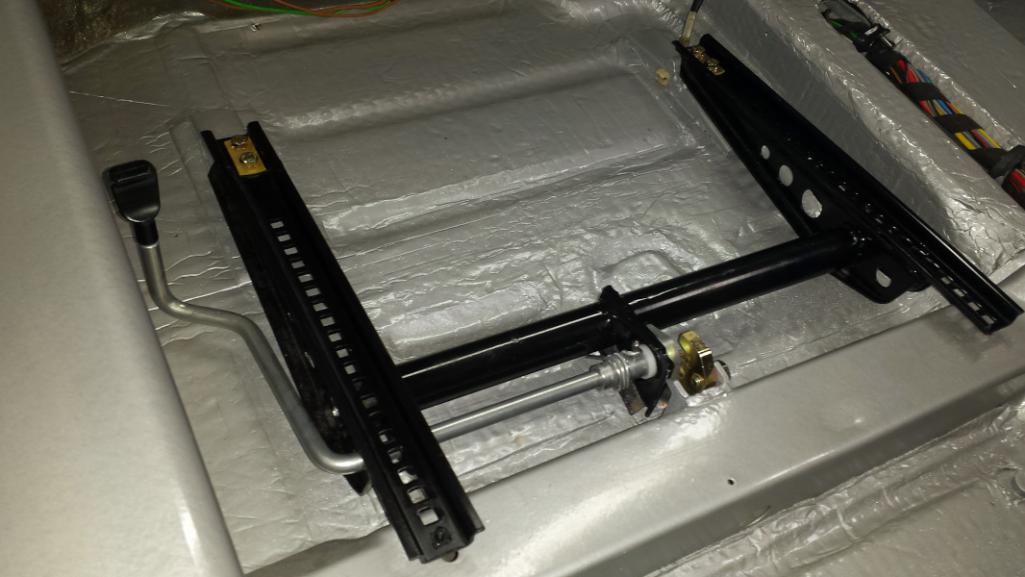 |
|
|
|
Posts in this topic
914_7T3 Seat Frame: New Challenge Mar 2 2019, 12:58 PM bbrock Just a drift to drive out the roll pin that the sp... Mar 2 2019, 02:03 PM
 914_7T3
Just a drift to drive out the roll pin that the s... Mar 2 2019, 02:32 PM 914_7T3 Got the frames back from Powder Coating and cleane... Mar 17 2019, 07:26 PM 914_7T3
Ok, so does that mean securing the spring to the... Mar 17 2019, 10:21 PM mepstein Didn't 914rubber make a tool for winding or se... Mar 17 2019, 08:31 PM 914_7T3
Didn't 914rubber make a tool for winding or s... Mar 17 2019, 08:39 PM mepstein
[quote name='mepstein' post='2697677' date='Mar 1... Mar 17 2019, 08:48 PM 914_7T3
[quote name='914_7T3' post='2697679' date='Mar 17... Mar 17 2019, 10:25 PM bbrock That kit is what I installed. The roll pins that ... Mar 17 2019, 10:57 PM Mikey914 Yes the tool holds the pin so you can get it insta... Mar 18 2019, 06:07 AM bbrock
As far as the roll pins I actually used the ones ... Mar 18 2019, 07:38 AM Mikey914 Either way I'll take a look too this next week... Mar 18 2019, 03:23 PM Olympic 914 Bolted the seat rails to work table and used a wir... Mar 18 2019, 05:08 PM mepstein
Bolted the seat rails to work table and used a wi... Mar 18 2019, 06:07 PM 914_7T3
Bolted the seat rails to work table and used a wi... Apr 21 2019, 10:39 PM
914_7T3
Just a drift to drive out the roll pin that the s... Mar 2 2019, 02:32 PM 914_7T3 Got the frames back from Powder Coating and cleane... Mar 17 2019, 07:26 PM 914_7T3
Ok, so does that mean securing the spring to the... Mar 17 2019, 10:21 PM mepstein Didn't 914rubber make a tool for winding or se... Mar 17 2019, 08:31 PM 914_7T3
Didn't 914rubber make a tool for winding or s... Mar 17 2019, 08:39 PM mepstein
[quote name='mepstein' post='2697677' date='Mar 1... Mar 17 2019, 08:48 PM 914_7T3
[quote name='914_7T3' post='2697679' date='Mar 17... Mar 17 2019, 10:25 PM bbrock That kit is what I installed. The roll pins that ... Mar 17 2019, 10:57 PM Mikey914 Yes the tool holds the pin so you can get it insta... Mar 18 2019, 06:07 AM bbrock
As far as the roll pins I actually used the ones ... Mar 18 2019, 07:38 AM Mikey914 Either way I'll take a look too this next week... Mar 18 2019, 03:23 PM Olympic 914 Bolted the seat rails to work table and used a wir... Mar 18 2019, 05:08 PM mepstein
Bolted the seat rails to work table and used a wi... Mar 18 2019, 06:07 PM 914_7T3
Bolted the seat rails to work table and used a wi... Apr 21 2019, 10:39 PM |
1 User(s) are reading this topic (1 Guests and 0 Anonymous Users)
0 Members:

|
Lo-Fi Version | Time is now: 18th September 2025 - 06:18 PM |
Invision Power Board
v9.1.4 © 2025 IPS, Inc.