|
|
|
Porsche, and the Porsche crest are registered trademarks of Dr. Ing. h.c. F. Porsche AG.
This site is not affiliated with Porsche in any way. Its only purpose is to provide an online forum for car enthusiasts. All other trademarks are property of their respective owners. |
|
|


| Retroracer |
 Feb 7 2020, 07:24 PM Feb 7 2020, 07:24 PM
Post
#1
|
|
Senior Member  Group: Members Posts: 655 Joined: 7-July 13 From: Bend OR Member No.: 16,100 Region Association: Pacific Northwest |
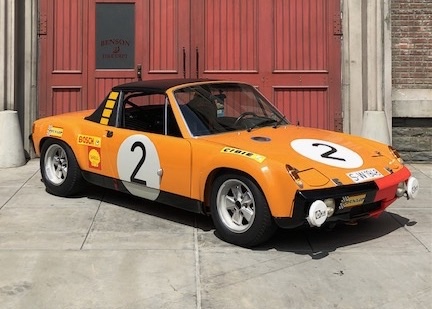 I’ve always been fascinated by the front lower spotlight mounting that appears on some of the GT cars, notably the winning 1970 Marathon de la Route cars. A few years ago I got a chance to obtain some original Cibie Iode 45 lamps from a seller in France. These had yellow lenses – one fog, one driving - which matched the yellow Cibie Tango’s I have mounted in my GT tribute car already, in the “standard” fog light position within the fiberglass front bumper. Not clear to me was how the factory fabricated brackets were designed. The inverted “T” cut into the fiberglass bumper meant that the brackets must somehow get fed through that to get mounted; also somehow they mount to the body and may / may not hold the bumper on? Searching in-period as well as recent pictures did not yield many clues; a few detailed the outside construction and bracing, but I had no clear idea of what was behind the bumper cut out. Until: luckily last summer I did get a chance to see the original “Number 2” Marathon car up close at Luft 6, so took the opportunity to crawl around under the front of the car to try and see what was going on. That is, until folks who were waiting to take unobstructed pictures of the legendary vehicle were bored of waiting for the strange geezer lying on his back peering into the oil cooler opening….! 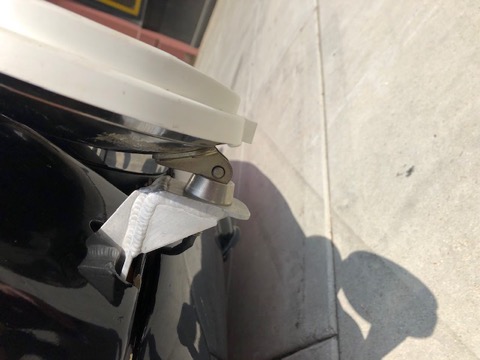 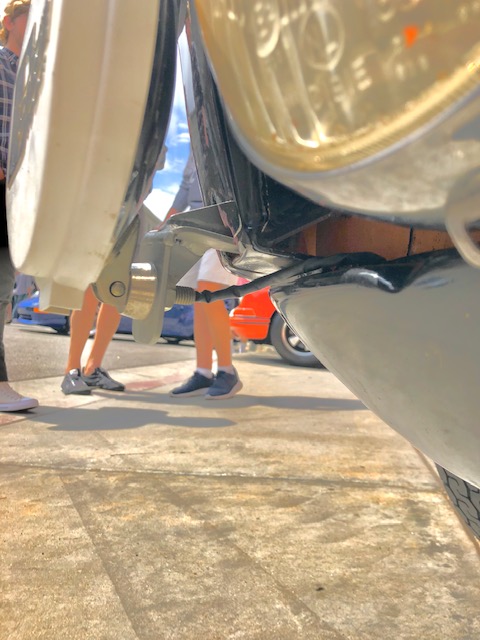 I took some detailed pics and thought that attempting to make up some brackets might be a good winter project. It is not clear to me (on olde number 2) whether the brackets were the originals or replicas – but I learned enough to want to try and replicate them. So the brackets themselves (as the pics show) look pretty basic on the face of it. But some thought obviously went into the design, as they need to meet multiple criteria: - be shaped such that they can be fed through the inverted “T” cut in the bumper - secure the bumper to the body - have welded in bracing to prevent the lights vibrating & flexing - clear the front valance mounting tabs (which are just below the bumper mount holes) 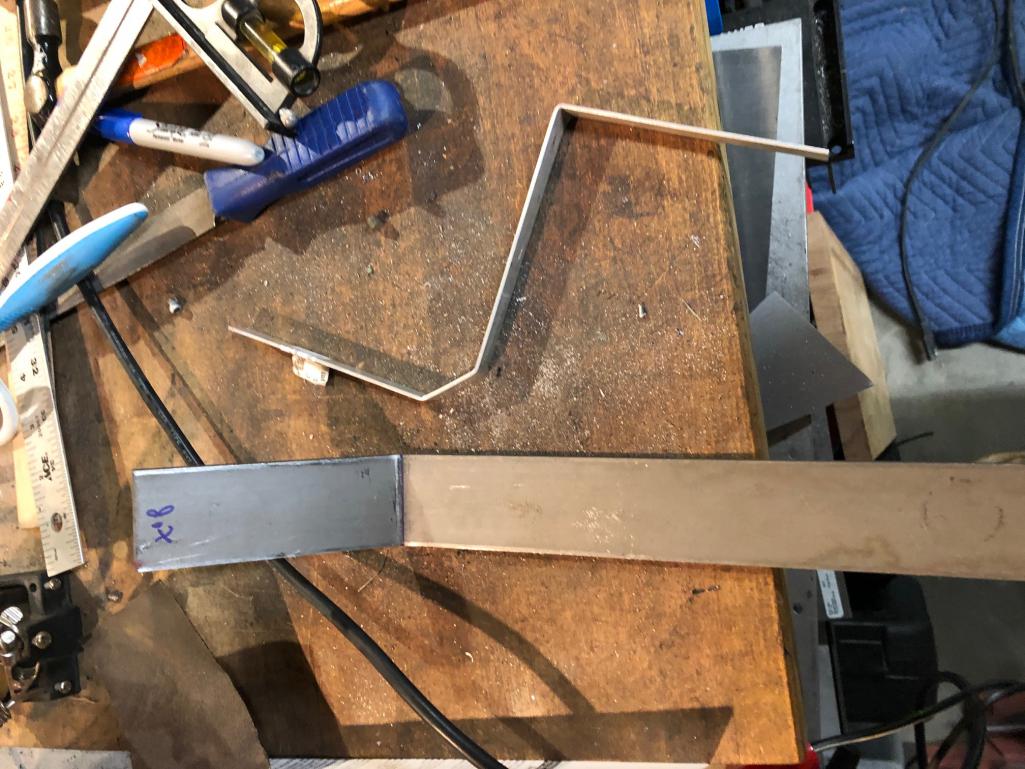 The upper piece in this shot shows the side profile I went for, bent up in aluminum as a test for clearance; one of the main bracket is being fab'ed using mild steel. 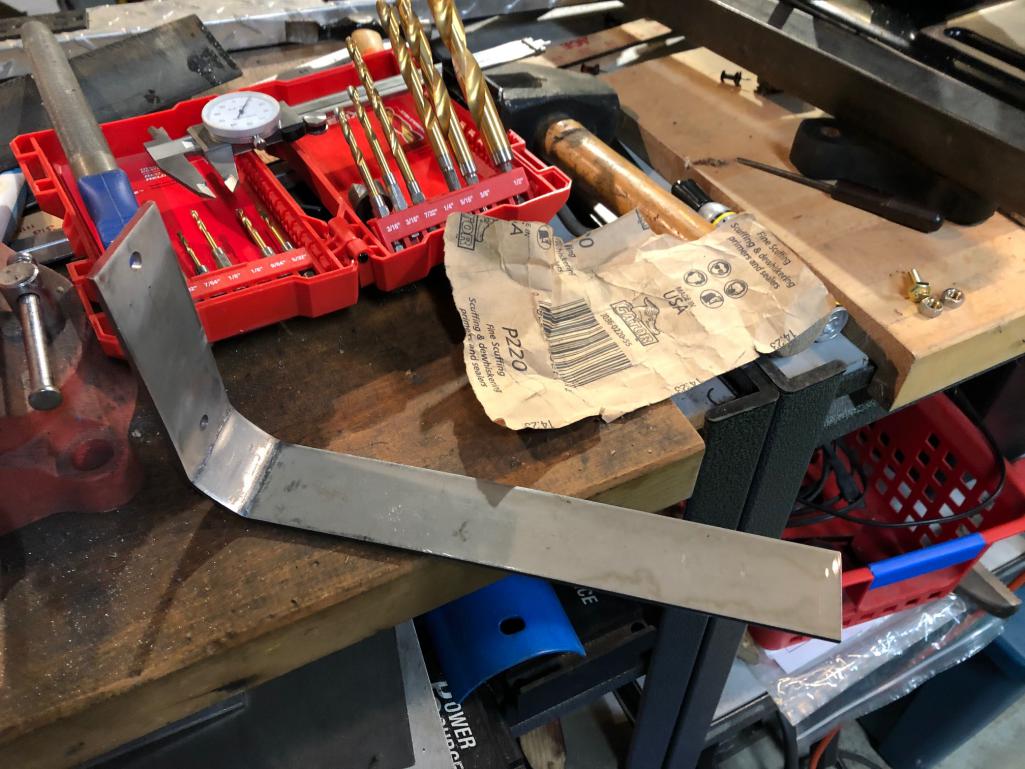 The cut in the bumper (fiberglass) was done with fingers crossed but turned out to be correct, the shot below shows a test fit & alignment check before cutting the vertical: 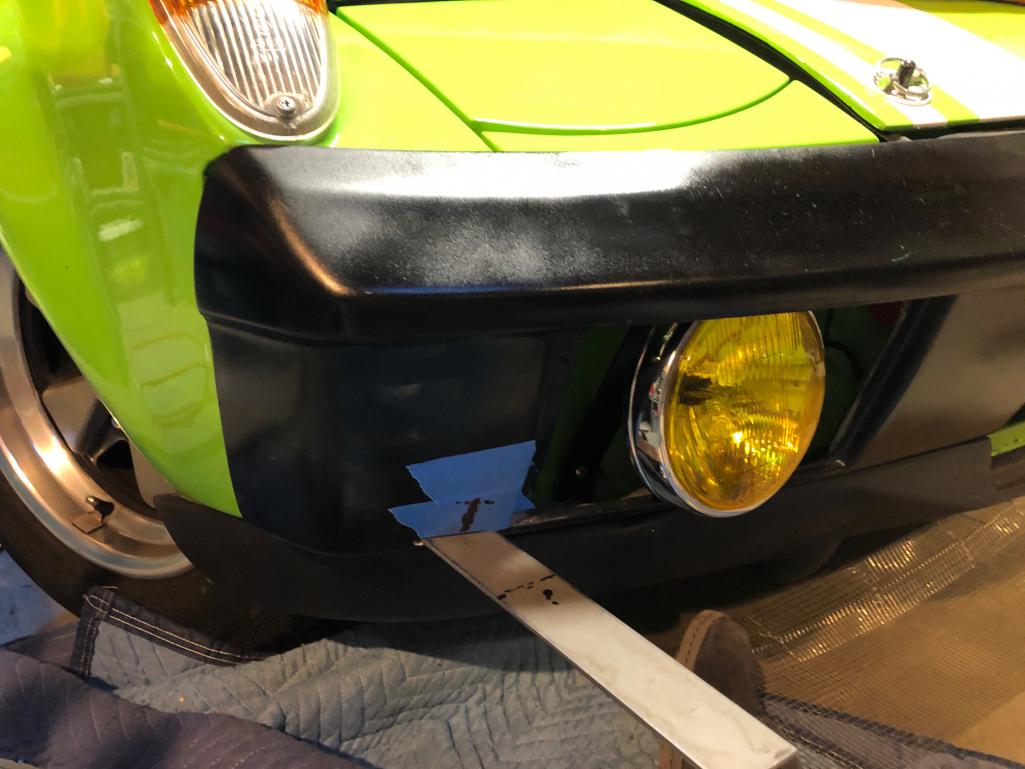 I welded some M6 nuts to the strips to use as mounts, aligned with the holes in the bumper and the body. Cutting the bracing pieces needed some experimentation and mocking up, as looking carefully at the existing photos of the OUTSIDE, it was hard to judge overall dimensions – extension, drop, etc. – so in the end it was basically a visual judgement call. 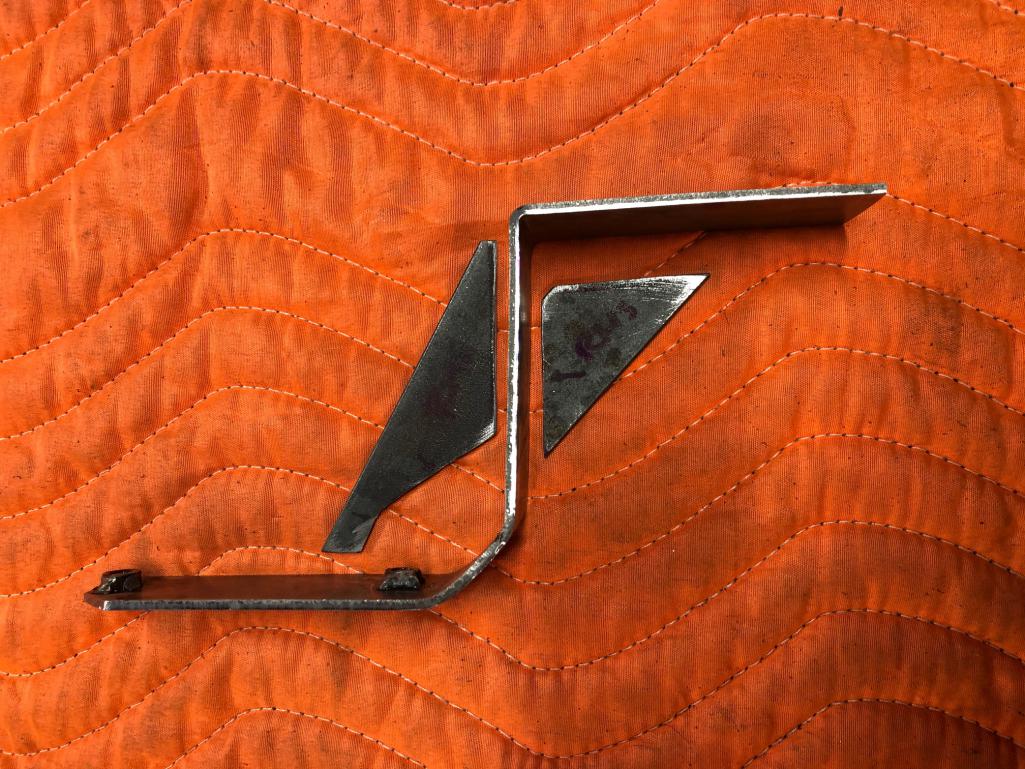 and.... |
   |

 
|
Posts in this topic

 Retroracer
So on to welding and shaping (lower shot shows ... Feb 7 2020, 07:31 PM Retroracer I may get them powder coated at some later point, ... Feb 7 2020, 07:36 PM Retroracer couple more shots (apologies for photo orientation... Feb 7 2020, 07:40 PM Sway Bar Nicely done, looks the part...Ctrl-C, Ctrl-V, for ... Feb 7 2020, 08:01 PM Sway Bar For interest sake, I saved this pic a long time ag... Feb 7 2020, 08:12 PM
Retroracer
So on to welding and shaping (lower shot shows ... Feb 7 2020, 07:31 PM Retroracer I may get them powder coated at some later point, ... Feb 7 2020, 07:36 PM Retroracer couple more shots (apologies for photo orientation... Feb 7 2020, 07:40 PM Sway Bar Nicely done, looks the part...Ctrl-C, Ctrl-V, for ... Feb 7 2020, 08:01 PM Sway Bar For interest sake, I saved this pic a long time ag... Feb 7 2020, 08:12 PM
 Retroracer
For interest sake, I saved this pic a long time a... Feb 7 2020, 09:09 PM 914forme Nice job on the bracket.
Second bracket was done ... Feb 7 2020, 09:19 PM pete000 Wish they would make those for the masses. Feb 8 2020, 12:22 AM eric9144
Wish they would make those for the masses.
If so... Feb 9 2020, 09:20 PM 914forme
Wish they would make those for the masses.
If s... Feb 10 2020, 08:38 AM maf914 Retroracer,
Nice work on your brackets. When I ... Feb 10 2020, 08:15 AM Mueller Nice brackets, those lights look great on the car. Feb 10 2020, 10:53 AM tygaboy Nice! Wonderful custom fab work. :headbanger: Feb 10 2020, 11:07 AM Retroracer @tygaboy and [b]@[url=http://www.914world.com/bb... Feb 10 2020, 01:19 PM maf914
[b]@[url=http://www.914world.com/bbs2/index.php?... Feb 11 2020, 03:05 PM Retroracer Here is the placard placed with the green GT.
@[... Feb 11 2020, 04:15 PM eric9144
@Sway_Bar and [b]@[url=http://www.914world.com/... Feb 10 2020, 01:44 PM porschetub So the green car in reply #11 has a mixture of Osc... Feb 11 2020, 02:02 PM Retroracer
So the green car in reply #11 has a mixture of Os... Feb 11 2020, 04:06 PM porschetub
So the green car in reply #11 has a mixture of O... Feb 12 2020, 12:36 PM RickS Only real Dicks add aux lights, says Richard.
Feb 12 2020, 09:13 PM campbellcj I'm inferring the Rennenmetal brackets are NLA... Feb 15 2020, 09:59 AM eric9144
PM if anyone wants to pursue that.
PM sent :bee... Feb 15 2020, 11:02 AM eric9144 Finally had some time to start copying out the bra... Apr 9 2020, 10:55 AM carlislebill Has anyone produced these brackets yet? I am inter... Jul 22 2020, 08:41 AM eric9144
Has anyone produced these brackets yet? I am inte... Jul 22 2020, 08:47 AM carlislebill Thanks Eric. Please email me as soon as you are re... Jul 22 2020, 04:09 PM campbellcj Such a weird coincidence, I was just wondering abo... Jul 23 2020, 07:31 AM 914forme PM'd about production idea, I can get these cu... Jul 23 2020, 09:10 AM eric9144
I can get these cut for you with out the slag ass... Jul 23 2020, 10:38 AM pete000 Water jet?
If these brackets get produced, put me... Jul 23 2020, 10:41 AM R1200rider I’m in for a set too! Jul 23 2020, 11:00 AM 914forme Eric, has shared with me his work on this. I will... Jul 23 2020, 01:42 PM eric9144 @914forMe I just sent you a bunch of pictures to ... Jul 23 2020, 02:06 PM porbmw Hi
Also in for a set, if possible.
Thanks
Paul Jul 24 2020, 02:30 PM Larmo63 I have a nice set of those Cibie Iode lights with ... Jul 24 2020, 11:46 PM silverg I would like to buy a set Jul 25 2020, 05:08 AM carlislebill Don't forget I was first! lol Just kidding... Aug 12 2020, 08:12 AM wes Put me in for one set please. Aug 12 2020, 11:14 PM 914forme Project still on track, I have made a few design c... Aug 13 2020, 09:52 AM wes I’d like a set also if not too late, Thanks! Sep 2 2020, 12:17 PM dakotaewing Please put me on the list of folks who are interes... Sep 2 2020, 01:34 PM 914forme Will do I hope to have the prototypes for this wee... Sep 2 2020, 02:17 PM 914forme Alpha test unit, this was mocked up, I need to gra... Sep 14 2020, 08:42 AM PWS1205 I'm in for a set too! Looks great. Let u... Sep 14 2020, 02:22 PM mlindner I went a little the other way...from the top down.... Sep 14 2020, 03:01 PM anglophone1 Just been directed to this thread.
I’m intereste... Sep 26 2020, 02:04 AM KSCarrera
Just been directed to this thread.
I’m interest... Sep 26 2020, 03:33 AM 914forme If your running fiberglass bumpers I would not fee... Sep 26 2020, 08:20 PM BillJ Thread revival. Are these available in ready to mo... Jan 29 2023, 12:12 AM CCE I like the clean look on mine,
but I am also ... Jan 31 2023, 12:06 PM CCE I like the clean look on mine,
but I am also ... Jan 31 2023, 12:26 PM BillJ Neat bumper. Definitely custom.
I hope to do a ... Jan 31 2023, 01:57 PM
Retroracer
For interest sake, I saved this pic a long time a... Feb 7 2020, 09:09 PM 914forme Nice job on the bracket.
Second bracket was done ... Feb 7 2020, 09:19 PM pete000 Wish they would make those for the masses. Feb 8 2020, 12:22 AM eric9144
Wish they would make those for the masses.
If so... Feb 9 2020, 09:20 PM 914forme
Wish they would make those for the masses.
If s... Feb 10 2020, 08:38 AM maf914 Retroracer,
Nice work on your brackets. When I ... Feb 10 2020, 08:15 AM Mueller Nice brackets, those lights look great on the car. Feb 10 2020, 10:53 AM tygaboy Nice! Wonderful custom fab work. :headbanger: Feb 10 2020, 11:07 AM Retroracer @tygaboy and [b]@[url=http://www.914world.com/bb... Feb 10 2020, 01:19 PM maf914
[b]@[url=http://www.914world.com/bbs2/index.php?... Feb 11 2020, 03:05 PM Retroracer Here is the placard placed with the green GT.
@[... Feb 11 2020, 04:15 PM eric9144
@Sway_Bar and [b]@[url=http://www.914world.com/... Feb 10 2020, 01:44 PM porschetub So the green car in reply #11 has a mixture of Osc... Feb 11 2020, 02:02 PM Retroracer
So the green car in reply #11 has a mixture of Os... Feb 11 2020, 04:06 PM porschetub
So the green car in reply #11 has a mixture of O... Feb 12 2020, 12:36 PM RickS Only real Dicks add aux lights, says Richard.
Feb 12 2020, 09:13 PM campbellcj I'm inferring the Rennenmetal brackets are NLA... Feb 15 2020, 09:59 AM eric9144
PM if anyone wants to pursue that.
PM sent :bee... Feb 15 2020, 11:02 AM eric9144 Finally had some time to start copying out the bra... Apr 9 2020, 10:55 AM carlislebill Has anyone produced these brackets yet? I am inter... Jul 22 2020, 08:41 AM eric9144
Has anyone produced these brackets yet? I am inte... Jul 22 2020, 08:47 AM carlislebill Thanks Eric. Please email me as soon as you are re... Jul 22 2020, 04:09 PM campbellcj Such a weird coincidence, I was just wondering abo... Jul 23 2020, 07:31 AM 914forme PM'd about production idea, I can get these cu... Jul 23 2020, 09:10 AM eric9144
I can get these cut for you with out the slag ass... Jul 23 2020, 10:38 AM pete000 Water jet?
If these brackets get produced, put me... Jul 23 2020, 10:41 AM R1200rider I’m in for a set too! Jul 23 2020, 11:00 AM 914forme Eric, has shared with me his work on this. I will... Jul 23 2020, 01:42 PM eric9144 @914forMe I just sent you a bunch of pictures to ... Jul 23 2020, 02:06 PM porbmw Hi
Also in for a set, if possible.
Thanks
Paul Jul 24 2020, 02:30 PM Larmo63 I have a nice set of those Cibie Iode lights with ... Jul 24 2020, 11:46 PM silverg I would like to buy a set Jul 25 2020, 05:08 AM carlislebill Don't forget I was first! lol Just kidding... Aug 12 2020, 08:12 AM wes Put me in for one set please. Aug 12 2020, 11:14 PM 914forme Project still on track, I have made a few design c... Aug 13 2020, 09:52 AM wes I’d like a set also if not too late, Thanks! Sep 2 2020, 12:17 PM dakotaewing Please put me on the list of folks who are interes... Sep 2 2020, 01:34 PM 914forme Will do I hope to have the prototypes for this wee... Sep 2 2020, 02:17 PM 914forme Alpha test unit, this was mocked up, I need to gra... Sep 14 2020, 08:42 AM PWS1205 I'm in for a set too! Looks great. Let u... Sep 14 2020, 02:22 PM mlindner I went a little the other way...from the top down.... Sep 14 2020, 03:01 PM anglophone1 Just been directed to this thread.
I’m intereste... Sep 26 2020, 02:04 AM KSCarrera
Just been directed to this thread.
I’m interest... Sep 26 2020, 03:33 AM 914forme If your running fiberglass bumpers I would not fee... Sep 26 2020, 08:20 PM BillJ Thread revival. Are these available in ready to mo... Jan 29 2023, 12:12 AM CCE I like the clean look on mine,
but I am also ... Jan 31 2023, 12:06 PM CCE I like the clean look on mine,
but I am also ... Jan 31 2023, 12:26 PM BillJ Neat bumper. Definitely custom.
I hope to do a ... Jan 31 2023, 01:57 PM  |
1 User(s) are reading this topic (1 Guests and 0 Anonymous Users)
0 Members:

|
Lo-Fi Version | Time is now: 2nd April 2026 - 05:30 PM |
Invision Power Board
v9.1.4 © 2026 IPS, Inc.