|
|
|
Porsche, and the Porsche crest are registered trademarks of Dr. Ing. h.c. F. Porsche AG.
This site is not affiliated with Porsche in any way. Its only purpose is to provide an online forum for car enthusiasts. All other trademarks are property of their respective owners. |
|
|

 Model Specific Information
914/4: 70 71 72 73 74 75 76 914/6: 70 71 72

| wonkipop |
 Dec 10 2020, 07:37 PM Dec 10 2020, 07:37 PM
Post
#1
|
|
914 Guru  Group: Members Posts: 5,550 Joined: 6-May 20 From: north antarctica Member No.: 24,231 Region Association: NineFourteenerVille |
think this is the right section of the website to put this in.
even though its a spanner job, the material is historic and possibly of esoteric industrial archeology interest. who knows? 1. background. i recently recommissioned my 74 1.8 after nearly 16 years of storage. i paid for storing but i always knew i would. complete rebuild of fuel system. we got the original fuel pump to come to life but it bled from every orifice. flow rate was ok however and motor still worked fine - just a minor fire hazard. 2. action. to get the car up and running we took out the original 0 580 463 009 fuel pump and re-plumbed for a modern two port in line pump. car runs. having done that, in some ways i felt the plumbing was a little compromised over the original given the pump needed to be repositioned to have a line in the back as well as out the front making the line out a pretty tight turn to get up into the engine bay. but it runs. 3. delayed dream due to thoughts of it being a nightmare. in the back of my mind was the idea of rebuilding the original fuel pump. general consensus down here at the bottom of the world (aus) was don't bother, its a sealed unit and unserviceable. 4. then. a young guy with a 1970 citroen DS21 IE inspired me. he had taken his similar bosch 3 port pump apart and rebuilt it proving its possible if you are determined enough. i think the pump in the citroen was a 0 580 463 005, which the 009 replaced not sure when the 009 came in, but its before the 010 (which is the completely different pump and fitted to the later 75 and 76 cars - amongst the first of the in line 2 port types). maybe the historians know exactly when 009 kicked in, i'm guessing it comes in with the L jetronic in 74 model year, but it could be earlier. externally a 005 is indistinguishable from a 009. i might have discovered the difference internally in what i have taken apart to date. TAKING the 0 580 463 009 apart. STEP 1. undo the 4 screws securing the pump and outlet housing on top of the unit. keep it all upright and vertical. remove the top part of the housing. remove the upper o-ring. remove the metal pump vane and the five cylindrical magnets housed in it. (bag them so you don't lose them - they seem to be weakly magnetic cylinders). remove the vane housing. remove the lower o-ring. If your pump is only leaking from this upper housing its an easy fix. just replace the two o-rings and put it all back together. Don't need to post pics of this stuff its very simple to do. the o-rings are 30x2mm i believe. could be 31x2mm. yet to confirm. still to make the trip to the specialist o-ring shop here in melb aus. i'll be looking to find the best fuel resistant o-rings i can get hold of. suprisingly these o-rings were still in good shape in my pump and were not the source of the leaks. but i will be replacing them. |
   |

 
|
  |
Replies
| wonkipop |
Dec 10 2020, 08:07 PM
Post
#2
|
|
914 Guru Group: Members Posts: 5,550 Joined: 6-May 20 From: north antarctica Member No.: 24,231 Region Association: NineFourteenerVille |
STEP 3.
step 2 gets you to one of the internal leak failures. the big o-ring sealing the motor housing. i inspected this o-ring. it was hard on one side and had definitely been leaking. but there is one more seal to go. the electrical plug. Additionally at this point you can inspect the commutator and brushes on the electric motor. Mine were in good condition with reasonable level of wear. made sense. the car is a two owner car with 44 K miles and its been dormant for the last 16 years. the pump is worth saving assuming i can solve the leaks with new seals. Moving on. Electrical plug removal. at this point you have to get the lower part of the port/pump housing apart and detach the motor. first. there are two electrical connections rising from the plug to the brush holders. these wires are like springs at the brush ends. take a soldering iron and release the solder joints so they are free. next there are three spring washers which hold the pump/port housing together. work these off with a fine pick and a small fine screwdriver. finally drive out a very small pin which secures the motor axle to the top of the pump housing. you will need an ultra small pin punch, less than 2mm. or 1/16 in imperial size. be careful driving the pin out. i secured the axle in a vice with soft jaws and placed a rag below the vice to catch the pin. you do not want to lose this pin, its very very small. pull the motor out of the pump/port housing. carefully lift the internal face of the pump/port housing up threading the spring wires through it as you go. once apart stop there. you will be looking at the back of the electrical plug and if its a 009 pump it should look like the last image. there will be an earth wire, going to a stamped pin and the same stamped pin holds the sprung wire that connects to the brush holder on the motor section you have detached. to note. a 005 may not look like this. at some point i will know as i have a 005 to disassemble, but i have not done that yet. 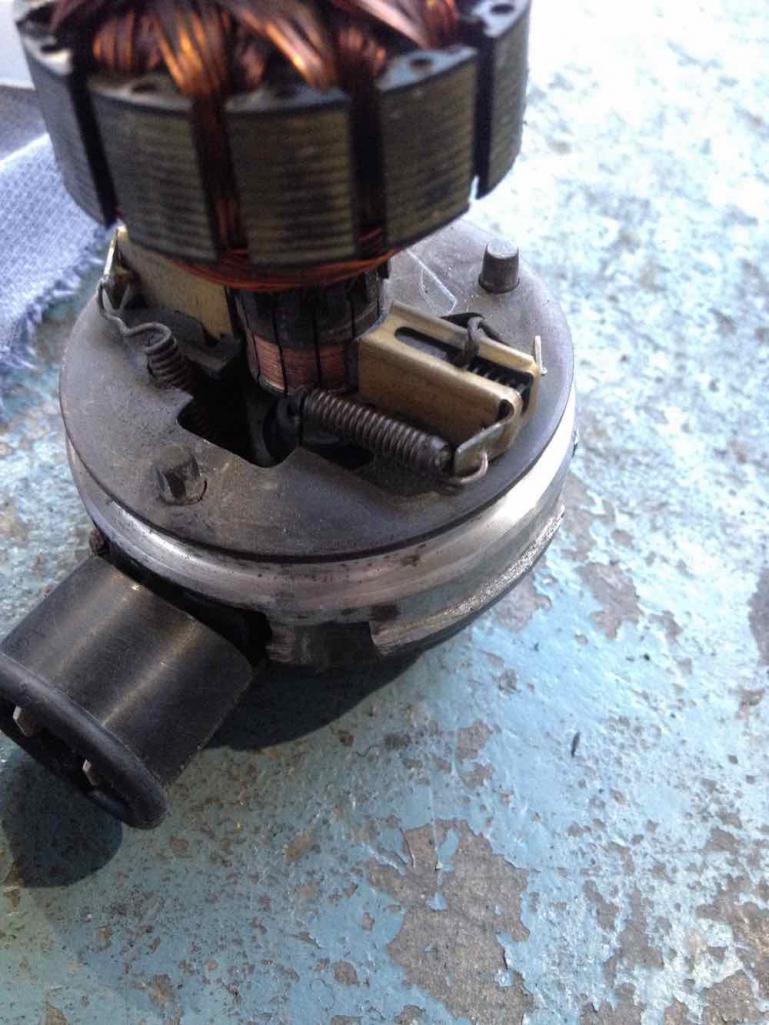 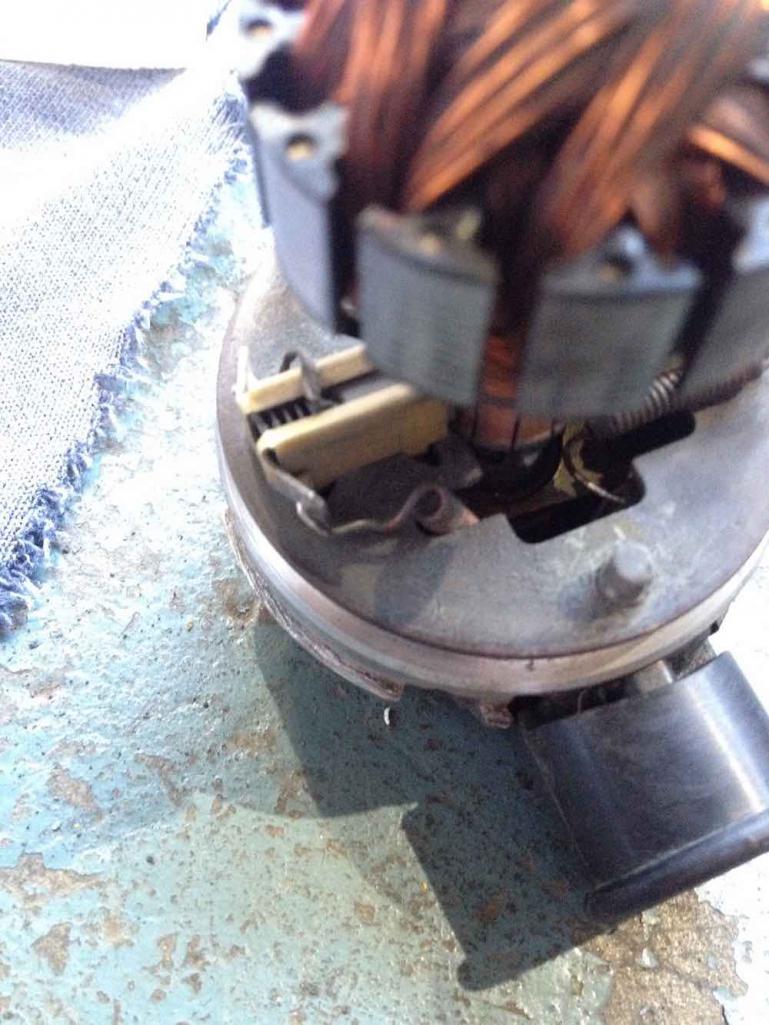 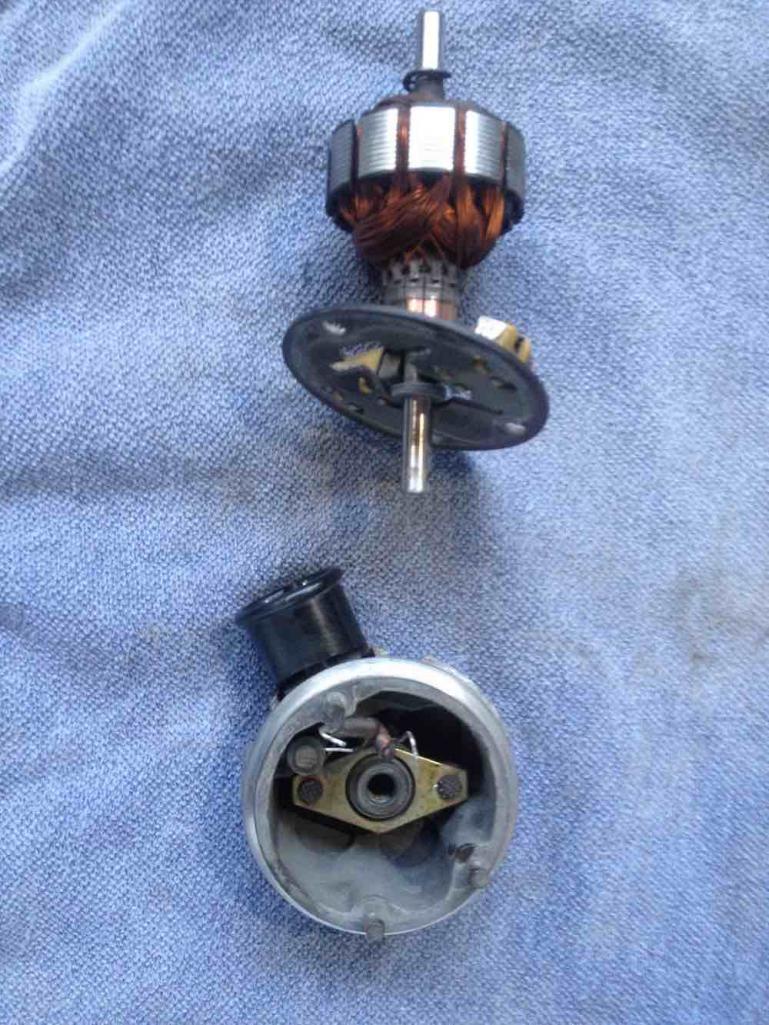 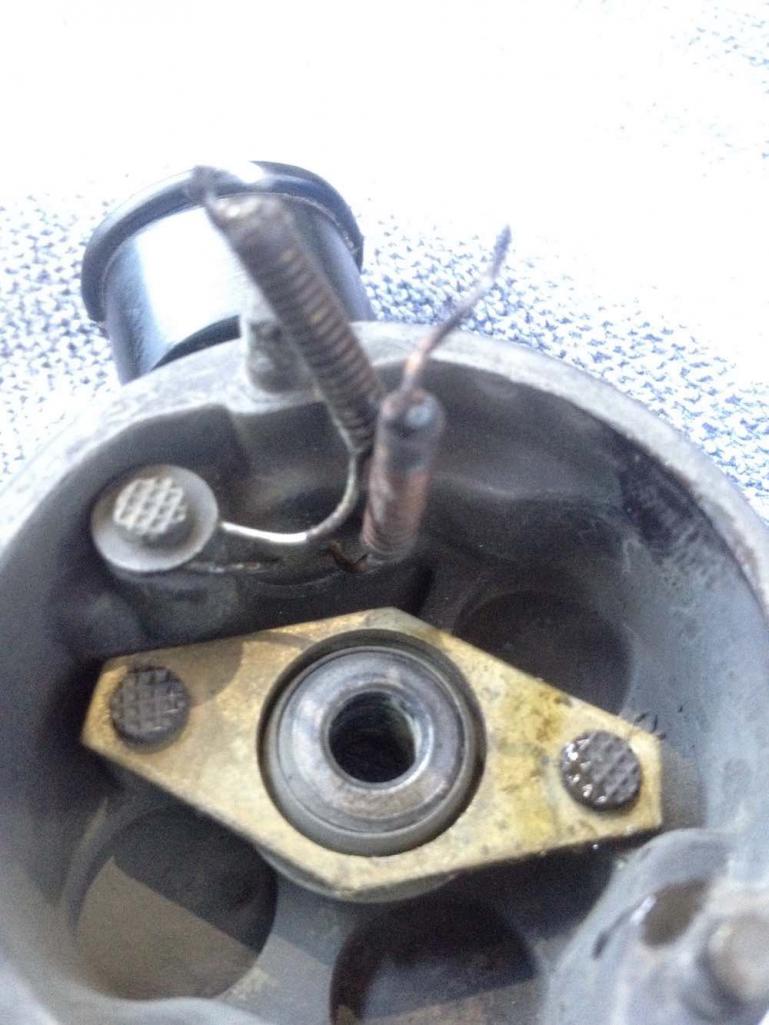 |
|
|
|
Posts in this topic
wonkipop Fuelpump rebuild: Bosch 0 580 463 009 Dec 10 2020, 07:37 PM wonkipop STEP 2.
Going further in.
The next job is to get... Dec 10 2020, 07:52 PM wonkipop STEP 4.
snip the earth wire to the plug. as clos... Dec 10 2020, 08:15 PM wonkipop POST SCRIPT.
there are a couple of similar 3 port... Dec 10 2020, 08:39 PM SirAndy :trophy:
Very nice writeup, i'm going to li... Dec 11 2020, 11:55 AM wonkipop Update - O Ring sizes.
Sizes quoted above were gi... Dec 13 2020, 07:26 PM wonkipop 005 Pump.
Disassembled the 005 pump today. Gett... Dec 16 2020, 12:34 PM wonkipop i made photos of the upper section of the 005 pump... Dec 16 2020, 12:41 PM Tdskip I have one that pumps but leaks from the top below... Dec 18 2020, 10:35 AM
wonkipop STEP 2.
Going further in.
The next job is to get... Dec 10 2020, 07:52 PM wonkipop STEP 4.
snip the earth wire to the plug. as clos... Dec 10 2020, 08:15 PM wonkipop POST SCRIPT.
there are a couple of similar 3 port... Dec 10 2020, 08:39 PM SirAndy :trophy:
Very nice writeup, i'm going to li... Dec 11 2020, 11:55 AM wonkipop Update - O Ring sizes.
Sizes quoted above were gi... Dec 13 2020, 07:26 PM wonkipop 005 Pump.
Disassembled the 005 pump today. Gett... Dec 16 2020, 12:34 PM wonkipop i made photos of the upper section of the 005 pump... Dec 16 2020, 12:41 PM Tdskip I have one that pumps but leaks from the top below... Dec 18 2020, 10:35 AM
 wonkipop
I have one that pumps but leaks from the top belo... Dec 18 2020, 01:31 PM Tdskip Funny enough my spare is from a 1971 Saab 99.
Goo... Dec 20 2020, 04:51 PM StarBear This is marvelous. Congratulations. Maybe a sideli... Dec 26 2020, 09:13 AM wonkipop moved into assembly mode today and hit first obsta... Jan 18 2021, 01:28 AM wonkipop REASSEMBLY - STEP 1.
now have correct electrical ... Jan 28 2021, 03:46 PM wonkipop REASSEMBLY STEP 2
fitting the port housing inner ... Feb 19 2021, 02:37 PM wonkipop STEP 3 - REASSEMBLING THE PORT HOUSING, MOTOR SHAF... Feb 19 2021, 03:09 PM wonkipop STEP 4
re-crimping the pump casing to the port/p... Feb 19 2021, 03:25 PM wonkipop STEP 5 - PUMP 3 PORT TOP SECTION.
the next day.
t... Feb 19 2021, 03:37 PM wonkipop STEP 6 - TEST.
at the end of the day we hooked up... Feb 19 2021, 03:45 PM wonkipop FUEL FILTER AFTER PUMP.
having taken apart origin... Feb 19 2021, 06:44 PM wonkipop just noticed that auto atlanta has rebuilt 009 typ... Feb 21 2021, 05:31 PM wonkipop test results.
under load.
009 (ex 914). achieving... Feb 25 2021, 10:50 PM JeffBowlsby Nice work! Mar 3 2021, 10:58 AM wonkipop i have worked out how the pressure relief valve an... Mar 4 2021, 02:33 AM wonkipop epilogue -
i was given a bosch 0580 960 004 fuel ... May 11 2021, 03:24 AM Yellowbeard I'm working on a similar problem in the US. I... Feb 16 2025, 01:46 PM
wonkipop
I have one that pumps but leaks from the top belo... Dec 18 2020, 01:31 PM Tdskip Funny enough my spare is from a 1971 Saab 99.
Goo... Dec 20 2020, 04:51 PM StarBear This is marvelous. Congratulations. Maybe a sideli... Dec 26 2020, 09:13 AM wonkipop moved into assembly mode today and hit first obsta... Jan 18 2021, 01:28 AM wonkipop REASSEMBLY - STEP 1.
now have correct electrical ... Jan 28 2021, 03:46 PM wonkipop REASSEMBLY STEP 2
fitting the port housing inner ... Feb 19 2021, 02:37 PM wonkipop STEP 3 - REASSEMBLING THE PORT HOUSING, MOTOR SHAF... Feb 19 2021, 03:09 PM wonkipop STEP 4
re-crimping the pump casing to the port/p... Feb 19 2021, 03:25 PM wonkipop STEP 5 - PUMP 3 PORT TOP SECTION.
the next day.
t... Feb 19 2021, 03:37 PM wonkipop STEP 6 - TEST.
at the end of the day we hooked up... Feb 19 2021, 03:45 PM wonkipop FUEL FILTER AFTER PUMP.
having taken apart origin... Feb 19 2021, 06:44 PM wonkipop just noticed that auto atlanta has rebuilt 009 typ... Feb 21 2021, 05:31 PM wonkipop test results.
under load.
009 (ex 914). achieving... Feb 25 2021, 10:50 PM JeffBowlsby Nice work! Mar 3 2021, 10:58 AM wonkipop i have worked out how the pressure relief valve an... Mar 4 2021, 02:33 AM wonkipop epilogue -
i was given a bosch 0580 960 004 fuel ... May 11 2021, 03:24 AM Yellowbeard I'm working on a similar problem in the US. I... Feb 16 2025, 01:46 PM |
1 User(s) are reading this topic (1 Guests and 0 Anonymous Users)
0 Members:

|
Lo-Fi Version | Time is now: 13th June 2026 - 07:56 PM |
Invision Power Board
v9.1.4 © 2026 IPS, Inc.