
 How To: Close the Gap on Triangle Window Seal |
|
|

|
Porsche, and the Porsche crest are registered trademarks of Dr. Ing. h.c. F. Porsche AG.
This site is not affiliated with Porsche in any way. Its only purpose is to provide an online forum for car enthusiasts. All other trademarks are property of their respective owners. |
|
|

| bbrock |
 Aug 7 2022, 11:39 AM
Post
#1
|
|
914 Guru  Group: Members Posts: 5,269 Joined: 17-February 17 From: Montana Member No.: 20,845 Region Association: Rocky Mountains 
 |
When I was reassembling my bare metal restoration, I probably spent close to 80 hours installing and adjusting body seals and gaskets. I wanted to get the car as air tight as possible to control cabin noise and leaks. I'm happy to say that my car seals tight enough to feel that pressure bubble when you close a door with top on and windows up like you get with a new modern car.
However, my one trouble spot was the top of the side triangle window. The 914Rubber main front targa seal is nice, but the rubber on mine was just a little too stiff to let the triangle frame to bed in for a proper seal. No amount of adjustment to move the frame forward helped. I even tried wrapping a ratchet strap around the top of the triangle window and windshield frame to pull the frame into the rubber and left it for two weeks to see if it would take a set. It didn't. There was this gap that let water trip in and created significant wind noise in an otherwise suprisingly quiet top on, windows up, cabin. 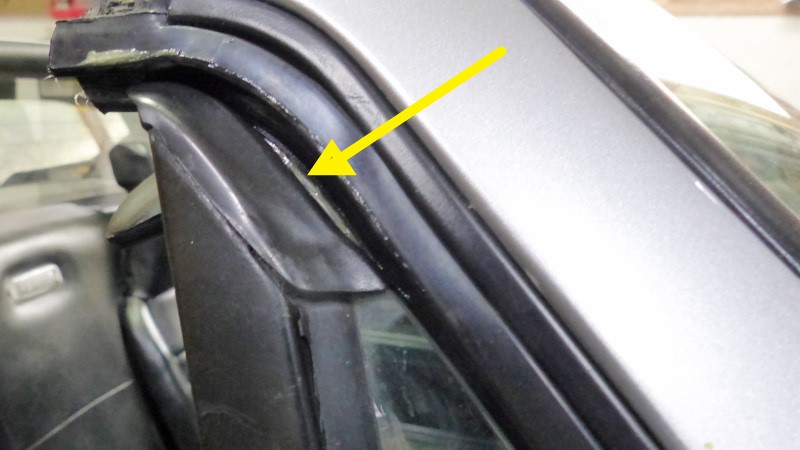 Here is how I fixed it. 1. Clean the main targa seal, triangle window end cap, and top edge of the triangle window thoroughly with isopropyl alcohol. 2. Smear the triangle window end cap and a few inches of the top edge of the window with a generous, but smooth coat of petroleum jelly. This will act as a release agent for the silicone caulk you are about to apply. 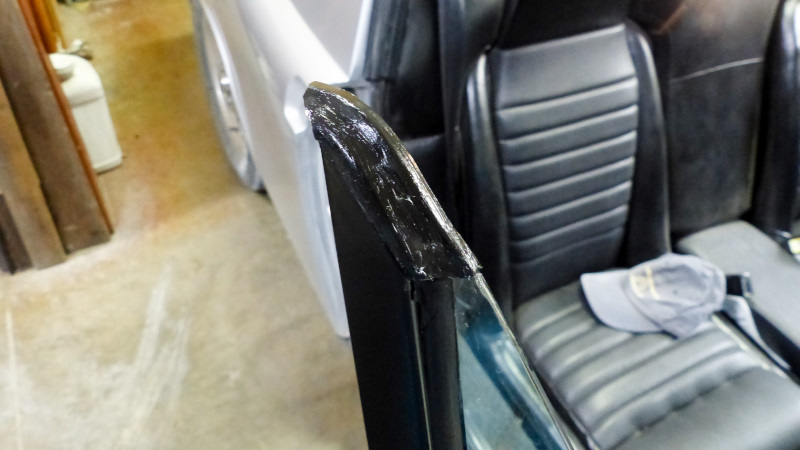 3. Apply a thick bead of black silicone on the targa seal in the area where the gap needs to be filled. Don't worry about getting it smooth at this point. Don't overdo it or you will have more mess to clean up in the next step. 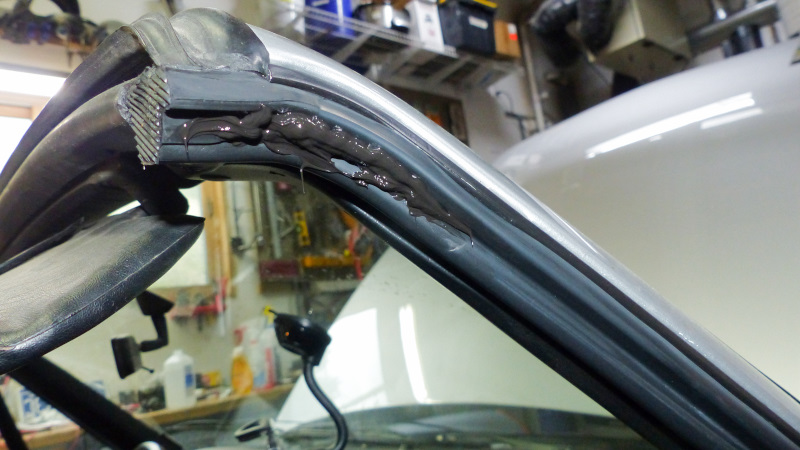 4. Close the door tight and use a lint free cloth soaked with isopropyl alcohol to clean up any silicone that oozes out on the inside. Be thorough with the clean up on this side. 5. Use your finger on the outside to force the silicone into the gap and smooth it out. I had to squirt in a bit more silicone to make sure it was completely filled. 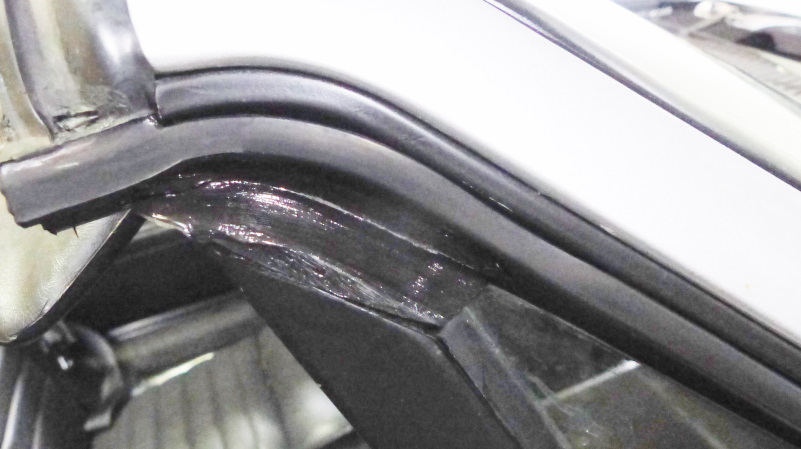 6. When you are satisfied the gap is completely filled with silicone and it looks nice and smooth, carefully go over inside and out with a clean alcohol soaked cloth to tidy up any stray silicone. Much easier at this stage than after silicone has cured. Careful not wipe the petroleum jelly off the end cap though. 7. Leave the car alone for at least 12 hours to let the silicone cure. After the silicone has cured, open the door and clean off the petroleum jelly with alcohol. 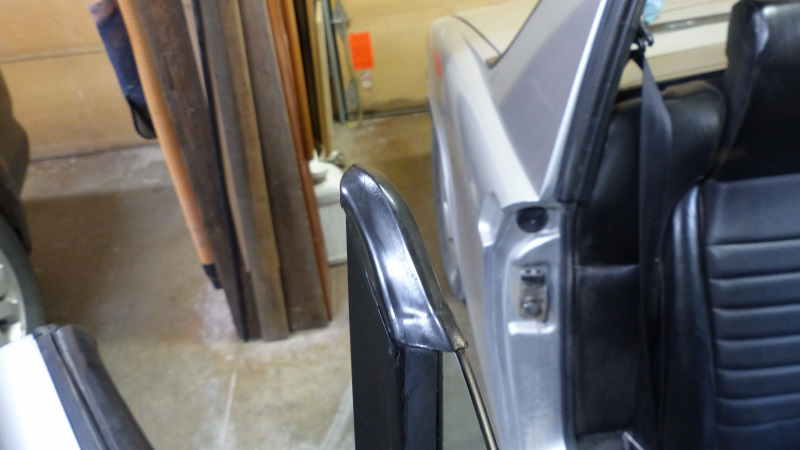 You should have a perfect seal and nearly invisible repair. This picture was taken with a flash to better show the cured silicone. 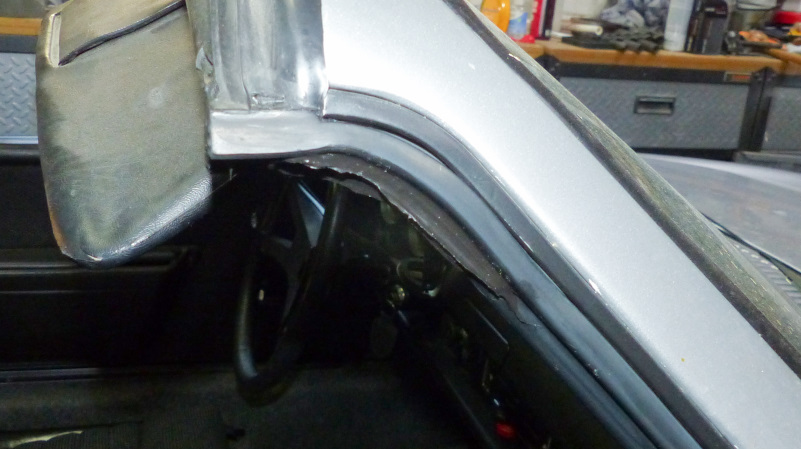 And here is without flash which is more representative of how it looks in natural light. 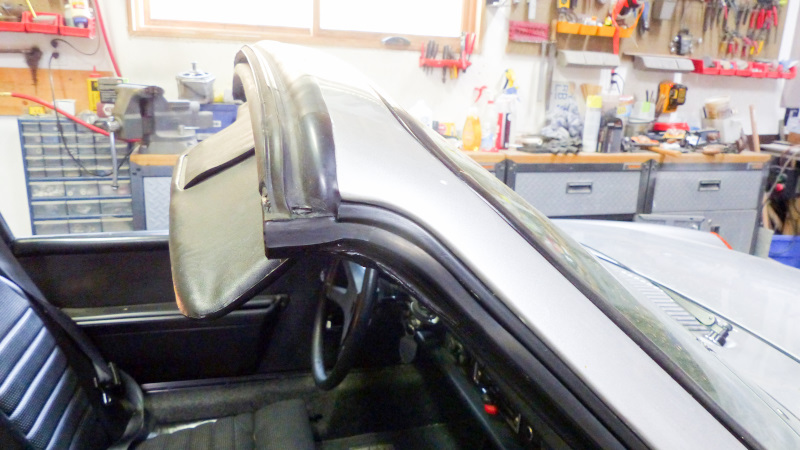 The small amount of jagged slag is only noticeable if you are looking for it, and disappears when the door is closed, but I'll let the silicone cure a few more days and try to smooth it with some fine sandpaper. 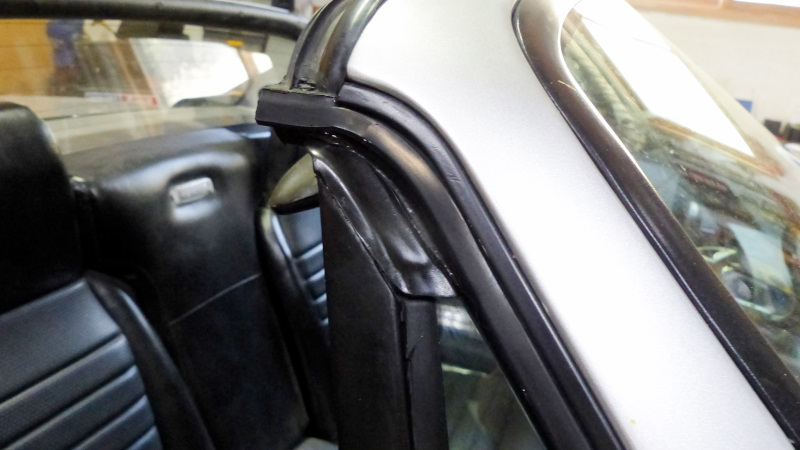 Happy drip and whistle free motoring! (IMG:style_emoticons/default/driving.gif) (IMG:style_emoticons/default/driving-girl.gif) |
   |

 
|
  |
Replies
| Mikey914 |
Aug 10 2022, 04:37 PM
Post
#2
|
|
The rubber man Group: Members Posts: 12,785 Joined: 27-December 04 From: Hillsboro, OR Member No.: 3,348 Region Association: None
|
I keep looking at this and something doesn't look right. Given that the blocks are identical to the factory ones in shape and durometer, what would the solution be here?
There appears to be a 1/2" section of rubber not fully seated, Is it holding it out? Could the amount of butyl behind the "chrome" be holding it down slightly? I don't think that would be the whole story. The triangle window looks like the top is seated deeper than the cap. Almost like if the top of the triangle window was shimmed out more it would push the bottom of the cap out more to "close the gap". This appears to be where the failure is. I've seen many of the caps worn and look slightly deformed from the top of the glass pushing it out, but not here. It looks like it's barely engaged. Why it would sit lower is beyond me. The initial complaint was it was too tight, which would hold it up. Thoughts?? |
|
|
|
| Superhawk996 |
Aug 11 2022, 06:30 AM
Post
#3
|
|
914 Guru Group: Members Posts: 8,149 Joined: 25-August 18 From: Woods of N. Idaho Member No.: 22,428 Region Association: Galt's Gulch
|
QUOTE(Mikey914 @ Aug 10 2022, 06:37 PM)  Given that the blocks are identical to the factory ones in shape and durometer, what would the solution be here? @Mikey914 Of the various replacement seals I've installed, I've found the new seals attachment block (base of the seal) to be significantly larger than what came off the car. As a result, they fit much tighter into the aluminum channels and have less flexibility than what came off the car. I apologize I don't have a picture handy of my car and/or my main targa seal. Here is a comparison of the base of the seal for the upper window seal that goes into the targa. 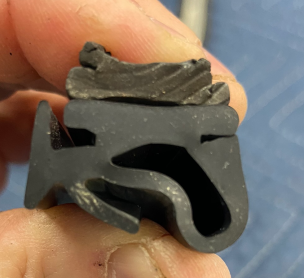 In several cases, the OEM seal can be pulled though the aluminum channel with only moderate force. I believe the fact that seals could be moved with only moderate force is the reason the factory "staked" the aluminum channels once they had the seal in place. The OEM seals can sort of the "inch wormed" into and out of the aluminum channel. I found this to be true on my 1st car way back when I painted that one in about 1987. In the case of all the replacement seals on my 2nd car, I've had to install the seal by rolling it into the aluminum channel with a trim stick. Once the seal is in the aluminum channel, it becomes very difficult to move it and it really can't be "inch wormed" very much at all. Likewise, I haven't seen the need to stake the replacement seals to keep them from moving since they are so tight in the channel. Having a bigger base stuffed into the aluminum channel will affect the overall stiffness of the bulb seal that that window interacts with. As you stated previously, rubber shrinks and hardens as it ages and leads to a fair degree of guesswork. I fully understand that engineering rubber parts is 1/2 engineering and 1/2 black art. I cant understate for the community how difficult a job it is for 914Rubber to reverse engineer 50 year old parts. Even more so when you don't have a budget for mass production tooling and a consistent production process that is running day in and day out. Worse yet when you potentially have to make a batch of seals for a minimum buy and then they sit an a self (months, years, multiple years?) and harden in the warehouse. I honestly have the utmost appreciation for what 914Rubber is doing for the community by making these seals -- It isn't an easy job and most don't appreciate just how difficult it is. . Regardless of that fact. I've done a lot of development in automotive around bushings and seals. Each time a supplier changes, parts usually have to be changed or tweaked to get equivalent performance. With rubber parts, It's not as simple as handing a drawing to two suppliers and getting EXACTLY the same part back from each supplier. I can't tell you the number of times I've seen a major OEM purchasing department burned by attempting this. They will take a part that was engineered, developed, and produced by Supplier A - send that print to supplier B who promises a cheaper piece price. Parts come back from supplier B but yet, they don't perform as they should. Now purchasing is mad a engineering because they say the drawings didn't contain all the critical characteristics. Engineering is mad at purchasing for resourcing a part that was working fine and manpower is needed to fix it with Supplier B. Supplier A is mad since they are having business taken away to a cheaper competitor. Supplier B sits there looking stupid saying I produced what the print called for - not my problem. Supplier B often knows that they will recoup on the "cheaper" part by the time they get paid for "engineering changes" to the print to now make the "cheaper" part work within their production process. Now I remember why I'm retired! Simply copying the OEM design and durometer doesn't guarantee an equivalent result when rubber parts are involved Rubber formulations are not the same from supplier to supplier. One may use a bit more sulfur and a little bit different vulcanization time than the other. Drifts in durometer that are seeming irrelevant sometimes need to the offset by changes to the section of the part. Sometimes the part is the same durometer but ends up with different elasticity characteristics and that affects function. A seemingly small section thickness difference (within print tolerance) between the parts can leads to the need for the some tweaking and/or re-engineering to get the part to perform the desired function when changing from supplier A to supplier B. This is a long way to say, that simply copying the OEM durometer and dimensions won't necessarily yield the same part, and the same functionality as the OEM part. As the others have noted, I've noticed that what came off the car is softer and more deformable than the replacement part. |
 |
|
Posts in this topic
bbrock How To: Close the Gap on Triangle Window Seal Aug 7 2022, 11:39 AM FlacaProductions Your ingenuity never fails to impress. Practical ... Aug 7 2022, 12:52 PM Dion Nice one Brent! I may need to do this. Evil ge... Aug 7 2022, 01:37 PM Superhawk996 Good job on a fix. :trophy:
Would be far nicer ... Aug 7 2022, 02:18 PM

 mb911
Good job on a fix. :trophy:
Would be far nicer... Aug 7 2022, 02:46 PM Superhawk996
My little story just was to express how surprise... Aug 7 2022, 03:43 PM Olympic 914 I have used a product called Shoe Goo. On things o... Aug 7 2022, 03:36 PM StarBear
I have used a product called Shoe Goo. On things ... Aug 7 2022, 05:47 PM bbrock
I have used a product called Shoe Goo. On things... Aug 7 2022, 06:11 PM vitamin914
I have used a product called Shoe Goo. On things ... Aug 8 2022, 02:40 PM SirAndy I'm pretty sure you can adjust the angle of th... Aug 7 2022, 03:49 PM bbrock
I'm pretty sure you can adjust the angle of t... Aug 7 2022, 03:54 PM mb911
I'm pretty sure you can adjust the angle of ... Aug 7 2022, 05:29 PM Superhawk996
[quote name='bbrock' post='3021064' date='Aug 7 2... Aug 7 2022, 05:34 PM bbrock
[quote name='bbrock' post='3021064' date='Aug 7 ... Aug 7 2022, 06:06 PM friethmiller Man! This is one issue I have on both doors. ... Aug 8 2022, 07:33 AM Superhawk996
I personally think the bottom part of the triangl... Aug 8 2022, 08:02 AM SirAndy My part is off a 73' and has a pocket to fit t... Aug 8 2022, 09:08 AM bbrock
I used carbide in a Dremmel to deepen the pocket ... Aug 8 2022, 10:42 AM Mikey914 SO, to comment on the production of these seals. 1... Aug 8 2022, 11:03 AM bbrock @Mikey914
Thanks for this Mark. As others have ... Aug 8 2022, 11:11 AM Superhawk996
@[url=http://www.914world.com/bbs2/index.php?show... Aug 8 2022, 11:56 AM Mikey914 Thanks,
Yes this winds up being about more than ma... Aug 8 2022, 11:18 AM StarBear
Thanks,
Yes this winds up being about more than m... Aug 8 2022, 03:24 PM Mikey914 We were "lucky" that there was a grant, ... Aug 9 2022, 01:06 AM bkrantz I used Porsche factory (recent production) triangl... Aug 9 2022, 08:38 PM worn
I used Porsche factory (recent production) triang... Aug 10 2022, 03:00 AM bbrock I drove 100 miles from Butte to home @ 80mph with ... Aug 10 2022, 07:14 AM Superhawk996
There appears to be a 1/2" section of rubbe... Aug 11 2022, 07:14 AM bbrock I think going a little softer on the vertical seal... Aug 10 2022, 06:52 PM mb911
I think going a little softer on the vertical sea... Aug 10 2022, 07:49 PM mepstein No surprise when this came up for sale, i jumped o... Aug 11 2022, 07:15 AM Superhawk996
No surprise when this came up for sale, i jumped ... Aug 11 2022, 07:38 AM Mikey914 Ok,
Lets have a conversation on the process.
#1- ... Aug 11 2022, 03:13 PM GeorgeKopf Wow. I am so glad that I found this thread. I sp... Oct 24 2026, 12:25 PM Superhawk996 George
Look inside the targa seal at the bottom ... Oct 24 2026, 12:59 PM burton73 A little history. Back in 2007 or so you could not... Oct 24 2026, 03:32 PM
|
9 User(s) are reading this topic (7 Guests and 0 Anonymous Users)
2 Members: Superhawk996, hndyhrr

|
Lo-Fi Version | Time is now: 24th October 2026 - 07:27 PM |
Invision Power Board
v9.1.4 © 2026 IPS, Inc.