
 How To: Close the Gap on Triangle Window Seal |
|
|

|
Porsche, and the Porsche crest are registered trademarks of Dr. Ing. h.c. F. Porsche AG.
This site is not affiliated with Porsche in any way. Its only purpose is to provide an online forum for car enthusiasts. All other trademarks are property of their respective owners. |
|
|

| bbrock |
 Aug 7 2022, 11:39 AM
Post
#1
|
|
914 Guru  Group: Members Posts: 5,269 Joined: 17-February 17 From: Montana Member No.: 20,845 Region Association: Rocky Mountains 
 |
When I was reassembling my bare metal restoration, I probably spent close to 80 hours installing and adjusting body seals and gaskets. I wanted to get the car as air tight as possible to control cabin noise and leaks. I'm happy to say that my car seals tight enough to feel that pressure bubble when you close a door with top on and windows up like you get with a new modern car.
However, my one trouble spot was the top of the side triangle window. The 914Rubber main front targa seal is nice, but the rubber on mine was just a little too stiff to let the triangle frame to bed in for a proper seal. No amount of adjustment to move the frame forward helped. I even tried wrapping a ratchet strap around the top of the triangle window and windshield frame to pull the frame into the rubber and left it for two weeks to see if it would take a set. It didn't. There was this gap that let water trip in and created significant wind noise in an otherwise suprisingly quiet top on, windows up, cabin. 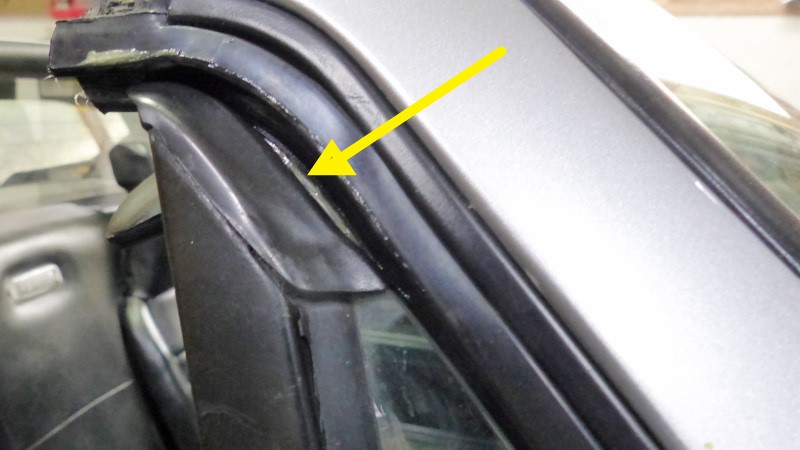 Here is how I fixed it. 1. Clean the main targa seal, triangle window end cap, and top edge of the triangle window thoroughly with isopropyl alcohol. 2. Smear the triangle window end cap and a few inches of the top edge of the window with a generous, but smooth coat of petroleum jelly. This will act as a release agent for the silicone caulk you are about to apply. 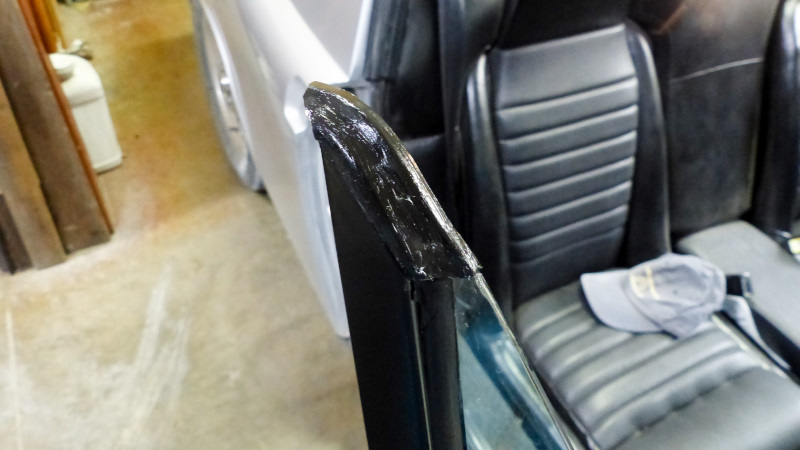 3. Apply a thick bead of black silicone on the targa seal in the area where the gap needs to be filled. Don't worry about getting it smooth at this point. Don't overdo it or you will have more mess to clean up in the next step. 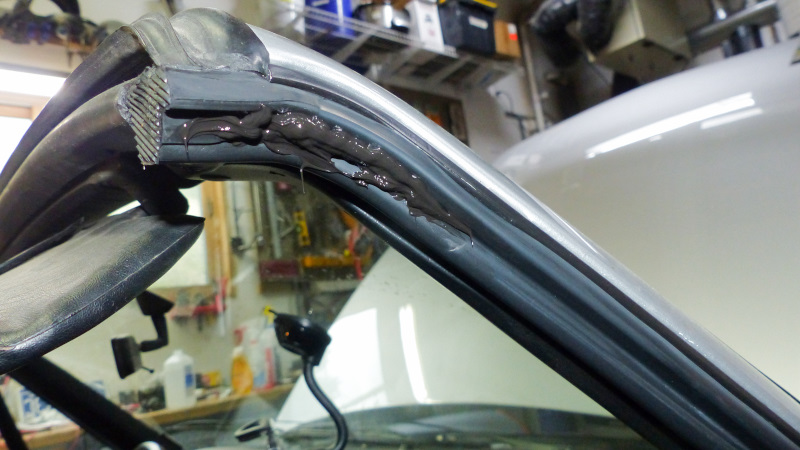 4. Close the door tight and use a lint free cloth soaked with isopropyl alcohol to clean up any silicone that oozes out on the inside. Be thorough with the clean up on this side. 5. Use your finger on the outside to force the silicone into the gap and smooth it out. I had to squirt in a bit more silicone to make sure it was completely filled. 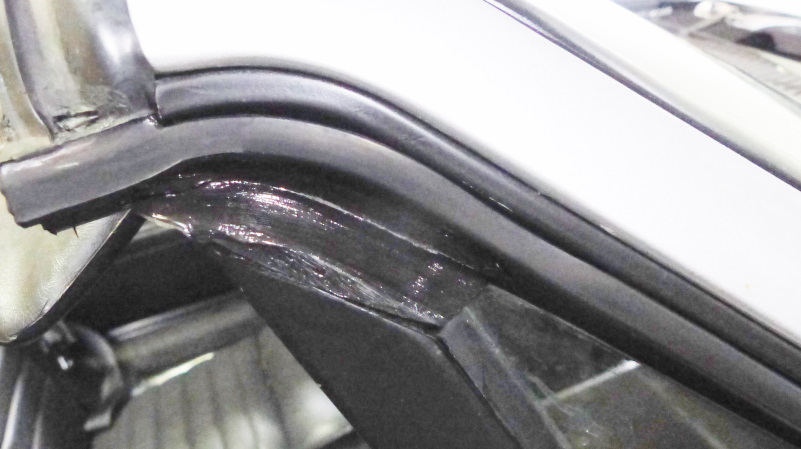 6. When you are satisfied the gap is completely filled with silicone and it looks nice and smooth, carefully go over inside and out with a clean alcohol soaked cloth to tidy up any stray silicone. Much easier at this stage than after silicone has cured. Careful not wipe the petroleum jelly off the end cap though. 7. Leave the car alone for at least 12 hours to let the silicone cure. After the silicone has cured, open the door and clean off the petroleum jelly with alcohol. 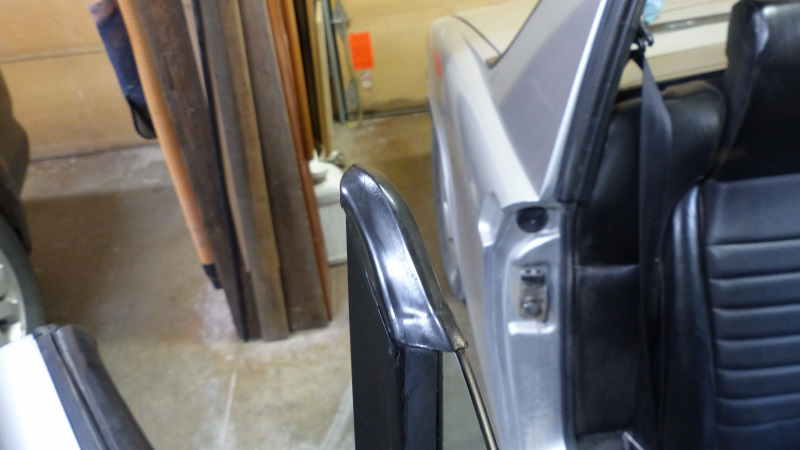 You should have a perfect seal and nearly invisible repair. This picture was taken with a flash to better show the cured silicone. 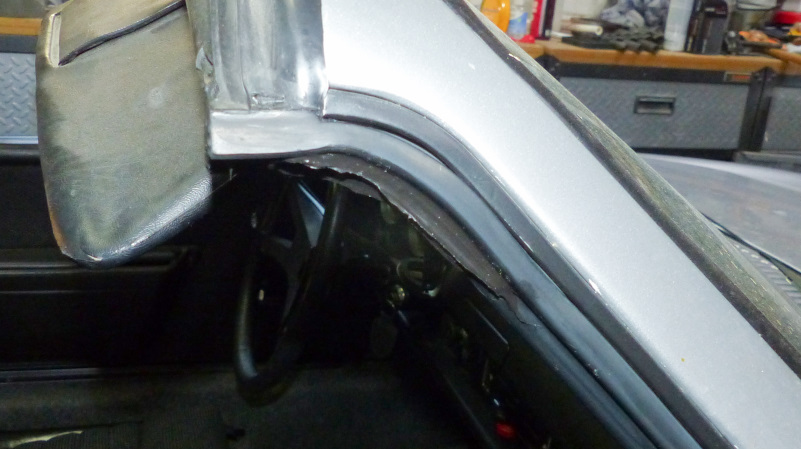 And here is without flash which is more representative of how it looks in natural light. 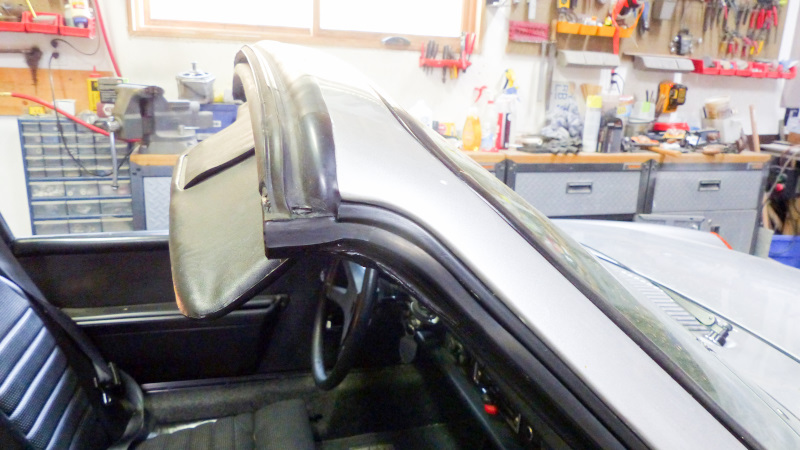 The small amount of jagged slag is only noticeable if you are looking for it, and disappears when the door is closed, but I'll let the silicone cure a few more days and try to smooth it with some fine sandpaper. 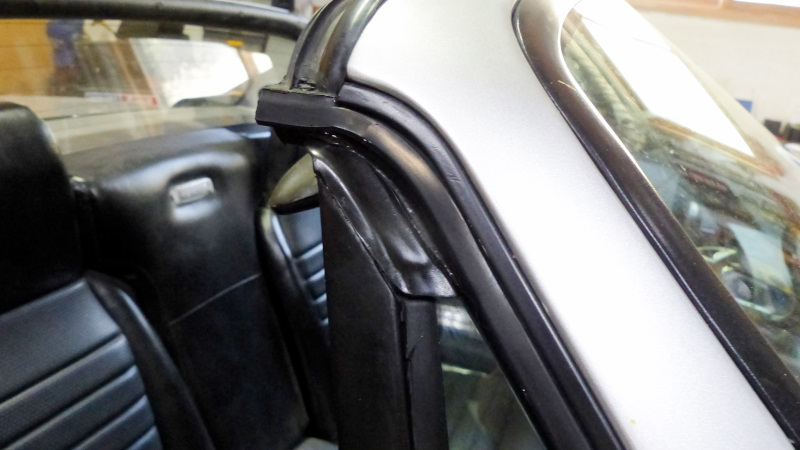 Happy drip and whistle free motoring! (IMG:style_emoticons/default/driving.gif) (IMG:style_emoticons/default/driving-girl.gif) |
   |

 
|
  |
Replies
| Mikey914 |
Aug 11 2022, 03:13 PM
Post
#2
|
|
The rubber man Group: Members Posts: 12,785 Joined: 27-December 04 From: Hillsboro, OR Member No.: 3,348 Region Association: None
|
Ok,
Lets have a conversation on the process. #1- we want to be as close to OEM as possible unless there is a specific reason. An example was the use of stainless or aluminum for internal clips. We were one of the 1st to take on this added expense that has been adopted by others too. As far as hardness and size there is a bit more to consider. Rubber will shrink over time, you can clearly see that in the new / old comparison. We look to ward the fits to parts and try to extrapolate what the original size was using a fomula that estimates it pretty closely. This takes multiple samples, and we can actually see when we have an original vs an OEM that was replaced. This is ideal as it helps confirm the side is correct. As for hardness, there are some standard harnesses that were used, and we can confirm the original while we are working on size. It's easy to say make it softer, but it's actually much more complicated and can actually create more problems. The hardness of the corner blocks are greater than that of the extrusions. The greater the difference, the more likely of a bonding issue. If the material is softer it may not retain as well in the tracks. These are just a few things that must be addressed. When the factory did something there is usually a reason, and small changes can have unintended consequences. I have been educated on this a few times, it's one of the reasons it has taken us more time than expected in bringing some products to market. There is always the installation technique that can be a variable. I prefer to seat the corner blocks (attach and screw into the frame), then engage the inner edge and push the seal up while seating the outer. It requires working your way down the edge on the outside while keeping the inner edge seated. I do think it's time for us to put together a formal install video so we can see a technique that works well for us. I did see that the top of the triangle window glass seems to sit a little lower. It almost looks like if it was 1/8" higher in the retainer the edge would come in and fill the gap. I did start a thread help us help you to try to deconstruct this specifically, as I would like to address specifically this issue. You can look for more from us in the future on this. Thanks, mark |
|
|
|
Posts in this topic
bbrock How To: Close the Gap on Triangle Window Seal Aug 7 2022, 11:39 AM FlacaProductions Your ingenuity never fails to impress. Practical ... Aug 7 2022, 12:52 PM Dion Nice one Brent! I may need to do this. Evil ge... Aug 7 2022, 01:37 PM Superhawk996 Good job on a fix. :trophy:
Would be far nicer ... Aug 7 2022, 02:18 PM

 mb911
Good job on a fix. :trophy:
Would be far nicer... Aug 7 2022, 02:46 PM Superhawk996
My little story just was to express how surprise... Aug 7 2022, 03:43 PM Olympic 914 I have used a product called Shoe Goo. On things o... Aug 7 2022, 03:36 PM StarBear
I have used a product called Shoe Goo. On things ... Aug 7 2022, 05:47 PM bbrock
I have used a product called Shoe Goo. On things... Aug 7 2022, 06:11 PM vitamin914
I have used a product called Shoe Goo. On things ... Aug 8 2022, 02:40 PM SirAndy I'm pretty sure you can adjust the angle of th... Aug 7 2022, 03:49 PM bbrock
I'm pretty sure you can adjust the angle of t... Aug 7 2022, 03:54 PM mb911
I'm pretty sure you can adjust the angle of ... Aug 7 2022, 05:29 PM Superhawk996
[quote name='bbrock' post='3021064' date='Aug 7 2... Aug 7 2022, 05:34 PM bbrock
[quote name='bbrock' post='3021064' date='Aug 7 ... Aug 7 2022, 06:06 PM friethmiller Man! This is one issue I have on both doors. ... Aug 8 2022, 07:33 AM Superhawk996
I personally think the bottom part of the triangl... Aug 8 2022, 08:02 AM SirAndy My part is off a 73' and has a pocket to fit t... Aug 8 2022, 09:08 AM bbrock
I used carbide in a Dremmel to deepen the pocket ... Aug 8 2022, 10:42 AM Mikey914 SO, to comment on the production of these seals. 1... Aug 8 2022, 11:03 AM bbrock @Mikey914
Thanks for this Mark. As others have ... Aug 8 2022, 11:11 AM Superhawk996
@[url=http://www.914world.com/bbs2/index.php?show... Aug 8 2022, 11:56 AM Mikey914 Thanks,
Yes this winds up being about more than ma... Aug 8 2022, 11:18 AM StarBear
Thanks,
Yes this winds up being about more than m... Aug 8 2022, 03:24 PM Mikey914 We were "lucky" that there was a grant, ... Aug 9 2022, 01:06 AM bkrantz I used Porsche factory (recent production) triangl... Aug 9 2022, 08:38 PM worn
I used Porsche factory (recent production) triang... Aug 10 2022, 03:00 AM bbrock I drove 100 miles from Butte to home @ 80mph with ... Aug 10 2022, 07:14 AM Mikey914 I keep looking at this and something doesn't l... Aug 10 2022, 04:37 PM Superhawk996
Given that the blocks are identical to the factor... Aug 11 2022, 06:30 AM Superhawk996
There appears to be a 1/2" section of rubbe... Aug 11 2022, 07:14 AM bbrock I think going a little softer on the vertical seal... Aug 10 2022, 06:52 PM mb911
I think going a little softer on the vertical sea... Aug 10 2022, 07:49 PM mepstein No surprise when this came up for sale, i jumped o... Aug 11 2022, 07:15 AM Superhawk996
No surprise when this came up for sale, i jumped ... Aug 11 2022, 07:38 AM GeorgeKopf Wow. I am so glad that I found this thread. I sp... Oct 24 2026, 12:25 PM Superhawk996 George
Look inside the targa seal at the bottom ... Oct 24 2026, 12:59 PM burton73 A little history. Back in 2007 or so you could not... Oct 24 2026, 03:32 PM
|
9 User(s) are reading this topic (7 Guests and 0 Anonymous Users)
2 Members: Superhawk996, hndyhrr

|
Lo-Fi Version | Time is now: 24th October 2026 - 07:28 PM |
Invision Power Board
v9.1.4 © 2026 IPS, Inc.