|
|
|
Porsche, and the Porsche crest are registered trademarks of Dr. Ing. h.c. F. Porsche AG.
This site is not affiliated with Porsche in any way. Its only purpose is to provide an online forum for car enthusiasts. All other trademarks are property of their respective owners. |
|
|


| DennisV |
 Nov 28 2023, 05:54 PM Nov 28 2023, 05:54 PM
Post
#1
|
|
Senior Member  Group: Members Posts: 670 Joined: 8-August 20 From: Santa Rosa, CA Member No.: 24,575 Region Association: Northern California |
TLDR;
I attempted to install rear trailing arm pivot shafts into new bushings over the weekend and it was a disaster. First go split the bushing. Second go with bushing from alternate vendor went in by hand. I assume if it went in that easy, something is not right. DETAIL I started with new shafts from Restoration Design, as they seemed closest to original design (i.e., hollow). I also used their Prekom brand bushings as I was told it was the original durometer and being supplied to Porsche, Rebel Racing and Elephant Racing. The trailing arm bushing split the top lip from the base on the first attempt to install a pivot shaft. Per conventional wisdom, I thoroughly lubricated them with dish soap, used a shop press, and had a helper. I didn’t want to mix bushings with different specs, so I pull out all the Prekom. They seemed pretty brittle and broke apart in most cases. Note: The dimensions (mm) of the bushing are quite different. Left to right in photos. WDG ID: 28, Height 54 Prekom ID: 26, Height 47 Original ID: 28.5, Height 55 I wish I had measured the OD of the new pivot shaft, but didn't think to do it before installing them. 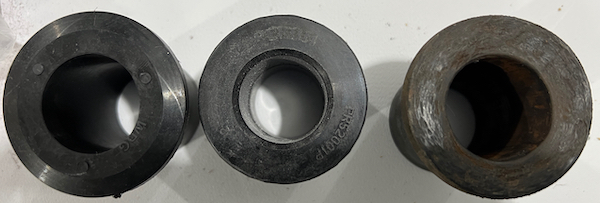 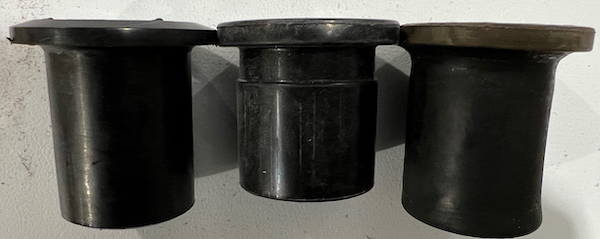 I tried again to install, this time with the same pivot shaft but using WDG bushing which I had on hand and are very close to the same dimensions of the originals. In this case I was able to install the pivot shaft into the bushings by hand. I assume it should not be that easy. (IMG:style_emoticons/default/WTF.gif) They did appear to set up a bit after leaving them overnight, but I am able to rotate the link bearing by hand with some moderate effort. Nut torqued, but not installed on car. So now I am left to decide if I leave it as is, or pull the pivot shaft and bushing and start over with another combination. (IMG:style_emoticons/default/confused24.gif) |
   |

 
|
  |
Replies
| Mikey914 |
Nov 29 2023, 12:41 AM
Post
#2
|
|
The rubber man Group: Members Posts: 12,772 Joined: 27-December 04 From: Hillsboro, OR Member No.: 3,348 Region Association: None |
We make bushings and shafts that are the same dimensions as the OEM. I do know with ours it it a tight tolerance, and is not a hand fit. It can however be tapped into place with lubrication.
|
|
|
|
| DennisV |
Nov 29 2023, 09:18 AM
Post
#3
|
|
Senior Member Group: Members Posts: 670 Joined: 8-August 20 From: Santa Rosa, CA Member No.: 24,575 Region Association: Northern California |
QUOTE(Mikey914 @ Nov 28 2023, 10:41 PM)  We make bushings and shafts that are the same dimensions as the OEM. I do know with ours it it a tight tolerance, and is not a hand fit. It can however be tapped into place with lubrication. Hi Mike. The second set of bushings that I used, where I was able to install the shaft by hand, were from 914Rubber. Marked WDG. Perhaps the pivot shafts from Restoration Design are not stock OD. Though if they were smaller, I wouldn't have thought my first install try would have ended like it did. |
|
|
|
Posts in this topic
 DennisV Pivot Shaft Installation Woes Nov 28 2023, 05:54 PM
 Superhawk996 Yes - they are a pain to install when you have the... Nov 28 2023, 07:36 PM
 mepstein
We make bushings and shafts that are the same di... Nov 30 2023, 07:01 AM 76-914 That shaft shouldn't rotate easily. It should ... Nov 29 2023, 06:32 PM 914Toy
That shaft shouldn't rotate easily. It should... Nov 30 2023, 09:17 AM Krieger Hi Dennis. I have a good pair of oem pivot shafts... Nov 29 2023, 11:08 PM DennisV
Hi Dennis. I have a good pair of oem pivot shaft... Nov 30 2023, 02:45 PM Montreal914 How does one can establish what the dimensions and... Nov 30 2023, 09:21 AM mepstein
How does one can establish what the dimensions an... Nov 30 2023, 06:18 PM 76-914
How does one can establish what the dimensions a... Dec 5 2023, 08:42 PM
mepstein
We make bushings and shafts that are the same di... Nov 30 2023, 07:01 AM 76-914 That shaft shouldn't rotate easily. It should ... Nov 29 2023, 06:32 PM 914Toy
That shaft shouldn't rotate easily. It should... Nov 30 2023, 09:17 AM Krieger Hi Dennis. I have a good pair of oem pivot shafts... Nov 29 2023, 11:08 PM DennisV
Hi Dennis. I have a good pair of oem pivot shaft... Nov 30 2023, 02:45 PM Montreal914 How does one can establish what the dimensions and... Nov 30 2023, 09:21 AM mepstein
How does one can establish what the dimensions an... Nov 30 2023, 06:18 PM 76-914
How does one can establish what the dimensions a... Dec 5 2023, 08:42 PM |
1 User(s) are reading this topic (1 Guests and 0 Anonymous Users)
0 Members:

|
Lo-Fi Version | Time is now: 16th July 2025 - 07:26 AM |
Invision Power Board
v9.1.4 © 2025 IPS, Inc.