|
|
|
Porsche, and the Porsche crest are registered trademarks of Dr. Ing. h.c. F. Porsche AG.
This site is not affiliated with Porsche in any way. Its only purpose is to provide an online forum for car enthusiasts. All other trademarks are property of their respective owners. |
|
|


| Robarabian |
 Aug 26 2023, 03:46 PM Aug 26 2023, 03:46 PM
Post
#1
|
|
914 A Roo  Group: Members Posts: 739 Joined: 11-February 19 From: Simi Valley, Kalifornia Member No.: 22,865 Region Association: Southern California |
Ok, here is my stab at an installation thread.
1) I am a home mechanic, not the Red Barn. Please be constructive, I am sure there are several better ways, but this is what I did and it works... at least so far. 2) You will see a red fan and a silver fan. I had to switch them in the end, for alignment purposes. I haven't figured out why yet. 3) I love the way it turned out. Here goes nothing...: You start by removing your pulleys from both the fan and the crank. The crank one goes on easy, and I used a new bolt that I bought with the kit from Clewitt. The instructions say to make sure there are no burrs on your fan. This is important. It was a tight fit, I ended up doing a bit of sanding and cleaning up the fan pulley area to get the Clewitt pulley to fit on and off. It says you can use shims to make sure everything is straight. I used my 911 cam chain straight edge that I got from Stomski Racing to line up the pulleys. Once you know they are in alignment, you need to mount the tensioner. In my case, I had to fabricate a bracket. On the left side, the tins would be in the way on my particular engine. I used the right side mount bolt. Note: Clewitt's tensioner is on an eccentric, so it can be tensioned from either side, it is a universal as far as that goes. It works at about any angle. I used a beefy angle mount I had, and a piece of straight / flat bar. After measuring it up, I mig welded both sides, and ground em down a bit since I am not a super welder. I drilled the mounting holes and mounted it up. Once it is in place, I fiddled with where I wanted it. I notched my angle mount so it would sort of catch my engine mount and lock into place to avoid any rotation due to tension. I got lucky here. After test fitting it and tensioning it, I shortened one end and then painted it black. Clewitt pre-threads it, so I noticed the tensioner wasn't in perfect alignment. I used a few washers between the mount I made and the tensioner to shim it forward slightly and it popped into perfect alignment. It looks pretty slick and the belt change is as simple as loosening the eccentric bolt, rotating the tensioner either direction and removing the belt. You re-tension it and allow for 1/4 inch deflection. Richard Clewitt said not to over tension it, or you can either put wear on the alternator bearing or the tensioner, but he said it is designed that the tensioner will fail before an alternator bearing. Replacements are pretty cheap. You shouldn't have to fabricate anything if you are using the Rich Johnson type mount, as it has the provisions for the tensioner to bolt directly to. This is just what I had to do. See photos. 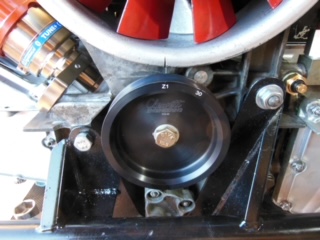 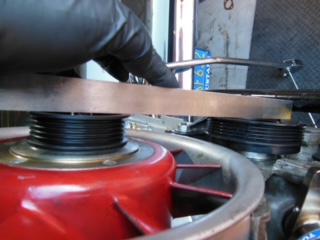 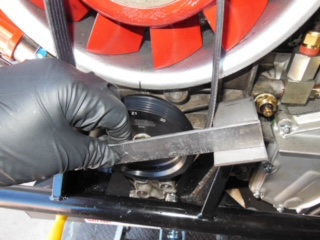 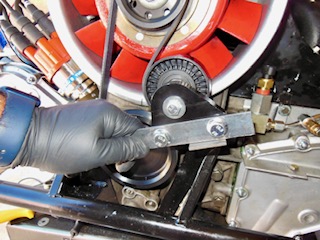 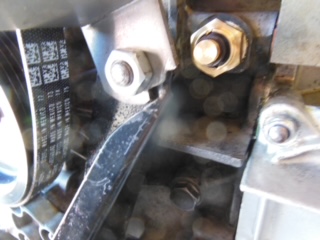  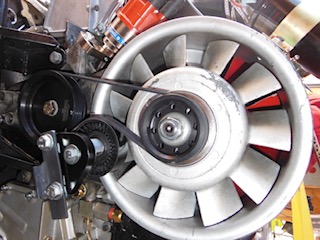 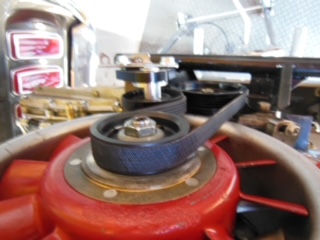 |
   |

 
|
  |
Replies
| live free & drive |
Dec 5 2024, 09:01 PM
Post
#2
|
|
Member Group: Members Posts: 213 Joined: 29-June 16 From: New Hampshire Member No.: 20,159 Region Association: None |
The Naro mount puts the engine 1/2” closer to the firewall
|
|
|
|
| mb911 |
Dec 6 2024, 09:00 AM
Post
#3
|
|
914 Guru Group: Members Posts: 7,740 Joined: 2-January 09 From: Burlington wi Member No.: 9,892 Region Association: Upper MidWest |
QUOTE(live free & drive @ Dec 5 2024, 07:01 PM)  The Naro mount puts the engine 1/2” closer to the firewall And also lower in the chassis so the engine seal doesn’t seal. Not a fan of that mount for those 2 reasons |
|
|
|
| Montreal914 |
Dec 6 2024, 10:24 AM
Post
#4
|
|
Advanced Member Group: Members Posts: 2,080 Joined: 8-August 10 From: Claremont, CA Member No.: 12,023 Region Association: Southern California |
QUOTE(mb911 @ Dec 6 2024, 07:00 AM) QUOTE(live free & drive @ Dec 5 2024, 07:01 PM) The Naro mount puts the engine 1/2” closer to the firewall And also lower in the chassis so the engine seal doesn’t seal. Not a fan of that mount for those 2 reasons @live free & drive , @mb911 These are two very good piece of information. (IMG:style_emoticons/default/smilie_pokal.gif) I was wondering about how to know/set the mount to ensure the engine is precisely where it is supposed to be. (IMG:style_emoticons/default/sad.gif) I guess one could bring the engine in the bay but that is quite an undertake. Are there any rereference points/distances that can be measure between engine and chassis that could help this engine mount positioning without the use of the actual engine? Is there anything preventing shiming out the base of the Naro engine mount away from the firewall? Abeit 1/2" is a lot! (IMG:style_emoticons/default/blink.gif) Is there anything preventing the mount to be installed higher so the tin can settle properly with the chassis seal? I can't see my installation not fitting properly in that seal, this will not look right in my book. (IMG:style_emoticons/default/dry.gif) Thank you for the input, sorry for the small drift in OPs thread. (IMG:style_emoticons/default/unsure.gif) The Clewitt upgrade seems really nice but a few picture examples of 914s integration would be helpfull. Obviously designed for the 911 rear engine configuration, seems trickier on 914s especially with the various engine mount options on the market. |
|
|
|
Posts in this topic
 Robarabian Serpentine Belt-- Updated Thread Aug 26 2023, 03:46 PM
 ClayPerrine
Ok, here is my stab at an installation thread.
... Aug 26 2023, 03:56 PM
ClayPerrine
Ok, here is my stab at an installation thread.
... Aug 26 2023, 03:56 PM
 Robarabian I sent the photos to Clewitt to get his opinion. I... Aug 26 2023, 03:58 PM jim_hoyland Nice presentation Rob :) Aug 26 2023, 08:33 PM Cairo94507 I think that is a significant improvement over the... Aug 27 2023, 08:52 AM mb911 I would love this setup. Need to sell more oil tan... Aug 27 2023, 10:19 AM Robarabian Ok, I got some feedback from Clewitt, and he also ... Aug 27 2023, 12:35 PM arbitrary @Robarabian how is the tensioner mount working ou... Dec 1 2024, 05:17 PM Cairo94507 Congratulations on getting that sorted. We instal... Dec 2 2024, 09:10 AM Montreal914 Curious as to what made this installation a custom... Dec 4 2024, 10:38 AM Robarabian Not with the mount I have. I have the one that is... Dec 4 2024, 10:18 PM ClayPerrine What I did on my 2.4L with this same setup is to u... Dec 5 2024, 07:50 AM Robarabian I'd love to see close ups of that Clay. I real... Dec 5 2024, 08:00 PM Robarabian I'd love to see close ups of that Clay. I real... Dec 5 2024, 08:00 PM Montreal914 @Robarabian Are you using the Naro mount?
Dec 5 2024, 09:15 AM Robarabian Yes. that is the one. I actually really like it fo... Dec 5 2024, 07:55 PM Robarabian That would explain why it was so tight... I think ... Dec 5 2024, 10:35 PM Robarabian My engine seal, seals fine. It is a newly replaced... Dec 6 2024, 09:21 AM mb911
My engine seal, seals fine. It is a newly replace... Dec 6 2024, 10:14 AM mb911
[quote name='mb911' post='3180466' date='Dec 6 20... Dec 6 2024, 11:01 AM Montreal914 ...will discuss this in a different thread. My que... Dec 6 2024, 02:30 PM live free & drive Just for some tight numbers onthe Naro mount; if y... Dec 6 2024, 03:12 PM ClayPerrine This isn't the exact picture I was looking for... Dec 7 2024, 07:09 AM
Robarabian I sent the photos to Clewitt to get his opinion. I... Aug 26 2023, 03:58 PM jim_hoyland Nice presentation Rob :) Aug 26 2023, 08:33 PM Cairo94507 I think that is a significant improvement over the... Aug 27 2023, 08:52 AM mb911 I would love this setup. Need to sell more oil tan... Aug 27 2023, 10:19 AM Robarabian Ok, I got some feedback from Clewitt, and he also ... Aug 27 2023, 12:35 PM arbitrary @Robarabian how is the tensioner mount working ou... Dec 1 2024, 05:17 PM Cairo94507 Congratulations on getting that sorted. We instal... Dec 2 2024, 09:10 AM Montreal914 Curious as to what made this installation a custom... Dec 4 2024, 10:38 AM Robarabian Not with the mount I have. I have the one that is... Dec 4 2024, 10:18 PM ClayPerrine What I did on my 2.4L with this same setup is to u... Dec 5 2024, 07:50 AM Robarabian I'd love to see close ups of that Clay. I real... Dec 5 2024, 08:00 PM Robarabian I'd love to see close ups of that Clay. I real... Dec 5 2024, 08:00 PM Montreal914 @Robarabian Are you using the Naro mount?
Dec 5 2024, 09:15 AM Robarabian Yes. that is the one. I actually really like it fo... Dec 5 2024, 07:55 PM Robarabian That would explain why it was so tight... I think ... Dec 5 2024, 10:35 PM Robarabian My engine seal, seals fine. It is a newly replaced... Dec 6 2024, 09:21 AM mb911
My engine seal, seals fine. It is a newly replace... Dec 6 2024, 10:14 AM mb911
[quote name='mb911' post='3180466' date='Dec 6 20... Dec 6 2024, 11:01 AM Montreal914 ...will discuss this in a different thread. My que... Dec 6 2024, 02:30 PM live free & drive Just for some tight numbers onthe Naro mount; if y... Dec 6 2024, 03:12 PM ClayPerrine This isn't the exact picture I was looking for... Dec 7 2024, 07:09 AM |
1 User(s) are reading this topic (1 Guests and 0 Anonymous Users)
0 Members:

|
Lo-Fi Version | Time is now: 16th April 2026 - 06:59 AM |
Invision Power Board
v9.1.4 © 2026 IPS, Inc.