|
|
|
Porsche, and the Porsche crest are registered trademarks of Dr. Ing. h.c. F. Porsche AG.
This site is not affiliated with Porsche in any way. Its only purpose is to provide an online forum for car enthusiasts. All other trademarks are property of their respective owners. |
|
|


| DennisV |
 Dec 30 2024, 07:28 PM Dec 30 2024, 07:28 PM
Post
#1
|
|
Senior Member  Group: Members Posts: 910 Joined: 8-August 20 From: Santa Rosa, CA Member No.: 24,575 Region Association: Northern California |
I hate to belabor the rear shock topic, but I am stuck. I didn't have the original setup to reference, and I'm not finding much in terms of Boge details for 914-6.
Thanks for any assistance. 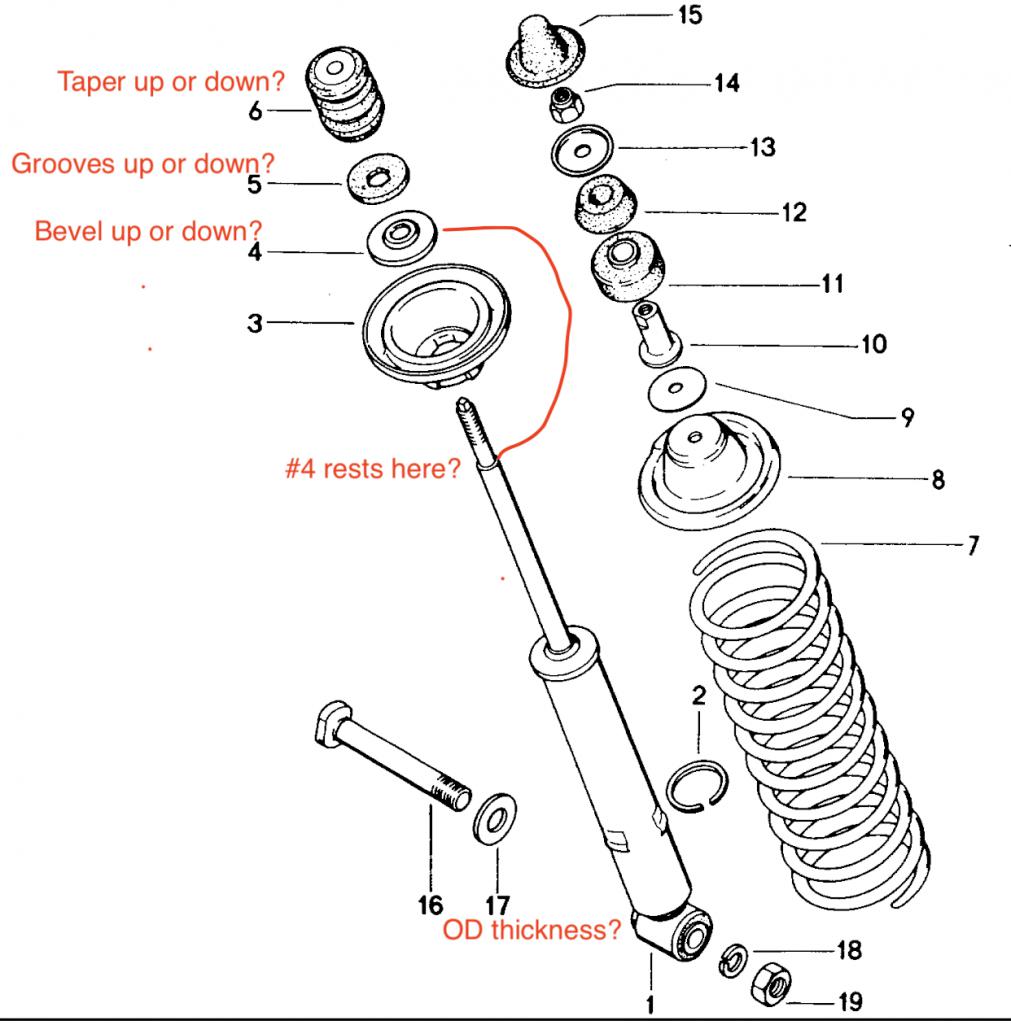 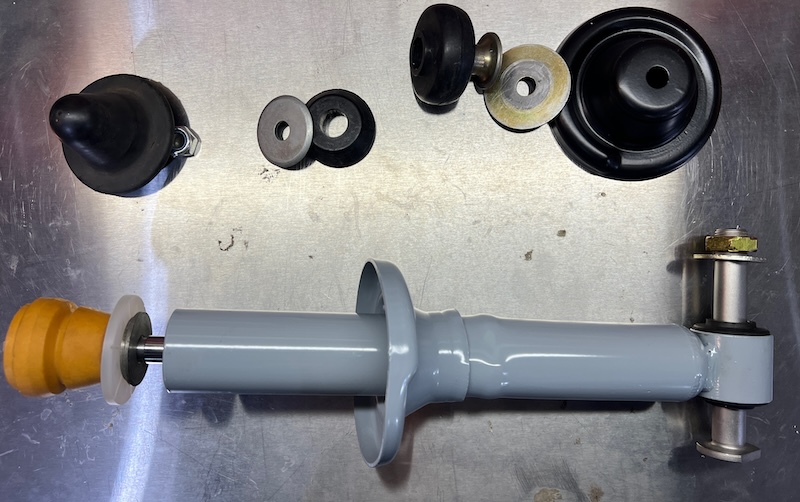 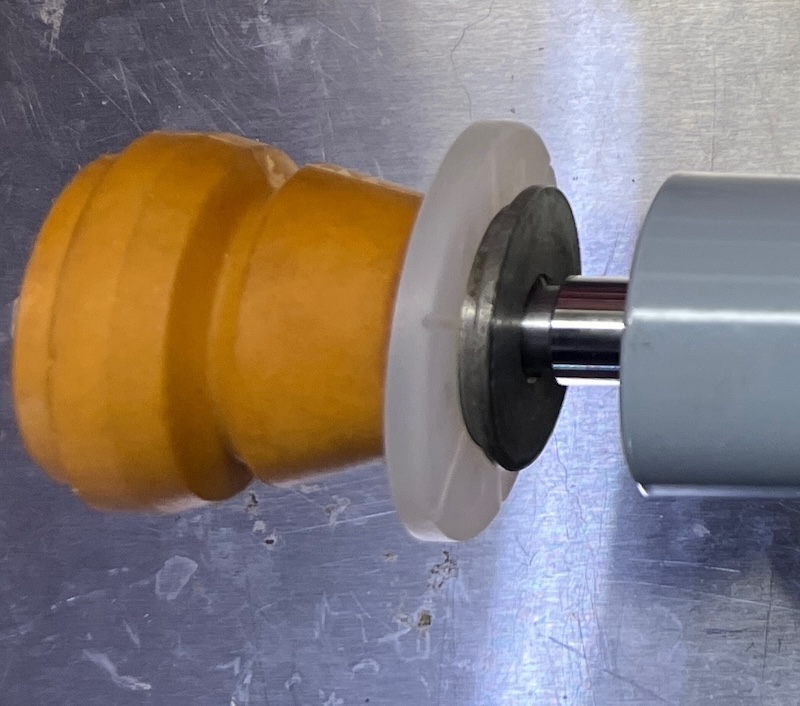 |
   |

 
|
  |
Replies
| Superhawk996 |
Dec 30 2024, 09:26 PM
Post
#2
|
|
914 Guru Group: Members Posts: 7,821 Joined: 25-August 18 From: Woods of N. Idaho Member No.: 22,428 Region Association: Galt's Gulch |
That is totally wrong but the PET diagram is garbage as far as an exploded diagram goes so that no slam on you.
Washer #5 should have a hole large enough to allow it to slide to the bottom of the damper rod. It goes at the bottom and should basically be resting on the damper body. This is the first thing to go on the damper. The purpose of the slots is to prevent a vacuum from getting formed on the damper seal (inside damper body) when the jounce bumper gets squished under hard compression. The yellow bounce bumper #6 should have a hole large enough to slide all the way to the bottom of the damper rod. The washer #4 that you have at the top of the damper rod has a smaller hole - supposed to stay at the top of the damper rod. However it nests into the top spring retainer/perch #8 on PET. You’ll note it is stepped - this will allow it to “nest” into the spring retainer. Smaller stepped side to the top. |
|
|
|
| DennisV |
Dec 31 2024, 08:16 PM
Post
#3
|
|
Senior Member Group: Members Posts: 910 Joined: 8-August 20 From: Santa Rosa, CA Member No.: 24,575 Region Association: Northern California |
QUOTE(Superhawk996 @ Dec 30 2024, 07:26 PM)  That is totally wrong but the PET diagram is garbage as far as an exploded diagram goes so that no slam on you. The yellow bounce bumper #6 should have a hole large enough to slide all the way to the bottom of the damper rod. The washer #4 that you have at the top of the damper rod has a smaller hole - supposed to stay at the top of the damper rod. However it nests into the top spring retainer/perch #8 on PET. You’ll note it is stepped - this will allow it to “nest” into the spring retainer. Smaller stepped side to the top. Thank you very much for taking time to post this. I think I have it sorted now. You are correct that I was using the parts catalog as an exploded diagram, which I guess I should not. It was definitely confusing in this case. The yellow bounce bumper #6 went on all the way down, but required some dish soap and persuasion.  |
|
|
|
| davep |
Dec 31 2024, 10:09 PM
Post
#4
|
|
914 Historian Group: Benefactors Posts: 5,362 Joined: 13-October 03 From: Burford, ON, N0E 1A0 Member No.: 1,244 Region Association: Canada |
QUOTE(DennisV @ Dec 31 2024, 09:16 PM) You are correct that I was using the parts catalog as an exploded diagram, which I guess I should not. It was definitely confusing in this case. The yellow bounce bumper #6 went on all the way down, but required some dish soap and persuasion. The parts diagram is basically numbered in the order of assembly. As soon as you use the shock in the car, the #6 bumper will ride up the shaft as the spring gets compressed; it is supposed to be up in the cap! You do not need part #2 since the shock body is designed to support the perch. I do not see #4. I do not see a proper #13 The drain hole in the perch #3 should be in the lowest position when the shock is installed, so it will face forward. |
|
|
|
| DennisV |
Jan 1 2025, 07:25 AM
Post
#5
|
|
Senior Member Group: Members Posts: 910 Joined: 8-August 20 From: Santa Rosa, CA Member No.: 24,575 Region Association: Northern California |
QUOTE(davep @ Dec 31 2024, 08:09 PM) #6 bumper will ride up the shaft as the spring gets compressed; it is supposed to be up in the cap! I do not see a proper #13 The drain hole in the perch #3 should be in the lowest position when the shock is installed, so it will face forward. 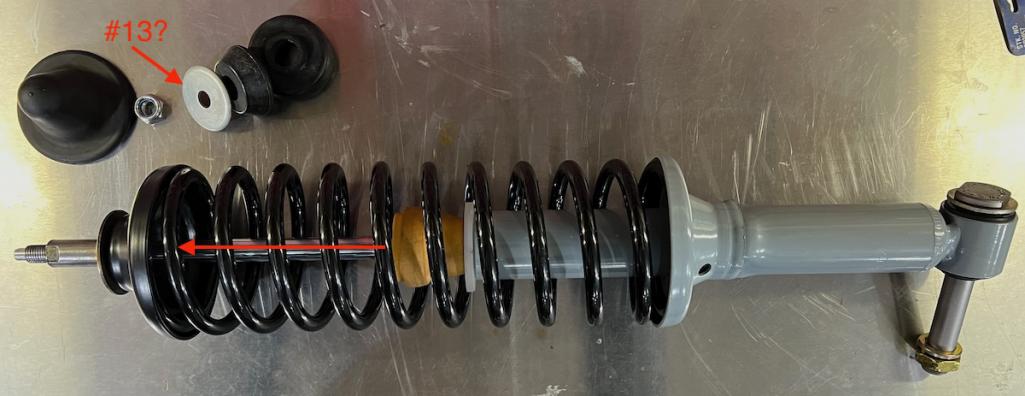 #6 will still be on the thicker part of the shaft though. So if I just slide it to meet the bevel washer, I am good? I thought the washer with the curved lip top left was #13? Is it not? The lip isn't easy to see in the photo. 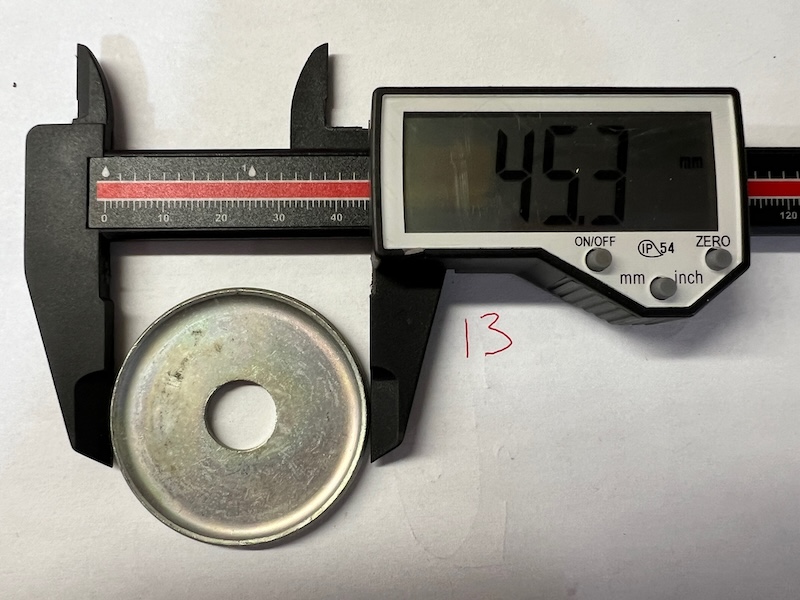 Thanks for the info on the drain hole position. |
|
|
|
| davep |
Jan 1 2025, 06:54 PM
Post
#6
|
|
914 Historian Group: Benefactors Posts: 5,362 Joined: 13-October 03 From: Burford, ON, N0E 1A0 Member No.: 1,244 Region Association: Canada |
QUOTE(DennisV @ Jan 1 2025, 08:25 AM) I thought the washer with the curved lip top left was #13? Is it not? The lip isn't easy to see in the photo. Thanks for the info on the drain hole position. That is indeed #13, but the cup faces up to the nut. |
|
|
|
Posts in this topic
DennisV Rear Shock Assembly for 914-6 - Boge Dec 30 2024, 07:28 PM Superhawk996 The jounce bumper doesn’t contact anything until... Dec 30 2024, 09:34 PM Superhawk996 Here’s a couple other pictures of rear dampers a... Dec 30 2024, 10:26 PM
 davep
Here’s a couple other pictures of rear dampers ... Dec 31 2024, 09:58 PM Superhawk996
The original bump stop had the stepped washer bo... Jan 1 2025, 01:48 AM Superhawk996 :trophy: Dec 31 2024, 08:27 PM davep The PET diagram is not too bad if you look at the ... Dec 31 2024, 09:49 PM DennisV
4 dust cap (stamped metal fits over the shock bod... Jan 1 2025, 07:15 AM Cairo94507 An excellent thread on rear shock assembly. Now I... Jan 1 2025, 08:06 AM Superhawk996 Was trying to find a NOS rear jounce bumper to see... Jan 1 2025, 01:29 PM StarBear
Was trying to find a NOS rear jounce bumper to se... Apr 26 2026, 05:15 PM Superhawk996 @DennisV
The jounce bumpers you already have wi... Jan 1 2025, 02:25 PM Superhawk996 I guess while I’m :deadhorse:
I might as well... Jan 1 2025, 02:33 PM davep I had a dozen of the orange bump stops, but the fo... Jan 1 2025, 07:44 PM DennisV
Most of my parts are buried at this time, but if ... Jan 2 2025, 02:20 PM Artfrombama
I had a dozen of the orange bump stops, but the f... Jan 18 2025, 01:19 AM StarBear
I had a dozen of the orange bump stops, but the ... Apr 26 2026, 05:16 PM rgalla9146 Great thread.
My reply is a bit off topic...bea... Jan 2 2025, 03:11 PM DennisV
Rear Boges grey ? ...don't remember.
... Jan 2 2025, 03:41 PM DennisV For anyone researching this in the future, I have ... Jan 3 2025, 12:14 PM Cairo94507 :trophy: Thanks for doing that. :beer2: Michael Jan 3 2025, 12:39 PM DennisV [b]TL;DR
It doesn't appear #4 is needed as a s... Jan 17 2025, 05:02 PM
davep
Here’s a couple other pictures of rear dampers ... Dec 31 2024, 09:58 PM Superhawk996
The original bump stop had the stepped washer bo... Jan 1 2025, 01:48 AM Superhawk996 :trophy: Dec 31 2024, 08:27 PM davep The PET diagram is not too bad if you look at the ... Dec 31 2024, 09:49 PM DennisV
4 dust cap (stamped metal fits over the shock bod... Jan 1 2025, 07:15 AM Cairo94507 An excellent thread on rear shock assembly. Now I... Jan 1 2025, 08:06 AM Superhawk996 Was trying to find a NOS rear jounce bumper to see... Jan 1 2025, 01:29 PM StarBear
Was trying to find a NOS rear jounce bumper to se... Apr 26 2026, 05:15 PM Superhawk996 @DennisV
The jounce bumpers you already have wi... Jan 1 2025, 02:25 PM Superhawk996 I guess while I’m :deadhorse:
I might as well... Jan 1 2025, 02:33 PM davep I had a dozen of the orange bump stops, but the fo... Jan 1 2025, 07:44 PM DennisV
Most of my parts are buried at this time, but if ... Jan 2 2025, 02:20 PM Artfrombama
I had a dozen of the orange bump stops, but the f... Jan 18 2025, 01:19 AM StarBear
I had a dozen of the orange bump stops, but the ... Apr 26 2026, 05:16 PM rgalla9146 Great thread.
My reply is a bit off topic...bea... Jan 2 2025, 03:11 PM DennisV
Rear Boges grey ? ...don't remember.
... Jan 2 2025, 03:41 PM DennisV For anyone researching this in the future, I have ... Jan 3 2025, 12:14 PM Cairo94507 :trophy: Thanks for doing that. :beer2: Michael Jan 3 2025, 12:39 PM DennisV [b]TL;DR
It doesn't appear #4 is needed as a s... Jan 17 2025, 05:02 PM |
4 User(s) are reading this topic (4 Guests and 0 Anonymous Users)
0 Members:

|
Lo-Fi Version | Time is now: 27th April 2026 - 05:48 AM |
Invision Power Board
v9.1.4 © 2026 IPS, Inc.