|
|
|
Porsche, and the Porsche crest are registered trademarks of Dr. Ing. h.c. F. Porsche AG.
This site is not affiliated with Porsche in any way. Its only purpose is to provide an online forum for car enthusiasts. All other trademarks are property of their respective owners. |
|
|


| Ron914 |
 Mar 24 2025, 05:21 PM Mar 24 2025, 05:21 PM
Post
#1
|
|
Member  Group: Members Posts: 496 Joined: 19-April 22 From: Huntington Beach,Ca Member No.: 26,487 Region Association: Southern California |
@emerygt350
I was asked my a member helping me with my high idle /vacuum leak problem how I currently have it hooked up .This is the diagram I am using . 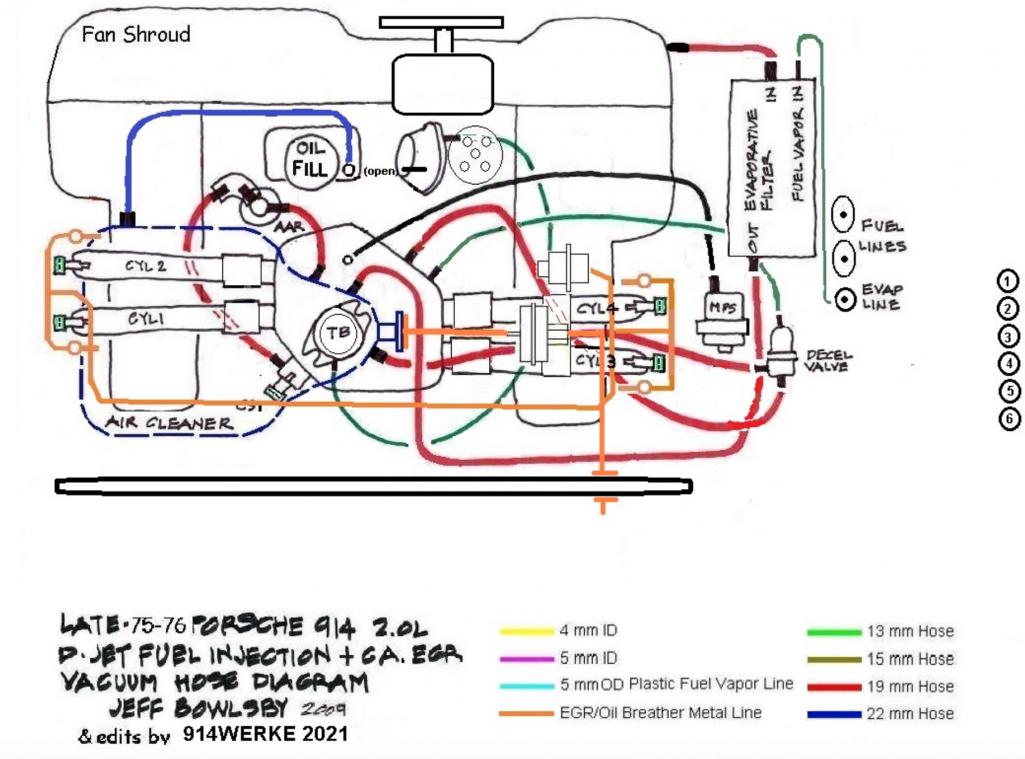 |
   |

 
|
  |
Replies
| emerygt350 |
Apr 5 2025, 08:13 AM
Post
#2
|
|
Advanced Member Group: Members Posts: 3,529 Joined: 20-July 21 From: Upstate, NY Member No.: 25,740 Region Association: North East States |
Let me see if I understand what you posted. When you plugged the MPS vacuum at the plenum and gave the MPS 22inhg with a warm engine the idle dropped to where it is supposed to be, and the MPS is leaking down as well?
I would double check your valves because it is relatively easy, but check your vacuum at the plenum first, it would be nice to know where it is at currently. Use the MPS port on the plenum. Just hook your mityvac to it and read the vacuum off of that. Be sure the engine is warmish when you do check or at least that the aar is closed or blocked and the leaking MPS is unplugged. If the vacuum is up around 18-20 inhg I might not bother with the valves just yet. I would also time your engine for the moment using the vacuum method. This is the way people used to time their engines in the old days. Disconnect the retard. Get the engine warm and idling at that 900 again (disconnect the mps or whatever was necessary). Check the vacuum, turn the distributor either way and watch the vacuum. You want to find the highest vacuum with the engine still running well. Then back it down 1-2inhg. If the vacuum is quite high (over 21inhg) I would just bring it down to 19inhg. If 19 or 20 is as high as it goes, I would maybe bring it back 1 inhg so it's between 18 and 19 just to be safe. If you don't have much faith in your timing marks or the light this should work fine. You could now check the timing with the light and see where you are at idle and all in at 3.5k rpm. Since you have a 2056 I don't know what to think about the 'euro spec' MPS. Sounds like the daiphragm is busted anyway so you will probably need one of Chris Foley's rebuild kits and at that point you will be tuning your own MPS anyway. I am not sure if the 2056 sucks enough gas over the stock to require that inline resistor though. Your ECU is already richer than the 73 that required that resistor. Better rich than lean and if you have a hunting idle, I would keep it for the time being. You might try richening the ECU pot to see if that hunting idle goes away. While you are working on this you may just want to keep that retard disconnected until everything is where it should be, then deal with the retard afterward. The nice thing about the retard is that you can put some extra timing into your engine and still have it start up nice and easy but we are not there yet. |
|
|
|
| Ron914 |
Apr 5 2025, 01:19 PM
Post
#3
|
|
Member Group: Members Posts: 496 Joined: 19-April 22 From: Huntington Beach,Ca Member No.: 26,487 Region Association: Southern California |
QUOTE(emerygt350 @ Apr 5 2025, 09:13 AM)  Let me see if I understand what you posted. When you plugged the MPS vacuum at the plenum and gave the MPS 22inhg with a warm engine the idle dropped to where it is supposed to be, and the MPS is leaking down as well? I would double check your valves because it is relatively easy, but check your vacuum at the plenum first, it would be nice to know where it is at currently. Use the MPS port on the plenum. Just hook your mityvac to it and read the vacuum off of that. Be sure the engine is warmish when you do check or at least that the aar is closed or blocked and the leaking MPS is unplugged. If the vacuum is up around 18-20 inhg I might not bother with the valves just yet. I would also time your engine for the moment using the vacuum method. This is the way people used to time their engines in the old days. Disconnect the retard. Get the engine warm and idling at that 900 again (disconnect the mps or whatever was necessary). Check the vacuum, turn the distributor either way and watch the vacuum. You want to find the highest vacuum with the engine still running well. Then back it down 1-2inhg. If the vacuum is quite high (over 21inhg) I would just bring it down to 19inhg. If 19 or 20 is as high as it goes, I would maybe bring it back 1 inhg so it's between 18 and 19 just to be safe. If you don't have much faith in your timing marks or the light this should work fine. You could now check the timing with the light and see where you are at idle and all in at 3.5k rpm. Since you have a 2056 I don't know what to think about the 'euro spec' MPS. Sounds like the daiphragm is busted anyway so you will probably need one of Chris Foley's rebuild kits and at that point you will be tuning your own MPS anyway. I am not sure if the 2056 sucks enough gas over the stock to require that inline resistor though. Your ECU is already richer than the 73 that required that resistor. Better rich than lean and if you have a hunting idle, I would keep it for the time being. You might try richening the ECU pot to see if that hunting idle goes away. While you are working on this you may just want to keep that retard disconnected until everything is where it should be, then deal with the retard afterward. The nice thing about the retard is that you can put some extra timing into your engine and still have it start up nice and easy but we are not there yet. Thanks Emery, all good suggestions . My day is growing short as we have a dinner party to go to @5:00 so I might not be able to do all this today .Lots of great suggestions . That would great if I didn't have to worry about adjusting the valves today . I am going to have to look up and do some studying it's been almost 50 years since I last did this on my VW's and I read somewhere that I will need to remove my HE's for access this might take a while and I still need to have a TDC mark I can trust . I do have this to help There is a mark on my flywheel and I can see it . Maybe tomorrow when girlfriend is here I can get her to look for the mark when it is aligned where the cases meet and hold my accelerator to 3500 for me . I believe Blue Lighting used this mark in one of his posts . I will jack the car up and put in 5th and turn the rear wheel while she looks for it . Not sure how once aligned I could use that to add a paint pen mark to my cooling fan as I cannot see any marks in the V cutout on my fan. 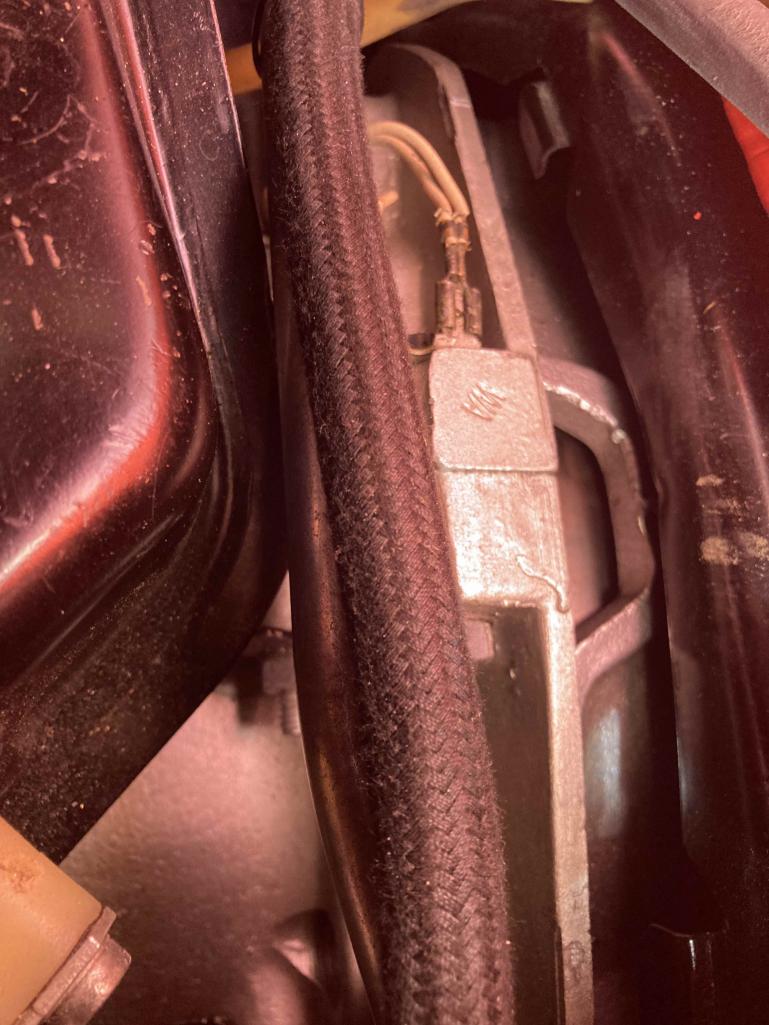 I only ordered that hot set up resistor because the box of stuff that came with the car had a homemade thingy that looked like an inline resistor ( it feel apart on me ) I had no idea what it was for so I searched and found this on AA site.However the motor was the stock 2.0L although Im not sure why it was in box with the other parts of the motor or if was even connected inline with the CHT. I have the ECU adjustment knob set at 9:00 position as I read somewhere I am pretty sure I warmed up the car with everything connected then I removed the 10mm & 5mm hoses that went to the decel and plugged them, I removed the 10mm that went to my MPS and clamped it close and added another hose to my MPS and added 20inHG to it and then started the car again. Now to testing the vacuum on the plenum . Im a bit confused about how to use the mityvac to test the amount of vacuum in the Plenum so let me think about that one for a bit and Ill get back to you .I like that method let write a list outlining the steps for you to confirm my understanding in a bit |
|
|
|
| emerygt350 |
Apr 5 2025, 02:34 PM
Post
#4
|
|
Advanced Member Group: Members Posts: 3,529 Joined: 20-July 21 From: Upstate, NY Member No.: 25,740 Region Association: North East States |
Definitely check the vacuum before you go breaking into the valves. If the vacuum is good, that really points to no real problem with the valves. No need to go crawling around if you don't have to. All you need to do is attach the mityvac to the hose that would normally go to the MPS or even the vacuum retard port on the TB if you want to leave the MPS attached. The engine vacuum will register on the mityvac gauge (don't pump it or anything).
When you do get around to adjusting the valves, I seriously suggest you do the crusty method, that allows you to set the gap without having to worry yourself about which cylinder is on a compression stroke. You just turn the wheel till a valve is completely compressed (very easy to see as you roll the wheel back and forth) and then adjust the opposite valve on the engine. There are only four lobes on the cam each lobe operates 2 valves on opposite banks, so when cylinder 1 exhaust is completely compressed, cylinder 3 exhaust is as loose as it can get. |
|
|
|
| Ron914 |
Apr 5 2025, 03:43 PM
Post
#5
|
|
Member Group: Members Posts: 496 Joined: 19-April 22 From: Huntington Beach,Ca Member No.: 26,487 Region Association: Southern California |
QUOTE(emerygt350 @ Apr 5 2025, 03:34 PM) Definitely check the vacuum before you go breaking into the valves. If the vacuum is good, that really points to no real problem with the valves. No need to go crawling around if you don't have to. All you need to do is attach the mityvac to the hose that would normally go to the MPS or even the vacuum retard port on the TB if you want to leave the MPS attached. The engine vacuum will register on the mityvac gauge (don't pump it or anything). When you do get around to adjusting the valves, I seriously suggest you do the crusty method, that allows you to set the gap without having to worry yourself about which cylinder is on a compression stroke. You just turn the wheel till a valve is completely compressed (very easy to see as you roll the wheel back and forth) and then adjust the opposite valve on the engine. There are only four lobes on the cam each lobe operates 2 valves on opposite banks, so when cylinder 1 exhaust is completely compressed, cylinder 3 exhaust is as loose as it can get. Very sound advice Emery , I will use the Crusty method , Im all about efficiency and things that don't waste my time I was trying to figure out about checking the vacuum first but I had to pump the mighty max to add 20inHG on my MPS I wasn't sure how I was going to connect to my plenum and read the draw, makes since the way you just explained . I love working on this car, learning things as I go .As the quote goes "You can give a man a fish to eat today but teach him how to fish and can eat for life " Thanks again for working with me and I've been collecting more cool tools |
|
|
|
| Ron914 |
Apr 5 2025, 03:46 PM
Post
#6
|
|
Member Group: Members Posts: 496 Joined: 19-April 22 From: Huntington Beach,Ca Member No.: 26,487 Region Association: Southern California |
QUOTE(Ron914 @ Apr 5 2025, 04:43 PM) QUOTE(emerygt350 @ Apr 5 2025, 03:34 PM) Definitely check the vacuum before you go breaking into the valves. If the vacuum is good, that really points to no real problem with the valves. No need to go crawling around if you don't have to. All you need to do is attach the mityvac to the hose that would normally go to the MPS or even the vacuum retard port on the TB if you want to leave the MPS attached. The engine vacuum will register on the mityvac gauge (don't pump it or anything). When you do get around to adjusting the valves, I seriously suggest you do the crusty method, that allows you to set the gap without having to worry yourself about which cylinder is on a compression stroke. You just turn the wheel till a valve is completely compressed (very easy to see as you roll the wheel back and forth) and then adjust the opposite valve on the engine. There are only four lobes on the cam each lobe operates 2 valves on opposite banks, so when cylinder 1 exhaust is completely compressed, cylinder 3 exhaust is as loose as it can get. Very sound advice Emery , I will use the Crusty method , Im all about efficiency and things that don't waste my time I was trying to figure out about checking the vacuum first but I had to pump the mighty max to add 20inHG on my MPS I wasn't sure how I was going to connect to my plenum and read the draw, makes since the way you just explained . I love working on this car, learning things as I go .As the quote goes "You can give a man a fish to eat today but teach him how to fish and can eat for life " Thanks again for working with me and I've been collecting more cool tools I'll be asking for help when I get to adjust the valves down the road , How often ?miles should I be adjusting them . I probably have just a few hundred miles on my new motor now while testing driving around in my neighborhood. |
|
|
|
| fiacra |
Apr 5 2025, 04:14 PM
Post
#7
|
|
Person.Woman.Man.Camera.TV. = MCI Group: Members Posts: 724 Joined: 1-March 19 From: East Bay Region - California Member No.: 22,920 Region Association: Northern California |
QUOTE(Ron914 @ Apr 5 2025, 02:46 PM) QUOTE(Ron914 @ Apr 5 2025, 04:43 PM) QUOTE(emerygt350 @ Apr 5 2025, 03:34 PM) Definitely check the vacuum before you go breaking into the valves. If the vacuum is good, that really points to no real problem with the valves. No need to go crawling around if you don't have to. All you need to do is attach the mityvac to the hose that would normally go to the MPS or even the vacuum retard port on the TB if you want to leave the MPS attached. The engine vacuum will register on the mityvac gauge (don't pump it or anything). When you do get around to adjusting the valves, I seriously suggest you do the crusty method, that allows you to set the gap without having to worry yourself about which cylinder is on a compression stroke. You just turn the wheel till a valve is completely compressed (very easy to see as you roll the wheel back and forth) and then adjust the opposite valve on the engine. There are only four lobes on the cam each lobe operates 2 valves on opposite banks, so when cylinder 1 exhaust is completely compressed, cylinder 3 exhaust is as loose as it can get. Very sound advice Emery , I will use the Crusty method , Im all about efficiency and things that don't waste my time I was trying to figure out about checking the vacuum first but I had to pump the mighty max to add 20inHG on my MPS I wasn't sure how I was going to connect to my plenum and read the draw, makes since the way you just explained . I love working on this car, learning things as I go .As the quote goes "You can give a man a fish to eat today but teach him how to fish and can eat for life " Thanks again for working with me and I've been collecting more cool tools I'll be asking for help when I get to adjust the valves down the road , How often ?miles should I be adjusting them . I probably have just a few hundred miles on my new motor now while testing driving around in my neighborhood. Ron, I've been enjoying watching your journey with this car. As for time interval for adjusting valves, typically it would be every 3K miles. However, since I it probably would take me two years or more to put that many miles on any of my air cooled cars I do a valve adjustment yearly, or whenever my ear tells me it is time. I also use the Cap'n Krusty method of valve adjusting. Make sure you have a decent set of feeler gauges and a good understanding of the amount of drag you would like to feel. If I remember correctly there is a very nice description of this in John Muir's "How to Keep your Volkswagen Alive." I would suggest you check the valve clearance on a newly rebuilt engine at 300 miles and then again at 1K miles. Not sure what others would recommend, but that's what I have done. You might ask your engine builder what they recommend. That might be your best source, especially if you have a warranty on your engine. |
|
|
|
Posts in this topic
 Ron914 1976 2.0L D-jet Mar 24 2025, 05:21 PM
 emerygt350 How high is the idle currently? Mar 24 2025, 05:28 PM
 Ron914
How high is the idle currently?
still around 140... Mar 24 2025, 06:19 PM Ron914 I think I might have a bad decel valve but others ... Mar 24 2025, 06:20 PM IronHillRestorations You might want to make sure the advance mechanism ... Mar 24 2025, 08:12 PM porschetub [quote name='IronHillRestorations' date=... May 8 2025, 06:46 PM emerygt350 That was my first thought. But you don't have... Mar 25 2025, 05:31 AM Ron914
That was my first thought. But you don't hav... Mar 25 2025, 07:59 AM emerygt350
That was my first thought. But you don't ha... Mar 25 2025, 08:48 AM emerygt350 Also ... 1400 just happens to be where the aar put... Mar 25 2025, 05:34 AM Ron914 Good morning Emery ,
I purchased these last night ... Mar 26 2025, 08:00 AM emerygt350 Oh the trouble we go through ;).
Someday I hope... Mar 26 2025, 08:45 AM Ron914 Great to hear you have family in Huntington Beach ... Mar 26 2025, 10:02 AM emerygt350 Very cool. Nothing bike related going on for anot... Mar 26 2025, 10:32 AM Ron914
Very cool. Nothing bike related going on for ano... Mar 26 2025, 10:58 AM emerygt350 If there is salt she hides in the garage. Otherwi... Mar 26 2025, 12:18 PM Ron914 Good morning Emery @emerygt350 ,
I finally had a ... Apr 5 2025, 07:25 AM Ron914
Good morning Emery [b]@[url=http://www.914world.... Apr 5 2025, 07:27 AM Ron914
Good morning Emery [b]@[url=http://www.914world... Apr 5 2025, 07:50 AM Ron914
[quote name='Ron914' post='3199804' date='Apr 5 2... Apr 5 2025, 03:48 PM emerygt350 That interval is what I shoot for, and I drive my ... Apr 5 2025, 05:13 PM Ron914 Emery ,
If the flaps are working and nothing has ... Apr 7 2025, 07:29 AM Ron914 Before I left for AZ I took photos of a couple of ... Apr 10 2025, 06:25 PM Superhawk996 Part on the left is the oil pressure switch for th... Apr 11 2025, 04:19 AM emerygt350 I would hate to be changing the cht sender at the ... Apr 11 2025, 07:07 AM Superhawk996
Hopefully what you have installed is the right o... Apr 11 2025, 08:11 AM Ron914 Hello Emery,
Finally had time to look at my car t... Apr 22 2025, 08:42 PM emerygt350 Definitely don't use the retard till you are g... Apr 23 2025, 06:09 AM emerygt350 The more I think about the more I suspect your diz... Apr 23 2025, 06:15 AM Superhawk996 :agree:
Gauge measures oil temp. Vehicle shoul... Apr 23 2025, 07:38 AM Ron914 I was probably idling and driving 30-40 minutes. I... Apr 23 2025, 07:58 AM Superhawk996
“ I assumed the thermo would pull them if w... Apr 23 2025, 08:57 AM ClayPerrine
“ I assumed the thermo would pull them if ... Apr 23 2025, 10:03 AM Ron914
“ I assumed the thermo would pull them if... Apr 24 2025, 12:04 PM Ron914 @emerygt350 ,Superhawk996,
I pulled my car out thi... Apr 24 2025, 01:38 PM Superhawk996 MPS should not be bleeding down noticeably
Redo ... Apr 24 2025, 01:44 PM Ron914
MPS should not be bleeding down noticeably
Redo... Apr 24 2025, 04:49 PM emerygt350 And your car should start with the vacuum hose off... Apr 24 2025, 02:18 PM Superhawk996 I am not sure if anyone has the diaphragms.
Tr... Apr 24 2025, 02:48 PM Ron914
And your car should start with the vacuum hose of... Apr 24 2025, 04:55 PM emerygt350 Hmmm... I put a new to me fan on mine when I rebu... Apr 24 2025, 07:02 PM Superhawk996
And your mps should hold air much longer than th... Apr 24 2025, 07:19 PM Ron914
Hmmm... I put a new to me fan on mine when I reb... Apr 24 2025, 07:57 PM Ron914 If I can find parts I will need some coaching on r... Apr 24 2025, 08:05 PM Ron914 Nothing on Patrick's site
I just found this bu... Apr 24 2025, 08:11 PM emerygt350 That's part of it. On a 76 if you have the ori... Apr 24 2025, 08:21 PM Superhawk996 Was revisiting a previous thread
Found this:
... Apr 24 2025, 08:23 PM Ron914
Was revisiting a previous thread
Found this:
... Apr 24 2025, 08:28 PM Superhawk996 I’m getting old - I don’t remember seeing that... Apr 24 2025, 08:45 PM Ron914
I’m getting old - I don’t remember seeing tha... Apr 24 2025, 09:11 PM Superhawk996
[quote name='Superhawk996' post='3202614' date='A... Apr 25 2025, 07:26 AM emerygt350 That's tough. The rebuild kit plus the tuning... Apr 25 2025, 04:24 AM Ron914
That's tough. The rebuild kit plus the tunin... Apr 25 2025, 06:47 AM Ron914 I found this AFR on a website ,What do you think ?... Apr 25 2025, 06:56 AM TJB/914 Hi Ron,
I sent you a PM this morning.
I have what ... Apr 25 2025, 07:03 AM Ron914 @Superhawk996 , [b]@[url=http://www.914world.com/b... Apr 25 2025, 07:45 AM Superhawk996
[b]@[url=http://www.914world.com/bbs2/index.php?s... Apr 25 2025, 07:56 AM JeffBowlsby
[b]@[url=http://www.914world.com/bbs2/index.php?s... Apr 25 2025, 08:29 AM Ron914
[b]@[url=http://www.914world.com/bbs2/index.php?... Apr 25 2025, 08:32 AM TJB/914
[b]@[url=http://www.914world.com/bbs2/index.php?s... Apr 25 2025, 09:00 AM Ron914
[b]@[url=http://www.914world.com/bbs2/index.php?... Apr 25 2025, 09:10 AM JeffBowlsby Sincere apologies Ron, did not realize your engine... Apr 25 2025, 09:03 AM Ron914 What else do you have in that box of junk(just kid... Apr 25 2025, 09:13 AM Ron914 @emerygt350 , [b]@[url=http://www.914world.com/bbs... Apr 25 2025, 10:39 AM emerygt350 I suggest an aem O2 sensor and gauge, I have tried... Apr 25 2025, 11:15 AM Ron914
I suggest an aem O2 sensor and gauge, I have trie... Apr 25 2025, 12:21 PM emerygt350 In this video my I am cruising down the highway at... Apr 25 2025, 11:20 AM Ron914
In this video my I am cruising down the highway a... Apr 25 2025, 07:58 PM Ron914 @emerygt350 , [b]@[url=http://www.914world.com/bbs... Apr 25 2025, 04:25 PM Ron914 @emerygt350
I found these online ,would they be w... Apr 25 2025, 07:56 PM Ron914 I can actually buy this set up on Amazon with free... Apr 25 2025, 08:15 PM Ron914 I forgot this one , and these choices look like my... Apr 25 2025, 08:24 PM emerygt350 Yes, those look good. Make sure the cables are lo... Apr 25 2025, 08:27 PM Ron914
Yes, those look good. Make sure the cables are l... Apr 25 2025, 09:11 PM emerygt350 If there is a 12 you may want that instead. Apr 26 2025, 04:19 AM Ron914
If there is a 12 you may want that instead.
@em... Apr 26 2025, 07:00 AM emerygt350 I bought the 18 and it was way too much. I just l... Apr 26 2025, 02:04 PM Ron914
I bought the 18 and it was way too much. I just ... Apr 26 2025, 04:48 PM Ron914 @emerygt350
Update: Where I am as of today . I k... May 6 2025, 05:13 PM rjames I have lost track of some of this thread, and I kn... May 6 2025, 05:37 PM Ron914
I have lost track of some of this thread, and I k... May 6 2025, 06:06 PM emerygt350 That looks like some good progress. I couldn... May 6 2025, 06:11 PM Ron914
That looks like some good progress. I couldn... May 6 2025, 06:47 PM emerygt350 The only thing you will be playing with are the id... May 7 2025, 05:14 AM rjames If the MPS won’t hold vacuum or is set way too l... May 7 2025, 09:03 AM emerygt350
If the MPS won’t hold vacuum or is set way too ... May 7 2025, 09:39 AM rjames
If the MPS won’t hold vacuum or is set way too... May 7 2025, 10:32 AM Ron914 Still working on my D-Jet issues I ran my motor an... May 7 2025, 02:14 PM emerygt350 Very good idea. You have the chart for that temp ... May 7 2025, 04:42 PM Ron914
Very good idea. You have the chart for that temp... May 7 2025, 05:00 PM emerygt350 One is for the supplementary heater on my afr (doe... May 7 2025, 07:36 PM Ron914
One is for the supplementary heater on my afr (do... May 7 2025, 09:50 PM emerygt350 You may want the afr up top and the cht down low w... May 7 2025, 07:37 PM emerygt350 The instructions are online, not sure what model y... May 8 2025, 04:19 AM
Ron914
How high is the idle currently?
still around 140... Mar 24 2025, 06:19 PM Ron914 I think I might have a bad decel valve but others ... Mar 24 2025, 06:20 PM IronHillRestorations You might want to make sure the advance mechanism ... Mar 24 2025, 08:12 PM porschetub [quote name='IronHillRestorations' date=... May 8 2025, 06:46 PM emerygt350 That was my first thought. But you don't have... Mar 25 2025, 05:31 AM Ron914
That was my first thought. But you don't hav... Mar 25 2025, 07:59 AM emerygt350
That was my first thought. But you don't ha... Mar 25 2025, 08:48 AM emerygt350 Also ... 1400 just happens to be where the aar put... Mar 25 2025, 05:34 AM Ron914 Good morning Emery ,
I purchased these last night ... Mar 26 2025, 08:00 AM emerygt350 Oh the trouble we go through ;).
Someday I hope... Mar 26 2025, 08:45 AM Ron914 Great to hear you have family in Huntington Beach ... Mar 26 2025, 10:02 AM emerygt350 Very cool. Nothing bike related going on for anot... Mar 26 2025, 10:32 AM Ron914
Very cool. Nothing bike related going on for ano... Mar 26 2025, 10:58 AM emerygt350 If there is salt she hides in the garage. Otherwi... Mar 26 2025, 12:18 PM Ron914 Good morning Emery @emerygt350 ,
I finally had a ... Apr 5 2025, 07:25 AM Ron914
Good morning Emery [b]@[url=http://www.914world.... Apr 5 2025, 07:27 AM Ron914
Good morning Emery [b]@[url=http://www.914world... Apr 5 2025, 07:50 AM Ron914
[quote name='Ron914' post='3199804' date='Apr 5 2... Apr 5 2025, 03:48 PM emerygt350 That interval is what I shoot for, and I drive my ... Apr 5 2025, 05:13 PM Ron914 Emery ,
If the flaps are working and nothing has ... Apr 7 2025, 07:29 AM Ron914 Before I left for AZ I took photos of a couple of ... Apr 10 2025, 06:25 PM Superhawk996 Part on the left is the oil pressure switch for th... Apr 11 2025, 04:19 AM emerygt350 I would hate to be changing the cht sender at the ... Apr 11 2025, 07:07 AM Superhawk996
Hopefully what you have installed is the right o... Apr 11 2025, 08:11 AM Ron914 Hello Emery,
Finally had time to look at my car t... Apr 22 2025, 08:42 PM emerygt350 Definitely don't use the retard till you are g... Apr 23 2025, 06:09 AM emerygt350 The more I think about the more I suspect your diz... Apr 23 2025, 06:15 AM Superhawk996 :agree:
Gauge measures oil temp. Vehicle shoul... Apr 23 2025, 07:38 AM Ron914 I was probably idling and driving 30-40 minutes. I... Apr 23 2025, 07:58 AM Superhawk996
“ I assumed the thermo would pull them if w... Apr 23 2025, 08:57 AM ClayPerrine
“ I assumed the thermo would pull them if ... Apr 23 2025, 10:03 AM Ron914
“ I assumed the thermo would pull them if... Apr 24 2025, 12:04 PM Ron914 @emerygt350 ,Superhawk996,
I pulled my car out thi... Apr 24 2025, 01:38 PM Superhawk996 MPS should not be bleeding down noticeably
Redo ... Apr 24 2025, 01:44 PM Ron914
MPS should not be bleeding down noticeably
Redo... Apr 24 2025, 04:49 PM emerygt350 And your car should start with the vacuum hose off... Apr 24 2025, 02:18 PM Superhawk996 I am not sure if anyone has the diaphragms.
Tr... Apr 24 2025, 02:48 PM Ron914
And your car should start with the vacuum hose of... Apr 24 2025, 04:55 PM emerygt350 Hmmm... I put a new to me fan on mine when I rebu... Apr 24 2025, 07:02 PM Superhawk996
And your mps should hold air much longer than th... Apr 24 2025, 07:19 PM Ron914
Hmmm... I put a new to me fan on mine when I reb... Apr 24 2025, 07:57 PM Ron914 If I can find parts I will need some coaching on r... Apr 24 2025, 08:05 PM Ron914 Nothing on Patrick's site
I just found this bu... Apr 24 2025, 08:11 PM emerygt350 That's part of it. On a 76 if you have the ori... Apr 24 2025, 08:21 PM Superhawk996 Was revisiting a previous thread
Found this:
... Apr 24 2025, 08:23 PM Ron914
Was revisiting a previous thread
Found this:
... Apr 24 2025, 08:28 PM Superhawk996 I’m getting old - I don’t remember seeing that... Apr 24 2025, 08:45 PM Ron914
I’m getting old - I don’t remember seeing tha... Apr 24 2025, 09:11 PM Superhawk996
[quote name='Superhawk996' post='3202614' date='A... Apr 25 2025, 07:26 AM emerygt350 That's tough. The rebuild kit plus the tuning... Apr 25 2025, 04:24 AM Ron914
That's tough. The rebuild kit plus the tunin... Apr 25 2025, 06:47 AM Ron914 I found this AFR on a website ,What do you think ?... Apr 25 2025, 06:56 AM TJB/914 Hi Ron,
I sent you a PM this morning.
I have what ... Apr 25 2025, 07:03 AM Ron914 @Superhawk996 , [b]@[url=http://www.914world.com/b... Apr 25 2025, 07:45 AM Superhawk996
[b]@[url=http://www.914world.com/bbs2/index.php?s... Apr 25 2025, 07:56 AM JeffBowlsby
[b]@[url=http://www.914world.com/bbs2/index.php?s... Apr 25 2025, 08:29 AM Ron914
[b]@[url=http://www.914world.com/bbs2/index.php?... Apr 25 2025, 08:32 AM TJB/914
[b]@[url=http://www.914world.com/bbs2/index.php?s... Apr 25 2025, 09:00 AM Ron914
[b]@[url=http://www.914world.com/bbs2/index.php?... Apr 25 2025, 09:10 AM JeffBowlsby Sincere apologies Ron, did not realize your engine... Apr 25 2025, 09:03 AM Ron914 What else do you have in that box of junk(just kid... Apr 25 2025, 09:13 AM Ron914 @emerygt350 , [b]@[url=http://www.914world.com/bbs... Apr 25 2025, 10:39 AM emerygt350 I suggest an aem O2 sensor and gauge, I have tried... Apr 25 2025, 11:15 AM Ron914
I suggest an aem O2 sensor and gauge, I have trie... Apr 25 2025, 12:21 PM emerygt350 In this video my I am cruising down the highway at... Apr 25 2025, 11:20 AM Ron914
In this video my I am cruising down the highway a... Apr 25 2025, 07:58 PM Ron914 @emerygt350 , [b]@[url=http://www.914world.com/bbs... Apr 25 2025, 04:25 PM Ron914 @emerygt350
I found these online ,would they be w... Apr 25 2025, 07:56 PM Ron914 I can actually buy this set up on Amazon with free... Apr 25 2025, 08:15 PM Ron914 I forgot this one , and these choices look like my... Apr 25 2025, 08:24 PM emerygt350 Yes, those look good. Make sure the cables are lo... Apr 25 2025, 08:27 PM Ron914
Yes, those look good. Make sure the cables are l... Apr 25 2025, 09:11 PM emerygt350 If there is a 12 you may want that instead. Apr 26 2025, 04:19 AM Ron914
If there is a 12 you may want that instead.
@em... Apr 26 2025, 07:00 AM emerygt350 I bought the 18 and it was way too much. I just l... Apr 26 2025, 02:04 PM Ron914
I bought the 18 and it was way too much. I just ... Apr 26 2025, 04:48 PM Ron914 @emerygt350
Update: Where I am as of today . I k... May 6 2025, 05:13 PM rjames I have lost track of some of this thread, and I kn... May 6 2025, 05:37 PM Ron914
I have lost track of some of this thread, and I k... May 6 2025, 06:06 PM emerygt350 That looks like some good progress. I couldn... May 6 2025, 06:11 PM Ron914
That looks like some good progress. I couldn... May 6 2025, 06:47 PM emerygt350 The only thing you will be playing with are the id... May 7 2025, 05:14 AM rjames If the MPS won’t hold vacuum or is set way too l... May 7 2025, 09:03 AM emerygt350
If the MPS won’t hold vacuum or is set way too ... May 7 2025, 09:39 AM rjames
If the MPS won’t hold vacuum or is set way too... May 7 2025, 10:32 AM Ron914 Still working on my D-Jet issues I ran my motor an... May 7 2025, 02:14 PM emerygt350 Very good idea. You have the chart for that temp ... May 7 2025, 04:42 PM Ron914
Very good idea. You have the chart for that temp... May 7 2025, 05:00 PM emerygt350 One is for the supplementary heater on my afr (doe... May 7 2025, 07:36 PM Ron914
One is for the supplementary heater on my afr (do... May 7 2025, 09:50 PM emerygt350 You may want the afr up top and the cht down low w... May 7 2025, 07:37 PM emerygt350 The instructions are online, not sure what model y... May 8 2025, 04:19 AM |
1 User(s) are reading this topic (1 Guests and 0 Anonymous Users)
0 Members:

|
Lo-Fi Version | Time is now: 29th April 2026 - 10:29 AM |
Invision Power Board
v9.1.4 © 2026 IPS, Inc.