|
|
|
Porsche, and the Porsche crest are registered trademarks of Dr. Ing. h.c. F. Porsche AG.
This site is not affiliated with Porsche in any way. Its only purpose is to provide an online forum for car enthusiasts. All other trademarks are property of their respective owners. |
|
|


| Ron914 |
 May 8 2025, 05:06 PM May 8 2025, 05:06 PM
Post
#1
|
|
Senior Member  Group: Members Posts: 550 Joined: 19-April 22 From: Huntington Beach,Ca Member No.: 26,487 Region Association: Southern California |
Hello to all who have helped me with this project . @emerygt350 ,@TJB/914, @Superhawk996 , @ChrisFoley , @rjames , @MDTerp
I am in the middle of rebuilding my MPS and have a couple of comments and questions . First when I opened up the unit I found the most difficult job was removing the rivets holding the two halves together. When I removed the retainer plate to take out the old diaphragm it was in two pieces . 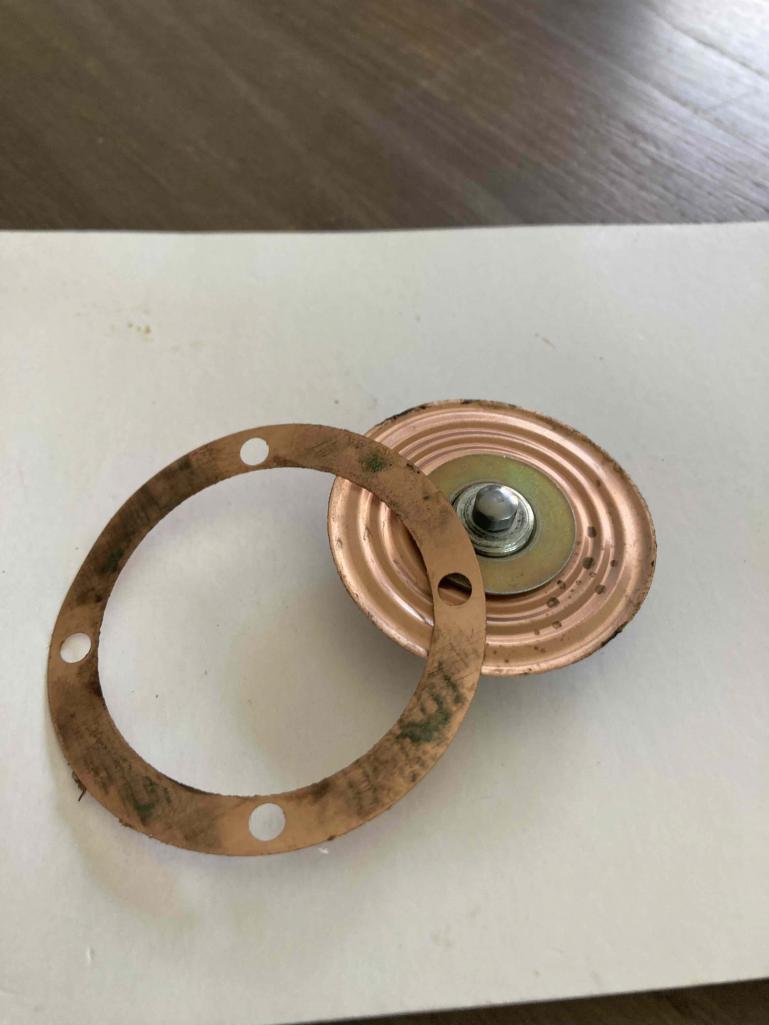 I needed to take two measurements since I was replacing the stop screw , I needed to measure the the stop screw protrusion into the housing . The instruction sheet sent to me by a member had the measurements he must have made when rebuilding his MPS . His stop screw protrusion was 1.97mm and mine only measured 1.72mm. His inner/outer screw assembly depth in the old diaphragm measured 6.51mm . Here's one of my questions ? when I measured mine I got two measurements depth to inner/outer screw assembly was 4.03 and depth to the washer outside the inner/outer screw assembly was 5.46mm. Again there is a difference and since mine was never accessed before (epoxy over screw was not disturbed) is the difference in measurements ok and which measurement should I use I will try to attach a photo or two to help with my question. this one . 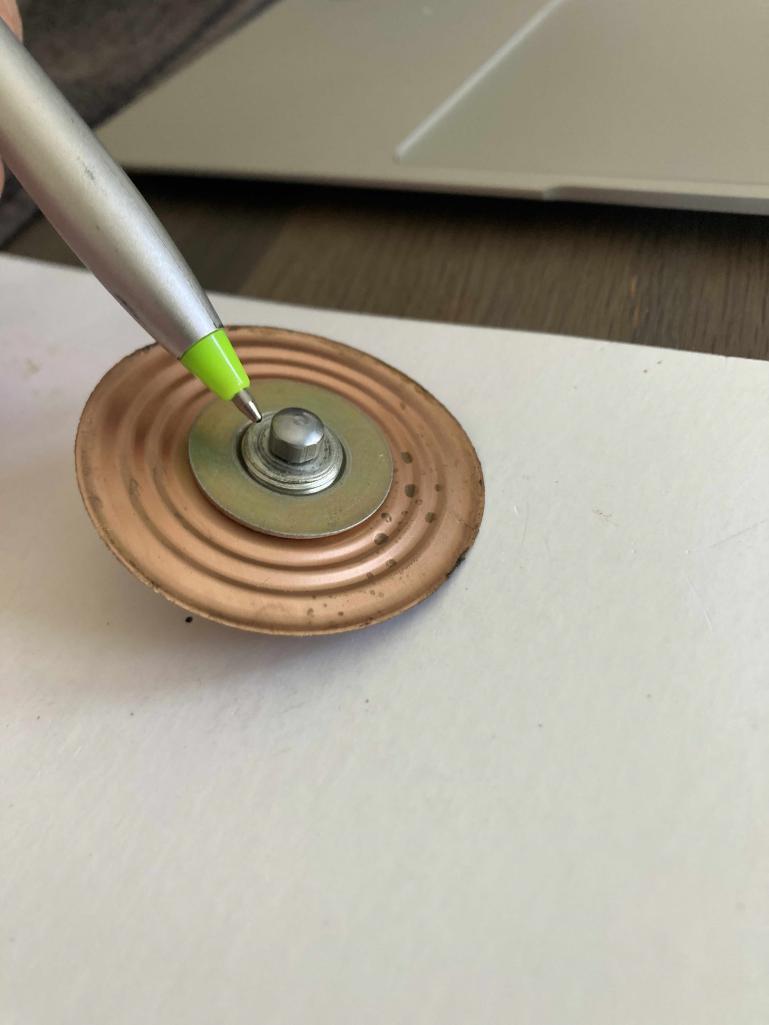 I have not touched either of these measurements yet and awaiting any help/comments. I think it's this one to the washer on diaphragm . 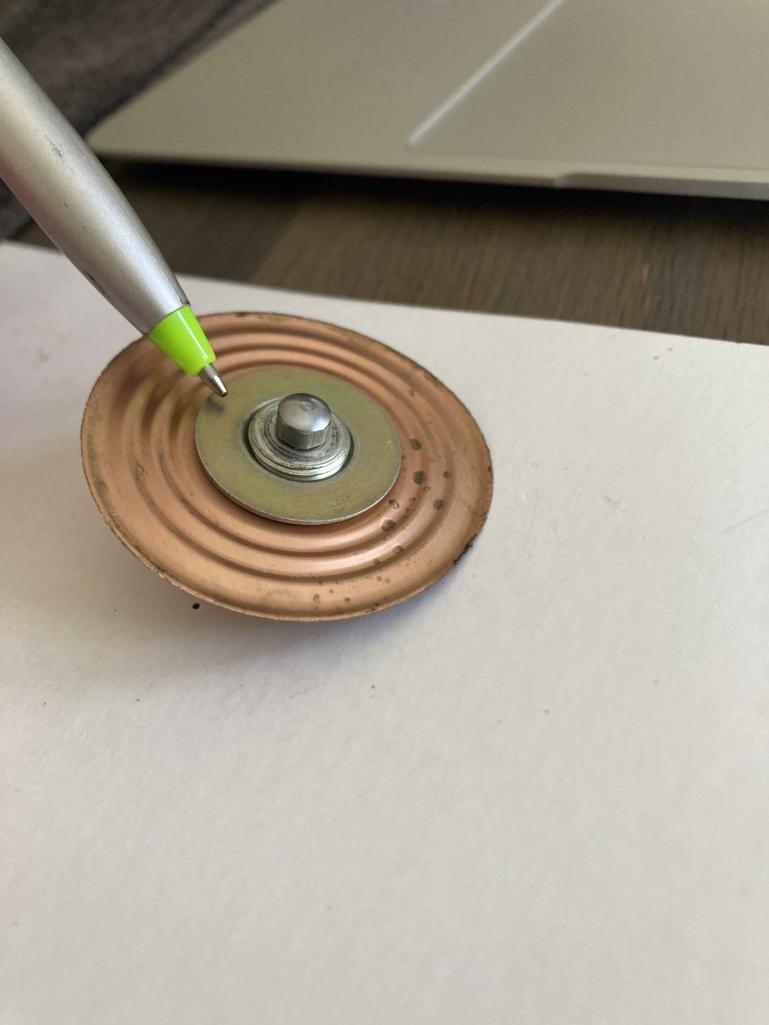 |
   |

 
|
  |
Replies
| Superhawk996 |
May 9 2025, 07:26 PM
Post
#2
|
|
914 Guru Group: Members Posts: 7,963 Joined: 25-August 18 From: Woods of N. Idaho Member No.: 22,428 Region Association: Galt's Gulch |
This is going to be a tough love post.
When you encounter a problem - don’t run off like a squirrel on meth and start changing and swapping parts. You’re getting distracted and confused by all kinds of parts changes and assumptions. The random changes to timing and/or retard aren’t helping. You should have visually checked and verified spark at each plug before jumping to conclusions and swapping from Pertronix back to points. Maybe I’m misunderstanding what led to that decision. There is nothing going on in the distributor cap that would have changed overnight / since the MPS swap that would account for the behavior you’re describing. Could be as simple as the cap not having been properly seated or bumped during the MPS removal / install. Again I’m probably not understanding all that happened. There is literally no telling what’s going on after all that chaos. When you encounter the unexpected - go back to the basics. Avoid the urge to start swapping parts. Change one thing at a time. If it doesn’t help, revert to the original condition and don’t keep stacking changes. The basics: 1) Spark. Visually observe spark at the plug. Set static timing at 7-8 degrees if the points are still in there. If you don’t know how to do this - ask and we’ll post instructions or provide a YouTube link. Avoid moving the timing around randomly. Verify you haven’t disturbed coil wiring. Test the condenser if need be - again post if you don’t know how. 2) Fuel - in this particular case (with a new and untuned MPS) I’d have stated by putting vacuum directly on the MPS and verifying the MPS connection all the way back to the ECU if necessary. I’d be verifying CHT resistance and wiring after playing with the resistor (which shouldn’t be in a late car anyway). observing plugs condition for grossly rich or lean conditions post photos. Use stating fluid if need if you think you aren’t getting fuel. Trigger points wiring as suggested by Emery. Grounds - did you knock off - disturb grounds serving injectors? Edit: did you bench test, the MPS for leakage - primary coil resistance, inductance etc on the bench before throwing it in the car? 3) Compression - don’t touch valves or anything at the moment. It certainly didn’t change due to a MPS swap or any of the other changes that were made. Ron, here to help but at this point I’m not sure where to start - you need to get settled on what condition you want (points vs Pertronix) and how you intend to run the fuel injection (with resistor or not; I recommend without). You need to stabilize your timing settings. You can work through this! Don’t give up. Be methodical in the approach. |
 |
|
Posts in this topic
 Ron914 MPS May 8 2025, 05:06 PM
 Superhawk996 There you have it, now you know why it was a leake... May 8 2025, 06:36 PM
 Ron914
There you have it, now you know why it was a leak... May 8 2025, 06:58 PM
Ron914
There you have it, now you know why it was a leak... May 8 2025, 06:58 PM MDTerp
There you have it, now you know why it was a leak... May 8 2025, 08:17 PM Ron914 Well all done . I must say it was easier than I th... May 8 2025, 08:30 PM JeffBowlsby Another documented case of a completely fractured ... May 8 2025, 10:15 PM emerygt350 Way to go. I mean you are disassembling the most ... May 9 2025, 06:57 AM rjames Crazy that it could hold vacuum at all! May 9 2025, 10:01 AM Superhawk996
Crazy that it could hold vacuum at all!
Mine... May 9 2025, 01:24 PM Ron914 Well I was optimistic that my car was going to run... May 9 2025, 05:37 PM emerygt350 You can pull the wires one at a time till you find... May 9 2025, 06:09 PM Ron914
This is going to be a tough love post.
When you... May 12 2025, 03:17 PM Superhawk996 I’m going to post this over here
This is anoth... May 9 2025, 07:53 PM rjames What Hawk said.
And you just rebuilt your MPS, so... May 9 2025, 08:17 PM Ron914 Thank you Superhawk and emery ,You are correct in... May 9 2025, 08:27 PM emerygt350 Once it is all back together, remember that inner ... May 10 2025, 04:22 AM emerygt350 Don't worry about TDC, the distributor only go... May 12 2025, 05:50 PM Ron914
Don't worry about TDC, the distributor only g... May 12 2025, 06:57 PM fiacra
If only I didn't live in California I would b... May 12 2025, 08:03 PM Ron914
If only I didn't live in California I would ... May 12 2025, 09:46 PM Superhawk996 First on the to do list
MPS is leaking down too ... May 12 2025, 06:57 PM Ron914
First on the to do list
MPS is leaking down too... May 12 2025, 09:44 PM Superhawk996 Aren’t other guys in CA running 123’s?
Regard... May 12 2025, 07:00 PM Superhawk996 Also with respect to the dizzy vs timing
Yes - s... May 12 2025, 07:19 PM Ron914 As far as putting a 123 in my California car I was... May 12 2025, 09:11 PM Superhawk996 I would open the MPS back up. I can post time lap... May 13 2025, 08:37 AM Ron914
I would open the MPS back up. I can post time la... May 13 2025, 10:19 AM emerygt350 I agree with hawk. The first time I rebuilt mine ... May 13 2025, 10:02 AM fiacra Ron got that Pertronix from me, and yes it is olde... May 13 2025, 01:34 PM Ron914
Ron got that Pertronix from me, and yes it is old... May 13 2025, 03:25 PM fiacra
If I was to eventually pass a smog test I could t... May 13 2025, 07:00 PM Superhawk996 Remote stater switch is about $15 and pricele... May 13 2025, 01:35 PM Superhawk996 Z0n2aTFRMiI?si=W8rg02X2Kwp4r_54
I cut this off at... May 13 2025, 02:40 PM rjames There is an art (and likely some luck) in getting ... May 13 2025, 03:00 PM Ron914
There is an art (and likely some luck) in getting... May 13 2025, 03:10 PM SVG223 Good luck with this, my MPS is leaking too, watchi... May 13 2025, 04:18 PM Ron914 [quote name='SVG223' post='3205335... May 13 2025, 09:01 PM JeffBowlsby Just a heads up, there are other places the MPS ca... May 13 2025, 06:18 PM JeffBowlsby dbl dbl. May 13 2025, 06:18 PM Ron914 Well I opened my MPS and found that the order in w... May 14 2025, 07:57 AM ChrisFoley I switched from a round o-ring to square in my kit... May 14 2025, 10:45 AM Ron914
I switched from a round o-ring to square in my ki... May 14 2025, 12:07 PM emerygt350 I think that is exactly what I did the first time ... May 14 2025, 11:54 AM Ron914
I think that is exactly what I did the first time... May 14 2025, 12:08 PM Ron914
I think that is exactly what I did the first time... May 14 2025, 04:36 PM emerygt350
I think that is exactly what I did the first tim... May 14 2025, 04:48 PM emerygt350 Although no leak is best. That leak is pretty slow... May 14 2025, 12:29 PM Superhawk996 Get rid of the adapters
Go straight from vacuum ... May 14 2025, 01:41 PM Ron914
Get rid of the adapters
Go straight from vacuum... May 14 2025, 04:32 PM Superhawk996
[quote name='Superhawk996' post='3205480' date='M... May 14 2025, 05:58 PM rjames
[quote name='Superhawk996' post='3205480' date='... May 14 2025, 06:20 PM Ron914
[quote name='Superhawk996' post='3205480' date='... May 15 2025, 12:29 PM SVG223 Mine takes 45 seconds to leak from 10 in/hg to 5 i... May 14 2025, 03:12 PM emerygt350
Mine takes 45 seconds to leak from 10 in/hg to 5 ... May 14 2025, 04:18 PM ChrisFoley Problem with the old square o-ring is that it will... May 15 2025, 08:57 AM Ron914
Problem with the old square o-ring is that it wil... May 18 2025, 01:41 PM Superhawk996 :trophy: you’re getting there! May 18 2025, 02:17 PM rjames No need to crack it open again to adjust if you ha... May 18 2025, 03:12 PM Ron914 Well after putting the old square O ring back in ... May 24 2025, 08:40 AM rjames Put the ecu knob back in the middle and adjust onl... May 24 2025, 09:16 AM Ron914
Put the ecu knob back in the middle and adjust on... May 24 2025, 10:27 AM rjames
Put the ecu knob back in the middle and adjust o... May 27 2025, 06:30 PM Superhawk996
I need to add that I must set my timing still , ... May 28 2025, 05:36 AM Ron914
I need to add that I must set my timing still ,... May 29 2025, 06:25 PM JeffBowlsby Of those three pairs of wires, one is grounds for ... May 24 2025, 10:49 AM Ron914
Of those three pairs of wires, 1 iz grounds did t... May 24 2025, 11:09 AM Superhawk996 Those grounds are mighty crispy and corroded and a... May 28 2025, 05:31 AM Superhawk996 My bad Ron
I completely forgot you were running P... May 30 2025, 04:15 AM Ron914 Hello to all that have been helping me getting my ... Aug 19 2025, 03:10 PM Superhawk996 Hi Ron,
Glad you haven’t given up.
Two thi... Aug 19 2025, 04:35 PM Superhawk996 Here’s a little experiment you can do before the... Aug 19 2025, 04:46 PM Ron914 I will try your suggestions later today and post t... Aug 19 2025, 05:03 PM emerygt350
I will try your suggestions later today and post ... Aug 19 2025, 05:20 PM Ron914
I will try your suggestions later today and post... Aug 19 2025, 05:30 PM Superhawk996
I will try your suggestions later today and post ... Aug 19 2025, 07:50 PM Ron914 @Superhawk996 I made the checks you requested and... Aug 19 2025, 10:39 PM ctc911ctc Audio engineers Fluke!
[b]@[url=http://www.... Aug 20 2025, 09:52 AM Superhawk996 Good job and report out on the testing Ron. :head... Aug 19 2025, 11:33 PM Ron914
Good job and report out on the testing Ron. :hea... Aug 20 2025, 08:12 AM Ron914 I made the tool needed to remove my CHT and I noti... Aug 25 2025, 12:30 PM Ron914 I decided to verify the condition of the CHT wire ... Aug 25 2025, 12:46 PM Superhawk996 Flukes rarely go bad
New leads are much cheaper ... Aug 25 2025, 12:59 PM ctc911ctc
Flukes rarely go bad
^^^^^^^^^^^^^^^^
:agree:... Aug 25 2025, 01:27 PM Ron914 Yes the car is still stalling after 5-10 minutes o... Aug 25 2025, 01:44 PM Superhawk996
Yes the car is still stalling after 5-10 minutes ... Aug 25 2025, 03:54 PM Ron914
Yes the car is still stalling after 5-10 minutes... Aug 25 2025, 05:39 PM emerygt350 Your not at a higher altitude are you?
16 isnt en... Aug 25 2025, 02:04 PM Ron914
Your not at a higher altitude are you?
16 isnt e... Aug 25 2025, 02:32 PM emerygt350 At the least you can resell it. Just remember, th... Aug 25 2025, 03:22 PM cgnj I'm curious where these diaphragms are being s... Aug 25 2025, 03:29 PM emerygt350 Go for it! I love a carb too but this is like ... Aug 25 2025, 03:44 PM Superhawk996 Ah - OK so you have a good wire from sensor to ECU... Aug 25 2025, 07:03 PM emerygt350 I always do a visual before hand as well. Mps vac... Aug 26 2025, 05:37 AM Puebloswatcop Where can I obtain a MPS re-build kit with a new d... Aug 26 2025, 06:46 AM FlacaProductions Unless someone is going to sell you from their sta... Aug 26 2025, 07:17 AM Ron914 Getting back to my D-Jet issue , walking away is w... Sep 8 2025, 12:05 PM rjames I'm confused (happens often).
On August 19th y... Sep 8 2025, 12:38 PM Ron914
I'm confused (happens often).
On August 19th ... Sep 8 2025, 03:00 PM emerygt350 A 2 psi drop would lean the mix quite a bit.
That... Sep 8 2025, 02:21 PM
MDTerp
There you have it, now you know why it was a leak... May 8 2025, 08:17 PM Ron914 Well all done . I must say it was easier than I th... May 8 2025, 08:30 PM JeffBowlsby Another documented case of a completely fractured ... May 8 2025, 10:15 PM emerygt350 Way to go. I mean you are disassembling the most ... May 9 2025, 06:57 AM rjames Crazy that it could hold vacuum at all! May 9 2025, 10:01 AM Superhawk996
Crazy that it could hold vacuum at all!
Mine... May 9 2025, 01:24 PM Ron914 Well I was optimistic that my car was going to run... May 9 2025, 05:37 PM emerygt350 You can pull the wires one at a time till you find... May 9 2025, 06:09 PM Ron914
This is going to be a tough love post.
When you... May 12 2025, 03:17 PM Superhawk996 I’m going to post this over here
This is anoth... May 9 2025, 07:53 PM rjames What Hawk said.
And you just rebuilt your MPS, so... May 9 2025, 08:17 PM Ron914 Thank you Superhawk and emery ,You are correct in... May 9 2025, 08:27 PM emerygt350 Once it is all back together, remember that inner ... May 10 2025, 04:22 AM emerygt350 Don't worry about TDC, the distributor only go... May 12 2025, 05:50 PM Ron914
Don't worry about TDC, the distributor only g... May 12 2025, 06:57 PM fiacra
If only I didn't live in California I would b... May 12 2025, 08:03 PM Ron914
If only I didn't live in California I would ... May 12 2025, 09:46 PM Superhawk996 First on the to do list
MPS is leaking down too ... May 12 2025, 06:57 PM Ron914
First on the to do list
MPS is leaking down too... May 12 2025, 09:44 PM Superhawk996 Aren’t other guys in CA running 123’s?
Regard... May 12 2025, 07:00 PM Superhawk996 Also with respect to the dizzy vs timing
Yes - s... May 12 2025, 07:19 PM Ron914 As far as putting a 123 in my California car I was... May 12 2025, 09:11 PM Superhawk996 I would open the MPS back up. I can post time lap... May 13 2025, 08:37 AM Ron914
I would open the MPS back up. I can post time la... May 13 2025, 10:19 AM emerygt350 I agree with hawk. The first time I rebuilt mine ... May 13 2025, 10:02 AM fiacra Ron got that Pertronix from me, and yes it is olde... May 13 2025, 01:34 PM Ron914
Ron got that Pertronix from me, and yes it is old... May 13 2025, 03:25 PM fiacra
If I was to eventually pass a smog test I could t... May 13 2025, 07:00 PM Superhawk996 Remote stater switch is about $15 and pricele... May 13 2025, 01:35 PM Superhawk996 Z0n2aTFRMiI?si=W8rg02X2Kwp4r_54
I cut this off at... May 13 2025, 02:40 PM rjames There is an art (and likely some luck) in getting ... May 13 2025, 03:00 PM Ron914
There is an art (and likely some luck) in getting... May 13 2025, 03:10 PM SVG223 Good luck with this, my MPS is leaking too, watchi... May 13 2025, 04:18 PM Ron914 [quote name='SVG223' post='3205335... May 13 2025, 09:01 PM JeffBowlsby Just a heads up, there are other places the MPS ca... May 13 2025, 06:18 PM JeffBowlsby dbl dbl. May 13 2025, 06:18 PM Ron914 Well I opened my MPS and found that the order in w... May 14 2025, 07:57 AM ChrisFoley I switched from a round o-ring to square in my kit... May 14 2025, 10:45 AM Ron914
I switched from a round o-ring to square in my ki... May 14 2025, 12:07 PM emerygt350 I think that is exactly what I did the first time ... May 14 2025, 11:54 AM Ron914
I think that is exactly what I did the first time... May 14 2025, 12:08 PM Ron914
I think that is exactly what I did the first time... May 14 2025, 04:36 PM emerygt350
I think that is exactly what I did the first tim... May 14 2025, 04:48 PM emerygt350 Although no leak is best. That leak is pretty slow... May 14 2025, 12:29 PM Superhawk996 Get rid of the adapters
Go straight from vacuum ... May 14 2025, 01:41 PM Ron914
Get rid of the adapters
Go straight from vacuum... May 14 2025, 04:32 PM Superhawk996
[quote name='Superhawk996' post='3205480' date='M... May 14 2025, 05:58 PM rjames
[quote name='Superhawk996' post='3205480' date='... May 14 2025, 06:20 PM Ron914
[quote name='Superhawk996' post='3205480' date='... May 15 2025, 12:29 PM SVG223 Mine takes 45 seconds to leak from 10 in/hg to 5 i... May 14 2025, 03:12 PM emerygt350
Mine takes 45 seconds to leak from 10 in/hg to 5 ... May 14 2025, 04:18 PM ChrisFoley Problem with the old square o-ring is that it will... May 15 2025, 08:57 AM Ron914
Problem with the old square o-ring is that it wil... May 18 2025, 01:41 PM Superhawk996 :trophy: you’re getting there! May 18 2025, 02:17 PM rjames No need to crack it open again to adjust if you ha... May 18 2025, 03:12 PM Ron914 Well after putting the old square O ring back in ... May 24 2025, 08:40 AM rjames Put the ecu knob back in the middle and adjust onl... May 24 2025, 09:16 AM Ron914
Put the ecu knob back in the middle and adjust on... May 24 2025, 10:27 AM rjames
Put the ecu knob back in the middle and adjust o... May 27 2025, 06:30 PM Superhawk996
I need to add that I must set my timing still , ... May 28 2025, 05:36 AM Ron914
I need to add that I must set my timing still ,... May 29 2025, 06:25 PM JeffBowlsby Of those three pairs of wires, one is grounds for ... May 24 2025, 10:49 AM Ron914
Of those three pairs of wires, 1 iz grounds did t... May 24 2025, 11:09 AM Superhawk996 Those grounds are mighty crispy and corroded and a... May 28 2025, 05:31 AM Superhawk996 My bad Ron
I completely forgot you were running P... May 30 2025, 04:15 AM Ron914 Hello to all that have been helping me getting my ... Aug 19 2025, 03:10 PM Superhawk996 Hi Ron,
Glad you haven’t given up.
Two thi... Aug 19 2025, 04:35 PM Superhawk996 Here’s a little experiment you can do before the... Aug 19 2025, 04:46 PM Ron914 I will try your suggestions later today and post t... Aug 19 2025, 05:03 PM emerygt350
I will try your suggestions later today and post ... Aug 19 2025, 05:20 PM Ron914
I will try your suggestions later today and post... Aug 19 2025, 05:30 PM Superhawk996
I will try your suggestions later today and post ... Aug 19 2025, 07:50 PM Ron914 @Superhawk996 I made the checks you requested and... Aug 19 2025, 10:39 PM ctc911ctc Audio engineers Fluke!
[b]@[url=http://www.... Aug 20 2025, 09:52 AM Superhawk996 Good job and report out on the testing Ron. :head... Aug 19 2025, 11:33 PM Ron914
Good job and report out on the testing Ron. :hea... Aug 20 2025, 08:12 AM Ron914 I made the tool needed to remove my CHT and I noti... Aug 25 2025, 12:30 PM Ron914 I decided to verify the condition of the CHT wire ... Aug 25 2025, 12:46 PM Superhawk996 Flukes rarely go bad
New leads are much cheaper ... Aug 25 2025, 12:59 PM ctc911ctc
Flukes rarely go bad
^^^^^^^^^^^^^^^^
:agree:... Aug 25 2025, 01:27 PM Ron914 Yes the car is still stalling after 5-10 minutes o... Aug 25 2025, 01:44 PM Superhawk996
Yes the car is still stalling after 5-10 minutes ... Aug 25 2025, 03:54 PM Ron914
Yes the car is still stalling after 5-10 minutes... Aug 25 2025, 05:39 PM emerygt350 Your not at a higher altitude are you?
16 isnt en... Aug 25 2025, 02:04 PM Ron914
Your not at a higher altitude are you?
16 isnt e... Aug 25 2025, 02:32 PM emerygt350 At the least you can resell it. Just remember, th... Aug 25 2025, 03:22 PM cgnj I'm curious where these diaphragms are being s... Aug 25 2025, 03:29 PM emerygt350 Go for it! I love a carb too but this is like ... Aug 25 2025, 03:44 PM Superhawk996 Ah - OK so you have a good wire from sensor to ECU... Aug 25 2025, 07:03 PM emerygt350 I always do a visual before hand as well. Mps vac... Aug 26 2025, 05:37 AM Puebloswatcop Where can I obtain a MPS re-build kit with a new d... Aug 26 2025, 06:46 AM FlacaProductions Unless someone is going to sell you from their sta... Aug 26 2025, 07:17 AM Ron914 Getting back to my D-Jet issue , walking away is w... Sep 8 2025, 12:05 PM rjames I'm confused (happens often).
On August 19th y... Sep 8 2025, 12:38 PM Ron914
I'm confused (happens often).
On August 19th ... Sep 8 2025, 03:00 PM emerygt350 A 2 psi drop would lean the mix quite a bit.
That... Sep 8 2025, 02:21 PM |
1 User(s) are reading this topic (1 Guests and 0 Anonymous Users)
0 Members:

|
Lo-Fi Version | Time is now: 26th July 2026 - 06:22 PM |
Invision Power Board
v9.1.4 © 2026 IPS, Inc.