|
|
|
Porsche, and the Porsche crest are registered trademarks of Dr. Ing. h.c. F. Porsche AG.
This site is not affiliated with Porsche in any way. Its only purpose is to provide an online forum for car enthusiasts. All other trademarks are property of their respective owners. |
|
|


| Mr.Vman |
 May 2 2025, 05:49 PM May 2 2025, 05:49 PM
Post
#1
|
|
Newbie  Group: Members Posts: 27 Joined: 1-October 24 From: Sierra Vista, AZ. Member No.: 28,388 Region Association: Southwest Region |
The 1976 914 build continues, Question on the master cylinder lines from brake fluid reservoir. Do the hard lines from the reservoir just push into the rubber grommet on top of the master cylinder? I tried pushing the lines in, would not stay and leaked. Also, no click that I have read about. Are there washers that are installed before the flared end of the reservoir lines? Perhaps remove the rubber grommets from the master cylinder, install reservoir lines into grommets and then install assembly into master cylinder? What is the order the lines are pushed into the master cylinder? Where do the washers go? How deep do the hard lines fit into the grommets? Through the rubber grommet and into the master cylinder? Thanks in advance, stalled on this one. Steve
|
   |

 
|
  |
Replies
| Mr.Vman |
May 2 2025, 11:19 PM
Post
#2
|
|
Newbie Group: Members Posts: 27 Joined: 1-October 24 From: Sierra Vista, AZ. Member No.: 28,388 Region Association: Southwest Region |
Thanks for the replies. Order of install; Metal washer goes into, Master cylinder. Next rubber grommet. Last reservoir supply line? Master cylinder comes with grommets installed, washers in bag. Remove grommets from Master Cylinder, install washers in Master Cylinder. Next, grommet and finally supply line? The supply line snaps into rubber grommet some how? Or install washer into Master cylinder, with grommet out of, Master Cylinder insert supply line into rubber grommet. Then grommet with supply line installed into Master Cylinder? How to use a flare wrench on the supply line to insert into grommet? I have been using pliers to push supply line into grommet. I ruined the pre installed grommets trying to push the supply lines into the rubber grommets. I installed the Master Cylinder in the car. Did not use the washers, where ever they go? Once again thanks for the help.
|
|
|
|
| fiacra |
May 3 2025, 11:31 AM
Post
#3
|
|
Person.Woman.Man.Camera.TV Group: Members Posts: 633 Joined: 1-March 19 From: East Bay Region - California Member No.: 22,920 Region Association: Northern California |
QUOTE(Mr.Vman @ May 2 2025, 10:19 PM)  Thanks for the replies. Order of install; Metal washer goes into, Master cylinder. Next rubber grommet. Last reservoir supply line? Master cylinder comes with grommets installed, washers in bag. Remove grommets from Master Cylinder, install washers in Master Cylinder. Next, grommet and finally supply line? The supply line snaps into rubber grommet some how? Or install washer into Master cylinder, with grommet out of, Master Cylinder insert supply line into rubber grommet. Then grommet with supply line installed into Master Cylinder? How to use a flare wrench on the supply line to insert into grommet? I have been using pliers to push supply line into grommet. I ruined the pre installed grommets trying to push the supply lines into the rubber grommets. I installed the Master Cylinder in the car. Did not use the washers, where ever they go? Once again thanks for the help. If your MC is out of your car I'd put the grommets and lines in first then install the MC. It's a ton easier, in my opinion. You do have to move (but not fully remove) the gas tank to feed the lines up, but that is pretty easy. So for me, assuming the MC is already out of the car, it's check to make sure washers are in and properly seated, put metal lines into grommets, install grommets, install MC, feed lines up and make connection with the reservoir. Don't forget the seals/rubber sleeves (part #111 957 861) where the lines go through the body above the MC. If the MC is already in my order of operations is put the washers, install metal lines into grommets, lube grommets with brake fluid, and then install grommets. I've already explained how I get them to pop in, but use whatever method you like. I've read a few different ways in other posts. Good luck! Edit 7/4/25: corrected the part number for the seal where the brake lines go through the body |
|
|
|
| DennisV |
Jul 4 2025, 06:31 AM
Post
#4
|
|
Senior Member Group: Members Posts: 760 Joined: 8-August 20 From: Santa Rosa, CA Member No.: 24,575 Region Association: Northern California |
QUOTE(fiacra @ May 3 2025, 10:31 AM) Don't forget the seals/rubber sleeves (part #311 971 911) where the lines go through the body above the MC. Do you happen to have a photo of this part and its position installed on the car? I am having a hard time locating it. #14 in the parts catalog diagram with quantity X. NLA from Porsche. I thought #15 (111 957 861) in the parts diagram was the boot for where the lines go through the body. 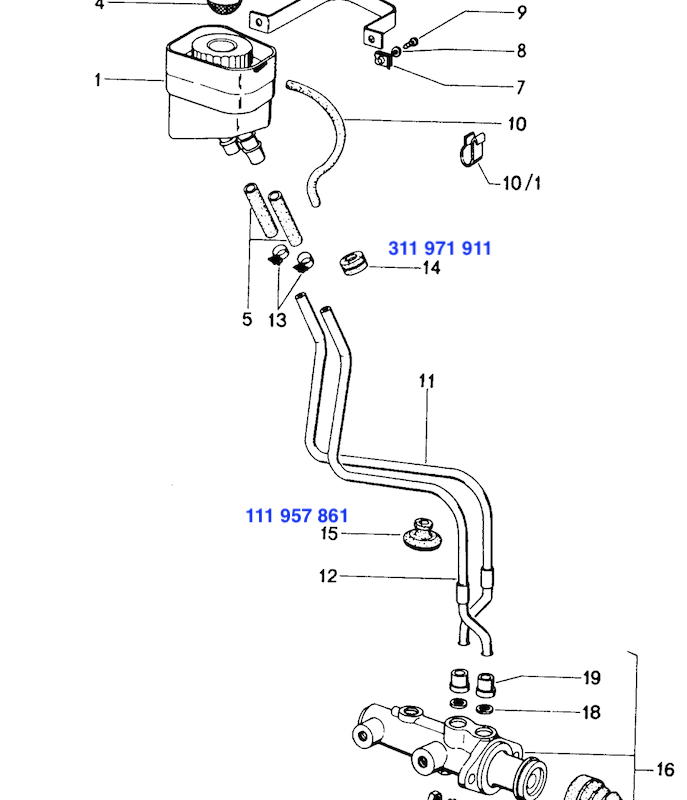 |
|
|
|
| fiacra |
Jul 4 2025, 08:54 AM
Post
#5
|
|
Person.Woman.Man.Camera.TV Group: Members Posts: 633 Joined: 1-March 19 From: East Bay Region - California Member No.: 22,920 Region Association: Northern California |
QUOTE(DennisV @ Jul 4 2025, 05:31 AM) QUOTE(fiacra @ May 3 2025, 10:31 AM) Don't forget the seals/rubber sleeves (part #311 971 911) where the lines go through the body above the MC. Do you happen to have a photo of this part and its position installed on the car? I am having a hard time locating it. #14 in the parts catalog diagram with quantity X. NLA from Porsche. I thought #15 (111 957 861) in the parts diagram was the boot for where the lines go through the body. @DennisV You are correct. I had the wrong part number in my previous post. Edited it to put in the correct part number. |
|
|
|
| DennisV |
Jul 5 2025, 04:25 PM
Post
#6
|
|
Senior Member Group: Members Posts: 760 Joined: 8-August 20 From: Santa Rosa, CA Member No.: 24,575 Region Association: Northern California |
QUOTE(fiacra @ Jul 4 2025, 07:54 AM) You are correct. I had the wrong part number in my previous post. Edited it to put in the correct part number. To avoid confusion or hard feelings, I wasn't trying to force an admission of error. I was really trying to figure out what #14 (311 971 911) looks like and where it goes. |
|
|
|
| fiacra |
Jul 5 2025, 06:56 PM
Post
#7
|
|
Person.Woman.Man.Camera.TV Group: Members Posts: 633 Joined: 1-March 19 From: East Bay Region - California Member No.: 22,920 Region Association: Northern California |
QUOTE(DennisV @ Jul 5 2025, 03:25 PM) QUOTE(fiacra @ Jul 4 2025, 07:54 AM) You are correct. I had the wrong part number in my previous post. Edited it to put in the correct part number. To avoid confusion or hard feelings, I wasn't trying to force an admission of error. I was really trying to figure out what #14 (311 971 911) looks like and where it goes. @DennisV Confused is often my baseline. When someone points out an error I made I'm usually grateful rather than having my pride wounded, so thank you for seeing that. Never being able to admit your errors is a hard life to lead. Having the opportunity to correct an error, even a minor one, is priceless. In return, here's a link to a thread with pictures and hopefully all the information you need about the reservoir overflow tube. Looks like a simple readily available grommet will work just fine for the overflow tube penetration. A hardware store part rather than needing to get it from Porsche or one of our usual suppliers (IMG:style_emoticons/default/beerchug.gif) http://www.914world.com/bbs2/index.php?showtopic=336070 |
|
|
|
Posts in this topic
Mr.Vman Brake master cylinder grommets May 2 2025, 05:49 PM mepstein The small metal spacers go into the mc, under the ... May 2 2025, 05:59 PM
 fiacra
The small metal spacers go into the mc, under the... May 2 2025, 08:32 PM mepstein Some mc’s come with the metal washers installed,... May 3 2025, 02:39 AM Mr.Vman Removed Master cylinder grommets, no washers in th... May 3 2025, 11:52 AM mepstein
Removed Master cylinder grommets, no washers in t... May 3 2025, 01:22 PM Literati914
Removed Master cylinder grommets, no washers in t... May 3 2025, 12:34 PM VaccaRabite So I tried something new this week. I always do th... Jul 5 2025, 10:01 PM
fiacra
The small metal spacers go into the mc, under the... May 2 2025, 08:32 PM mepstein Some mc’s come with the metal washers installed,... May 3 2025, 02:39 AM Mr.Vman Removed Master cylinder grommets, no washers in th... May 3 2025, 11:52 AM mepstein
Removed Master cylinder grommets, no washers in t... May 3 2025, 01:22 PM Literati914
Removed Master cylinder grommets, no washers in t... May 3 2025, 12:34 PM VaccaRabite So I tried something new this week. I always do th... Jul 5 2025, 10:01 PM |
2 User(s) are reading this topic (2 Guests and 0 Anonymous Users)
0 Members:

|
Lo-Fi Version | Time is now: 3rd November 2025 - 07:07 AM |
Invision Power Board
v9.1.4 © 2025 IPS, Inc.