|
|
|
Porsche, and the Porsche crest are registered trademarks of Dr. Ing. h.c. F. Porsche AG.
This site is not affiliated with Porsche in any way. Its only purpose is to provide an online forum for car enthusiasts. All other trademarks are property of their respective owners. |
|
|


| siverson |
 Jun 4 2003, 12:45 PM Jun 4 2003, 12:45 PM
Post
#1
|
|
Advanced Member  Group: Benefactors Posts: 2,448 Joined: 5-May 03 From: San Diego, CA Member No.: 654 Region Association: Southern California |
Click here for the pictures
(IMG:style_emoticons/default/driving.gif) I thought I'd share some pictures of my progress on my car, and ask a bunch of questions at the same time. A little background... I've owned the car for about 12 years now, drove it around with a 2.0 four for about 7 years, then converted to a 6-cyl 3.6 liter engine, drove it around for about 2 years like that, and now about three years ago I started to take it all apart (again) and do all the things with the conversion that I didn't have the time or money to do the first time (I did the whole 3.6 conversion in about 3 weekends the first time, and was still about 3 days late getting back to college!) Anyways... The "re-version" includes: - factory steel GT flares - carbon fiber front and rear lids - extensive chassis reinforcement - 13" front rotors, 993TT front calipers - Vellios trailing arm adapter, carrera rear wheel bearing, carrera e-brake, 930 rear rotor, C2T rear calipers - 964 3.6 engine, rebuilt by Andial with Euro RS cams and a couple other fun things - rebuilt '84 915 w/ factory LSD (Vellios adapter) - and that's all I can think of at the moment... (And yes, just to be clear, I agree with all the Vellios bashing that occurs on this board. The parts are pretty nice once you get them to work, but they are far from complete and George Vellios is an extremely difficult person to work with. I wouldn't purchase them again...) Questions: - Any problems that you can see from any of these pictures? I'd appreciate any critique. In particular, do I have any of the rubber installed backwards or incorrectly? For example, the front rear trunk (if that makes any sense) is asymmetrical, but seems like it would function fine either way, but I'm sure there is a correct way. - At this point, it seems like it would be just as easy to run braided -3 or -4 line for the brakes, or reinstall the factory hard lines. Any reason I should choose one of the other? I'd like to also install a cockpit mounted front/rear brake bias adjuster. - Do I need those back metal "dust-cover" things for the rotors? I currently don't have them on the front or rear. Am I going to really regret not having them after the first couple hundred miles, or is it no big deal? If so, I'll have to figure out how to adapt some sort of 13" cover from a C2T or 993TT, because the early 911 covers that fit on my struts or rear trailing arm now are way too small for the rotors. - All the rubber is OEM Porsche, but the rubber on the door (long piece) seems to fit so fugly. I've got to be doing something wrong... - What do you think about my cheesy plastic "grommets" I made from the plastic wire loom stuff? Anyone have a source for something better? Some nice, smooth, high-temperature resistant rubber would be nice. It's primary used to protect braided oil lines where they pass through the body. - Anyone have a Bosch Hammer (KTS-300 or KTS-500) (aka Porsche tester 9288) for sale? - What's the best way to remove super glue from chrome? (Sigh... don't ask.) Thanks for any tips! Click here for the pictures Attached image(s) 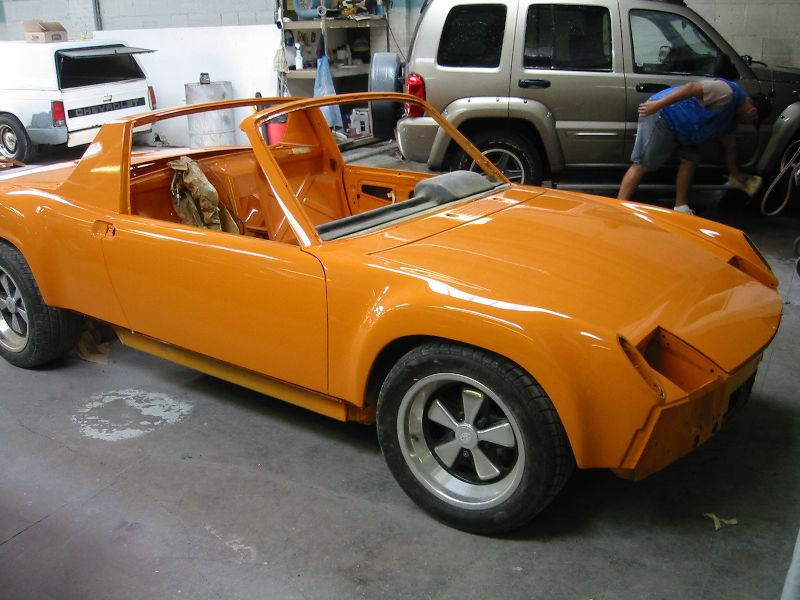
|
   |

 
|
  |
Replies
| TMorr |
Jun 5 2003, 09:26 AM
Post
#2
|
|
Tracey of Windrush Group: Members Posts: 85 Joined: 28-January 03 From: San Carlos, CA USA Member No.: 205 |
Hi Siverson
Found this in a quick search, the spec of the process is probably similar to what your plater has done and this does allude to the embrittlement relief.... [QUOTE]CADMIUM PLUS YELLOW CHROMATE Applicable Industry Spec: ASTM B766, CLASS 5, TYPE II QQ-P 416 Class 3, Type II The parts shall be capable of passing a 96 hour salt spray test to white corrosion and a minimum of a 200 hour salt spray test to red rust per ASTM B117. Typically, cadmium plus yellow chromate offered by PEM is .0002" to minimum of cadmium applied to all significant surfaces. Significant surfaces exclude such features as threads, holes, deep recesses and bases of angles. A yellow chromate conversion coating is applied after cadmium plating. Steel parts requiring embrittlement relief after plating are baked according to industry standards.[/QUOTE] To others on the forum attracted to salvaging old fasteners and hardware (I know I am) be careful to separate parts that require baking before delivery and be certain your plater can complete the treatment. We learned the hard way about 15 years ago when we had about 40lbs of BMW parts plated. All the bolts ended up scrap, air filter clips, throttle butterfly springs, large suspension botls etc. Only the simple steel parts like tabs, brackets, some suspension pieces could be used. Since then we have approached the plating process with parts divided into groups. Regards Hayden PTBT |
|
|
|
Posts in this topic
 siverson Pictures of my 914/6 project Jun 4 2003, 12:45 PM
 Lawrence914-6 What a gorgeous piece of work. :clap:
What do ... Jun 4 2003, 12:57 PM siverson Thanks - that is the Brad Meyeur (sp?) longitudina... Jun 4 2003, 01:20 PM seanery Very, very nice. Jun 4 2003, 01:34 PM Lawrence914-6 I suspected that was the Mayeur kit, but I didn... Jun 4 2003, 01:39 PM 914guy Your car looks great.. My project was in the paint... Jun 4 2003, 02:24 PM maf914 Wow. Extensive project! Your hardware looks ... Jun 4 2003, 03:25 PM siverson re: the cad plating.
No - believe it or not, it... Jun 4 2003, 03:49 PM krk I'll add my voice to the throngs -- that's... Jun 4 2003, 05:39 PM TMorr Hi Siverson,
Very nice project.
I just wanted to... Jun 4 2003, 05:49 PM siverson Hmm... No, I am not that familar with the cad proc... Jun 4 2003, 06:56 PM 914Timo Hello Siverson,
I think I have sade this before, ... Jun 5 2003, 02:25 PM 914Timo ... and second Jun 5 2003, 02:28 PM
Lawrence914-6 What a gorgeous piece of work. :clap:
What do ... Jun 4 2003, 12:57 PM siverson Thanks - that is the Brad Meyeur (sp?) longitudina... Jun 4 2003, 01:20 PM seanery Very, very nice. Jun 4 2003, 01:34 PM Lawrence914-6 I suspected that was the Mayeur kit, but I didn... Jun 4 2003, 01:39 PM 914guy Your car looks great.. My project was in the paint... Jun 4 2003, 02:24 PM maf914 Wow. Extensive project! Your hardware looks ... Jun 4 2003, 03:25 PM siverson re: the cad plating.
No - believe it or not, it... Jun 4 2003, 03:49 PM krk I'll add my voice to the throngs -- that's... Jun 4 2003, 05:39 PM TMorr Hi Siverson,
Very nice project.
I just wanted to... Jun 4 2003, 05:49 PM siverson Hmm... No, I am not that familar with the cad proc... Jun 4 2003, 06:56 PM 914Timo Hello Siverson,
I think I have sade this before, ... Jun 5 2003, 02:25 PM 914Timo ... and second Jun 5 2003, 02:28 PM siverson Thanks for the pictures about the door rubber... Jun 5 2003, 10:12 PM
 |
1 User(s) are reading this topic (1 Guests and 0 Anonymous Users)
0 Members:

|
Lo-Fi Version | Time is now: 10th June 2024 - 11:49 AM |
Invision Power Board
v9.1.4 © 2024 IPS, Inc.