|
|
|
Porsche, and the Porsche crest are registered trademarks of Dr. Ing. h.c. F. Porsche AG.
This site is not affiliated with Porsche in any way. Its only purpose is to provide an online forum for car enthusiasts. All other trademarks are property of their respective owners. |
|
|


| skline |
 Jun 17 2005, 04:53 PM Jun 17 2005, 04:53 PM
Post
#1
|
|
Born to Drive  Group: Members Posts: 7,910 Joined: 26-December 02 From: Costa Mesa, CA Member No.: 17 Region Association: Southern California |
Ok, Today at sklines garage we explore repairing the hell hole in a slightly rusty car. As some of you know, Mark Bland (Engman) has been working on a new Hell Hole repair kit. This is my redition of removing the rust and installing this kit. My first step is to remove the battery tray and support. I did so with my trusty $5.00 air chisel. The next step in to clean the area as good as you can and remove as much loose rust and get down to a point that you can weld. Next I will be fitting the kit into place for fittment. I will be posting pictures as I go. I just started and at this point, I have removed the battery tray and cleaned the hole out. Now I am going to fit the kit into place to see how it fits. Aaron has beent he photographer so dont blame me for bad pictures. If I have any question about it I will take some also. (IMG:http://www.914world.com/bbs2/html/emoticons/smile.gif) Off to work now, I will post the pictures later.
|
   |

 
|
  |
Replies
| skline |
Jun 18 2005, 10:06 AM
Post
#2
|
||
|
Born to Drive Group: Members Posts: 7,910 Joined: 26-December 02 From: Costa Mesa, CA Member No.: 17 Region Association: Southern California |
Actually, the kit doesnt replace that channel where the rubber goes, it gets welded on top of that. The rubber of course will have to be removed and replaced as it will melt from welding and this car is getting a V8 conversion so it will not be replaced. I tried to remove the old rubber but it wouldnt budge so I figure it will get nice and soft when I weld that piece in and be much more pliable when I am done. I didnt get it finished last night but will try to get it done today. This car was not very rusted and the kit is designed to repair a more seriously rusted car so I had to do some trimming to get some of the pieces to fit in. This is the first one I have done so in my opinion it is not as clean as it could have been, I am still learing what I should do with each piece as I go and figuring out that I should have done a few things differently. It's a learning curve. Alberto has one that is more in line for what this kit was made for and I am sure it will come out much nicer than this one. After I started welding in the piece on the side to cover the tray area, I realized the metal wouldnt really shape the way I wanted it to as I had already welded in where it would need to flex. So I had to cut a slit in it and then beat it into place and then weld around the cut. Fortunately the metal behind was still very strong and didnt need to be repaired. You will see what I mean. This is welded in but only tacked in a few place, I will finish it later today. Attached thumbnail(s) 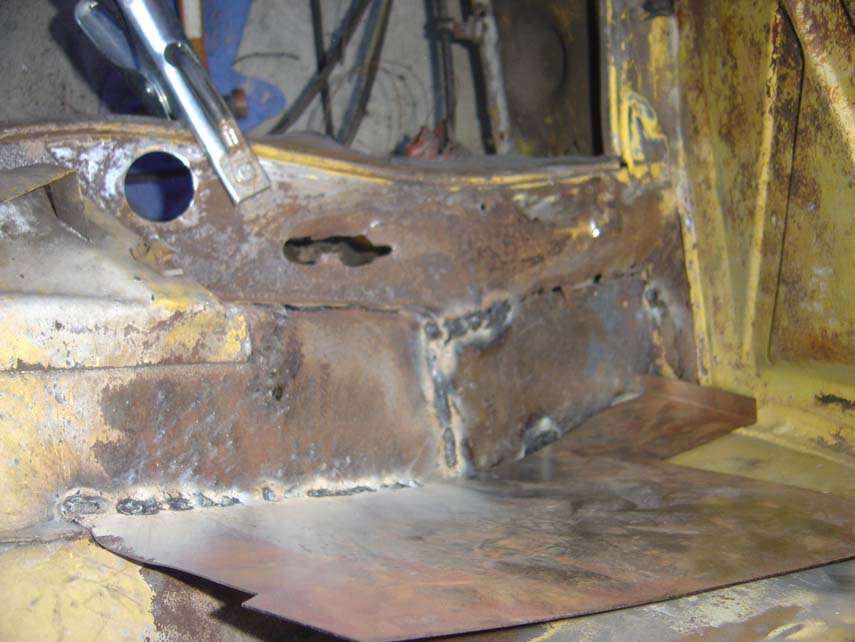
|
||
|
|
|
||
Posts in this topic
skline Hell Hole Repair made easy Jun 17 2005, 04:53 PM skline Here are a few of the starting out pictures Jun 17 2005, 04:58 PM skline Next Jun 17 2005, 04:59 PM skline Tray out Jun 17 2005, 05:00 PM skline Outfitted for sandblasting Jun 17 2005, 05:01 PM skline Getting into the work Jun 17 2005, 05:02 PM spunone JUST HOPE YOU DON'T DO TO YOUR 5.00 AIR CHISEL... Jun 17 2005, 05:03 PM ChrisReale Outfitted for sandblasting looks like a SoCal Dart... Jun 17 2005, 05:05 PM skline This is the kit as packaged by Mark, looks cool. H... Jun 17 2005, 05:08 PM jet1 It's about time someone put a kit together... Jun 17 2005, 05:17 PM Eric_Shea Hurry up Biatch. Get'er done. Mark won't... Jun 17 2005, 05:19 PM sixnotfour
|
2 User(s) are reading this topic (2 Guests and 0 Anonymous Users)
0 Members:

|
Lo-Fi Version | Time is now: 4th September 2025 - 06:11 AM |
Invision Power Board
v9.1.4 © 2025 IPS, Inc.
| All rights reserved 914World.com © since 2002 |
|
914World.com is the fastest growing online 914 community! We have it all, classifieds, events, forums, vendors, parts, autocross, racing, technical articles, events calendar, newsletter, restoration, gallery, archives, history and more for your Porsche 914 ... |