|
|
|
Porsche, and the Porsche crest are registered trademarks of Dr. Ing. h.c. F. Porsche AG.
This site is not affiliated with Porsche in any way. Its only purpose is to provide an online forum for car enthusiasts. All other trademarks are property of their respective owners. |
|
|


| pgollender |
 Apr 27 2025, 03:31 PM Apr 27 2025, 03:31 PM
Post
#1
|
|
Member  Group: Members Posts: 201 Joined: 5-July 11 From: Sacramento Member No.: 13,281 Region Association: Northern California |
I am trying to expand off Dave Darling’s old posts on the Pelican and from info archived from Brad Anders pages. Many thanks to Paul Wiles who supplied me with a few dead AAR’s to experiment with.
The mechanical rebuilding process has been explained in detail including a nice piece by Ian Karr. The problem with many of our AAR (Auxillary air valve regulators) is that the 12volt lead has broken off or the NiChrome heating element has broken off or burnt out. Depending on whether your valve is stuck open or frozen shut will affect either the warmup process or performance of your 914 after it has reached operating temperature. This is assuming that your cold start valve is also functioning properly. The insulated 12volt lead passes through the bottom of the AAR then through a thin pressed fire-retardant material and is riveted to a copper pin on the inside of the ceramic heat-sink. From the pin connection, a 13 ohm wound niChrome heating element (resistor) exits counter-clockwise to a grounding copper rivet that grounds to the bottom of the AAR. The ceramic heat sink is also riveted centrally to the bottom of the AAR. In the original design the wound NiChrome wire is epoxied to a small round kerf in two places. It is 99% impossible to remove the epoxy/wire without either destroying the wire or the round kerf mounting surface. I have included a few pictures to help look at the structures. Per Dave Darlings Pelican notes I ordered some ceramic “5 watt bathtub resistors” and will connect them in series to obtain 13 ohms. It’s been along time since I used Ohm’s law so I’m not 100% sure if I am doing this right. Anyway you have to remove the ceramic tub to have enough clearance for the metallic spring to fit. I haven’t completed the project yet but wanted to post the project so far. I still need to secure the resistors in place and find a suitable 12volt wire insulator to pass through the narrow channel and then be able to ground it to the AAR chassis properly. 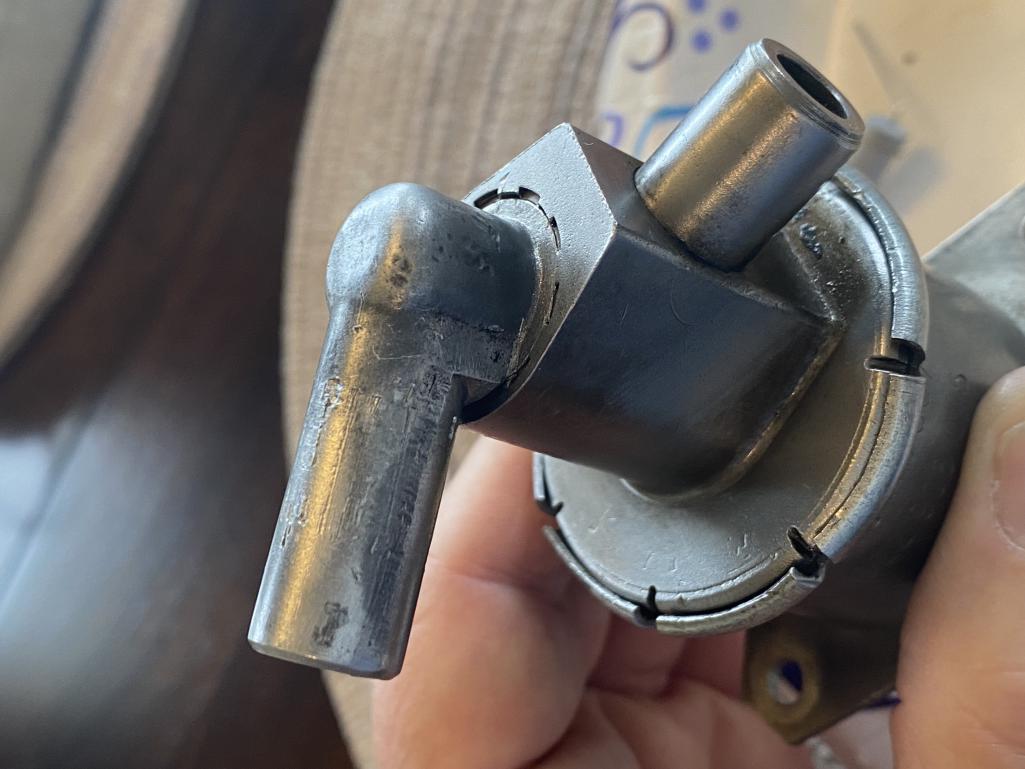 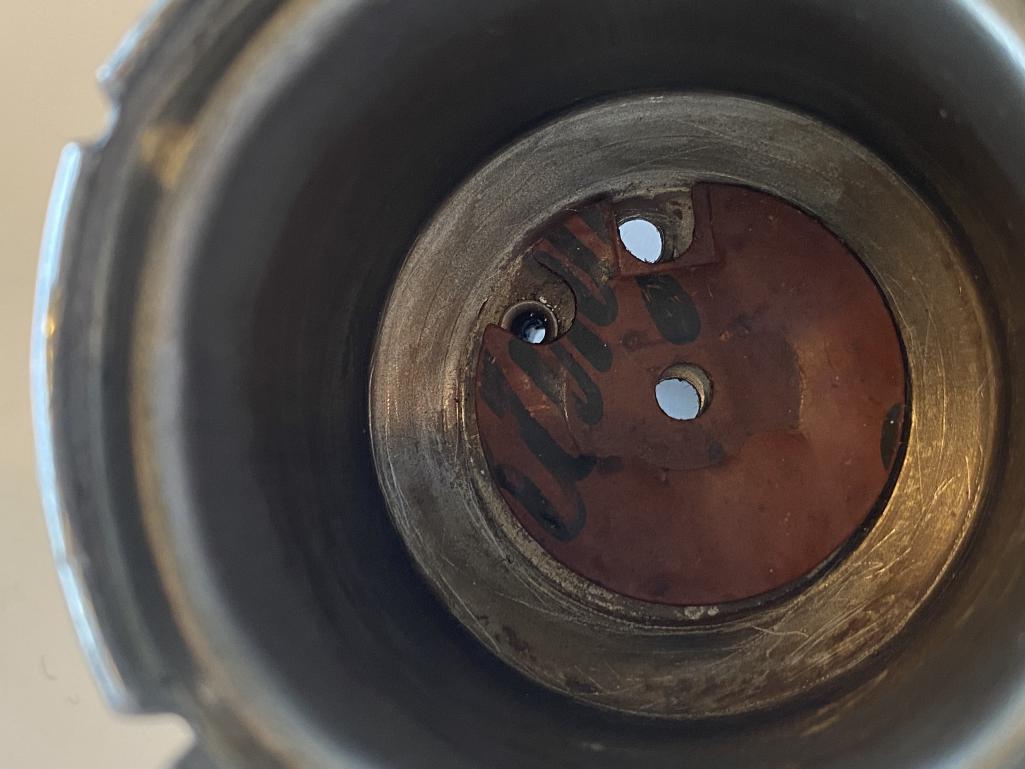 |
   |

 
|
Posts in this topic
 pgollender Project AAR resto-mod Apr 27 2025, 03:31 PM
 pgollender
I am trying to expand off Dave Darling’s old po... Apr 27 2025, 03:37 PM
pgollender
I am trying to expand off Dave Darling’s old po... Apr 27 2025, 03:37 PM
 pgollender
I am trying to expand off Dave Darling’s old p... Apr 27 2025, 03:39 PM pgollender
[quote name='pgollender' post='3203048' date='Apr... Apr 27 2025, 03:40 PM pgollender
[quote name='pgollender' post='3203048' date='Ap... Apr 27 2025, 03:44 PM emerygt350 Very interesting! Best of luck! I was th... Apr 27 2025, 04:03 PM 914sgofast2 So is it your plan to replace the heating element ... Apr 27 2025, 11:17 PM pgollender
So is it your plan to replace the heating element... May 11 2025, 09:01 AM Superhawk996
I ordered some ceramic “5 watt bathtub resisto... Apr 28 2025, 07:48 AM pgollender
I ordered some ceramic “5 watt bathtub resist... May 11 2025, 09:17 AM Spoke Interesting way to produce heat using power resist... Apr 28 2025, 11:35 AM pgollender
Interesting way to produce heat using power resis... May 11 2025, 09:40 AM
pgollender
I am trying to expand off Dave Darling’s old p... Apr 27 2025, 03:39 PM pgollender
[quote name='pgollender' post='3203048' date='Apr... Apr 27 2025, 03:40 PM pgollender
[quote name='pgollender' post='3203048' date='Ap... Apr 27 2025, 03:44 PM emerygt350 Very interesting! Best of luck! I was th... Apr 27 2025, 04:03 PM 914sgofast2 So is it your plan to replace the heating element ... Apr 27 2025, 11:17 PM pgollender
So is it your plan to replace the heating element... May 11 2025, 09:01 AM Superhawk996
I ordered some ceramic “5 watt bathtub resisto... Apr 28 2025, 07:48 AM pgollender
I ordered some ceramic “5 watt bathtub resist... May 11 2025, 09:17 AM Spoke Interesting way to produce heat using power resist... Apr 28 2025, 11:35 AM pgollender
Interesting way to produce heat using power resis... May 11 2025, 09:40 AM  |
3 User(s) are reading this topic (1 Guests and 0 Anonymous Users)
2 Members: pgollender, Franz_x

|
Lo-Fi Version | Time is now: 11th May 2025 - 02:28 PM |
Invision Power Board
v9.1.4 © 2025 IPS, Inc.