|
|
|
Porsche, and the Porsche crest are registered trademarks of Dr. Ing. h.c. F. Porsche AG.
This site is not affiliated with Porsche in any way. Its only purpose is to provide an online forum for car enthusiasts. All other trademarks are property of their respective owners. |
|
|


| ConeDodger |
 Jul 4 2007, 09:11 PM Jul 4 2007, 09:11 PM
Post
#1
|
|
Apex killer!  Group: Members Posts: 23,604 Joined: 31-December 04 From: Tahoe Area Member No.: 3,380 Region Association: Northern California |
I notice that everyone seems to be doing the gas tank dance lately...
I did too. I used the POR15 kit which is a three stage treatment that cleans and eliminates rust and then coats the interior of the tank with a tough paint coating that will prevent rust from forming and seal any that had already formed. I copied an pasted all of these pictures as I didn't want my camera anywhere near me during this battle. Thanks to those who provided these... First step is to remove the tank. Hopefully, you have little if any fuel left in it. I had nearly ten gallons and it was quite an adventure getting it all out and not well... out on the floor. I have two of those 5 gallon gas containers I used to use for Jet Ski's so they did the trick... The tank is held in by a strap across the top which holds it down. It is nestled on some odd looking pillow devices meant to hold it in a position. Don't lose these. Many people attach an extra length of fuel line to the tank so the tank can be lowered in without trying to connect fuel lines through tiny holes. This is recommended. Under the tank you will find an inlet for fuel to return which will go to a line heading into the tunnel. You will also find an outlet which goes to the pump before going to the other line going through the tunnel. Just cut the hoses. You should replace them as long as you are in there. Once the tank is out you will need to remove the fittings on the bottom as well as the filler and the fuel level assy. The bolts on the top are 8mm with a washer and can be reused. Now the fun begins... Wear gloves, eye protection, and preferably a lab apron. The first step in the POR15 kit is the Marine Clean. They provide two bottles of the stuff. The instructions say to mix it in about a quart of warm water. I duct taped the fitting fixtures on the bottom and across the openings on the top. You will know if your water is too hot because it will melt the adhesive on your duct tape. Once you pour the evil stuff in, tape the opening, and slosh it around for 20 minutes or so... Two bottles at 20 minutes each and 40 minutes later you are ready for the next step... The next step is the Metal Ready. Metal Ready is an acid that dissolves rust. I poured it in full strength and taped the hole shut again. 20 minutes of sloshing and you are ready for the rinse... I spent about a 15 minutes rinsing with a hose and sloshing the water around to get all the nooks and cranies. Finally I placed the tank in a position to dry over night. In my case, actually two nights. Flash rust can occur but I am in the Central Valley of California so this was not a problem for me. It dried quite nicely with a clean metal surface. Now for the last step. Retape your fittings and cover your holes except one. Mix your US Tank Sealer Paint well and pour it in to the last opening. Tape the hole shut and carefully slosh it around until you have covered all the interior surfaces. Then, untape your holes and fittings and pour out the excess into the can and throw it away. Place your tank in a position to dry and wait 24 hours. I suggest placing it so the inlet and outlet are up somewhat to prevent the paint from clogging the openings. 24 hours or so later, you are ready to reassemble. A couple things to watch for: POR15 drys very hard. So I bought 8mm sacrificial bolts to put in the bolt holes to prevent them becoming buggered up by the paint. Once dry I just spun them out and had clean threads. A second thing to watch for is that Marine clean if left for any length of time on paint will take it off. So if you don't want to repaint the exterior of the tank tape well. Likewise, the POR15 is silver and if it gets on the exterior it will dry thick and hard and be extremely hard to get off. All that said, if I had it to do over again I would just go to a radiator shop and have them boil it out. The kit costs @ $65.00 The radiator shop is probably less. You don't have to risk chemical burns or kill your flowers, and you can still buy the POR15 paint at the paint store to do up the interior if you wish... One last comment. I found that when I click on Pelican's parts diagram feature it brings me to the exploded diagram and parts numbers. You can buy the sock, the gaskets and even some of the fittings. When on the main Porsche parts site, I didn't see the sock available. We shall see as the sock and gaskets will be delivered next week... Attached image(s) 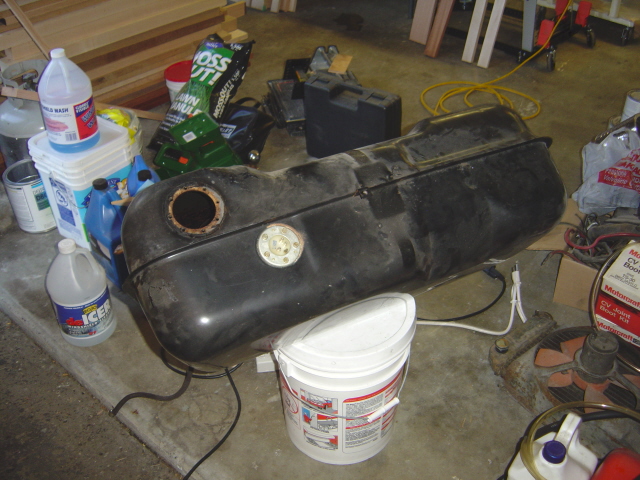
|
   |

 
|
Posts in this topic
 ConeDodger How to: POR15 Gas tank treatment Jul 4 2007, 09:11 PM
 ConeDodger The top picture is of a tank that has been treated... Jul 4 2007, 09:42 PM ConeDodger The tank on the left is in a little worse shape th... Jul 4 2007, 09:46 PM ConeDodger This tank has thicker rust. But even this can be f... Jul 4 2007, 09:50 PM ConeDodger Hopefully, this is helpful to someone. Thanks to t... Jul 4 2007, 09:52 PM BahnBrenner914 Keep me updated on that fuel filter sock, I need a... Jul 10 2007, 02:08 AM
 ConeDodger
Keep me updated on that fuel filter sock, I need ... Jul 10 2007, 10:34 AM dr914@autoatlanta.com
Keep me updated on that fuel filter sock, I need... Jul 10 2007, 06:21 PM ConeDodger
[quote name='ConeDodger' post='921676' date='Jul ... Jul 10 2007, 06:42 PM Krieger914 I used the Eastwood kit around 1994 and have never... Jul 10 2007, 08:51 AM ConeDodger
I used the Eastwood kit around 1994 and have neve... Jul 10 2007, 10:37 AM Headrage Any bug shop can supply the sock and washer.
It... Jul 10 2007, 06:45 PM
ConeDodger
Keep me updated on that fuel filter sock, I need ... Jul 10 2007, 10:34 AM dr914@autoatlanta.com
Keep me updated on that fuel filter sock, I need... Jul 10 2007, 06:21 PM ConeDodger
[quote name='ConeDodger' post='921676' date='Jul ... Jul 10 2007, 06:42 PM Krieger914 I used the Eastwood kit around 1994 and have never... Jul 10 2007, 08:51 AM ConeDodger
I used the Eastwood kit around 1994 and have neve... Jul 10 2007, 10:37 AM Headrage Any bug shop can supply the sock and washer.
It... Jul 10 2007, 06:45 PM  |
1 User(s) are reading this topic (1 Guests and 0 Anonymous Users)
0 Members:

|
Lo-Fi Version | Time is now: 31st May 2024 - 09:17 PM |
Invision Power Board
v9.1.4 © 2024 IPS, Inc.