|
|
|
Porsche, and the Porsche crest are registered trademarks of Dr. Ing. h.c. F. Porsche AG.
This site is not affiliated with Porsche in any way. Its only purpose is to provide an online forum for car enthusiasts. All other trademarks are property of their respective owners. |
|
|

  |

| kenshapiro2002 |
 Oct 7 2009, 05:01 PM Oct 7 2009, 05:01 PM
Post
#1
|
|
Senior Member  Group: Members Posts: 1,486 Joined: 23-July 09 From: Bawlmer, MD Member No.: 10,598 Region Association: MidAtlantic Region |
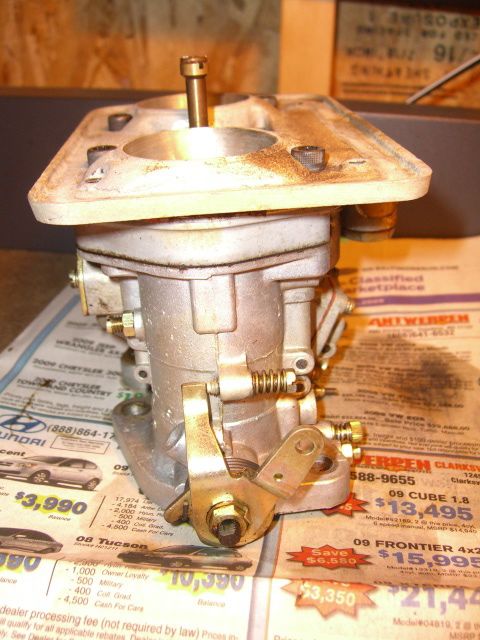
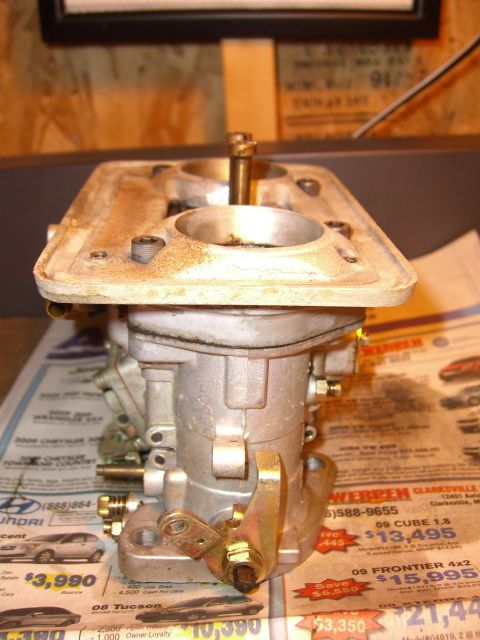
For those who have been following my travails to get this beast running correctly (had a bad rotor), well, it's still running like crap. In fact it stalled out twice today and I wasn't sure Id make it back home from around the block. So, I just decided to dive in and have removed one of the 40s just now. I'm taking photos, counting turns and taking my good old time. I'll let ya'll know what happens.
|
   |

 
|
| neil30076 |
Oct 7 2009, 05:08 PM
Post
#2
|
|
Recovering dismantler! Group: Members Posts: 397 Joined: 12-September 06 From: San Diego ( RB) CA Member No.: 6,826 Region Association: Southwest Region |
QUOTE(kenshapiro2002 @ Oct 7 2009, 04:01 PM)  For those who have been following my travails to get this beast running correctly (had a bad rotor), well, it's still running like crap. In fact it stalled out twice today and I wasn't sure Id make it back home from around the block. So, I just decided to dive in and have removed one of the 40s just now. I'm taking photos, counting turns and taking my good old time. I'll let ya'll know what happens. Ken, keep posting what you find - you can get them running fine - and idling good to, i've got mine just right and it won't stall, even when cold! |
|
|
|
| r_towle |
Oct 7 2009, 05:08 PM
Post
#3
|
|
Custom Member Group: Members Posts: 24,705 Joined: 9-January 03 From: Taxachusetts Member No.: 124 Region Association: North East States |
It was inevitable.
Here is a reference pic for the thread. Attached image(s) 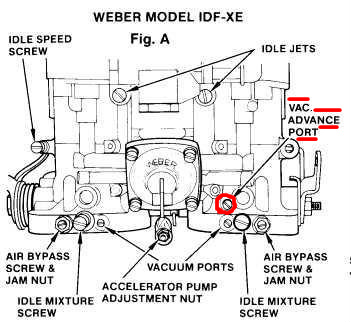
|
|
|
|
| neil30076 |
Oct 7 2009, 05:10 PM
Post
#4
|
|
Recovering dismantler! Group: Members Posts: 397 Joined: 12-September 06 From: San Diego ( RB) CA Member No.: 6,826 Region Association: Southwest Region |
QUOTE(r_towle @ Oct 7 2009, 04:08 PM) It was inevitable. Here is a reference pic for the thread. LOL, you beat me to the picture, are you going to tell him how to set up the linkage and adjust, or should I? (IMG:style_emoticons/default/biggrin.gif) |
|
|
|
| r_towle |
Oct 7 2009, 05:21 PM
Post
#5
|
|
Custom Member Group: Members Posts: 24,705 Joined: 9-January 03 From: Taxachusetts Member No.: 124 Region Association: North East States |
QUOTE(neil30076 @ Oct 7 2009, 07:10 PM) QUOTE(r_towle @ Oct 7 2009, 04:08 PM) It was inevitable. Here is a reference pic for the thread. LOL, you beat me to the picture, are you going to tell him how to set up the linkage and adjust, or should I? (IMG:style_emoticons/default/biggrin.gif) Hell no, you already typed it all up so nice...I am to lazy to redo that level of work. he needs to clean them up first before the linkage saga can start...(I hate the cross bar linkage) Rich |
|
|
|
| kenshapiro2002 |
Oct 7 2009, 07:17 PM
Post
#6
|
|
Senior Member Group: Members Posts: 1,486 Joined: 23-July 09 From: Bawlmer, MD Member No.: 10,598 Region Association: MidAtlantic Region |
Why's id the vacuum advance jet circled and red?
QUOTE(r_towle @ Oct 7 2009, 07:08 PM) It was inevitable. Here is a reference pic for the thread. |
|
|
|
| kenshapiro2002 |
Oct 7 2009, 07:18 PM
Post
#7
|
|
Senior Member Group: Members Posts: 1,486 Joined: 23-July 09 From: Bawlmer, MD Member No.: 10,598 Region Association: MidAtlantic Region |
I didn't need to chsange anything on my linkage. I was able to drop the connection without changing the length at all...will go back exactly as it was.
QUOTE(neil30076 @ Oct 7 2009, 07:10 PM) QUOTE(r_towle @ Oct 7 2009, 04:08 PM) It was inevitable. Here is a reference pic for the thread. LOL, you beat me to the picture, are you going to tell him how to set up the linkage and adjust, or should I? (IMG:style_emoticons/default/biggrin.gif) |
|
|
|
| kenshapiro2002 |
Oct 7 2009, 07:22 PM
Post
#8
|
|
Senior Member Group: Members Posts: 1,486 Joined: 23-July 09 From: Bawlmer, MD Member No.: 10,598 Region Association: MidAtlantic Region |
Needless to say, my Weber manual is a little different than my carb, but still makes sense 90% of the time. I don;t really want to remove the auxiliary venturis as they say, do I?
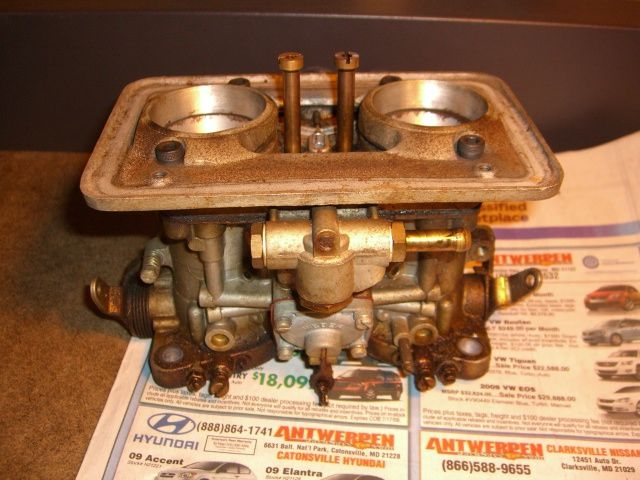
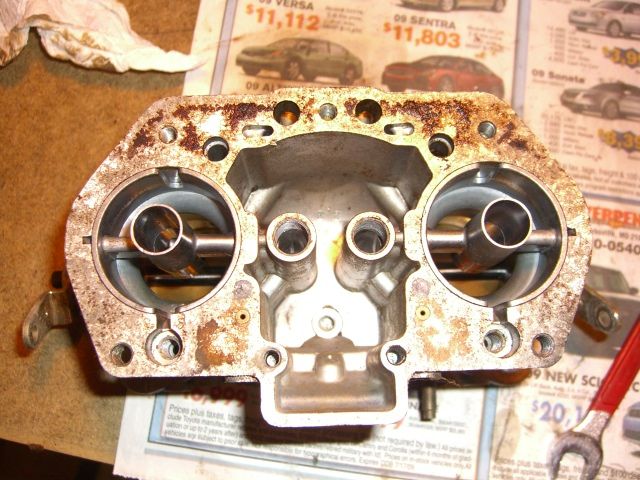
The float chambers look very clean. The accelerator pump diaphragms looked pretty shot on the one carb I'm working on. They were working (when I'd look into a barrel and work the throttle) but look cracked and rotted. The screen on the fuel inlet was pretty gunky too, but not blocked by any means. |
|
|
|
| r_towle |
Oct 7 2009, 07:30 PM
Post
#9
|
|
Custom Member Group: Members Posts: 24,705 Joined: 9-January 03 From: Taxachusetts Member No.: 124 Region Association: North East States |
The best way to do it is to remove everything.
Accel pumps typically get replaced...they are rubber and they are old Venturis get removed...simple lock nut holds them in...just remove that and pull them straight up. You need to remove the accel squirters first to get them out of the way...its the squirter that is aimed right down the venturi. Pull all the jets, screens, fillers, set screws etc etc etc. Clean the body as clean as you can... When you remove some of the screws on the bottom you will (may ) notice sooty or gummed up conditions...those ports need to be blasted with carb cleaner and you need to clean the screws. Any gummy condition is bad...so if its on the screen, in the bowl etc etc it eventually gets into the jets, that is why you gotta go all the way and blow out all the passages... I use the Gunk or Berrymans carb cleaner dunk..it comes in a gallon can...it is fantastic stuff for this.. Rich |
|
|
|
| neil30076 |
Oct 7 2009, 07:46 PM
Post
#10
|
|
Recovering dismantler! Group: Members Posts: 397 Joined: 12-September 06 From: San Diego ( RB) CA Member No.: 6,826 Region Association: Southwest Region |
Ken, check out http://www.rescue912.com/spider/WeberIDF_Setup/ for a full breakdown of the IDF's. Treat yours like this article ( I did) and they will be better than new.
|
|
|
|
| kenshapiro2002 |
Oct 7 2009, 08:06 PM
Post
#11
|
|
Senior Member Group: Members Posts: 1,486 Joined: 23-July 09 From: Bawlmer, MD Member No.: 10,598 Region Association: MidAtlantic Region |
Thanks guys. Some questions:
1.) The one part I may have blown was when the manual said, "Note which way round (freakin' Brits) the needle valve return spring hook is positioned". Well...it fell off before I "noted" I can always look at the other carb I guess. 2.) How come the rebuild kit comes with a new needle valve assembly for the float? 3.) How long should I soak the body? Thought I read somewhere that you can soak aluminum for too long. 4.) The vacuum ports are just for blanking (I removed them anyway)? 5.) Do I need to remove the vacuum advance port? 6.) Why should I remove the idle speed screw? Can't I leave it right where it is...all properly set and all? |
|
|
|
| kenshapiro2002 |
Oct 7 2009, 08:06 PM
Post
#12
|
|
Senior Member Group: Members Posts: 1,486 Joined: 23-July 09 From: Bawlmer, MD Member No.: 10,598 Region Association: MidAtlantic Region |
Thanks.
QUOTE(neil30076 @ Oct 7 2009, 09:46 PM) Ken, check out http://www.rescue912.com/spider/WeberIDF_Setup/ for a full breakdown of the IDF's. Treat yours like this article ( I did) and they will be better than new. |
|
|
|
| neil30076 |
Oct 7 2009, 08:16 PM
Post
#13
|
|
Recovering dismantler! Group: Members Posts: 397 Joined: 12-September 06 From: San Diego ( RB) CA Member No.: 6,826 Region Association: Southwest Region |
QUOTE(kenshapiro2002 @ Oct 7 2009, 07:06 PM) "Note which way round (freakin' Brits) the needle valve return spring hook is positioned". Well...it fell off before I "noted" I can always look at the other carb I guess. Hey, I'm a Brit - makes perfect sense ! (IMG:style_emoticons/default/lol-2.gif) |
|
|
|
| kenshapiro2002 |
Oct 7 2009, 08:39 PM
Post
#14
|
|
Senior Member Group: Members Posts: 1,486 Joined: 23-July 09 From: Bawlmer, MD Member No.: 10,598 Region Association: MidAtlantic Region |
  |
|
|
|
| kenshapiro2002 |
Oct 7 2009, 08:40 PM
Post
#15
|
|
Senior Member Group: Members Posts: 1,486 Joined: 23-July 09 From: Bawlmer, MD Member No.: 10,598 Region Association: MidAtlantic Region |
  |
|
|
|
| kenshapiro2002 |
Oct 7 2009, 08:42 PM
Post
#16
|
|
Senior Member Group: Members Posts: 1,486 Joined: 23-July 09 From: Bawlmer, MD Member No.: 10,598 Region Association: MidAtlantic Region |
   |
|
|
|
| kenshapiro2002 |
Oct 7 2009, 08:42 PM
Post
#17
|
|
Senior Member Group: Members Posts: 1,486 Joined: 23-July 09 From: Bawlmer, MD Member No.: 10,598 Region Association: MidAtlantic Region |
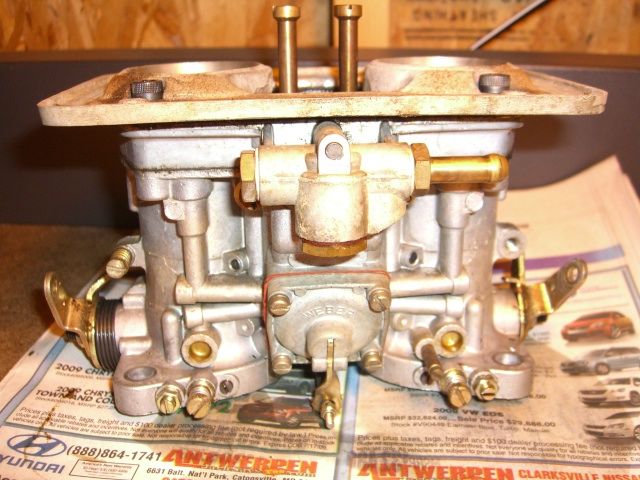
First two shots were before I sprayed the outsides.
|
|
|
|
| VaccaRabite |
Oct 8 2009, 07:20 AM
Post
#18
|
|
En Garde! Group: Admin Posts: 13,845 Joined: 15-December 03 From: Dallastown, PA Member No.: 1,435 Region Association: MidAtlantic Region |
Mmmmmmm goooey.
Keep track of all the hardware and springs. I like those 2 oz sealable plastic containers from Giant. Make sure none of your mix screws are bent at the tip. the come to a point, and can get deformed if over tightened. Then they have to be replaced. Replace everything rubber. replace all the paper gaskets. ita not all that hard to rebuild these things, but you do want to be meticulous. For the air correction screws (the ones with little lock nuts), note down how many 1/2 turns they are off bottom. Chances are you want them back to that space once the carbs are rebuilt. Also, jot down all your jetting information. it will be helpfull down the line. All the jets will have stamps on them what they are (or were before some PO reamed them out) Zach |
|
|
|
| kenshapiro2002 |
Oct 8 2009, 07:25 AM
Post
#19
|
|
Senior Member Group: Members Posts: 1,486 Joined: 23-July 09 From: Bawlmer, MD Member No.: 10,598 Region Association: MidAtlantic Region |
Thanks. Know any of the answers to post #11 above?
I have everything in baggies, and labeled, and counted every turn I took out as a good reference just to get her started again so I can then tune the carbs correctly. In fact, I'm soaking parts in a few stages so I don't get too confused this first go-round. QUOTE(Vacca Rabite @ Oct 8 2009, 09:20 AM) Mmmmmmm goooey. Keep track of all the hardware and springs. I like those 2 oz sealable plastic containers from Giant. Make sure none of your mix screws are bent at the tip. the come to a point, and can get deformed if over tightened. Then they have to be replaced. Replace everything rubber. replace all the paper gaskets. ita not all that hard to rebuild these things, but you do want to be meticulous. For the air correction screws (the ones with little lock nuts), note down how many 1/2 turns they are off bottom. Chances are you want them back to that space once the carbs are rebuilt. Also, jot down all your jetting information. it will be helpfull down the line. All the jets will have stamps on them what they are (or were before some PO reamed them out) Zach |
|
|
|
| SGB |
Oct 8 2009, 07:45 AM
Post
#20
|
|
just visiting Group: Members Posts: 4,086 Joined: 8-March 03 From: Huntsville, AL Member No.: 404 Region Association: South East States |
1. no big deal. it will be apparent
2. use the new needle valve. float height is critical. Be careful removing the float pivot b/c the tabs holding it tend to break. I have used JB weld to repair this in both my carbs. 3. IDK about too long, but a day or two should be fine 4. yes 5. no 6.leave it. QUOTE(kenshapiro2002 @ Oct 7 2009, 09:06 PM) Thanks guys. Some questions: 1.) The one part I may have blown was when the manual said, "Note which way round (freakin' Brits) the needle valve return spring hook is positioned". Well...it fell off before I "noted" I can always look at the other carb I guess. 2.) How come the rebuild kit comes with a new needle valve assembly for the float? 3.) How long should I soak the body? Thought I read somewhere that you can soak aluminum for too long. 4.) The vacuum ports are just for blanking (I removed them anyway)? 5.) Do I need to remove the vacuum advance port? 6.) Why should I remove the idle speed screw? Can't I leave it right where it is...all properly set and all? |
|
|
|
|
1 User(s) are reading this topic (1 Guests and 0 Anonymous Users)
0 Members:

|
Lo-Fi Version | Time is now: 2nd April 2026 - 08:12 AM |
Invision Power Board
v9.1.4 © 2026 IPS, Inc.