|
|
|
Porsche, and the Porsche crest are registered trademarks of Dr. Ing. h.c. F. Porsche AG.
This site is not affiliated with Porsche in any way. Its only purpose is to provide an online forum for car enthusiasts. All other trademarks are property of their respective owners. |
|
|

  |

| bradtho |
 Sep 11 2011, 05:49 PM Sep 11 2011, 05:49 PM
Post
#1
|
|
Member  Group: Members Posts: 266 Joined: 22-December 09 From: Seattle, WA Member No.: 11,165 Region Association: None |
I've read several threads on case splitting and been over the classic "splitting case halves" pictures at least 3 times. I'm pulling on the tranny studs, and not seeing any gap form at all. here's some pictures in case someone is able to spot a bolt that I've missed. I'm avoiding the use of screwdrivers, but what would your next steps be assuming that I haven't in fact missed a bolt.
the big 6 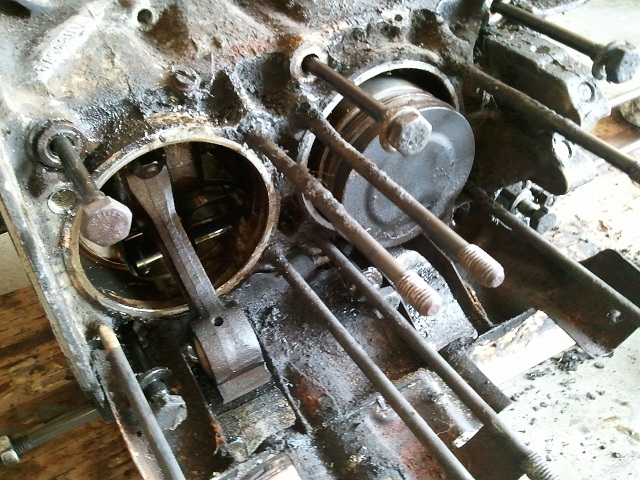 along the top 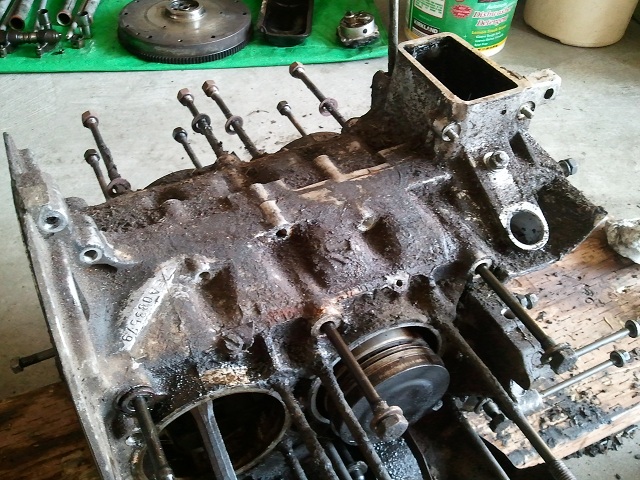 down the front (you think the front main seal was leaking?) 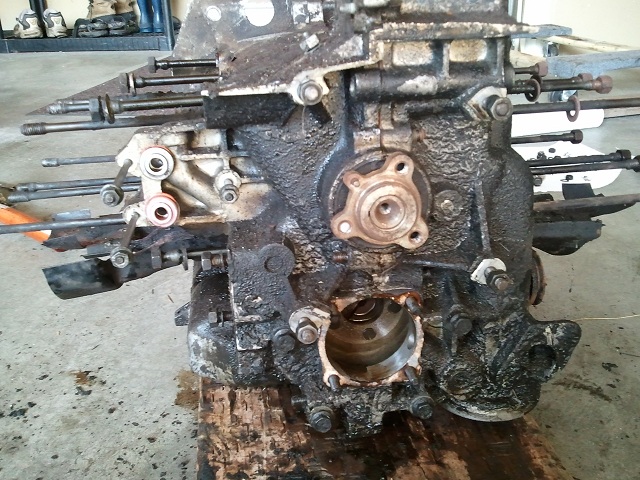 the sneaky 2 on the side 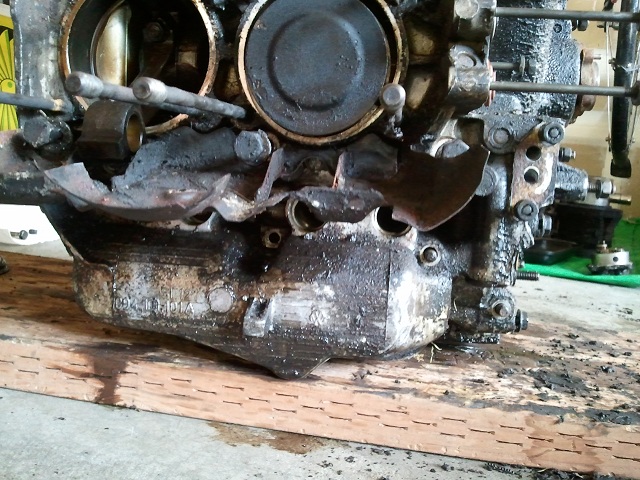 the one behind the flywheel 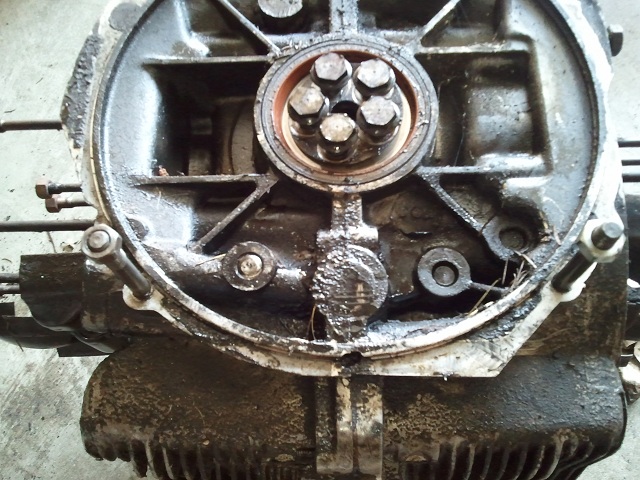 sneaky one below the flywheel and back half of bottom 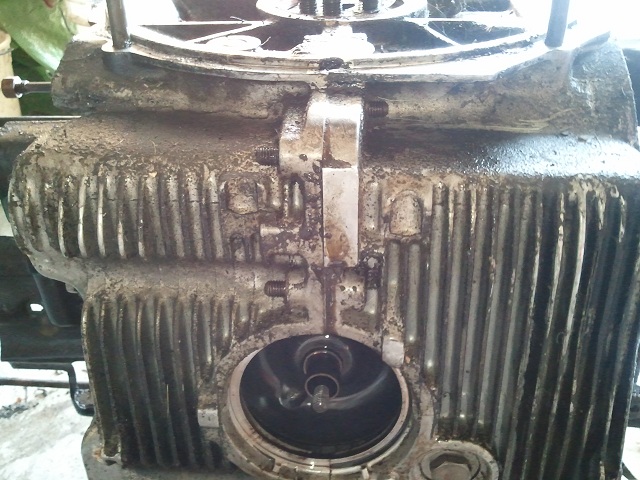 front half of bottom 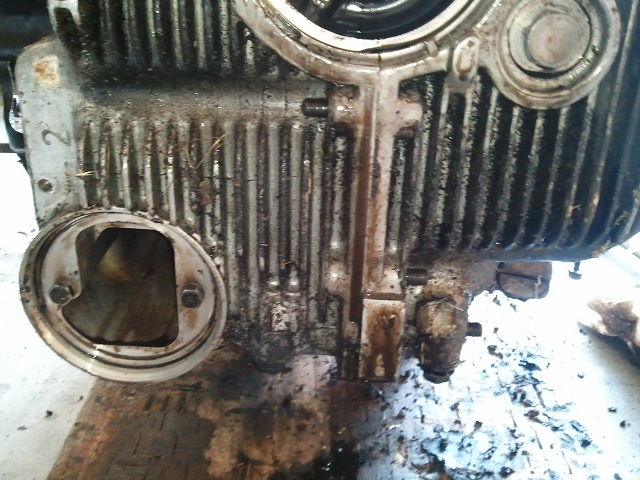 |
   |

 
|
| tomeric914 |
Sep 11 2011, 06:16 PM
Post
#2
|
|
One Lap of America in a 914! Group: Members Posts: 1,321 Joined: 25-May 08 From: Syracuse, NY Member No.: 9,101 Region Association: North East States |
If you forceably tried to pull the 6 thru case studs out, they may have wedged the plastic bolt dampeners at the case halves. Push those 6 bolts back through and try again.
|
|
|
|
| McMark |
Sep 11 2011, 06:47 PM
Post
#3
|
|
914 Freak! Group: Retired Admin Posts: 20,180 Joined: 13-March 03 From: Grand Rapids, MI Member No.: 419 Region Association: None |
You can safely apply pressure by wedging a screwdriver between the crank and the front main seal. That way you have the hardened crank on one side and the rubber seal on the other and you can usually get it started there.
It looks like you got all the nuts and bolts. But if it doesn't crack open with light pressure there, don't just push harder. Sometimes the sealant used on the case halves can make splitting a PITA. |
|
|
|
| stugray |
Sep 11 2011, 07:21 PM
Post
#4
|
|
Advanced Member Group: Members Posts: 3,825 Joined: 17-September 09 From: Longmont, CO Member No.: 10,819 Region Association: None |
I use my woodworkers plastic clamps.
You can reverse them to push apart. I put that in the oil pump hole to apply easy pressure without defacing anything. Stu |
|
|
|
| bradtho |
Sep 11 2011, 08:39 PM
Post
#5
|
|
Member Group: Members Posts: 266 Joined: 22-December 09 From: Seattle, WA Member No.: 11,165 Region Association: None |
QUOTE(tomeric914 @ Sep 11 2011, 05:16 PM)  If you forceably tried to pull the 6 thru case studs out, they may have wedged the plastic bolt dampeners at the case halves. Push those 6 bolts back through and try again. good point. i was expecting at the time that they'd come out, so yeah, I'll need to try pushing them back in a bit. |
|
|
|
| Valy |
Sep 12 2011, 08:20 AM
Post
#6
|
|
Senior Member Group: Members Posts: 1,677 Joined: 6-April 10 From: Sunnyvale, CA Member No.: 11,573 Region Association: Northern California |
QUOTE(bradtho @ Sep 11 2011, 04:49 PM) Hard to say but, in this picture there is one just above the pulley on the right that seems to still be there. I also used a woodworkers plastic clamp like Stugray mentioned (and broke one). But, I used it on the oil pump bolts as I was afraid to scratch the oil pump location. Also used it on the flywheel side between 2 bolts. Also used the hammer handle in the oil breather rectangle. |
|
|
|
| bradtho |
Sep 12 2011, 08:44 AM
Post
#7
|
|
Member Group: Members Posts: 266 Joined: 22-December 09 From: Seattle, WA Member No.: 11,165 Region Association: None |
QUOTE(Valy @ Sep 12 2011, 07:20 AM) Hard to say but, in this picture there is one just above the pulley on the right that seems to still be there. the thermstat pulley? I'm not sure where you're referring to. here's a higher res in case it helps.  |
|
|
|
| McMark |
Sep 12 2011, 09:40 AM
Post
#8
|
|
914 Freak! Group: Retired Admin Posts: 20,180 Joined: 13-March 03 From: Grand Rapids, MI Member No.: 419 Region Association: None |
I think she's talking about this one...
Attached image(s) 
|
|
|
|
| gothspeed |
Sep 12 2011, 10:47 AM
Post
#9
|
|
Senior Member Group: Members Posts: 1,539 Joined: 3-February 09 From: SoCal Member No.: 10,019 Region Association: None |
As was mentioned it should not have to be forced too hard. Also before you use a screwdriver I would use one of these;
http://www.appletreeauto.com/CASE-SPLITTER/ there are better versions, but you get the idea. |
|
|
|
| Valy |
Sep 12 2011, 11:11 AM
Post
#10
|
|
Senior Member Group: Members Posts: 1,677 Joined: 6-April 10 From: Sunnyvale, CA Member No.: 11,573 Region Association: Northern California |
QUOTE(McMark @ Sep 12 2011, 08:40 AM) I think she's talking about this one... (IMG:style_emoticons/default/agree.gif) Bt not "she"... |
|
|
|
| r_towle |
Sep 12 2011, 11:18 AM
Post
#11
|
|
Custom Member Group: Members Posts: 24,705 Joined: 9-January 03 From: Taxachusetts Member No.: 124 Region Association: North East States |
A block of wood resting on a case tab and a good tap with a rubber mallet is the most I have needed...
Rich |
|
|
|
| Cap'n Krusty |
Sep 12 2011, 12:14 PM
Post
#12
|
|
Cap'n Krusty Group: Members Posts: 10,794 Joined: 24-June 04 From: Santa Maria, CA Member No.: 2,246 Region Association: Central California |
With one half of the case securely attached to the engine stand, you can knock the nose of the crank sideways (away from the side of the case bolted to the engine stand) using a piece of 2x4 and a BFH. If you don't have a proper Porsche type engine stand yoke, forget this method.
The Cap'n |
|
|
|
| McMark |
Sep 12 2011, 02:46 PM
Post
#13
|
|
914 Freak! Group: Retired Admin Posts: 20,180 Joined: 13-March 03 From: Grand Rapids, MI Member No.: 419 Region Association: None |
QUOTE(Valy @ Sep 12 2011, 10:11 AM) QUOTE(McMark @ Sep 12 2011, 08:40 AM) I think she's talking about this one... (IMG:style_emoticons/default/agree.gif) Bt not "she"... Whoops, typo! (IMG:style_emoticons/default/stirthepot.gif) (IMG:style_emoticons/default/lol-2.gif) |
|
|
|
| bradtho |
Sep 17 2011, 03:42 PM
Post
#14
|
|
Member Group: Members Posts: 266 Joined: 22-December 09 From: Seattle, WA Member No.: 11,165 Region Association: None |
weekend again, so I'm back at it. i tapped the 6 big one's back in some and put some PB blaster along the seam (front, back & top). No luck.
The only woodworkers clamp I've been able to find is wood and way to big. Tried Lowe's, Home Depot & Sears. I used a small bench vise and was able to get it to catch on the oil pump studs like Valy mentioned. Given everyone else's comments about it being easy I didn't want to use too much pressure, so maybe I wimped out, but I think it should have been enough to see a crack start, but no go. I'm afraid I've missed something obvious. This is my first time to split a case. Any other ideas? |
|
|
|
| McMark |
Sep 17 2011, 08:02 PM
Post
#15
|
|
914 Freak! Group: Retired Admin Posts: 20,180 Joined: 13-March 03 From: Grand Rapids, MI Member No.: 419 Region Association: None |
QUOTE(McMark @ Sep 11 2011, 05:47 PM) You can safely apply pressure by wedging a screwdriver between the crank and the front main seal. That way you have the hardened crank on one side and the rubber seal on the other and you can usually get it started there. It looks like you got all the nuts and bolts. But if it doesn't crack open with light pressure there, don't just push harder. Sometimes the sealant used on the case halves can make splitting a PITA. As mentioned... |
|
|
|
| bradtho |
Sep 17 2011, 08:04 PM
Post
#16
|
|
Member Group: Members Posts: 266 Joined: 22-December 09 From: Seattle, WA Member No.: 11,165 Region Association: None |
QUOTE(McMark @ Sep 17 2011, 07:02 PM) QUOTE(McMark @ Sep 11 2011, 05:47 PM) You can safely apply pressure by wedging a screwdriver between the crank and the front main seal. That way you have the hardened crank on one side and the rubber seal on the other and you can usually get it started there. It looks like you got all the nuts and bolts. But if it doesn't crack open with light pressure there, don't just push harder. Sometimes the sealant used on the case halves can make splitting a PITA. As mentioned... yeah, I've still got the hub on and its blocking me. you see, I broke one of the screws in it, so I'm kinda stuck with the hub on. |
|
|
|
| McMark |
Sep 17 2011, 08:07 PM
Post
#17
|
|
914 Freak! Group: Retired Admin Posts: 20,180 Joined: 13-March 03 From: Grand Rapids, MI Member No.: 419 Region Association: None |
Pry between the hub and the seal. (IMG:style_emoticons/default/wink.gif)
|
|
|
|
| bradtho |
Sep 17 2011, 08:56 PM
Post
#18
|
|
Member Group: Members Posts: 266 Joined: 22-December 09 From: Seattle, WA Member No.: 11,165 Region Association: None |
QUOTE(McMark @ Sep 17 2011, 07:07 PM) SUCCESS! So, having never done this before and with it as dirty as it was, I thought that the seal was part of the case! embarrassing or funny? You be the judge. anyway, thanks for your persistence mcmark. it was probably easier because of the hub. 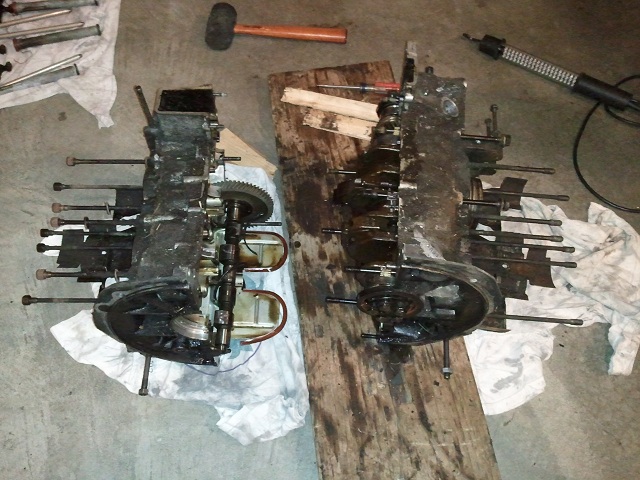 |
|
|
|
| dlee6204 |
Sep 17 2011, 09:03 PM
Post
#19
|
|
Howdy Group: Members Posts: 2,162 Joined: 30-April 06 From: Burnsville, NC Member No.: 5,956 |
Good work! (IMG:style_emoticons/default/smilie_pokal.gif)
|
|
|
|
| McMark |
Sep 18 2011, 09:27 AM
Post
#20
|
|
914 Freak! Group: Retired Admin Posts: 20,180 Joined: 13-March 03 From: Grand Rapids, MI Member No.: 419 Region Association: None |
Nice job! Some of them are more 'stuck' than others. I torn down and engine at a BBQ once and that engine happened to be the one that would NOT come apart.
|
|
|
|
|
1 User(s) are reading this topic (1 Guests and 0 Anonymous Users)
0 Members:

|
Lo-Fi Version | Time is now: 2nd April 2026 - 06:27 AM |
Invision Power Board
v9.1.4 © 2026 IPS, Inc.