|
|
|
Porsche, and the Porsche crest are registered trademarks of Dr. Ing. h.c. F. Porsche AG.
This site is not affiliated with Porsche in any way. Its only purpose is to provide an online forum for car enthusiasts. All other trademarks are property of their respective owners. |
|
|

  |

| porbmw |
 Oct 5 2012, 06:39 AM Oct 5 2012, 06:39 AM
Post
#1
|
|
Senior Member  Group: Members Posts: 818 Joined: 10-September 08 From: Vancouver, B.C. Member No.: 9,534 Region Association: None |
Any suggestions on how to refinish interior flocking of glove box...or, for that matter, best method and material/paint etc to refinish the outside of the box.
Also, how might one properly repair the nice round hole the PO put in the bottom, presumably to run some wires (IMG:style_emoticons/default/dry.gif) Need two early glove boxes, if I can't get this done right...mine have holes in them. Will post in classifieds... |
   |

 
|
| zymurgist |
Oct 5 2012, 08:23 AM
Post
#2
|
|
"Ace" Mechanic Group: Members Posts: 7,411 Joined: 9-June 05 From: Hagerstown, MD Member No.: 4,238 Region Association: None |
What is it made from? I used Plastimend to make a permanent repair on a cracked side fairing on my Ninja. That part is made of ABS plastic.
|
|
|
|
| Gint |
Oct 5 2012, 09:49 AM
Post
#3
|
|
Mike Ginter Group: Admin Posts: 16,106 Joined: 26-December 02 From: Denver CO. Member No.: 20 Region Association: Rocky Mountains |
|
|
|
|
| bobheinonen |
Oct 5 2012, 11:03 AM
Post
#4
|
|
Newbie Group: Members Posts: 10 Joined: 16-September 08 From: San Diego, CA Member No.: 9,556 Region Association: Southern California |
QUOTE(zymurgist @ Oct 5 2012, 07:23 AM)  What is it made from? I used Plastimend to make a permanent repair on a cracked side fairing on my Ninja. That part is made of ABS plastic. Just a suggestion. Find a junk box. Cut out the piece you need. Splice into the box to be repaired. Find a glue that will not melt the material (test on the junk box). Finish with flocking kit from Eastwood (www.eastwood.com)(charcoal or grey flocking kit #50730Z or #50731Z). |
|
|
|
| gothspeed |
Oct 5 2012, 03:31 PM
Post
#5
|
|
Senior Member Group: Members Posts: 1,539 Joined: 3-February 09 From: SoCal Member No.: 10,019 Region Association: None |
Does anyone make a fiberglass glove box replacement for the 914? or ABS plastic?
|
|
|
|
| porbmw |
Oct 5 2012, 10:16 PM
Post
#6
|
|
Senior Member Group: Members Posts: 818 Joined: 10-September 08 From: Vancouver, B.C. Member No.: 9,534 Region Association: None |
QUOTE(Gint @ Oct 5 2012, 08:49 AM) Thanks re the search. If I wasn't such a luddite, I'd figure it a whole lot better... Will keep at it... |
|
|
|
| zonedoubt |
Oct 24 2012, 11:10 AM
Post
#7
|
|
Canadian Member Group: Members Posts: 668 Joined: 14-May 03 From: Vancouver, BC Member No.: 696 Region Association: Canada |
I'm also looking into doing this to the glovebox. I acquired an OK glovebox from one of speed metal army's parts cars. The one in my car is shredded.
Lee Valley has a flocking kit that might bring it back to life. http://www.leevalley.com/en/wood/page.aspx...669&p=44669 |
|
|
|
| Griffinroydonald |
Oct 24 2012, 09:37 PM
Post
#8
|
|
Newbie Group: Members Posts: 49 Joined: 21-January 10 From: Kings Mtn N.C. Member No.: 11,274 Region Association: None |
I used acrylic spackling you would use on Dry wall repairs and filled a few cracks. Then painted with trunk splatter paint. I covered the splatter paint with flat black Krylon spray pain . Looked great but didn't take pictures before returning car to owner. (IMG:style_emoticons/default/chair.gif)
|
|
|
|
| Mikey914 |
Oct 24 2012, 09:40 PM
Post
#9
|
|
The rubber man Group: Members Posts: 12,772 Joined: 27-December 04 From: Hillsboro, OR Member No.: 3,348 Region Association: None |
QUOTE(gothspeed @ Oct 5 2012, 02:31 PM) Does anyone make a fiberglass glove box replacement for the 914? or ABS plastic? Fiberglass and yes, we have this on the prduction schedule right after our next big HIGHLY NEEDED PART. As soon as production is full steam on the tops, we will be showing off a few more cool parts. -Mark |
|
|
|
| JawjaPorsche |
Oct 25 2012, 07:06 AM
Post
#10
|
|
Advanced Member Group: Members Posts: 3,463 Joined: 23-July 11 From: Clayton, Georgia Member No.: 13,351 Region Association: South East States |
|
|
|
|
| Mikey914 |
Oct 25 2012, 07:09 AM
Post
#11
|
|
The rubber man Group: Members Posts: 12,772 Joined: 27-December 04 From: Hillsboro, OR Member No.: 3,348 Region Association: None |
We're only working on the inner cavity. Not the door.
|
|
|
|
| JawjaPorsche |
Oct 25 2012, 08:04 AM
Post
#12
|
|
Advanced Member Group: Members Posts: 3,463 Joined: 23-July 11 From: Clayton, Georgia Member No.: 13,351 Region Association: South East States |
My Bad! Did not read original post close enough! (IMG:style_emoticons/default/biggrin.gif)
|
|
|
|
| gothspeed |
Oct 25 2012, 08:23 AM
Post
#13
|
|
Senior Member Group: Members Posts: 1,539 Joined: 3-February 09 From: SoCal Member No.: 10,019 Region Association: None |
QUOTE(Mikey914 @ Oct 25 2012, 06:09 AM) We're only working on the inner cavity. Not the door. Cool! mine is in decent shape but I prefer one that I will not have to replace (IMG:style_emoticons/default/smile.gif) |
|
|
|
| porbmw |
Oct 25 2012, 11:12 AM
Post
#14
|
|
Senior Member Group: Members Posts: 818 Joined: 10-September 08 From: Vancouver, B.C. Member No.: 9,534 Region Association: None |
QUOTE(Mikey914 @ Oct 25 2012, 06:09 AM) We're only working on the inner cavity. Not the door. Inner cavity..... Sandbox material.... As we know....there are two sizes of inner cavities..... (IMG:style_emoticons/default/blink.gif) The early ones had the larger..... Hopefully you are, on this project, working on both..... (IMG:style_emoticons/default/smile.gif) |
|
|
|
| rfuerst911sc |
Oct 26 2012, 04:20 AM
Post
#15
|
|
Advanced Member Group: Members Posts: 2,158 Joined: 4-May 06 From: Dahlonega , Georgia Member No.: 5,980 Region Association: South East States |
Flocking is available at most craft stores. When I did mine I used spray adhesive and then just spread/dropped the flocking on the glue. Let it dry and then used a vacumn to suck up what hadn't stuck to the glue. It was an easy cheap repair and has held up for 2+ years now.
|
|
|
|
| porbmw |
Oct 26 2012, 06:27 AM
Post
#16
|
|
Senior Member Group: Members Posts: 818 Joined: 10-September 08 From: Vancouver, B.C. Member No.: 9,534 Region Association: None |
QUOTE(rfuerst911sc @ Oct 26 2012, 03:20 AM) Flocking is available at most craft stores. When I did mine I used spray adhesive and then just spread/dropped the flocking on the glue. Let it dry and then used a vacumn to suck up what hadn't stuck to the glue. It was an easy cheap repair and has held up for 2+ years now. I"m going to give that a go. I have a real ratty one I"ll experiment on first....and hopefully will hone the process to something acceptable.... |
|
|
|
| zonedoubt |
Nov 21 2012, 09:30 PM
Post
#17
|
|
Canadian Member Group: Members Posts: 668 Joined: 14-May 03 From: Vancouver, BC Member No.: 696 Region Association: Canada |
Start with a crusty glovebox...
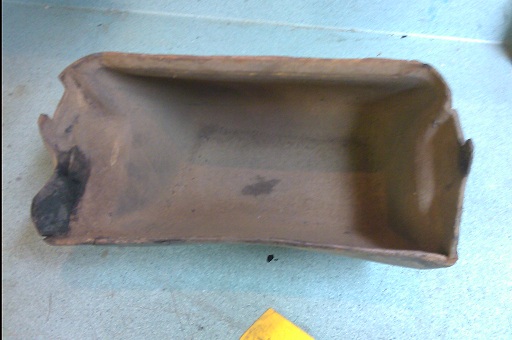 Straighten out the warped cardboard. Mist with water, clamp, leave overnight to dry. 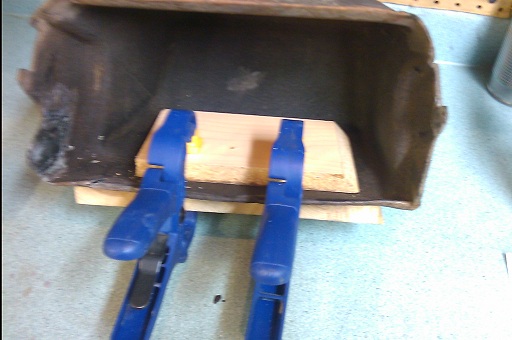 Apply glue, flocking, leave overnight to dry. 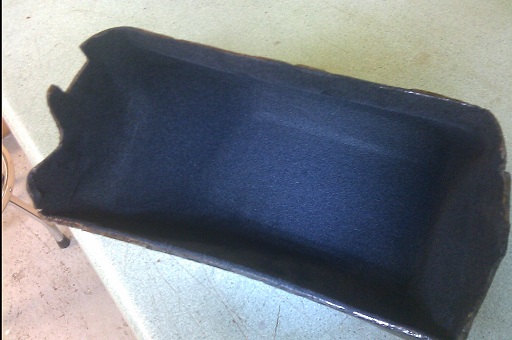 Velvety finish. A flocking good time.  |
|
|
|
| Chris Pincetich |
Nov 21 2012, 09:41 PM
Post
#18
|
|
B-) Group: Members Posts: 2,082 Joined: 3-October 05 From: Point Reyes Station, CA Member No.: 4,907 Region Association: Northern California |
OMG they are a pain in the @ss to re-install
any good tips?? Mine is still on the shelf, I cracked it trying to squeeze it back in and temporarily gave up (IMG:style_emoticons/default/dry.gif) Help! (IMG:style_emoticons/default/beerchug.gif) |
|
|
|
| zonedoubt |
Nov 21 2012, 09:43 PM
Post
#19
|
|
Canadian Member Group: Members Posts: 668 Joined: 14-May 03 From: Vancouver, BC Member No.: 696 Region Association: Canada |
I can't see any other way to get them in without a bit of a squeeze. Short of pulling the dash out that is.
|
|
|
|
|
1 User(s) are reading this topic (1 Guests and 0 Anonymous Users)
0 Members:

|
Lo-Fi Version | Time is now: 2nd April 2026 - 08:33 AM |
Invision Power Board
v9.1.4 © 2026 IPS, Inc.