|
|
|
Porsche, and the Porsche crest are registered trademarks of Dr. Ing. h.c. F. Porsche AG.
This site is not affiliated with Porsche in any way. Its only purpose is to provide an online forum for car enthusiasts. All other trademarks are property of their respective owners. |
|
|

  |

| orbit398 |
 Jan 25 2016, 10:39 AM Jan 25 2016, 10:39 AM
Post
#1
|
|
Member  Group: Members Posts: 139 Joined: 29-April 15 From: League city, Texas Member No.: 18,681 Region Association: Southwest Region |
Putting my engine back together and have a few questions on the thermostat. I did the check to make sure it grows to the proper length (1.81" at 150 -160 degree water) and it seems close enough. Air flappers all operate fine, accept I think there is a little interference with the drivers side flap. If I try to close the flap all the way, it appears to hit a small piece on the aluminum large air bracket. See pics. I can't shift that flapper door down the bar a bit allowing it to clear this small piece of aluminum sticking out. I can modify the flapper a bit so it'd close all the way but figured I'd ask folks.
Next Question, are there instructions on how to adjust the cable operation of the air flappers. I assume I need to pull the thermostat to it's extended length and secure the small cable to the flapper bar location at that cable length. The result being that when the thermostat is extended, the cable should allow the flapper bar spring to fully open the air flappers. thanks for any advice Attached image(s) 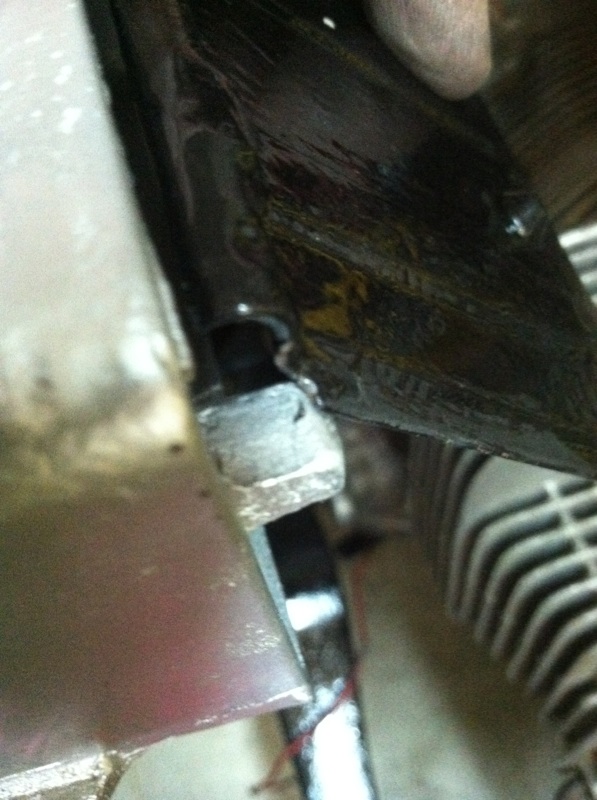 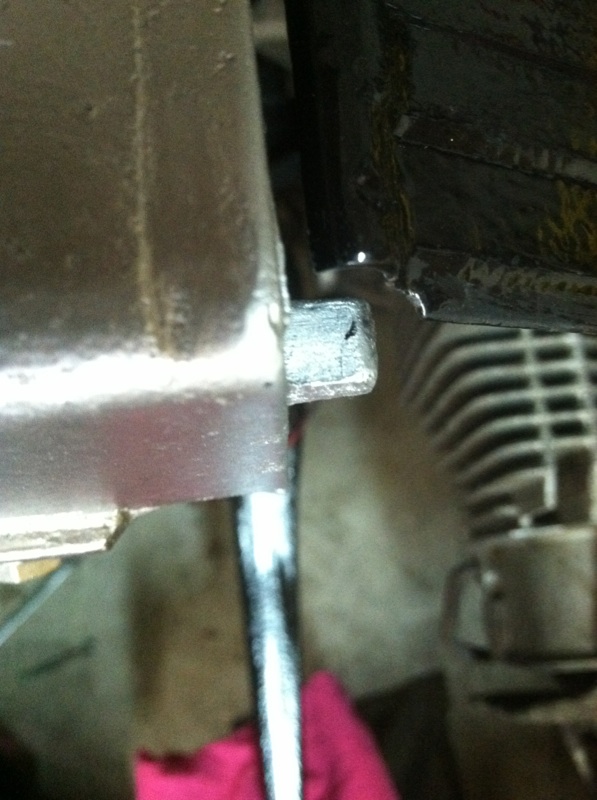
|
   |

 
|
| ndfrigi |
Jan 25 2016, 10:48 AM
Post
#2
|
|
Advanced Member Group: Members Posts: 2,978 Joined: 21-August 11 From: Orange County Member No.: 13,474 Region Association: Southern California |
In regards to the driver side flap, i believed it will not close all the way so it will flow some air.
|
|
|
|
| iankarr |
Jan 25 2016, 03:58 PM
Post
#3
|
|
The wrencher formerly known as Cuddy_K Group: Members Posts: 2,595 Joined: 22-May 15 From: Heber City, UT Member No.: 18,749 Region Association: Intermountain Region |
The flap doesn't have to go all the way down. it's all about the rear of the flap cutting off or allowing air to go down to the oil cooler.
|
|
|
|
| TheCabinetmaker |
Jan 25 2016, 08:28 PM
Post
#4
|
|
I drive my car everyday Group: Members Posts: 8,373 Joined: 8-May 03 From: Tulsa, Ok. Member No.: 666 |
QUOTE(cuddyk @ Jan 25 2016, 04:58 PM)  The flap doesn't have to go all the way down. it's all about the rear of the flap cutting off or allowing air to go down to the oil cooler. That is on the passenger side. He's referring to the drivers side flap. Ndfrigi said it right. The nub that it hits is the stop. |
|
|
|
| Tbrown4x4 |
Jan 26 2016, 04:00 AM
Post
#5
|
|
Senior Member Group: Members Posts: 708 Joined: 13-May 14 From: Port Orchard, WA Member No.: 17,338 Region Association: None |
My cable had come off the pulley. I used a heat gun to expand the bellows and re-install it.
|
 |
|
| iankarr |
Jan 26 2016, 07:41 AM
Post
#6
|
|
The wrencher formerly known as Cuddy_K Group: Members Posts: 2,595 Joined: 22-May 15 From: Heber City, UT Member No.: 18,749 Region Association: Intermountain Region |
QUOTE(The Cabinetmaker @ Jan 25 2016, 09:28 PM) QUOTE(cuddyk @ Jan 25 2016, 04:58 PM) The flap doesn't have to go all the way down. it's all about the rear of the flap cutting off or allowing air to go down to the oil cooler. That is on the passenger side. He's referring to the drivers side flap. Ndfrigi said it right. The nub that it hits is the stop. Sorry...brain fart. Or cramp. Or crampy fart! |
|
|
|
| rhodyguy |
Jan 26 2016, 10:17 AM
Post
#7
|
|
Chimp Sanctuary NW. Check it out. Group: Members Posts: 22,252 Joined: 2-March 03 From: Orion's Bell. The BELL! Member No.: 378 Region Association: Galt's Gulch |
With the cable unattached the vanes should be in the cooling position (default). To attach the cable, engine cold thermo not expanded, manually push the rod towards the rear of the car and then attach the cable. As the engine warms up, the thermo expands and the cooling flaps should move to their cooling position. A third hand makes the cable attachment a whole lot easier. If you are putting in a new cable DO NOT cut it too short after the install. Leave at least an inch and a little more is better. Too short and it's damn near impossible to reattach if you have to uncouple it. Even with a third hand, it's a bitch. Then you surrender and just spring for a new cable. btdt.
|
|
|
|
| mankowski |
Jan 26 2016, 11:01 PM
Post
#8
|
|
Member Group: Members Posts: 128 Joined: 7-February 10 From: Portland, Oregon Member No.: 11,335 Region Association: Pacific Northwest |
In my experience, it's better to tighten the cable to the pinch nut on the flapper when the engine is at full operating temperature.
If you tighten the nut to a tight cable when the engine is cold (and holding the flaps down manually), the thermostat may not expand enough to allow the flaps to open fully when hot. This means there will be less air flowing over the oil cooler at full engine temps. Better to error on the side of running a little cooler and taking a little longer to warmup than to run too hot when the engine is completely warmed up. |
|
|
|
| orbit398 |
Jan 28 2016, 02:43 PM
Post
#9
|
|
Member Group: Members Posts: 139 Joined: 29-April 15 From: League city, Texas Member No.: 18,681 Region Association: Southwest Region |
QUOTE(rhodyguy @ Jan 26 2016, 10:17 AM) With the cable unattached the vanes should be in the cooling position (default). To attach the cable, engine cold thermo not expanded, manually push the rod towards the rear of the car and then attach the cable. As the engine warms up, the thermo expands and the cooling flaps should move to their cooling position. A third hand makes the cable attachment a whole lot easier. If you are putting in a new cable DO NOT cut it too short after the install. Leave at least an inch and a little more is better. Too short and it's damn near impossible to reattach if you have to uncouple it. Even with a third hand, it's a bitch. Then you surrender and just spring for a new cable. btdt. I think you mean "front" of the car. If I understand correctly. I pulled the thermostat forward until it could not expand any more, thus the cable was longer. I clamped/secured it. At this time, the flaps were up as that's the default position via the spring and the cable was hypothetically in it thermostat hot position. Once I let the thermostat go, it pulled the flaps down a bit as the thermo was cold. |
|
|
|
| rhodyguy |
Jan 28 2016, 03:56 PM
Post
#10
|
|
Chimp Sanctuary NW. Check it out. Group: Members Posts: 22,252 Joined: 2-March 03 From: Orion's Bell. The BELL! Member No.: 378 Region Association: Galt's Gulch |
As for the default state, the clamping tab is near verticle in that mode and will go NO further forward with no wire attached. As in towards the headlights. When the thermostat is in the constricted state (non expanded) the operational length of the wire is shorter, thus NOT in a full cooling state allowing the oil to warm up. While warming, The thermo expands. the operational length INCREASES, and the vanes move towards the default. If you attach the wire to the bar, with the thermo constricted, and the bar tab is in the fully forward (towards the headlights) the expansion will have 0 effect upon the vane positioning. some owners living in warmer climates skip the thermostat system entirely as they don't seem to need the 'warm up' aspect. I seem to remember some of those owners even rivet the the vanes in the default state. Also, I imagine using the wire to strong arm expand a cold thermo might be a good way to ruin it.
|
|
|
|
| rhodyguy |
Jan 28 2016, 04:20 PM
Post
#11
|
|
Chimp Sanctuary NW. Check it out. Group: Members Posts: 22,252 Joined: 2-March 03 From: Orion's Bell. The BELL! Member No.: 378 Region Association: Galt's Gulch |
As for reply #8, I think one should check for full function regardless of the method of wire attachment and the temp when attached.
|
|
|
|
| Dave_Darling |
Jan 28 2016, 04:32 PM
Post
#12
|
|
914 Idiot Group: Members Posts: 15,335 Joined: 9-January 03 From: Silicon Valley / Kailua-Kona Member No.: 121 Region Association: Northern California |
I always got the car to operating temp (or close to it), then loosened the clamp that holds the wire, let the flaps go to full open, and then tightened the clamp on the wire. The "cold" position falls wherever it wants at that point, but you're sure that the "warm" position is correct, or as correct as you can get it.
--DD |
|
|
|
| rhodyguy |
Jan 28 2016, 05:24 PM
Post
#13
|
|
Chimp Sanctuary NW. Check it out. Group: Members Posts: 22,252 Joined: 2-March 03 From: Orion's Bell. The BELL! Member No.: 378 Region Association: Galt's Gulch |
Perhaps that is a better way. I don't know. Do the factory manuals include this procedure?
|
|
|
|
| 914ltd |
Jan 30 2016, 08:26 AM
Post
#14
|
|
Member Group: Members Posts: 245 Joined: 18-April 03 From: Peoria, IL Member No.: 581 Region Association: None |
As for the workshop manual, it gives only the heated dimension of the thermostat. With that information, all thermostats are OK! We had a 914 with a freshly rebuilt engine arrive here in summer from Chicago (150 miles) for overheating questions. The flaps were set with a bad thermostat. I installed a used thermo and changed oil, OK so far. I am almost out of good used thermostats, I'm sure this has been addressed but is there a (reliable) source? Thanks, Brad |
|
|
|
| BeatNavy |
Jan 30 2016, 12:33 PM
Post
#15
|
|
Certified Professional Scapegoat Group: Members Posts: 2,962 Joined: 26-February 14 From: Easton, MD Member No.: 17,042 Region Association: MidAtlantic Region |
QUOTE(914ltd @ Jan 30 2016, 09:26 AM) I am almost out of good used thermostats, I'm sure this has been addressed but is there a (reliable) source? Thanks, Brad The only source I'm aware of is Awesome Powdercoat. That's where I got mine. |
|
|
|
| 914ltd |
Jan 30 2016, 01:09 PM
Post
#16
|
|
Member Group: Members Posts: 245 Joined: 18-April 03 From: Peoria, IL Member No.: 581 Region Association: None |
QUOTE(BeatNavy @ Jan 30 2016, 10:33 AM) QUOTE(914ltd @ Jan 30 2016, 09:26 AM) I am almost out of good used thermostats, I'm sure this has been addressed but is there a (reliable) source? Thanks, Brad The only source I'm aware of is Awesome Powdercoat. That's where I got mine. Wow, thanks! Near the price I've seen used ones go for and these have a 2 year warranty. Brad |
|
|
|
|
1 User(s) are reading this topic (1 Guests and 0 Anonymous Users)
0 Members:

|
Lo-Fi Version | Time is now: 2nd April 2026 - 08:33 AM |
Invision Power Board
v9.1.4 © 2026 IPS, Inc.