|
|
|
Porsche, and the Porsche crest are registered trademarks of Dr. Ing. h.c. F. Porsche AG.
This site is not affiliated with Porsche in any way. Its only purpose is to provide an online forum for car enthusiasts. All other trademarks are property of their respective owners. |
|
|

  |

| friethmiller |
 Oct 27 2022, 07:50 AM Oct 27 2022, 07:50 AM
Post
#61
|
|
Senior Member  Group: Members Posts: 1,206 Joined: 10-February 19 From: Austin, TX Member No.: 22,863 Region Association: Southwest Region |
QUOTE(stoneman30hotmail @ Sep 21 2022, 06:41 PM)  That does look like a nice way to handle it with the frame rotisserie. And the braces held well enough to replace all that structure and not have the car bend and twist? I can well imagine you had a big budget to replace all those parts to show quality. Do you have an estimate on parts? For this build the parts and services totaled more than $30k. Having to rebuild the engine twice certainly didn't help with keeping cost down. There were other expenses that could have been avoided, if I had known WTF I was doing (IMG:style_emoticons/default/biggrin.gif) I did not have bending or twisting problems - based on my before/after measurements. The removal/replacement of the rear suspension points was what gave me the most trouble. If you can first verify all the underbody measurements are good and then avoid removing these components, the easier it will be for your restoration. For example, even if you replace the outer suspension console in the "exact" position, it can move on you during the welding process. You must go slow and cool your welds. If you have to replace any of the rear consoles, I'd highly recommend a jig. This will help you get it back in the correct spot. This can be done in a number of ways (i.e. welding metal, wood, etc). Looking back, there was so much I could have done a better job on. My "learning as you go" often got me in trouble. A lot of times it forced me to have to redo my work. It's all about the journey on something like this, though. Driving it now is truly a thing of joy for me. I have no plans to ever sell it, either. What value do you put on something like that?  |
   |

 
|
| mepstein |
Oct 27 2022, 10:28 AM
Post
#62
|
|
914-6 GT in waiting Group: Members Posts: 20,587 Joined: 19-September 09 From: Landenberg, PA/Wilmington, DE Member No.: 10,825 Region Association: MidAtlantic Region |
Attached image(s) 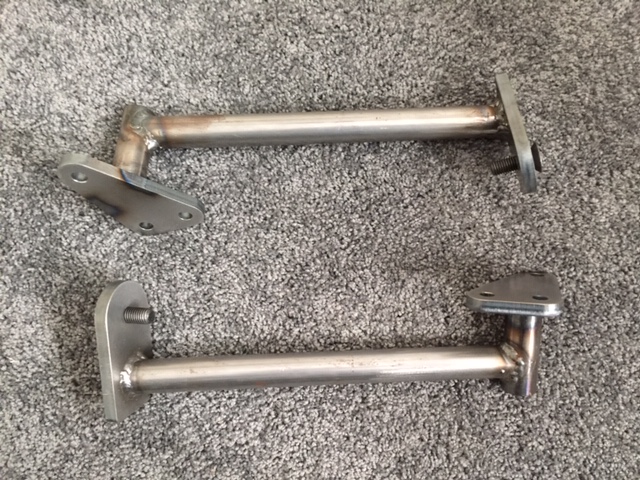 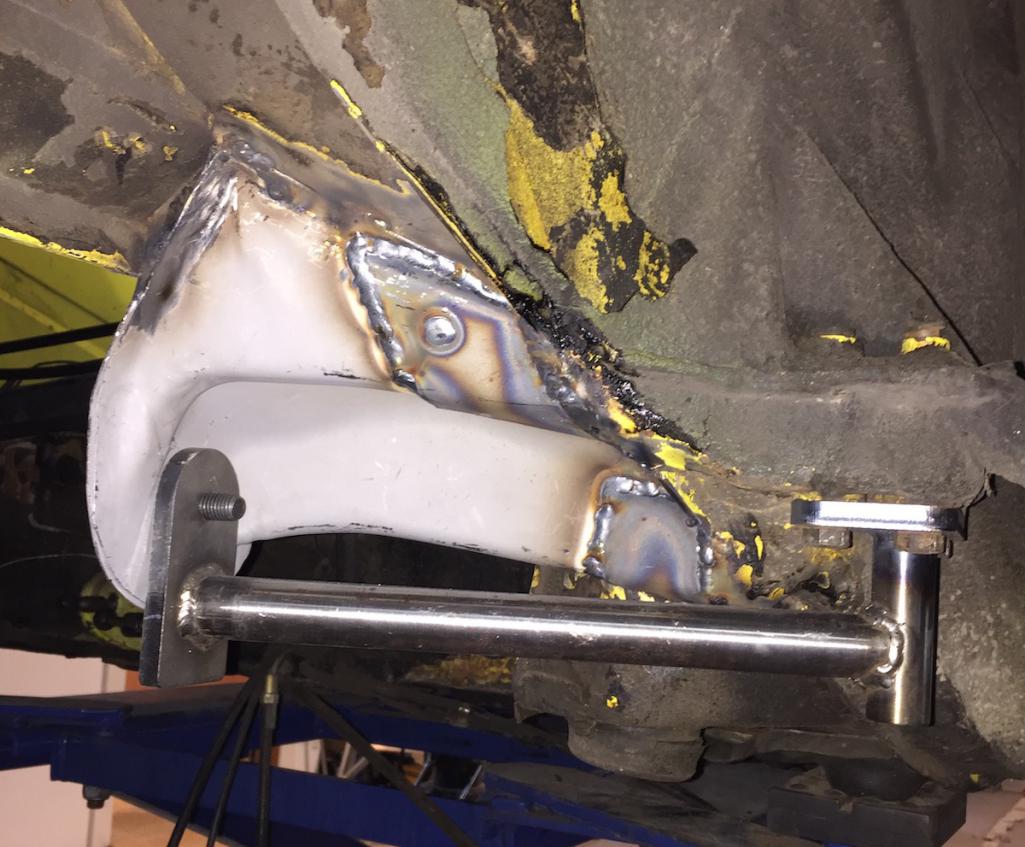
|
 |
|
| DaveB |
Oct 27 2022, 12:32 PM
Post
#63
|
|
Member Group: Members Posts: 173 Joined: 25-November 21 From: Portland, Oregon Member No.: 26,107 Region Association: Pacific Northwest |
This is what I picked-up:
 I found too many suspect parts and overall WTF moments as I dug into the car. I am looking at a 2 to 3 year ground-up build to get this the way I want it. I have similar rust to what you have. My first step was to stripped it down to this: 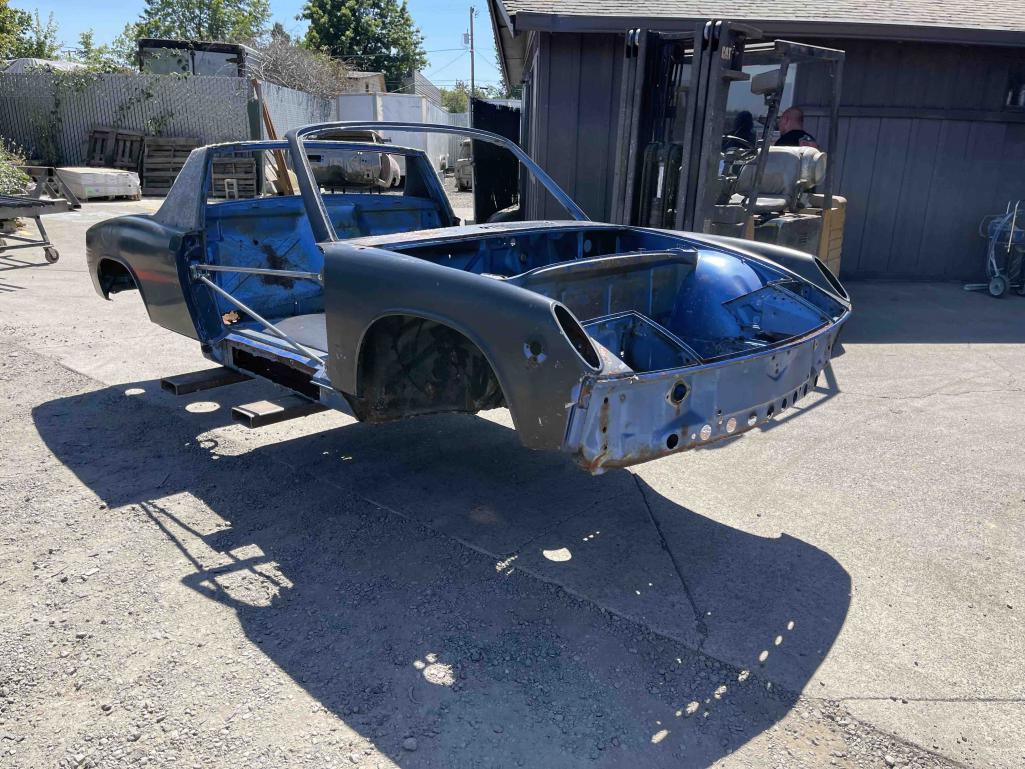 I've got the chassis and body parts at a chemical dip plant. In preparation for the build I have most of the replacement sheetmetal, rebuilt or new suspension, rebuilt transmission and will finish the engine rebuild next month. I still need to build jigs and fixtures. There are sheetmetal parts that I can't get and will need to make. I also went back and took some additional courses for MIG and TIG welding. With all the parts and material I have about $23K invested. $6.2K of that is suspension and brakes. I've probably got another $25K to go to get it completed. That's with me doing bodywork, engine build, wiring, final assembly and having a shop do the exterior paint. I could buy a good well sorted out 914 for $25K to $30K. Then I'd want to tweek the suspension, drop the engine and get more power, might as well rebuild the transmission while I'm there, Brembos might fit, lets convert to a 5 lug, etc. Might as well start with a clean slate up front. You can be frugal if you have the equipment to do the job. You can learn almost everything needed. Good advice and help on this forum. Just don't use the 914 for practice. (IMG:style_emoticons/default/biggrin.gif) |
|
|
|
| bbrock |
Oct 27 2022, 04:34 PM
Post
#64
|
|
914 Guru Group: Members Posts: 5,269 Joined: 17-February 17 From: Montana Member No.: 20,845 Region Association: Rocky Mountains |
QUOTE(stoneman30hotmail @ Oct 26 2022, 07:09 PM) Is there something to do short of using a whole new inner wheelhouse and engine compartment longitudinal member and replacing the suspension and engine mounts? ...even though there looks to be a lot of good metal around the hole? I don't think I could feasibly fab the metal around the heater tube. Most of the rustoration threads show a reinforcement layer on the inner long there, but I don't see that the restoration design part comes with one. Is that right? You've made some good progress there. Nice to start getting an accurate picture of what is needed. I think there are 3 options in order of my preference: 1. fabricate the patches 2. place a WTB in the classifieds to see if someone will cut the bits you need out of a donor. 3. buy the RD parts. I only place RD parts last because of the size of the repair you need to make. In general, those panels make the easiest and nicest repairs if you really need to replace full panels. Seems like overkill for what I'm seeing in your pics. I would encourage you to give fabrication a shot. I didn't know jack didley about fabrication when I started my project. There are some great youtube vids on metal shaping that might give you inspiration. You might be surprised what you can do and it doesn't cost much more than time. If you find your really can't do it, you can always move on to one of the other options. |
|
|
|
| 930cabman |
Oct 27 2022, 04:47 PM
Post
#65
|
|
Advanced Member Group: Members Posts: 4,572 Joined: 12-November 20 From: Buffalo Member No.: 24,877 Region Association: North East States |
QUOTE(mepstein @ Oct 27 2022, 10:28 AM) These look great, but I would like to see another pickup point, maybe trans mount(s)? |
|
|
|
| stoneman30hotmail |
Oct 29 2022, 11:35 AM
Post
#66
|
|
Member Group: Members Posts: 80 Joined: 10-September 22 From: Greensboro, NC Member No.: 26,834 Region Association: South East States |
Exposed a bit more.
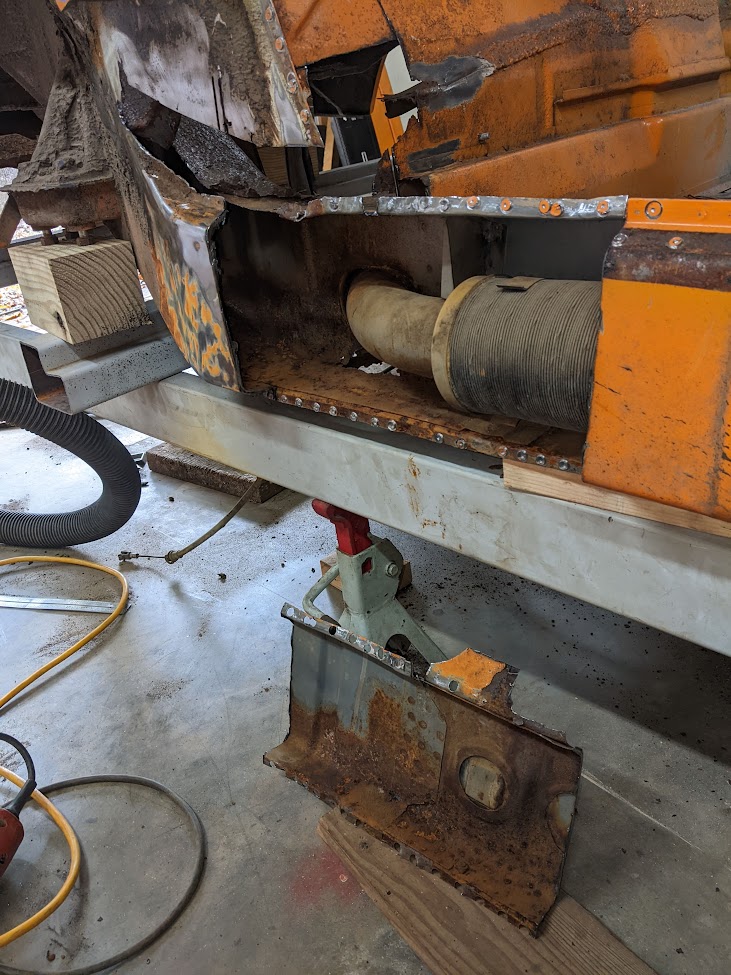 So I'm wondering how much of this I can reuse. If I clean these up, how do we regard the rust that is likely between the sheets? I should start a video series or rename this thread "Porsche 914 on a budget". Note that I have the car on some sort of warehouse shelving beams which I got from local DH Griffin wrecking. I got some 1.5" square tubing from there too for door braces and mounts at the bumpers for later rotisserie from some odd panel frames. Whatever I can haul off for $0.5/lb. I didn't find useful sheet metal yet. Though the tubing was mounted to 1/8" plate if I can use that. |
|
|
|
| dlee6204 |
Oct 29 2022, 12:58 PM
Post
#67
|
|
Howdy Group: Members Posts: 2,162 Joined: 30-April 06 From: Burnsville, NC Member No.: 5,956 |
QUOTE(stoneman30hotmail @ Oct 29 2022, 01:35 PM) Exposed a bit more. Whatever I can haul off for $0.5/lb. I didn't find useful sheet metal yet. Though the tubing was mounted to 1/8" plate if I can use that. Ever make it to western NC? I can hook you up with sheet metal scrap for cheap. Btw Keep up the work. I'm interested to see what you do with this one. |
|
|
|
| bbrock |
Oct 29 2022, 04:03 PM
Post
#68
|
|
914 Guru Group: Members Posts: 5,269 Joined: 17-February 17 From: Montana Member No.: 20,845 Region Association: Rocky Mountains |
QUOTE(stoneman30hotmail @ Oct 29 2022, 11:35 AM) So I'm wondering how much of this I can reuse. If I clean these up, how do we regard the rust that is likely between the sheets? I should start a video series or rename this thread "Porsche 914 on a budget". Note that I have the car on some sort of warehouse shelving beams which I got from local DH Griffin wrecking. I got some 1.5" square tubing from there too for door braces and mounts at the bumpers for later rotisserie from some odd panel frames. Whatever I can haul off for $0.5/lb. I didn't find useful sheet metal yet. Though the tubing was mounted to 1/8" plate if I can use that. Flood it with phosphoric acid to dissolve the rust. Ospho is what most use. Home Despot and Lowes used to carry a different brand for about half the price but they disappeared off the shelves about half way through my project. Don't know if they are back now. Anyway, Ospho will clean the parts to where you can make a better assessment. Usually they clean up nice and the Ospho can also soak in behind metal layers to attack that hidden rust you are asking about. You are on a budget so you'll have to decide how far you go, but after I got mine all clean, I put a coat or two of epoxy primer on all the internals before closing things back up. On double layer areas, I let the epoxy run down in between to try to coat as much as I could. When everything was closed back up, I treated all the internals with Eastwood Internal Frame Coating and followed with 3M Cavity Wax Plus. Possibly overkill, but as rust prone as our cars are, I think not. If I only did one thing, I'd opt for the Cavity Wax. The stuff is awesome. |
|
|
|
| dlee6204 |
Oct 29 2022, 04:06 PM
Post
#69
|
|
Howdy Group: Members Posts: 2,162 Joined: 30-April 06 From: Burnsville, NC Member No.: 5,956 |
QUOTE(bbrock @ Oct 29 2022, 06:03 PM) You are on a budget so you'll have to decide how far you go, but after I got mine all clean, I put a coat or two of epoxy primer on all the internals before closing things back up. On double layer areas, I let the epoxy run down in between to try to coat as much as I could. When everything was closed back up, I treated all the internals with Eastwood Internal Frame Coating and followed with 3M Cavity Wax Plus. Possibly overkill, but as rust prone as our cars are, I think not. If I only did one thing, I'd opt for the Cavity Wax. The stuff is awesome. (IMG:style_emoticons/default/agree.gif) That's pretty much my coating treatment too. |
|
|
|
| stoneman30hotmail |
Nov 2 2022, 07:09 PM
Post
#70
|
|
Member Group: Members Posts: 80 Joined: 10-September 22 From: Greensboro, NC Member No.: 26,834 Region Association: South East States |
Thanks for the replies.
Do you mean this stuff for rust remove? https://www.homedepot.com/p/Klean-Strip-1-G...30220/100406369 ? Looks like just welding in patches here would be the way to go. In the pic I cut out what I would fill in the inside of the inner long and could probably do the couple bends. I did find some 18 gauge sheet at local Alro supply. Is it important to stagger the seams for the inner and outer sheets? I.e., cut more on the other side of this? I'm thinking to do top to bottom there since it's all pitted. 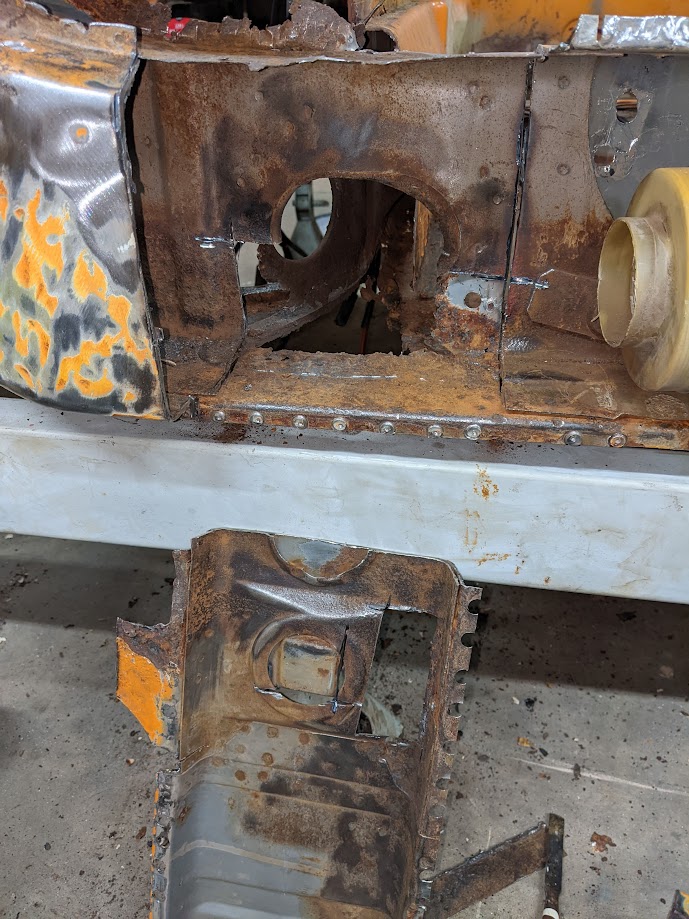 The upper part of the inner long looks so pitted that I'd like to replace that even though it feels a lot more solid than it looks. But I'm thinking the lower part is ok so I wouldn't want to get the whole RD part and rather leave the suspension mount. Seems like it would be hard to fab all the curves. How would I find a donor part there? 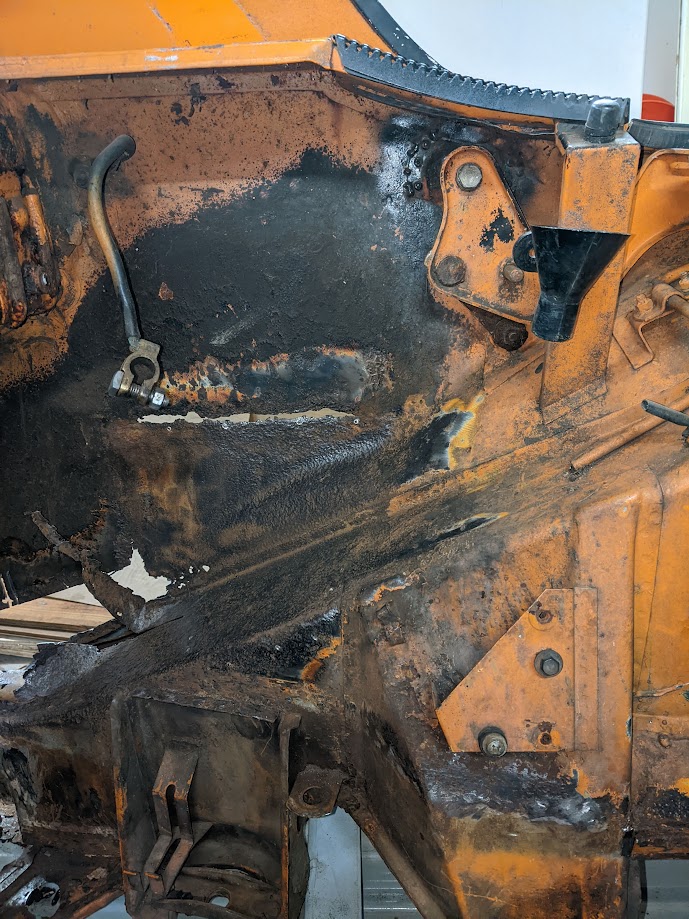 |
|
|
|
| Superhawk996 |
Nov 2 2022, 07:28 PM
Post
#71
|
|
914 Guru Group: Members Posts: 7,767 Joined: 25-August 18 From: Woods of N. Idaho Member No.: 22,428 Region Association: Galt's Gulch |
This piece of sheet metal from Auto Atlanta is what you want
It will save you a lot of time trying to patch or duplicate the compound curves in this area. Even if you cut up this part rather then replacing it wholesale - it will be easier and look better. Attached thumbnail(s) 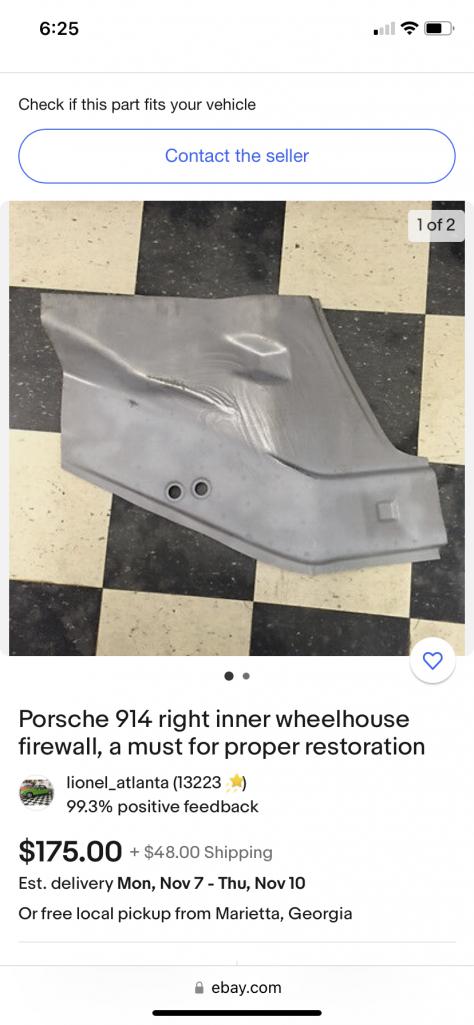
|
|
|
|
| bbrock |
Nov 2 2022, 10:44 PM
Post
#72
|
|
914 Guru Group: Members Posts: 5,269 Joined: 17-February 17 From: Montana Member No.: 20,845 Region Association: Rocky Mountains |
QUOTE(stoneman30hotmail @ Nov 2 2022, 07:09 PM) Do you mean this stuff for rust remove? https://www.homedepot.com/p/Klean-Strip-1-G...30220/100406369 ? Yep. |
|
|
|
| stoneman30hotmail |
Nov 4 2022, 05:27 PM
Post
#73
|
|
Member Group: Members Posts: 80 Joined: 10-September 22 From: Greensboro, NC Member No.: 26,834 Region Association: South East States |
QUOTE(Superhawk996 @ Nov 2 2022, 09:28 PM) This piece of sheet metal from Auto Atlanta is what you want It will save you a lot of time trying to patch or duplicate the compound curves in this area. Even if you cut up this part rather then replacing it wholesale - it will be easier and look better. What's the difference between ebay autoatlanta and autoatlanta? |
|
|
|
| Superhawk996 |
Nov 5 2022, 07:46 AM
Post
#74
|
|
914 Guru Group: Members Posts: 7,767 Joined: 25-August 18 From: Woods of N. Idaho Member No.: 22,428 Region Association: Galt's Gulch |
QUOTE(stoneman30hotmail @ Nov 4 2022, 07:27 PM) QUOTE(Superhawk996 @ Nov 2 2022, 09:28 PM) This piece of sheet metal from Auto Atlanta is what you want It will save you a lot of time trying to patch or duplicate the compound curves in this area. Even if you cut up this part rather then replacing it wholesale - it will be easier and look better. What's the difference between ebay autoatlanta and autoatlanta? None that I’m aware of. I’ve purchased parts both via eBay and online without issue. |
|
|
|
| stoneman30hotmail |
Jan 1 2023, 02:45 PM
Post
#75
|
|
Member Group: Members Posts: 80 Joined: 10-September 22 From: Greensboro, NC Member No.: 26,834 Region Association: South East States |
I'm glad to see my thread made it through the hack, thanks!
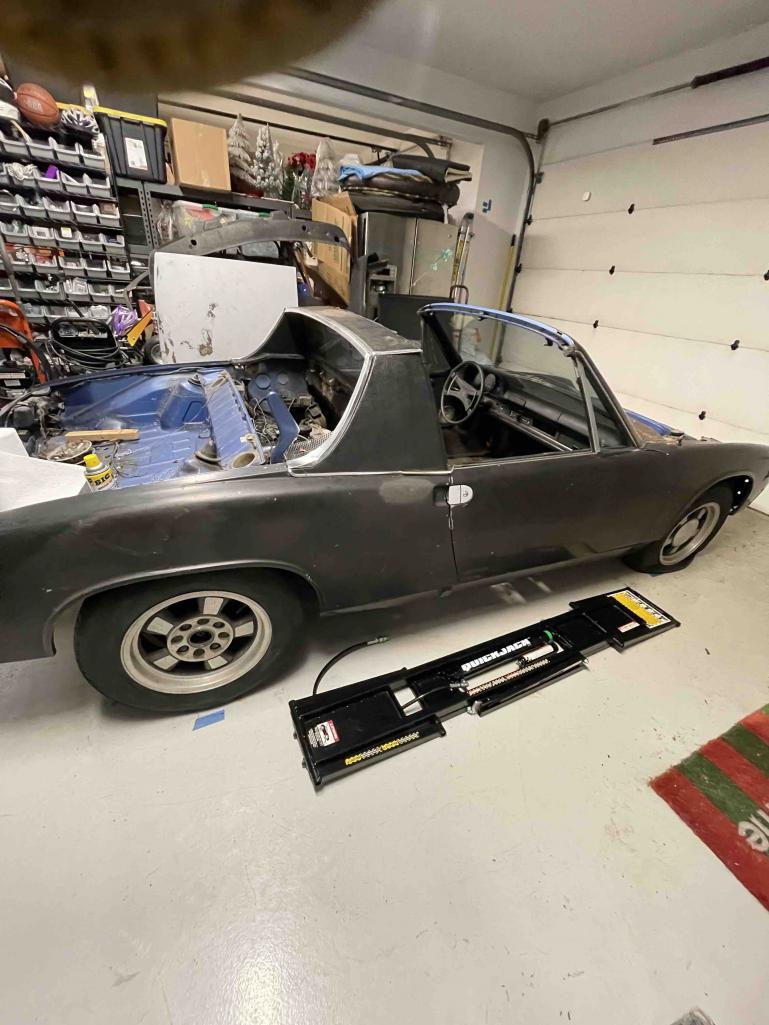
There was a cold spell for a while in NC but it's tolerable warm now. So making some progress. DOOR GAP: I'm concerned with the door gap. I was maybe over excited about closing the hell hole and thinking welding behind the door was no problem. 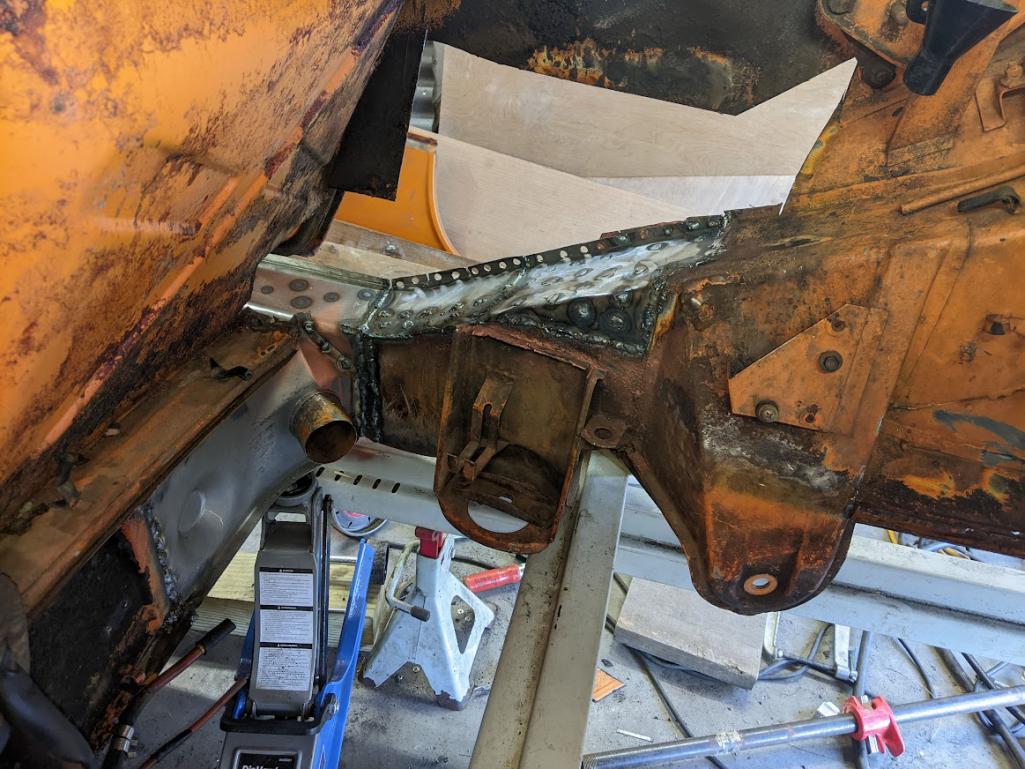 However I wonder that welding shortened the engine compartment and pushed the fender and door sill forward. Is that possible? I think it was still ok after welding forward. The top looks ok. (I tried pushing with the turnbuckle till it buckled). 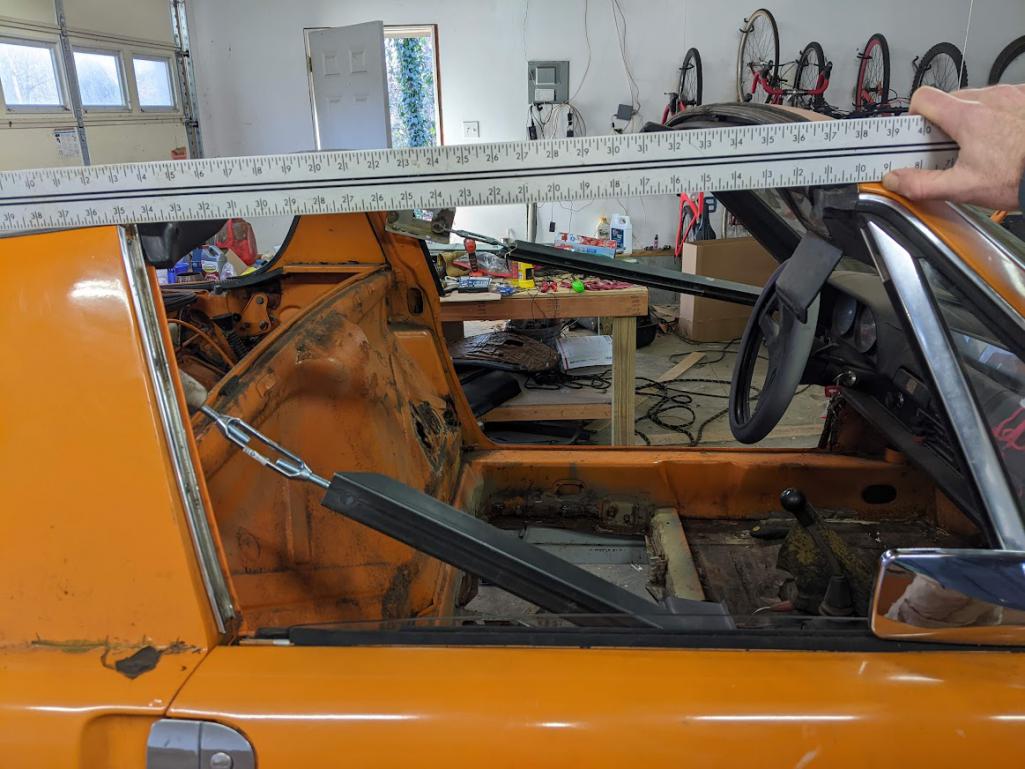 But it looks tight where the door is. 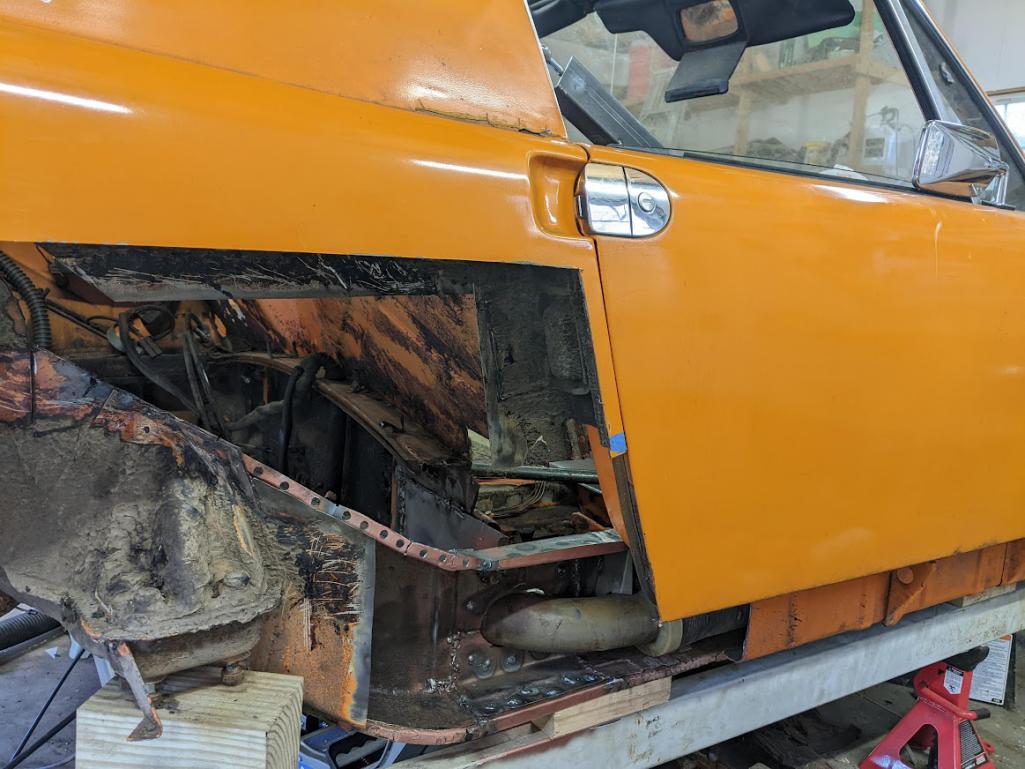 Anyway, I'm wondering what to do with it now. The floor will come out. So I could cut the long and somehow reweld some space. I also wonder if I weld hard on the inner wheelhouse if it will pull back. Or somehow push on the bottom while welding up the rest. 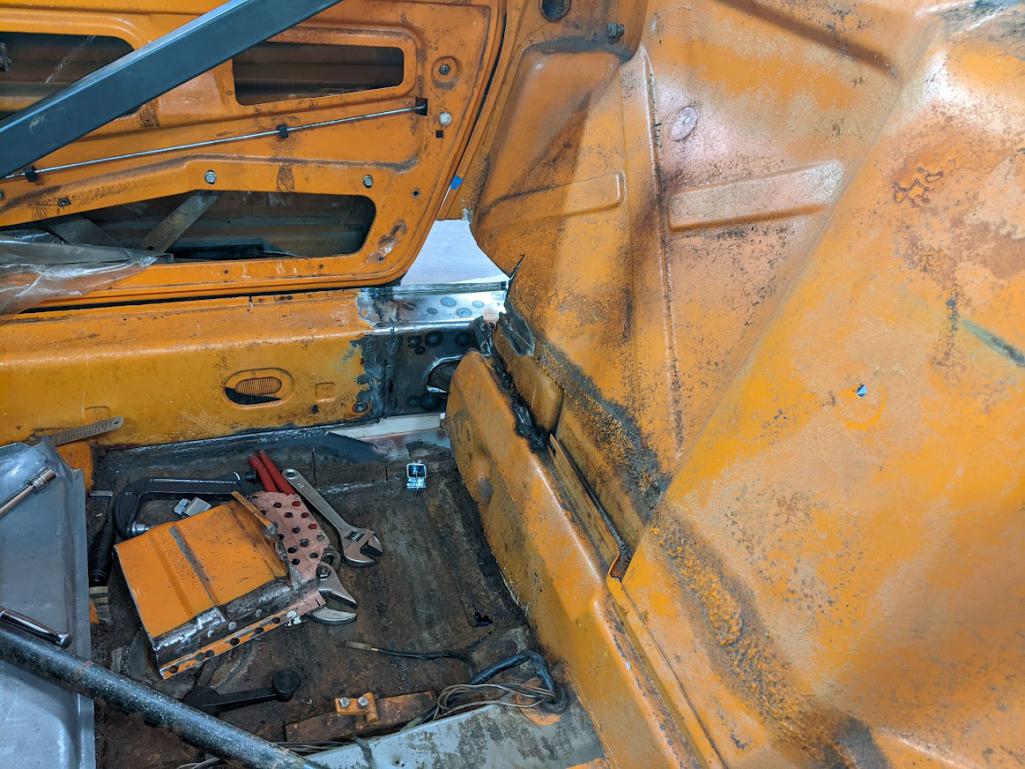 |
|
|
|
| Dlee6205 |
Jan 1 2023, 06:14 PM
Post
#76
|
|
Member Group: Members Posts: 89 Joined: 9-December 22 From: Burnsville, NC Member No.: 27,017 Region Association: South East States |
Looks like you lost 1/16"? Maybe a smidge more? Was the door mounted the whole time? I think it needs to be fixed now. I don't think any more heat or welding additional panels will make this situation better.
One idea is to cut the long, add a turnbuckle right over the new seam/gap, adjust to correct door gap and weld back up. |
|
|
|
| Geezer914 |
Jan 1 2023, 08:01 PM
Post
#77
|
|
Geezer914 Group: Members Posts: 2,260 Joined: 18-March 09 From: Salem, NJ Member No.: 10,179 Region Association: North East States |
I would stop working on this car and look for a car in better shape and use this for a parts car. You are gung ho now, but the amount of time you are going to spend repairing the amount of rust is going to get old fast. If the body is in this bad of shape, what shape are the engine, brakes and suspension in? If you are going to spend 30 grand or more trying to restore this car, you can buy a really nice California car with little rust and be driving it now, not 5 years from now! Walk away before it's too late.
|
|
|
|
| 76-914 |
Jan 1 2023, 09:17 PM
Post
#78
|
|
Repeat Offender & Resident Subaru Antagonist Group: Members Posts: 13,876 Joined: 23-January 09 From: Temecula, CA Member No.: 9,964 Region Association: Southern California |
Glad to see you navigated past the nay sayers. Desire and determination will go a lot further than parts and tools alone. Yes it shrunk. You're not letting the welds cool long enough between welds. If working in one area you should blow air on each weld until it is cooled enough to lay your pecker on it. That's about 3-5 seconds. I used to do 3 spot welds then cool but there was still a small amount of shrinkage. Buy that sidewall piece behind the battery. They're ~$150 and a lot easier than fabricating that piece. Since you're doing the bulk of the work yourself the metal work won't cost that much and by that point you'll see the light at the end of the tunnel and the rest will follow. The best piece of advice that I can give you is to work on it everyday if only for 30 minutes. 1000hr's is a bit optimistic in your case but then again you are doing this because you enjoy it; and why shouldn't you! (IMG:style_emoticons/default/beerchug.gif)
|
|
|
|
| Superhawk996 |
Jan 2 2023, 01:05 AM
Post
#79
|
|
914 Guru Group: Members Posts: 7,767 Joined: 25-August 18 From: Woods of N. Idaho Member No.: 22,428 Region Association: Galt's Gulch |
Your door braces are way to weak to be of any use in resisting the compression that occurs as welds shrink.
Do not proceed further. This needs to be fixed now before the structure gets even stiffer. Step 1) Build proper door braces with tubing and heim joints. Step 2) cut the long at the transition (see pic) Step 3) regap the door Step 4) reweld - go slow and cool as was suggested 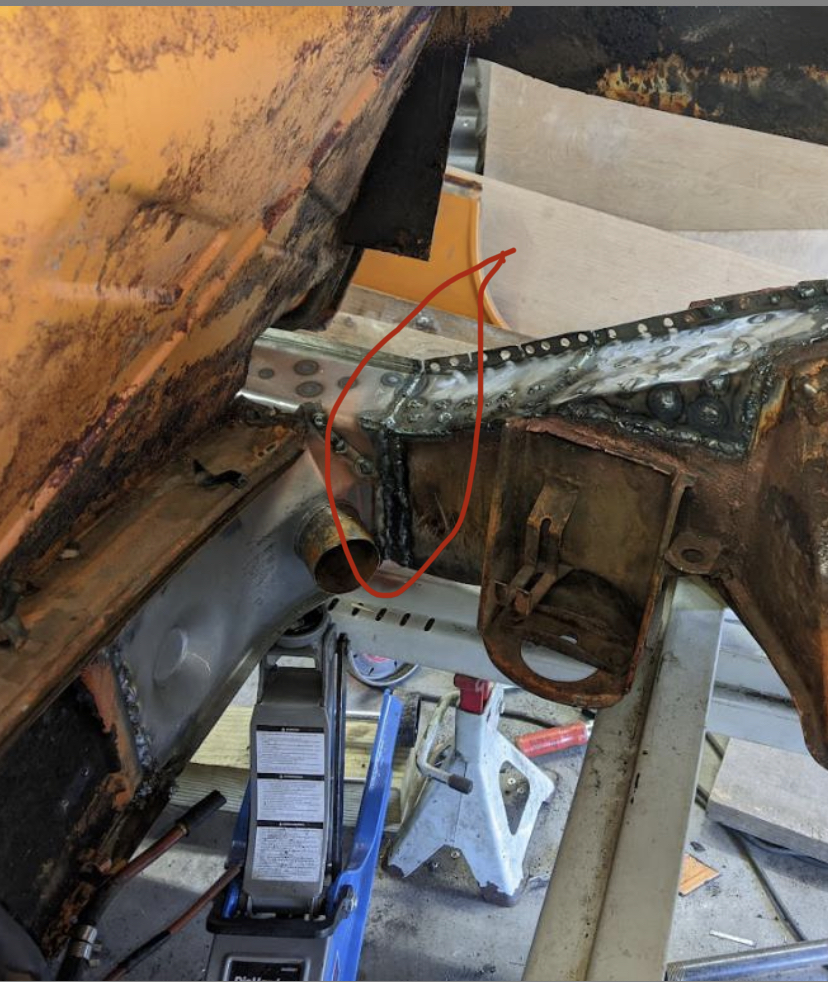 |
|
|
|
| Superhawk996 |
Jan 2 2023, 01:23 AM
Post
#80
|
|
914 Guru Group: Members Posts: 7,767 Joined: 25-August 18 From: Woods of N. Idaho Member No.: 22,428 Region Association: Galt's Gulch |
I haven’t seen this thread in a while. Great job on digging in and trying to do this properly!
Don’t let this minor setback dissuade you. We’ve all fought unintended shrinkage. It is amazing how much shrink can occur from just one weld that is done too quickly. It’s really easy to weld too fast with MIG. Slow down. |
|
|
|
|
1 User(s) are reading this topic (1 Guests and 0 Anonymous Users)
0 Members:

|
Lo-Fi Version | Time is now: 2nd April 2026 - 12:19 PM |
Invision Power Board
v9.1.4 © 2026 IPS, Inc.