|
|
|
Porsche, and the Porsche crest are registered trademarks of Dr. Ing. h.c. F. Porsche AG.
This site is not affiliated with Porsche in any way. Its only purpose is to provide an online forum for car enthusiasts. All other trademarks are property of their respective owners. |
|
|

  |

| VaccaRabite |
 Dec 3 2009, 03:20 PM Dec 3 2009, 03:20 PM
Post
#1
|
|
En Garde!  Group: Admin Posts: 13,445 Joined: 15-December 03 From: Dallastown, PA Member No.: 1,435 Region Association: MidAtlantic Region |
Both of the IDF 40 carbs had float ears that were broken, filed smooth, and then had the pin epoxied in place.
The epoxy was clearly not fuel safe, as the pin pulled free w/o any effort on my part. Is this salvageable? Could I keep the pin in with Quick Steel? My other option is scavenging the carb tops off my IDF 44s. Will they fit properly on the top of an IDF 40? I'd like not to do this, though, if possible. (IMG:http://farm3.static.flickr.com/2774/4156512236_14a9dc777a.jpg) Where could I buy another set of carb tops if I needed to. Ace? These carbs were a MESS. Lots of varnish, and lots of carbon. I bet they were lean on whatever engine they were on, and popping all the time. Zach |
   |

 
|
| underthetire |
Dec 3 2009, 04:06 PM
Post
#2
|
|
914 Guru Group: Members Posts: 5,062 Joined: 7-October 08 From: Brentwood Member No.: 9,623 Region Association: Northern California |
Sure you could save it. Make a new piece, drill and tap the lower section and put a couple small screws in it to hold it back together. I wouldn't try to glue it. If you cant do it yourself, mail it to me and I can do it on a bridgeport tuesday nights.
|
|
|
|
| DBCooper |
Dec 3 2009, 04:07 PM
Post
#3
|
|
14's in the 13's with ATTITUDE Group: Members Posts: 3,079 Joined: 25-August 04 From: Dazed and Confused Member No.: 2,618 Region Association: Northern California |
Yuu should be able to get someone with a TIG to build that up, then file it into shape and re-drill it, but check with Art at ACE first. Most carbs that are lost to corrosion crap out the bowls, so he'll probably have an extra top around, and maybe cheaper than having someone TIG it.
|
|
|
|
| DBCooper |
Dec 3 2009, 04:10 PM
Post
#4
|
|
14's in the 13's with ATTITUDE Group: Members Posts: 3,079 Joined: 25-August 04 From: Dazed and Confused Member No.: 2,618 Region Association: Northern California |
QUOTE(underthetire @ Dec 3 2009, 02:06 PM)  Sure you could save it. Make a new piece, drill and tap the lower section and put a couple small screws in it to hold it back together. I wouldn't try to glue it. If you cant do it yourself, mail it to me and I can do it on a bridgeport tuesday nights. Posted at the same time... an even better idea than the TIG. |
|
|
|
| VaccaRabite |
Dec 3 2009, 05:05 PM
Post
#5
|
|
En Garde! Group: Admin Posts: 13,445 Joined: 15-December 03 From: Dallastown, PA Member No.: 1,435 Region Association: MidAtlantic Region |
QUOTE(underthetire @ Dec 3 2009, 05:06 PM) Sure you could save it. Make a new piece, drill and tap the lower section and put a couple small screws in it to hold it back together. I wouldn't try to glue it. If you cant do it yourself, mail it to me and I can do it on a bridgeport tuesday nights. When I took the other carb apart, it was broke in the same way, and "fixed" the same way. Please PM me your address, costing, and time lines. I'd like to get this underway, so long as it is not more expensive then just buying a new top from ACE (who I'll be calling tomorrow for rebuild kits and venturis). Zach |
|
|
|
| Cap'n Krusty |
Dec 3 2009, 05:12 PM
Post
#6
|
|
Cap'n Krusty Group: Members Posts: 10,794 Joined: 24-June 04 From: Santa Maria, CA Member No.: 2,246 Region Association: Central California |
Trying to TIG weld potmetal is probably like trying to weld s*#t. It ain't gonna happen.
The Cap'n |
|
|
|
| yeahmag |
Dec 3 2009, 05:24 PM
Post
#7
|
|
Advanced Member Group: Members Posts: 2,422 Joined: 18-April 05 From: Pasadena, CA Member No.: 3,946 Region Association: Southern California |
What about pinning it? Glue them back together and then use a drill press to drill two small holes that you could tap. Two small allen heads sunk in there should hold it.
|
|
|
|
| morph |
Dec 3 2009, 06:06 PM
Post
#8
|
|
quality parts builder Group: Members Posts: 1,828 Joined: 25-November 03 From: oregon coast Member No.: 1,389 Region Association: Pacific Northwest |
i recomend you replace it . is your top the taper (early) or the later straight cut intake? both pictured
used 40 top for 40.00 pm me if you want it. james Attached thumbnail(s) 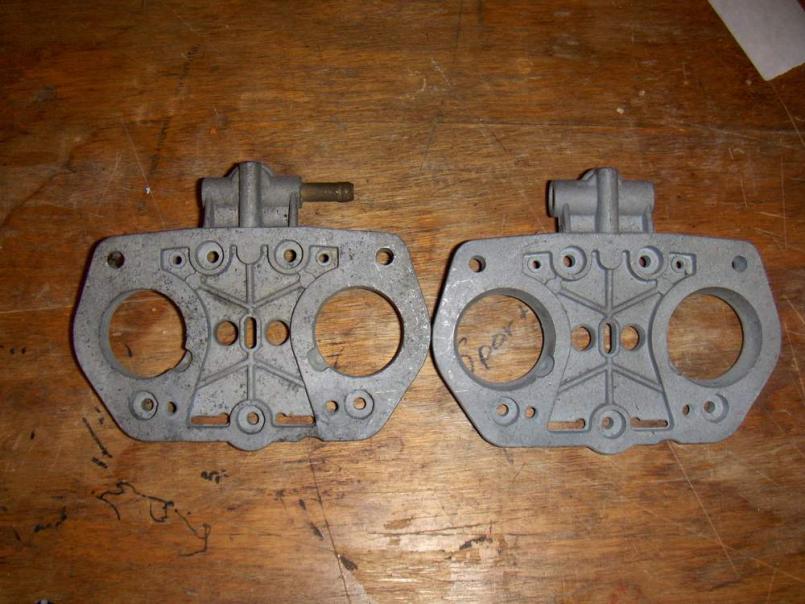 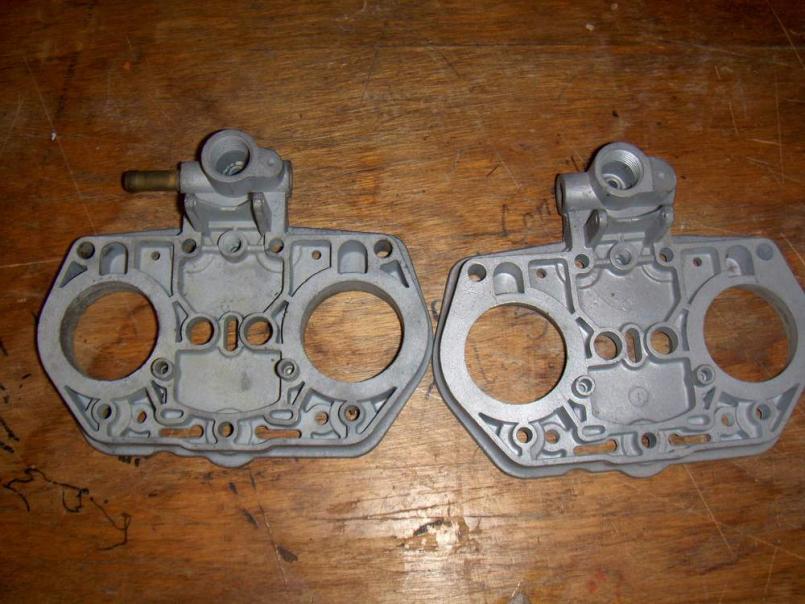
|
|
|
|
| 904svo |
Dec 3 2009, 06:46 PM
Post
#9
|
|
904SVO Group: Members Posts: 1,118 Joined: 17-November 05 From: Woodstock,Georgia Member No.: 5,146 |
This stuff will work, I used to to repair a 1937 Studebaker grill.
http://www.muggyweld.com/potmetal.html |
|
|
|
| SGB |
Dec 3 2009, 06:50 PM
Post
#10
|
|
just visiting Group: Members Posts: 4,086 Joined: 8-March 03 From: Huntsville, AL Member No.: 404 Region Association: South East States |
JB weld has held those ears together for years in both my webers...
Truly. |
|
|
|
| VaccaRabite |
Dec 3 2009, 08:16 PM
Post
#11
|
|
En Garde! Group: Admin Posts: 13,445 Joined: 15-December 03 From: Dallastown, PA Member No.: 1,435 Region Association: MidAtlantic Region |
I may have been unclear.
Its not in two parts. What I posted the pic of is all I have. The pin was epoxied directly to what was left of the ear. Both carbs are the same. As if the PO did it on purpose. I think I better just replace them. Zach |
|
|
|
| Dr Evil |
Dec 3 2009, 08:21 PM
Post
#12
|
|
Send me your transmission! Group: Members Posts: 23,000 Joined: 21-November 03 From: Loveland, OH 45140 Member No.: 1,372 Region Association: MidAtlantic Region |
Ah, I would make a piece of metal and place it over it with a screw. But I am ghetto at times, Dawg.
|
|
|
|
| VaccaRabite |
Dec 3 2009, 08:24 PM
Post
#13
|
|
En Garde! Group: Admin Posts: 13,445 Joined: 15-December 03 From: Dallastown, PA Member No.: 1,435 Region Association: MidAtlantic Region |
Looking closer, the the DAPO (not you Todd, I am sure you did not do this) actually CUT the ears like then, and broke them off at the bottom. And then glued the pin back in.
WTF! Seriously! This was INTENTIONAL! Zach |
|
|
|
| SGB |
Dec 3 2009, 08:50 PM
Post
#14
|
|
just visiting Group: Members Posts: 4,086 Joined: 8-March 03 From: Huntsville, AL Member No.: 404 Region Association: South East States |
I don't think so...
The slot is factory, and they just snap off right at the base... One broke when I squeezed it with pliers after I put the pin back in. The other broke while I was extracting the pin. Both looked just like that. |
|
|
|
| VaccaRabite |
Dec 3 2009, 09:06 PM
Post
#15
|
|
En Garde! Group: Admin Posts: 13,445 Joined: 15-December 03 From: Dallastown, PA Member No.: 1,435 Region Association: MidAtlantic Region |
I don't see the slot in the ones that Morph posted, and don't remember a slot in the 44s that I rebuilt - but that does not mean much.
The cut is a full 10 MM. Its supposed to be there? Why? Zach |
|
|
|
| underthetire |
Dec 3 2009, 09:20 PM
Post
#16
|
|
914 Guru Group: Members Posts: 5,062 Joined: 7-October 08 From: Brentwood Member No.: 9,623 Region Association: Northern California |
I figured it was slotted and broke off at the base. It really won't be a problem to fix in the shop. I'll machine a new piece, drill and tap the exsisting piece and viola your ready to go. The new piece will act like a clamp to hold the pin in. As per our PM, my price can't be beat. (IMG:style_emoticons/default/beer.gif)
|
|
|
|
| Spoke |
Dec 3 2009, 09:44 PM
Post
#17
|
|
Jerry Group: Members Posts: 6,983 Joined: 29-October 04 From: Allentown, PA Member No.: 3,031 Region Association: None |
QUOTE(Vacca Rabite @ Dec 3 2009, 10:06 PM) The cut is a full 10 MM. Its supposed to be there? Why? The slot is there so the 2 sides of the ear can be squeezed together to hold the pin. I was trying to get the pin out of one of mine and I expanded the slot too far and snapped off one like yours. I thought about drilling through the 2 pieces and use a screw but the ear is too thin to drill a hole in it and not weaken it further. What I did was get a 00-80 screw about an inch long, bend it in a U to fit over both pieces and cut the head off. I got a very small piece of brass, drilled 2 holes in it to fit the U and held the piece on with the U, the brass, and 2 nuts. I used a pair of pliers to bugger up the threads a bit so the nuts will stay on. The stress on the ear and the pin that goes through it is minimal. JB Weld or any other petrol-impervious glue would work. |
|
|
|
| r_towle |
Dec 3 2009, 09:52 PM
Post
#18
|
|
Custom Member Group: Members Posts: 24,577 Joined: 9-January 03 From: Taxachusetts Member No.: 124 Region Association: North East States |
miracle putty.
Or Get JB Weld that is fuel safe. Build up the area and drill out for the pin. If it was me, I would toss them and buy ones that are not broken. Rich |
|
|
|
| ChrisFoley |
Dec 3 2009, 10:31 PM
Post
#19
|
|
I am Tangerine Racing Group: Members Posts: 7,927 Joined: 29-January 03 From: Bolton, CT Member No.: 209 Region Association: None |
Either buy the ones Morph has or send them to me Zach. I've done repairs like that before.
They are designed to have a slot with an undersized hole, so the pin is pinched to keep it in place. I doubt they were broken intentionally. Whatever you do, don't throw them away. If you buy replacements I'll be happy to take those off your hands. There is no reason to try and spread the two sides to remove the pin. It isn't that tight and should only require moderate pressure to push out of the slot. If you break it you are using the wrong technique - plain and simple. |
|
|
|
| ME733 |
Dec 4 2009, 08:25 AM
Post
#20
|
|
Senior Member Group: Members Posts: 842 Joined: 25-June 08 From: Atlanta Ga. Member No.: 9,209 Region Association: South East States |
QUOTE(Racer Chris @ Dec 3 2009, 11:31 PM) Either buy the ones Morph has or send them to me Zach. I've done repairs like that before. They are designed to have a slot with an undersized hole, so the pin is pinched to keep it in place. I doubt they were broken intentionally. Whatever you do, don't throw them away. If you buy replacements I'll be happy to take those off your hands. There is no reason to try and spread the two sides to remove the pin. It isn't that tight and should only require moderate pressure to push out of the slot. If you break it you are using the wrong technique - plain and simple. (IMG:style_emoticons/default/popcorn[1].gif) I completely agree. (IMG:style_emoticons/default/popcorn[1].gif) and I recommend replacing them with undamaged ones. Just for ..if nothing else, the piece of mind of knowing that the carburators are as original as possable, and you will never have "something else to check'' when adjusting the carbs, or setting the float heights. AND.....LOOK AT THE FLOAT PIN...look at where the pin is when installed in the top and how it sits BELOW the top of the main body of the carburator....LOOK AT THE LENGTH of the pin... it is UNNECESSARY / not REQUIRED/ not a WEBER design that the float shaft /pin is held tight in the "ears"......THE FLOAT PIN due to it,s LENGTH... will be stopped from excessive movement /or being dislodged /or from "falling out" ...by the side walls of the FLOAT BOAL...AND I think the photographs in a previous post, pointing out the "TAPERED" intakes...(top of carb cover)...these tapered tops were used in a slightly different application....They were for a 356 porsche , and had 28 mm venturis as produced by weber....the tapered intake tapered into the smaller 28mm ventures....(IMG:style_emoticons/default/popcorn[1].gif) |
|
|
|
|
1 User(s) are reading this topic (1 Guests and 0 Anonymous Users)
0 Members:

|
Lo-Fi Version | Time is now: 21st May 2024 - 01:16 AM |
Invision Power Board
v9.1.4 © 2024 IPS, Inc.