|
|
|
Porsche, and the Porsche crest are registered trademarks of Dr. Ing. h.c. F. Porsche AG.
This site is not affiliated with Porsche in any way. Its only purpose is to provide an online forum for car enthusiasts. All other trademarks are property of their respective owners. |
|
|

  |

| ein 6er |
 Mar 19 2004, 07:13 PM Mar 19 2004, 07:13 PM
Post
#1
|
|
Senior Member  Group: Benefactors Posts: 1,115 Joined: 11-February 03 Member No.: 300 Region Association: None |
because the 2nd time i pulled it, i didn't have to remove the carbs and fan shroud!! what a pleasure that was!!
i didn't think it was possible to pull the alternator out, without pulling everything off!! thanks to krk and his very helpful thread and fotos which helped me tremendously the 1st time i pulled my alt. from what i've learned through this process, is that the alt and fan on the 6cyl engines can seize in the housing and on the shaft over time and can be a bitch to get off. if you've never had yours out you will probably need to pull the carbs and the shroud to make it all easier. and also to have a good look under the shroud and clean everything up. remember to antiseize everything on reassembly when i had to pull my alt for the 2nd time, (within a week) i reeeeeeeally didn't want to pull everything off again. i had to pull the fan out then turn the fan housing sideways and then pull the alt out. barely enough room to get it out. saved a lot of time!! doug |
   |

 
|
| krk |
Mar 19 2004, 08:11 PM
Post
#2
|
|
Senior Member Group: Members Posts: 997 Joined: 27-December 02 From: San Jose Member No.: 22 |
Dude,
You rock -- I would not have thought that possible! How did you get the silly nuts off the back of the deflector? kim. |
|
|
|
| Jeffs9146 |
Mar 19 2004, 08:45 PM
Post
#3
|
|
Ski Bum Group: Members Posts: 4,062 Joined: 10-January 03 From: Discovery Bay, Ca Member No.: 128 |
QUOTE i didn't think it was possible to pull the alternator out, without pulling everything off!! Tell me how!?? (IMG:style_emoticons/default/confused24.gif) I am doing it tomorrow! Jeff |
|
|
|
| ein 6er |
Mar 19 2004, 10:23 PM
Post
#4
|
|
Senior Member Group: Benefactors Posts: 1,115 Joined: 11-February 03 Member No.: 300 Region Association: None |
i couldn't believe it either!!! i almost gave up a couple of times!!
again .... if you haven't had it off recently it may not be possible to do it like this. i worked from the passenger side. 1st i removed the engine lid, disconnected the batt, removed the fan belt, unbolted the coil and laid it to the side, removed the heater air vents from the shroud, the ones on either side of the fan housing, the pass. side is one peice, the driver's side vent is plastic, the sheetmetal that holds it in, is in 2 pieces, i only had to remove the small piece (2 bolts i think) on the fan side and the sheetmetal screw on top of the shroud to remove the plastic vent. remove the bolts from the fan housing strap, i used some wire to tie the strap back on both sides to get more room. then i was able to lean the housing forward enough to start taking the air guide nuts off so you can get to the alt wires. take the ground strap off 1st, then you can rotate the housing around so you can reach all the nuts. a couple can be reached from the driver's side. luckily i didn't drop any, i used one of those magnets on an extension, like an antenna to help keep track on the nuts & washers as i was taking them off. then you can push the air guide back enough to get to the alt wires. even though i had just had the fan off, i still had to pull and push the fan back & forth to get it off, you need to turn the housing sideways so the fan can come out (pass. side). i think i had to untie the strap and let it fall back to it's normal position so i could get the fan out from between the shroud and the fire wall. because it's so tight in there i placed a rag over the housing to keep from scratching the paint on the firewall. the alt didn't want to come right out because the long bolts that hold it in want to catch on the fan housing. i had to take a wood hammer handle and tap the alt to push it out of the housing. i had to tap 1 side then rotate it half way and tap it some more. when i put it back in, i'll try to bend the bolts so they slide directly into the holes, to make it easier the next time. once the alt was out of the housing it took me a while to get it out past the shroud and the firewall. this is where i almost gave up a couple of times. i eventually had to push the air guide back and turn the fan housing front to back. again i had to let the strap fall back and wiggle the alt out. once i got the fan housing in the right place there was enough room to get the alt out. and after all that, the alt shop says my alt is good!!!! so i didn't need to take it out in the 1st place!!! (IMG:style_emoticons/default/headbang.gif) so now i need to figure out why i'm not getting voltage back into my batt!!! good luck, hope this helps!!! doug ps, i also remove the dizzy cap and rotor to get more room, didn't disconnect any wires. the fan and alt need to come out around the shroud down low. |
|
|
|
| ein 6er |
Mar 20 2004, 09:26 PM
Post
#5
|
|
Senior Member Group: Benefactors Posts: 1,115 Joined: 11-February 03 Member No.: 300 Region Association: None |
reinstalled the alt today and took a few pics. i'll post them as though it came out.
1st 1, the coil & dizzy cap off so the air vent can come off. Attached image(s) 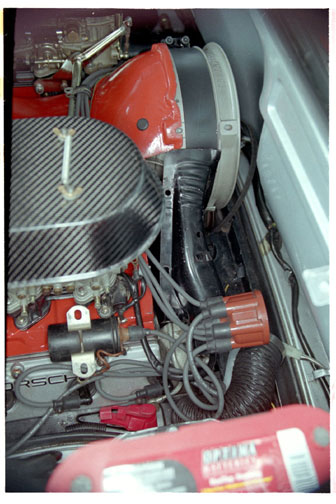
|
|
|
|
| ein 6er |
Mar 20 2004, 09:30 PM
Post
#6
|
|
Senior Member Group: Benefactors Posts: 1,115 Joined: 11-February 03 Member No.: 300 Region Association: None |
2nd
the housing strap tied back and my telescoping magnet for chasing dropped washers and nuts, (on the rain sheild). Attached image(s) 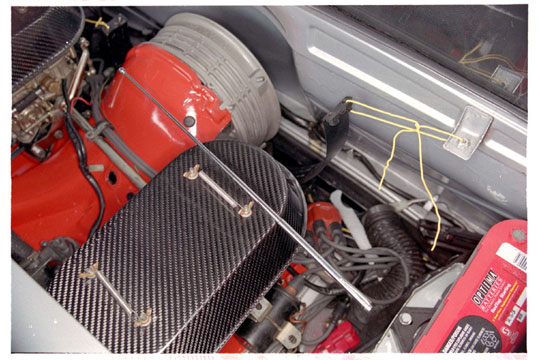
|
|
|
|
| ein 6er |
Mar 20 2004, 09:32 PM
Post
#7
|
|
Senior Member Group: Benefactors Posts: 1,115 Joined: 11-February 03 Member No.: 300 Region Association: None |
3
the left airvent and the small sheetmetal piece that needs to come off so the plastic vent can come out. Attached image(s) 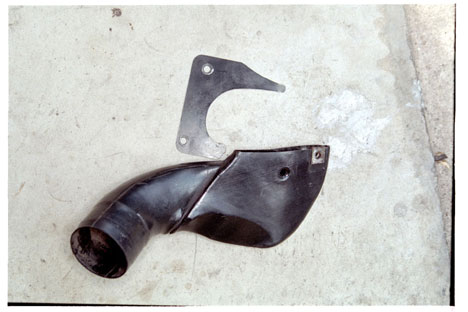
|
|
|
|
| ein 6er |
Mar 20 2004, 09:35 PM
Post
#8
|
|
Senior Member Group: Benefactors Posts: 1,115 Joined: 11-February 03 Member No.: 300 Region Association: None |
4
with the strap off, the housing can be tilted forward so the air guide nuts can be removed. remove the ground strap 1 1st so you can rotate the housing around so the others are easier. Attached image(s) 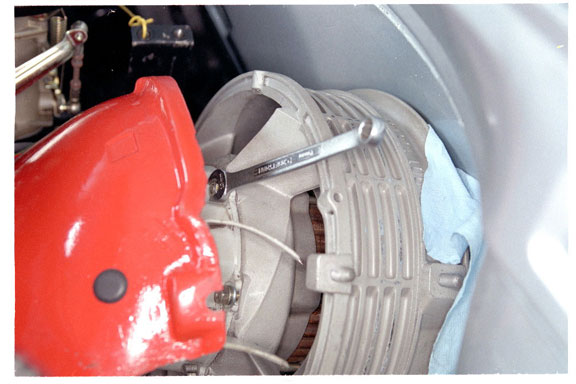
|
|
|
|
| ein 6er |
Mar 20 2004, 09:36 PM
Post
#9
|
|
Senior Member Group: Benefactors Posts: 1,115 Joined: 11-February 03 Member No.: 300 Region Association: None |
5
removing the wires on the alt. internal regulater. Attached image(s) 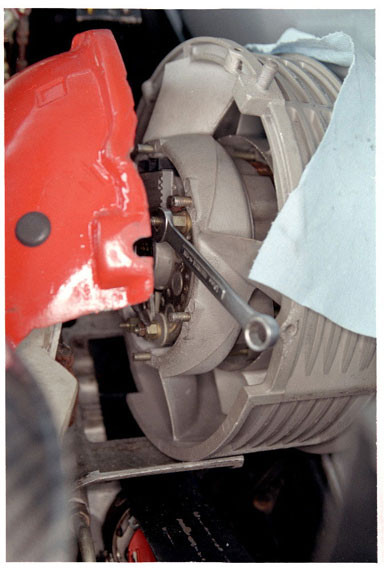
|
|
|
|
| ein 6er |
Mar 20 2004, 09:39 PM
Post
#10
|
|
Senior Member Group: Benefactors Posts: 1,115 Joined: 11-February 03 Member No.: 300 Region Association: None |
6
with the wires off the alt. the housing can be turned so the fan can come out. the housing needs to be in just the right place, the fan barely cleared the fan shaft. this is a good time to put a nice scratch in the paint. Attached image(s) 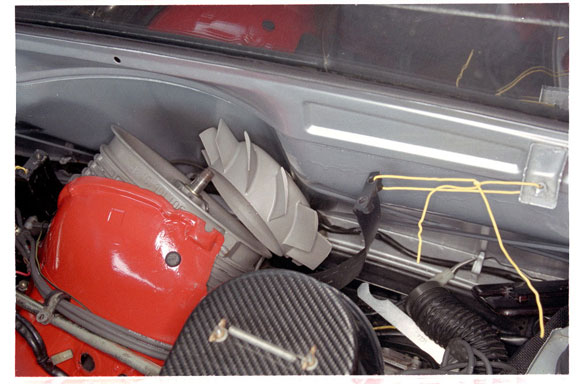
|
|
|
|
| ein 6er |
Mar 20 2004, 09:41 PM
Post
#11
|
|
Senior Member Group: Benefactors Posts: 1,115 Joined: 11-February 03 Member No.: 300 Region Association: None |
7
even though i had just had the alt out i still needed to tap it lightly with the wood handle to help it out. Attached image(s) 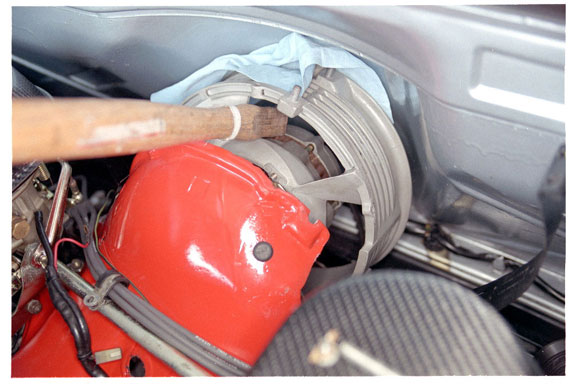
|
|
|
|
| ein 6er |
Mar 20 2004, 09:45 PM
Post
#12
|
|
Senior Member Group: Benefactors Posts: 1,115 Joined: 11-February 03 Member No.: 300 Region Association: None |
8
turn the housing sideways as far as you can, it needs to be in just the right place for the alt to squeeze out. it too barely makes it. Attached image(s) 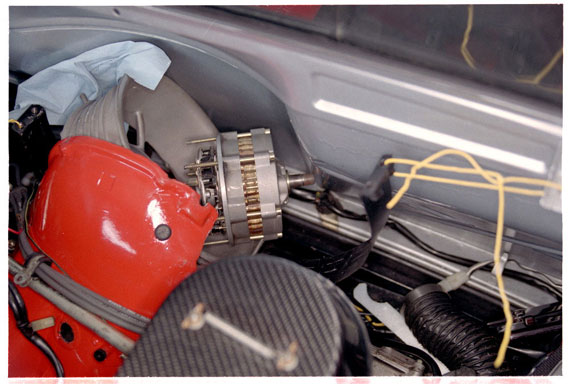
|
|
|
|
| ein 6er |
Mar 20 2004, 09:47 PM
Post
#13
|
|
Senior Member Group: Benefactors Posts: 1,115 Joined: 11-February 03 Member No.: 300 Region Association: None |
9
it has to rotate as it comes out. this is another good time to scratch the paint. Attached image(s) 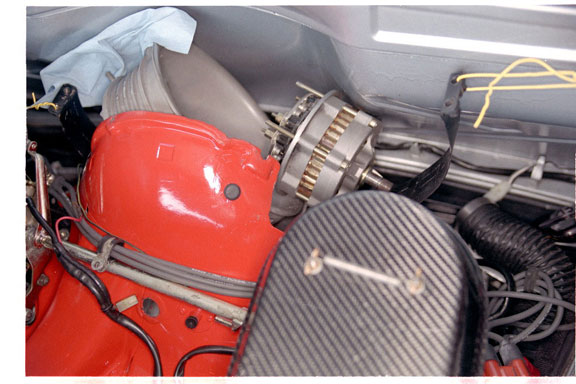
|
|
|
|
| ein 6er |
Mar 20 2004, 09:50 PM
Post
#14
|
|
Senior Member Group: Benefactors Posts: 1,115 Joined: 11-February 03 Member No.: 300 Region Association: None |
10
i had to let the strap fall back in place so the housing could come out. now wasn't that fun?!? (IMG:style_emoticons/default/wacko.gif) Attached image(s) 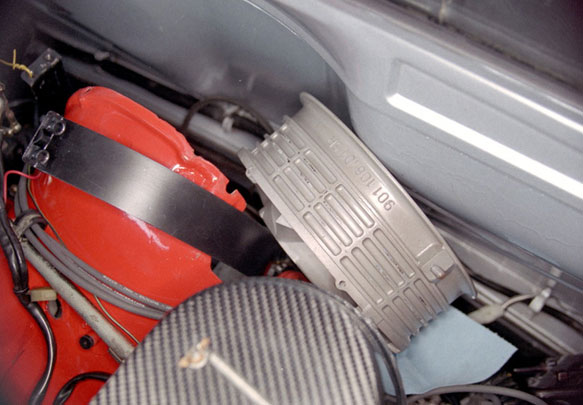
|
|
|
|
| krk |
Mar 20 2004, 10:34 PM
Post
#15
|
|
Senior Member Group: Members Posts: 997 Joined: 27-December 02 From: San Jose Member No.: 22 |
Doug,
Awesome pics! (btw, your engine compartment is too clean. You can use photoshop to dirty them up a bit before posting. ... ... .. (IMG:style_emoticons/default/laugh.gif)) They are great pics! I don't know much about combining threads or making sense of perhaps too much info, but if I were a SysAdim™ like The Gint™, I'd be thinking of a way to archive all this. It is certainly the case that releasing some of the shroud screws gives mobilitly. In fact, when re-assembling, it's helpful to leave everybody loose until all the bits are in, as tightening one too early can make some of the shroud maniputation harder. I would not have guessed that there was enough flex in there to pop that puppy out! Very cool work, and thx for the pics! kim. |
|
|
|
| ein 6er |
Mar 20 2004, 11:13 PM
Post
#16
|
|
Senior Member Group: Benefactors Posts: 1,115 Joined: 11-February 03 Member No.: 300 Region Association: None |
thanks kim!!
it looks better in there because i had taken it all out a few days before and cleaned it all up!! (IMG:style_emoticons/default/laugh.gif) i had the fan housing and fan media blasted and then i clear coated them with a high temp clear coat. i also did a little fiberglass work on the shroud and painted it. doug |
|
|
|
| ClayPerrine |
Oct 30 2005, 12:14 PM
Post
#17
|
|
Life's been good to me so far..... Group: Admin Posts: 16,545 Joined: 11-September 03 From: Hurst, TX. Member No.: 1,143 Region Association: NineFourteenerVille |
I just used this article to pull and reinstall the alt on my 73 six conversion. It works great with one addition.
I got to the point where I should rotate the fan housing, and I couldn't do it. I had created a way to use a serpentine belt to run the fan and an AC compressor, and the idler pulley bracket wouldn't let the fan housing rotate the way I needed it to. So I studied it for a bit. What I found was that if I unbolted the transmission mounts and lowered the back of the transmission about 8 to 10 inches, I had enough clearance to pull the fan housing, alternator and fan as a complete assembly. It took a little manipulating to get the electrical connection studs past the fan shroud, but the rest was easy. I left the back of the tranny down until I got everything hooked back up. The extra clearance made hooking up the wiring and the air deflector on the back of the alternator easier too. All in all and excellent article. And it disproves the conventional logic that says you have to pull the engine or the fuel system to replace the alternator in a 914/6. (IMG:http://www.914world.com/bbs2/html/emoticons/smilie_pokal.gif) (IMG:http://www.914world.com/bbs2/html/emoticons/smilie_pokal.gif) (IMG:http://www.914world.com/bbs2/html/emoticons/smilie_pokal.gif) |
|
|
|
|
1 User(s) are reading this topic (1 Guests and 0 Anonymous Users)
0 Members:

|
Lo-Fi Version | Time is now: 8th June 2026 - 10:31 PM |
Invision Power Board
v9.1.4 © 2026 IPS, Inc.