|
|
|
Porsche, and the Porsche crest are registered trademarks of Dr. Ing. h.c. F. Porsche AG.
This site is not affiliated with Porsche in any way. Its only purpose is to provide an online forum for car enthusiasts. All other trademarks are property of their respective owners. |
|
|

  |

| Cire |
 Dec 14 2009, 10:33 PM Dec 14 2009, 10:33 PM
Post
#1
|
|
Member  Group: Members Posts: 279 Joined: 12-March 09 From: Tucson, Arizona Member No.: 10,155 Region Association: None |
Howdy all,
I have taken apart my car and am working on the rust, dents, dings, broken welds etc. I added the Engman long kit. I also added the rear stiffening kit. I think I am getting closer to primer and paint but wanted to see if there are things I should do before putting it back together. Some examples I have thought of... 1 - Cut a hole and check the Clutch tube and make sure its not slipping or breaking loose. 2 - Change out the plastic fuel line for a solid steel one. Anything else you all can recomend? I am on a very tight budget but can do labor all day long. = ) Cash poor labor rich? Thanks. Eric 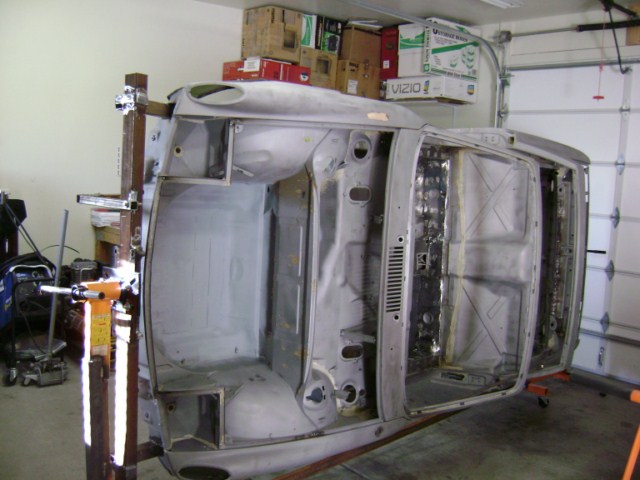 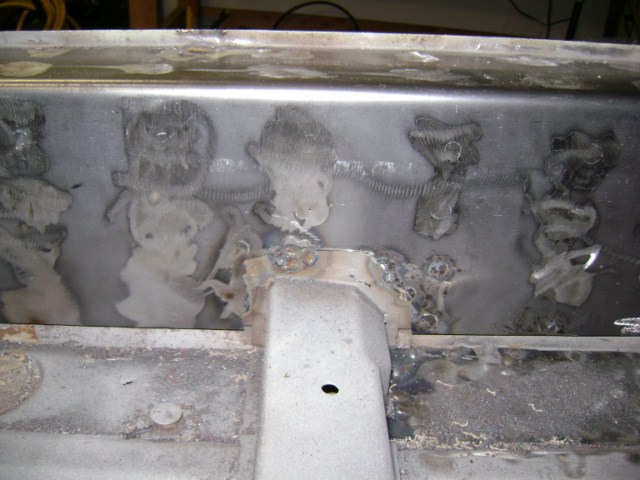 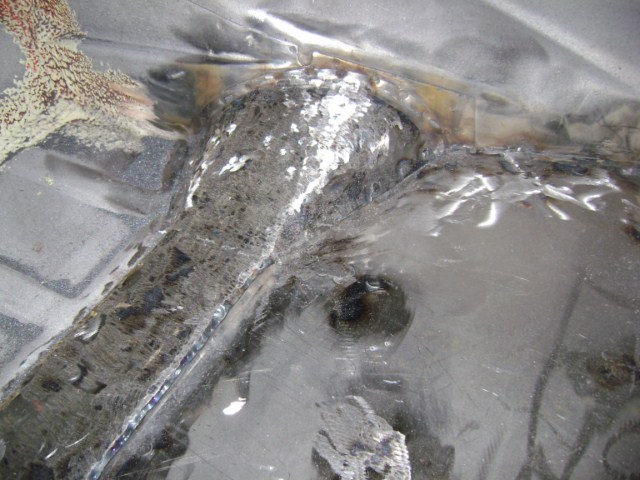 |
   |

 
|
| zig-n-zag |
Dec 15 2009, 04:13 PM
Post
#2
|
|
Member Group: Members Posts: 182 Joined: 18-May 06 From: Hawaii Member No.: 6,024 |
I sorta recall a thread where CFR welded in a piece of tubing behind
the rear shock mount to tie in the top of the long and cut away a piece of sheet metal hiding the unwelded vertical section of long-to-firewall in the engine compartment corners. With the rear kit, you're boxed. |
|
|
|
| URY914 |
Dec 15 2009, 05:14 PM
Post
#3
|
|
I built the lightest 914 in the history of mankind. Group: Members Posts: 120,318 Joined: 3-February 03 From: Jacksonville, FL Member No.: 222 Region Association: None |
If I had a car at that point I would add some sheet metal at the hell holes to prevent crap from getting down in the corners. Just weld some light gage metal in at an angle so water drains away rather than into the corners.
|
|
|
|
| J P Stein |
Dec 15 2009, 06:06 PM
Post
#4
|
|
Irrelevant old fart Group: Members Posts: 8,797 Joined: 30-December 02 From: Vancouver, WA Member No.: 45 Region Association: None |
Rip out all the sealant, tar, & other shittage (all the places water/rust can hide) and seam weld the chassis.
|
|
|
|
| Cire |
Dec 15 2009, 08:45 PM
Post
#5
|
|
Member Group: Members Posts: 279 Joined: 12-March 09 From: Tucson, Arizona Member No.: 10,155 Region Association: None |
QUOTE(J P Stein @ Dec 15 2009, 05:06 PM)  Rip out all the sealant, tar, & other shittage (all the places water/rust can hide) and seam weld the chassis. When you say seam weld the chassis.... Do you mean welding all the points where two joints come together? Do you have any pictures of what you are talking about? Do you think it adds more strength or do you think it just prevents water (rust) from getting into the joints? Thanks. Good idea. Eric |
|
|
|
| Cire |
Dec 15 2009, 08:47 PM
Post
#6
|
|
Member Group: Members Posts: 279 Joined: 12-March 09 From: Tucson, Arizona Member No.: 10,155 Region Association: None |
QUOTE(URY914 @ Dec 15 2009, 04:14 PM) If I had a car at that point I would add some sheet metal at the hell holes to prevent crap from getting down in the corners. Just weld some light gage metal in at an angle so water drains away rather than into the corners. Have you ever seen this done before? Got any pictures of it? Another good idea. Eric |
|
|
|
| J P Stein |
Dec 15 2009, 10:30 PM
Post
#7
|
|
Irrelevant old fart Group: Members Posts: 8,797 Joined: 30-December 02 From: Vancouver, WA Member No.: 45 Region Association: None |
QUOTE(Cire @ Dec 15 2009, 06:45 PM) QUOTE(J P Stein @ Dec 15 2009, 05:06 PM) Rip out all the sealant, tar, & other shittage (all the places water/rust can hide) and seam weld the chassis. When you say seam weld the chassis.... Do you mean welding all the points where two joints come together? Do you have any pictures of what you are talking about? Do you think it adds more strength or do you think it just prevents water (rust) from getting into the joints? Thanks. Good idea. Eric It does add strength to the car. It also prevents them lousy spot welds from cracking out. It's the first thing a professional shop does to a chassis when prepping a chassis fo racing. I have lots of pics...here 2 quickies one of the front & rear trunk. Attached thumbnail(s) 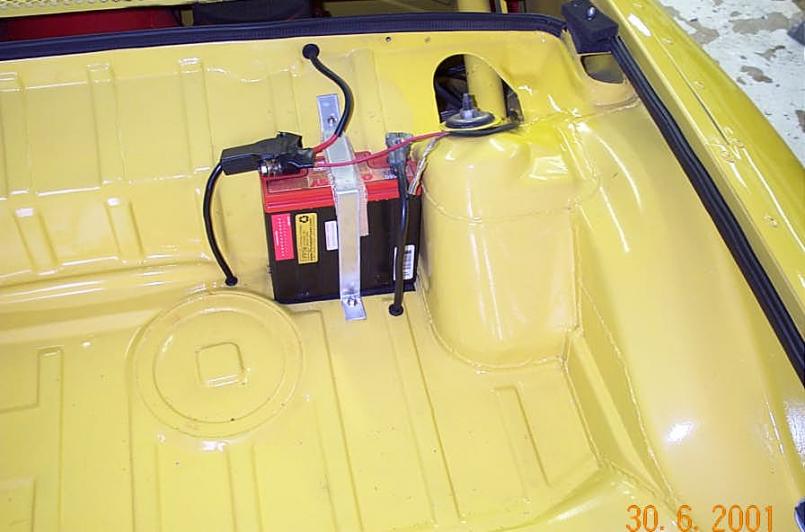 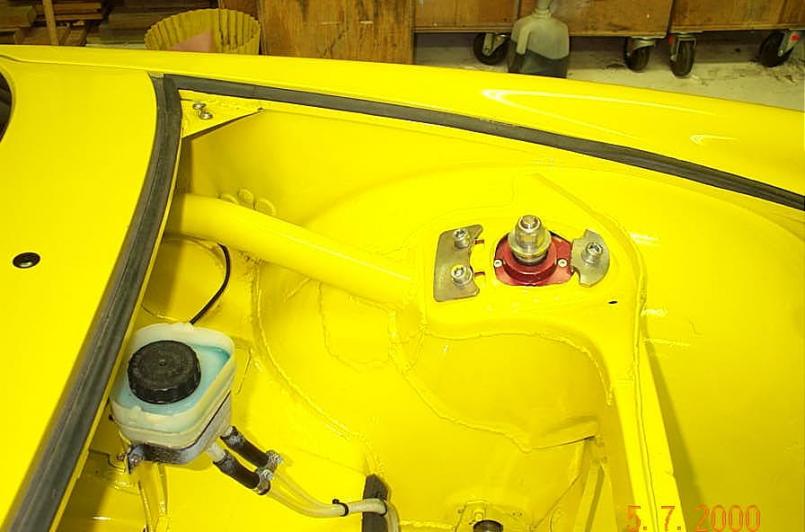
|
|
|
|
| Cire |
Dec 16 2009, 05:16 AM
Post
#8
|
|
Member Group: Members Posts: 279 Joined: 12-March 09 From: Tucson, Arizona Member No.: 10,155 Region Association: None |
QUOTE(J P Stein @ Dec 15 2009, 09:30 PM) QUOTE(Cire @ Dec 15 2009, 06:45 PM) QUOTE(J P Stein @ Dec 15 2009, 05:06 PM) Rip out all the sealant, tar, & other shittage (all the places water/rust can hide) and seam weld the chassis. When you say seam weld the chassis.... Do you mean welding all the points where two joints come together? Do you have any pictures of what you are talking about? Do you think it adds more strength or do you think it just prevents water (rust) from getting into the joints? Thanks. Good idea. Eric It does add strength to the car. It also prevents them lousy spot welds from cracking out. It's the first thing a professional shop does to a chassis when prepping a chassis fo racing. I have lots of pics...here 2 quickies one of the front & rear trunk. Great looking car. Can I get a few more pictures? I see the welds. Even the top along the seems get welded... Are the edges pushed down and welded or just the ends welded? So like along the bottom of the car. There is a seam that runs around the outside bottom edge of the car. Is that bent down and welded or just the edge welded? Nice stuff. Great color on the car. I was going to do Yellow and Black on mine. Did you powder coat the car or is it just regular paint? Thanks again for your help. Eric |
|
|
|
| Cire |
Dec 16 2009, 05:20 AM
Post
#9
|
|
Member Group: Members Posts: 279 Joined: 12-March 09 From: Tucson, Arizona Member No.: 10,155 Region Association: None |
[/quote] It does add strength to the car. It also prevents them lousy spot welds from cracking out. It's the first thing a professional shop does to a chassis when prepping a chassis fo racing. I have lots of pics...here 2 quickies one of the front & rear trunk. [/quote] How do you attach your front and rear hoods? I dont see a pin in the corner of the front hood... Intersting. Also, how about pictures of your engine area? Did the cut out all the crap in there? Whats left? Can you remove the engine skirt? Thanks again for your help. If anyone else has pictures of there AX or race car where work has been done, I would love to see it. = ) Eric |
|
|
|
| URY914 |
Dec 16 2009, 07:26 AM
Post
#10
|
|
I built the lightest 914 in the history of mankind. Group: Members Posts: 120,318 Joined: 3-February 03 From: Jacksonville, FL Member No.: 222 Region Association: None |
QUOTE(Cire @ Dec 15 2009, 07:47 PM) QUOTE(URY914 @ Dec 15 2009, 04:14 PM) If I had a car at that point I would add some sheet metal at the hell holes to prevent crap from getting down in the corners. Just weld some light gage metal in at an angle so water drains away rather than into the corners. Have you ever seen this done before? Got any pictures of it? Another good idea. Eric Sorry I don't have pics and really have never seen it done but I have aways thought it would be a good idea. Don't know if anyone has ever done it or not. |
|
|
|
| jd74914 |
Dec 16 2009, 08:33 AM
Post
#11
|
|
Its alive Group: Members Posts: 4,780 Joined: 16-February 04 From: CT Member No.: 1,659 Region Association: North East States |
The only problem I see with that is if water does manage to get in there it will never dry, and your car will rust without you ever being able to see it.
While it is a cool idea I'd rather see the pooling water than not see the potentially pooling water. |
|
|
|
| Cire |
Dec 16 2009, 08:39 AM
Post
#12
|
|
Member Group: Members Posts: 279 Joined: 12-March 09 From: Tucson, Arizona Member No.: 10,155 Region Association: None |
QUOTE(jd74914 @ Dec 16 2009, 07:33 AM) The only problem I see with that is if water does manage to get in there it will never dry, and your car will rust without you ever being able to see it. While it is a cool idea I'd rather see the pooling water than not see the potentially pooling water. GREAT point. I had the frame sand blasted and still see little sand particles falling down from those seams.... Yeah... If you sealed them, the sand and water would be trapped. I can imagine doing the seams near the suspension points. What else has been done to your car? Anything you -wish- you would have done? Thanks again. Eric |
|
|
|
| URY914 |
Dec 16 2009, 11:07 AM
Post
#13
|
|
I built the lightest 914 in the history of mankind. Group: Members Posts: 120,318 Joined: 3-February 03 From: Jacksonville, FL Member No.: 222 Region Association: None |
QUOTE(jd74914 @ Dec 16 2009, 07:33 AM) The only problem I see with that is if water does manage to get in there it will never dry, and your car will rust without you ever being able to see it. While it is a cool idea I'd rather see the pooling water than not see the potentially pooling water. Good welding, seam sealer and primer and paint. No problems. |
|
|
|
| zig-n-zag |
Dec 16 2009, 01:38 PM
Post
#14
|
|
Member Group: Members Posts: 182 Joined: 18-May 06 From: Hawaii Member No.: 6,024 |
Volume 8 (Body) of the Porsche 914 workshop manual notates certain
areas where the factory added weld beads for reinforcement when replacing damaged sheet metal. The text and pics cover mostly the front area of the car, but nothing around the rear suspension/enginebay. Still a good reference though. |
|
|
|
| J P Stein |
Dec 16 2009, 05:51 PM
Post
#15
|
|
Irrelevant old fart Group: Members Posts: 8,797 Joined: 30-December 02 From: Vancouver, WA Member No.: 45 Region Association: None |
Some areas to weld that would be a snap while you have it up.......but a bitch if you do it right side up. Rear suspension ear & area.
The outside edge of the ear cracks ...usually starting at the out side edge. Weld up the 2 pieces of the pinch seam & smooth out the fillet.....same with the whole pinch seam at the wheel arch.The factory welding on the doubler plate at the very top of the pic is horrible.....I ground most of it out & rewelded it. That'll keep ya busy for a while. (IMG:style_emoticons/default/biggrin.gif) Attached thumbnail(s) 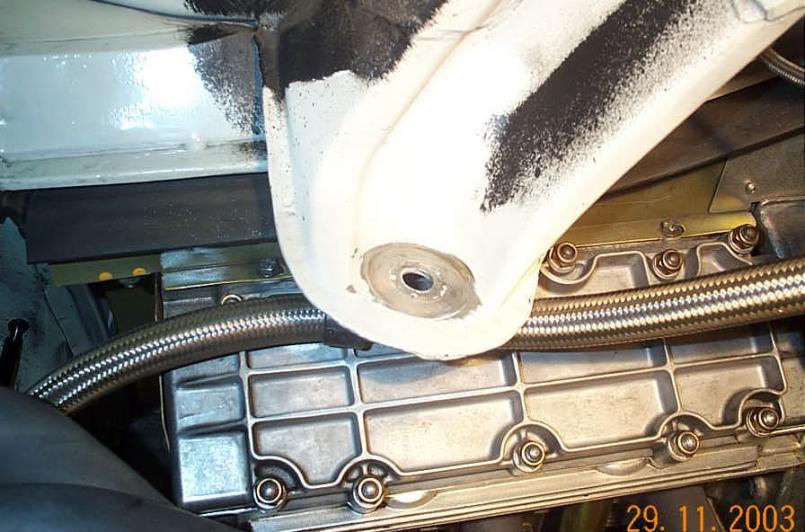 Attached image(s) 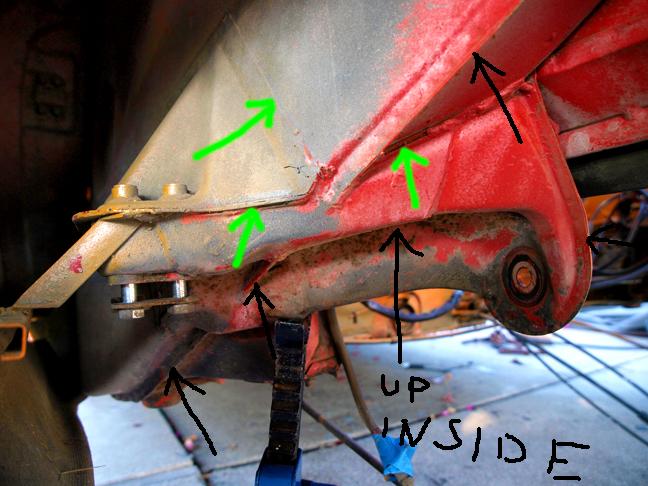
|
|
|
|
| J P Stein |
Dec 16 2009, 05:55 PM
Post
#16
|
|
Irrelevant old fart Group: Members Posts: 8,797 Joined: 30-December 02 From: Vancouver, WA Member No.: 45 Region Association: None |
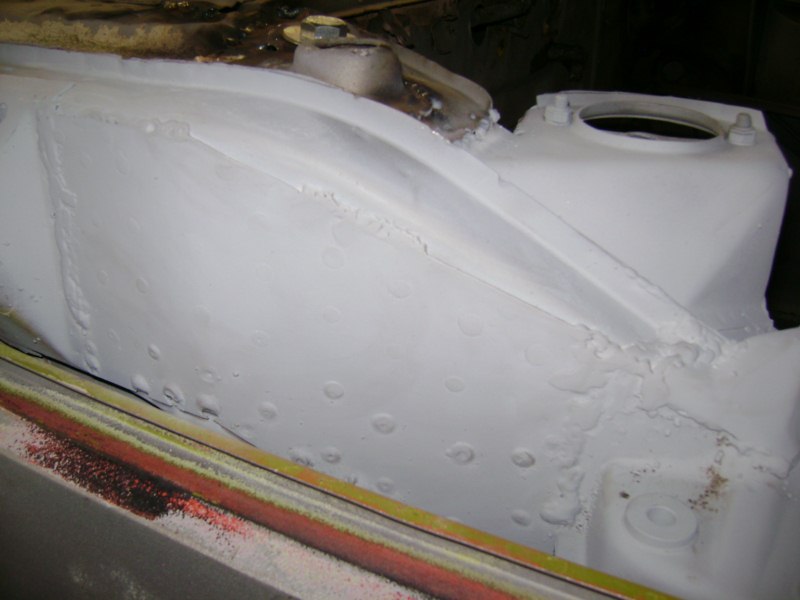
Or, you can do this to the ear.
Attached thumbnail(s) 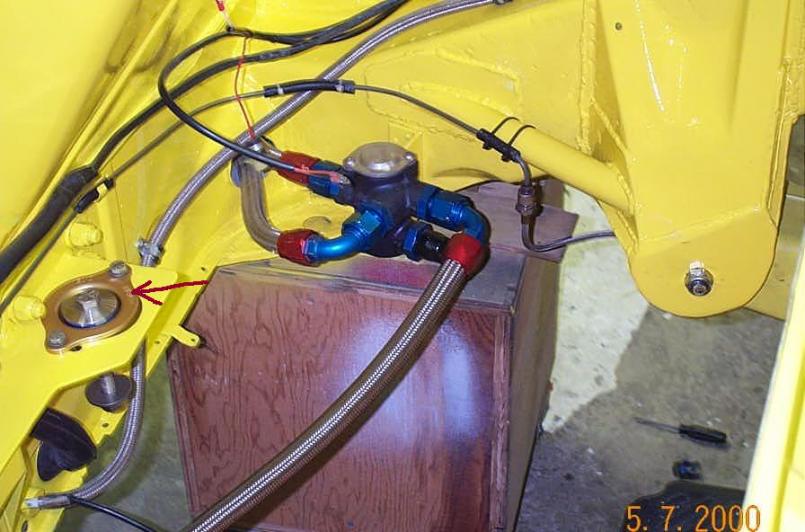
|
|
|
|
| Cire |
Dec 16 2009, 07:29 PM
Post
#17
|
|
Member Group: Members Posts: 279 Joined: 12-March 09 From: Tucson, Arizona Member No.: 10,155 Region Association: None |
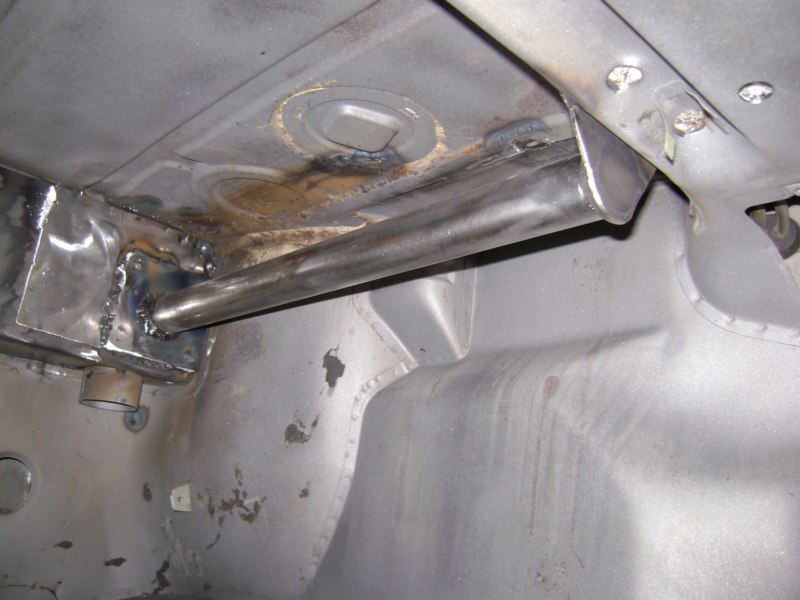
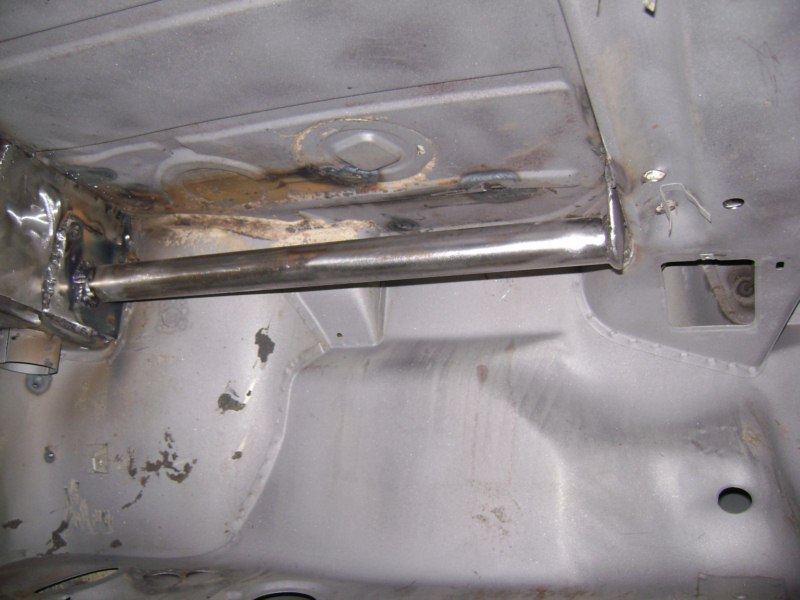
QUOTE(J P Stein @ Dec 16 2009, 04:55 PM) Or, you can do this to the ear. I added the rear stiffening kit. I even extended it about 12 inches so it covers the entire rear tranny support support. = ) Also I put a steel channel along the tranny support just to give it some more strength. I added the foot bar for the passengers side. I do need a dead pedal. Anyone got any pictures of things they have done? Anything else? I love the pictures of the support for the rear trailing arms. Cool. Eric 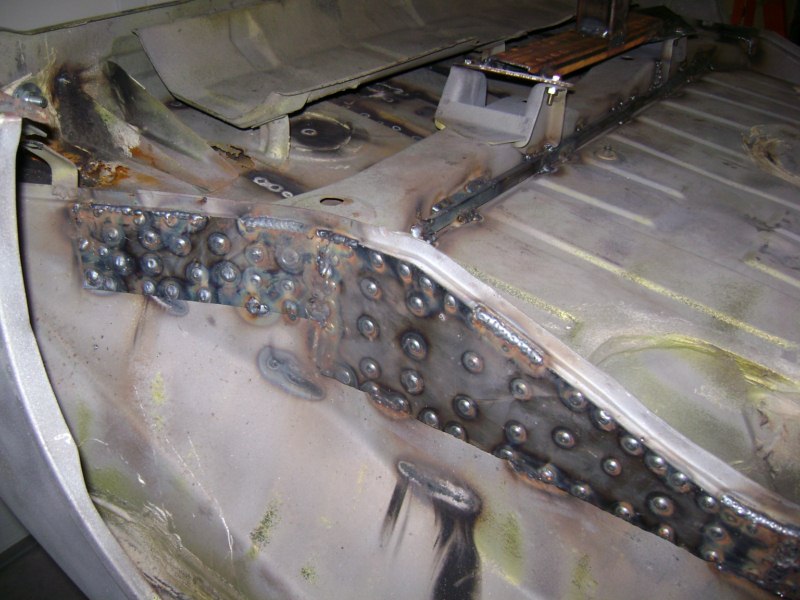 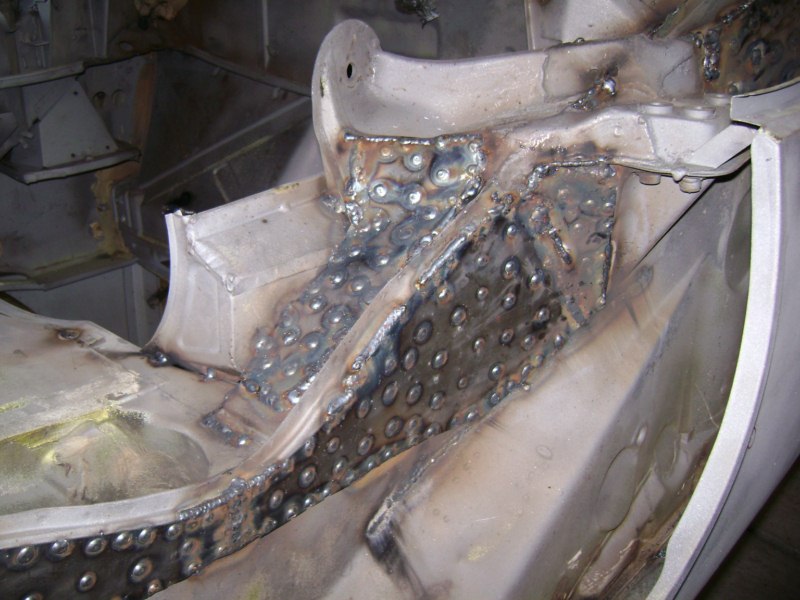 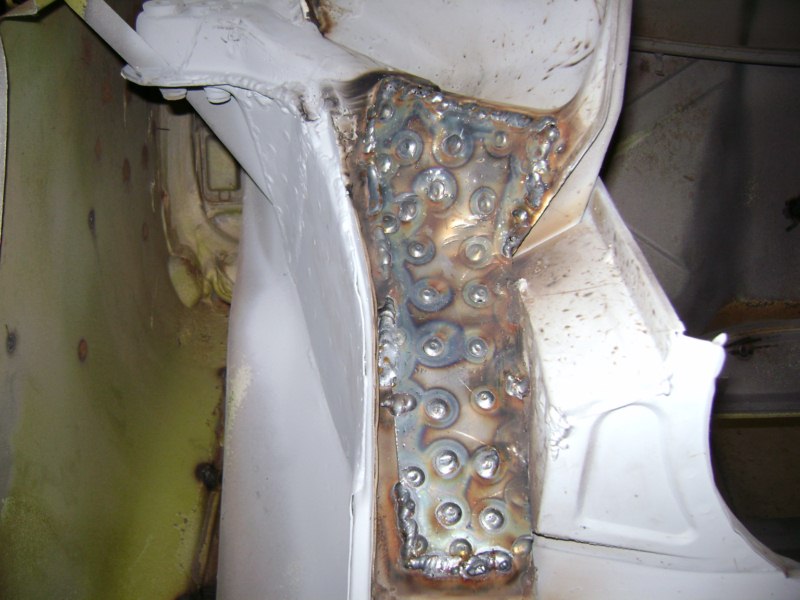 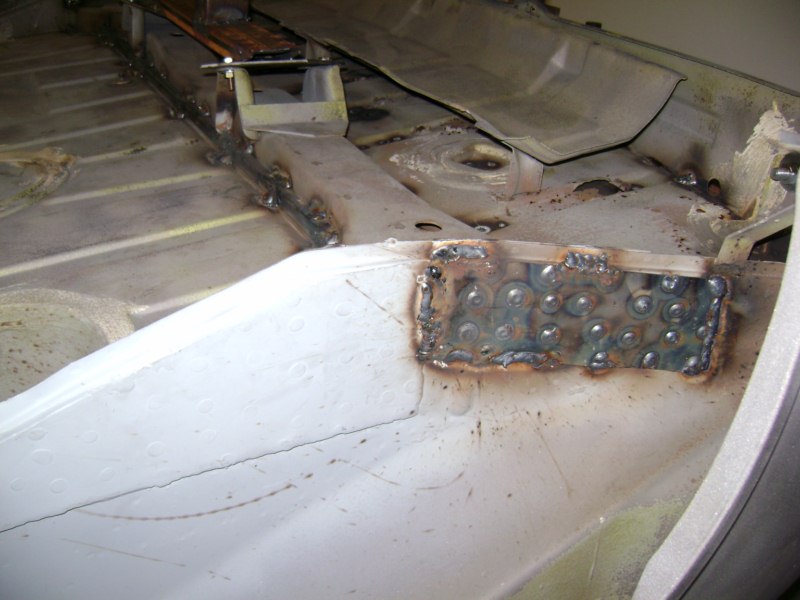 |
|
|
|
| Cire |
Dec 16 2009, 07:30 PM
Post
#18
|
|
Member Group: Members Posts: 279 Joined: 12-March 09 From: Tucson, Arizona Member No.: 10,155 Region Association: None |
    |
|
|
|
| J P Stein |
Dec 17 2009, 06:09 PM
Post
#19
|
|
Irrelevant old fart Group: Members Posts: 8,797 Joined: 30-December 02 From: Vancouver, WA Member No.: 45 Region Association: None |
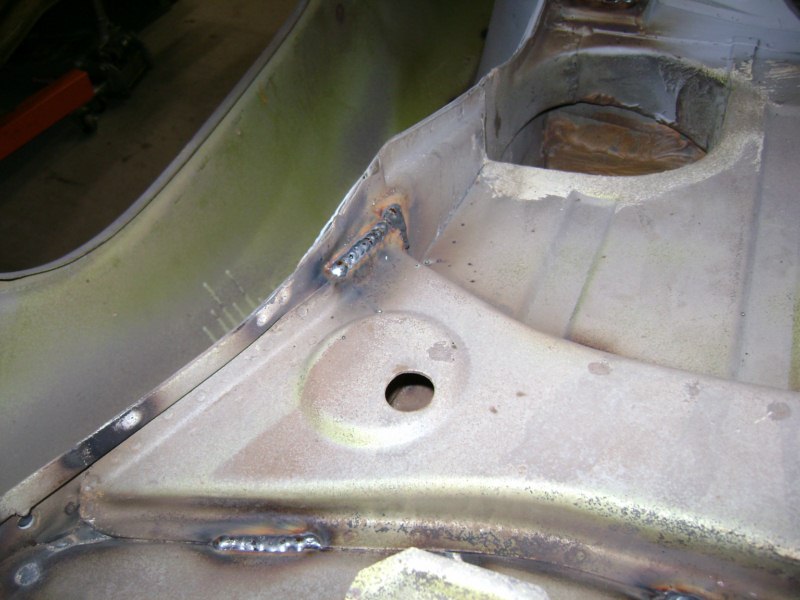
Areas than I have seen cracked....the ear always starts at the fwd side edge. Been know to come off entirely. At the wheel arch...usually at a spot weld that overlaps the edge of the seam. Front side of the shock tower at the botton as marked. There is no/little holding the tower to the long & rear fire wall....behind that little angled piece of the firewal.
Attached image(s) 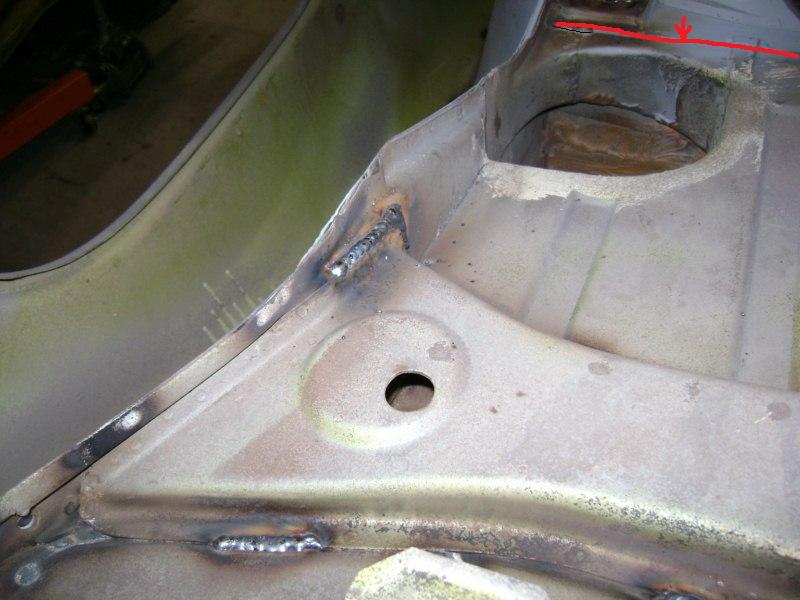 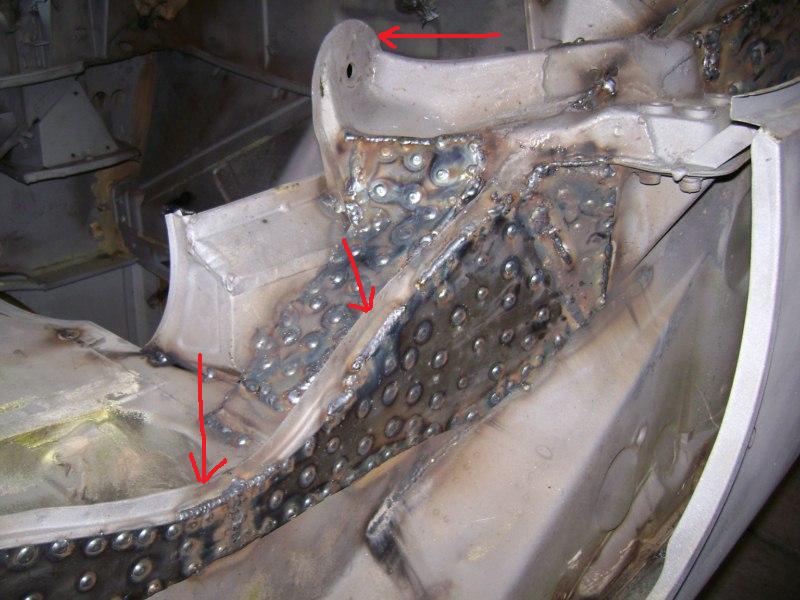
|
|
|
|
| Cire |
Dec 17 2009, 06:32 PM
Post
#20
|
|
Member Group: Members Posts: 279 Joined: 12-March 09 From: Tucson, Arizona Member No.: 10,155 Region Association: None |
QUOTE(J P Stein @ Dec 17 2009, 05:09 PM) Areas than I have seen cracked....the ear always starts at the fwd side edge. Been know to come off entirely. At the wheel arch...usually at a spot weld that overlaps the edge of the seam. Front side of the shock tower at the botton as marked. There is no/little holding the tower to the long & rear fire wall....behind that little angled piece of the firewal. Would you weld that seam the entire length? What would you do on the first photo? Run a weld beed down it? Do you happen to have pictures of yours and how it was done? Thanks for the thoughts. Greatly appreciated. Eric |
|
|
|
|
1 User(s) are reading this topic (1 Guests and 0 Anonymous Users)
0 Members:

|
Lo-Fi Version | Time is now: 2nd May 2024 - 09:30 PM |
Invision Power Board
v9.1.4 © 2024 IPS, Inc.