|
|
|
Porsche, and the Porsche crest are registered trademarks of Dr. Ing. h.c. F. Porsche AG.
This site is not affiliated with Porsche in any way. Its only purpose is to provide an online forum for car enthusiasts. All other trademarks are property of their respective owners. |
|
|

  |

| Krieger |
 Sep 21 2012, 10:26 PM Sep 21 2012, 10:26 PM
Post
#161
|
|
Advanced Member  Group: Members Posts: 4,704 Joined: 24-May 04 From: Santa Rosa CA Member No.: 2,104 Region Association: None |
Very nice work! It's hard to tell what color it is. Tan? Yellow?
|
   |

 
|
| Krieger |
Sep 21 2012, 10:27 PM
Post
#162
|
|
Advanced Member Group: Members Posts: 4,704 Joined: 24-May 04 From: Santa Rosa CA Member No.: 2,104 Region Association: None |
Oh, I like the bis ass black bumpers!
|
|
|
|
| wrightee |
Sep 22 2012, 06:10 AM
Post
#163
|
|
Member Group: Members Posts: 83 Joined: 18-November 09 From: Montclair, VA Member No.: 11,053 Region Association: MidAtlantic Region |
QUOTE(dlee6204 @ Jan 3 2012, 01:27 PM)  Before... After... I need to remember to replace the ground stud New tube installed Wow, excellent work and an inspiration to get working harder on my project. I have rust almost identical to photo #2 above (driver side engine shelf). Question: did you form sheet metal to patch the shelf piece and leave out the small drain indendation (that looks like it doesn't work anyway)? Also, for the inner firewall fix; did you have to open up the fender for access, or were you able to repair this from the inside? |
|
|
|
| wrightee |
Sep 22 2012, 06:13 AM
Post
#164
|
|
Member Group: Members Posts: 83 Joined: 18-November 09 From: Montclair, VA Member No.: 11,053 Region Association: MidAtlantic Region |
QUOTE(wrightee @ Sep 22 2012, 08:10 AM) QUOTE(dlee6204 @ Jan 3 2012, 01:27 PM) Before... After... I need to remember to replace the ground stud New tube installed Wow, excellent work and an inspiration to get working harder on my project. I have rust almost identical to photo #2 above (driver side engine shelf). Question: did you form sheet metal to patch the shelf piece and leave out the small drain indendation (that looks like it doesn't work anyway)? Also, for the inner firewall fix; did you have to open up the fender for access, or were you able to repair this from the inside? The photo was on post #74 |
|
|
|
| dlee6204 |
Sep 22 2012, 07:47 AM
Post
#165
|
|
Howdy Group: Members Posts: 2,162 Joined: 30-April 06 From: Burnsville, NC Member No.: 5,956 |
QUOTE(Krieger @ Sep 22 2012, 12:26 AM) Very nice work! It's hard to tell what color it is. Tan? Yellow? I believe its the original color L13 (Summer yellow). Hopefully we can get some better pictures once he gets the car back. (IMG:style_emoticons/default/smile.gif) |
|
|
|
| dlee6204 |
Sep 22 2012, 07:56 AM
Post
#166
|
|
Howdy Group: Members Posts: 2,162 Joined: 30-April 06 From: Burnsville, NC Member No.: 5,956 |
QUOTE(wrightee @ Sep 22 2012, 08:10 AM) Wow, excellent work and an inspiration to get working harder on my project. I have rust almost identical to photo #2 above (driver side engine shelf). Question: did you form sheet metal to patch the shelf piece and leave out the small drain indendation (that looks like it doesn't work anyway)? Also, for the inner firewall fix; did you have to open up the fender for access, or were you able to repair this from the inside? Yeah I believe I left the drain indent out of it. I can't remember if I drilled a drain hole or not. For the sidewall, I did not have to remove any part of the fender. I was able to do it all from the engine bay or passenger compartment. When doing the outer jackpost though I removed part of the door jamb to get a little more access. I didn't want to do anymore welding on exterior panels than I already had to. |
|
|
|
| nsr-jamie |
Sep 22 2012, 08:33 AM
Post
#167
|
|
914 guy in Japan Group: Members Posts: 1,182 Joined: 7-November 07 From: Nagoya, Japan Member No.: 8,305 Region Association: None |
Glad to see you got the bodywork done and some paint on it. Looking forward to seeing some better pictures. I sure learned a lot from this posting, thanks
|
|
|
|
| 993inNC |
Dec 1 2012, 09:31 PM
Post
#168
|
|
Member Group: Members Posts: 194 Joined: 14-August 09 From: at the beach Member No.: 10,676 Region Association: South East States |
SHE's BACK!!
So after three years and three months of owning what was supposed to be my little driver, Summer is back and ready for reassembly! I need to get it back to the body shop for some flaws I found and want fixed. Should have it to roller stage very soon. I have all new suspension, bearing and brake parts (accept calipers), and am ready to go..........if I could only find the rear trailing arm bolts (IMG:style_emoticons/default/headbang.gif) I'll get better pics tomorrow. I've already got the bumpers on, as well as the front A-arms. If I can find the rear swing arm bolts, it'll be rolling in no time Attached thumbnail(s) 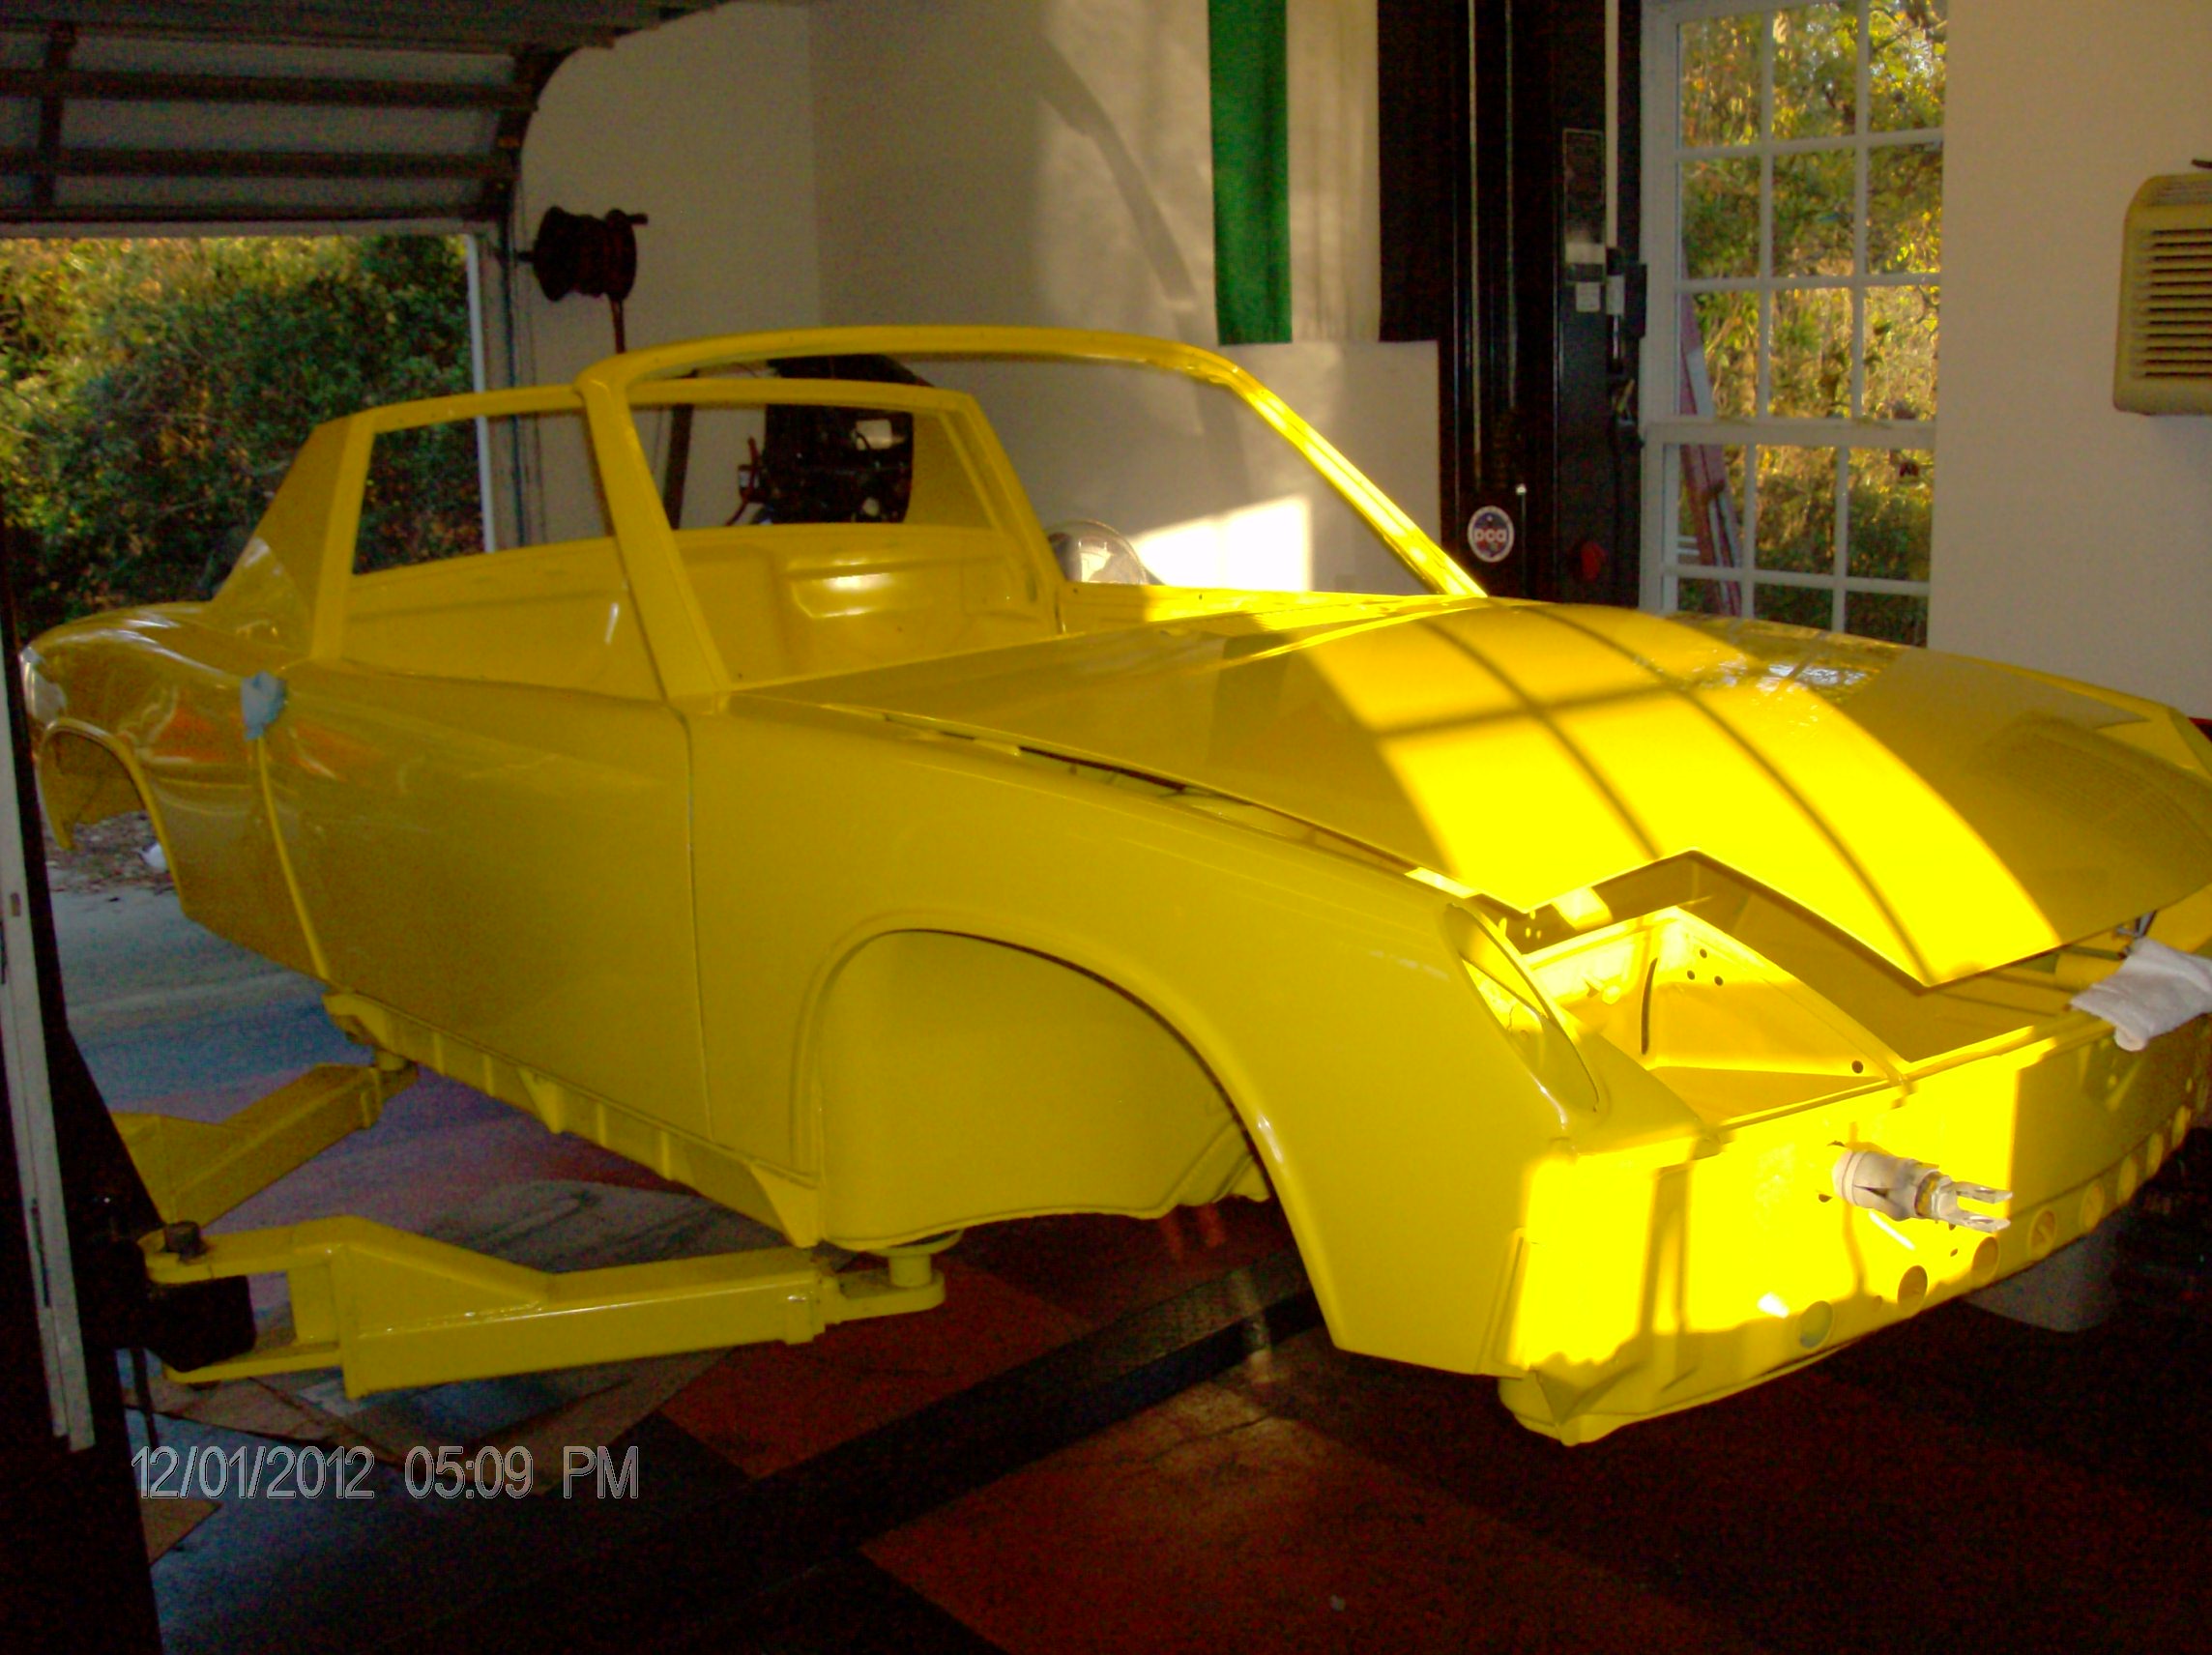  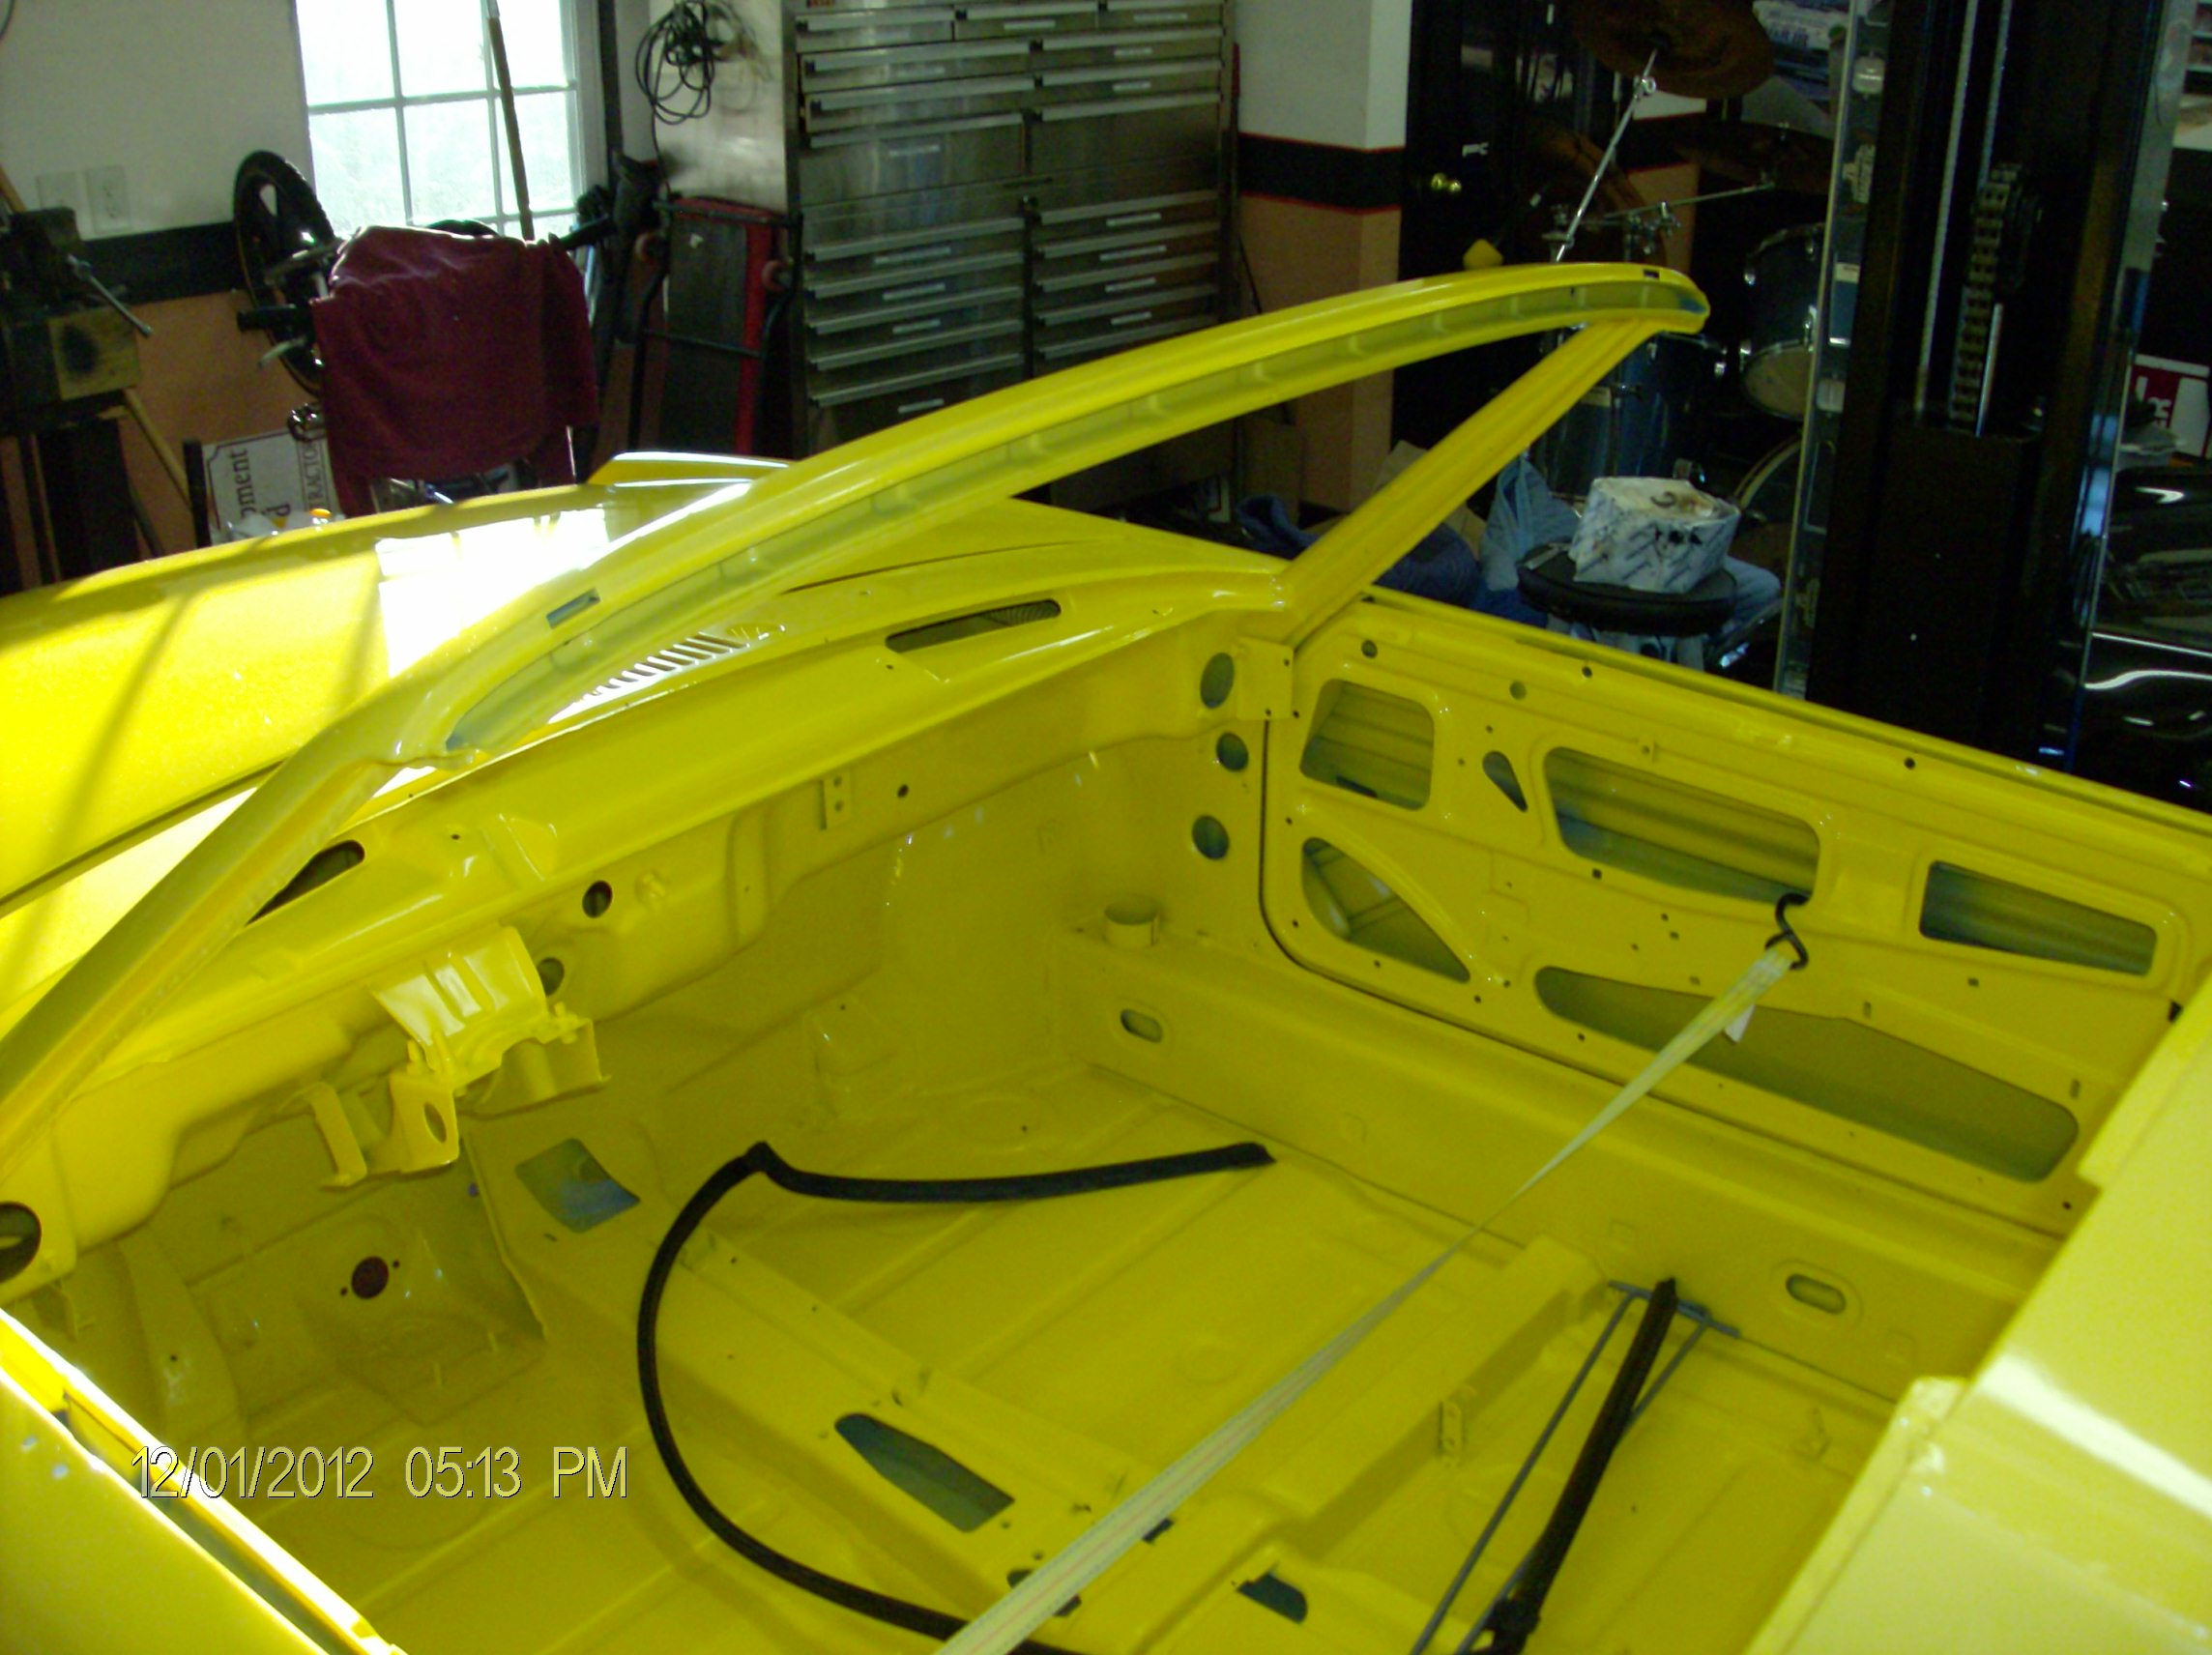 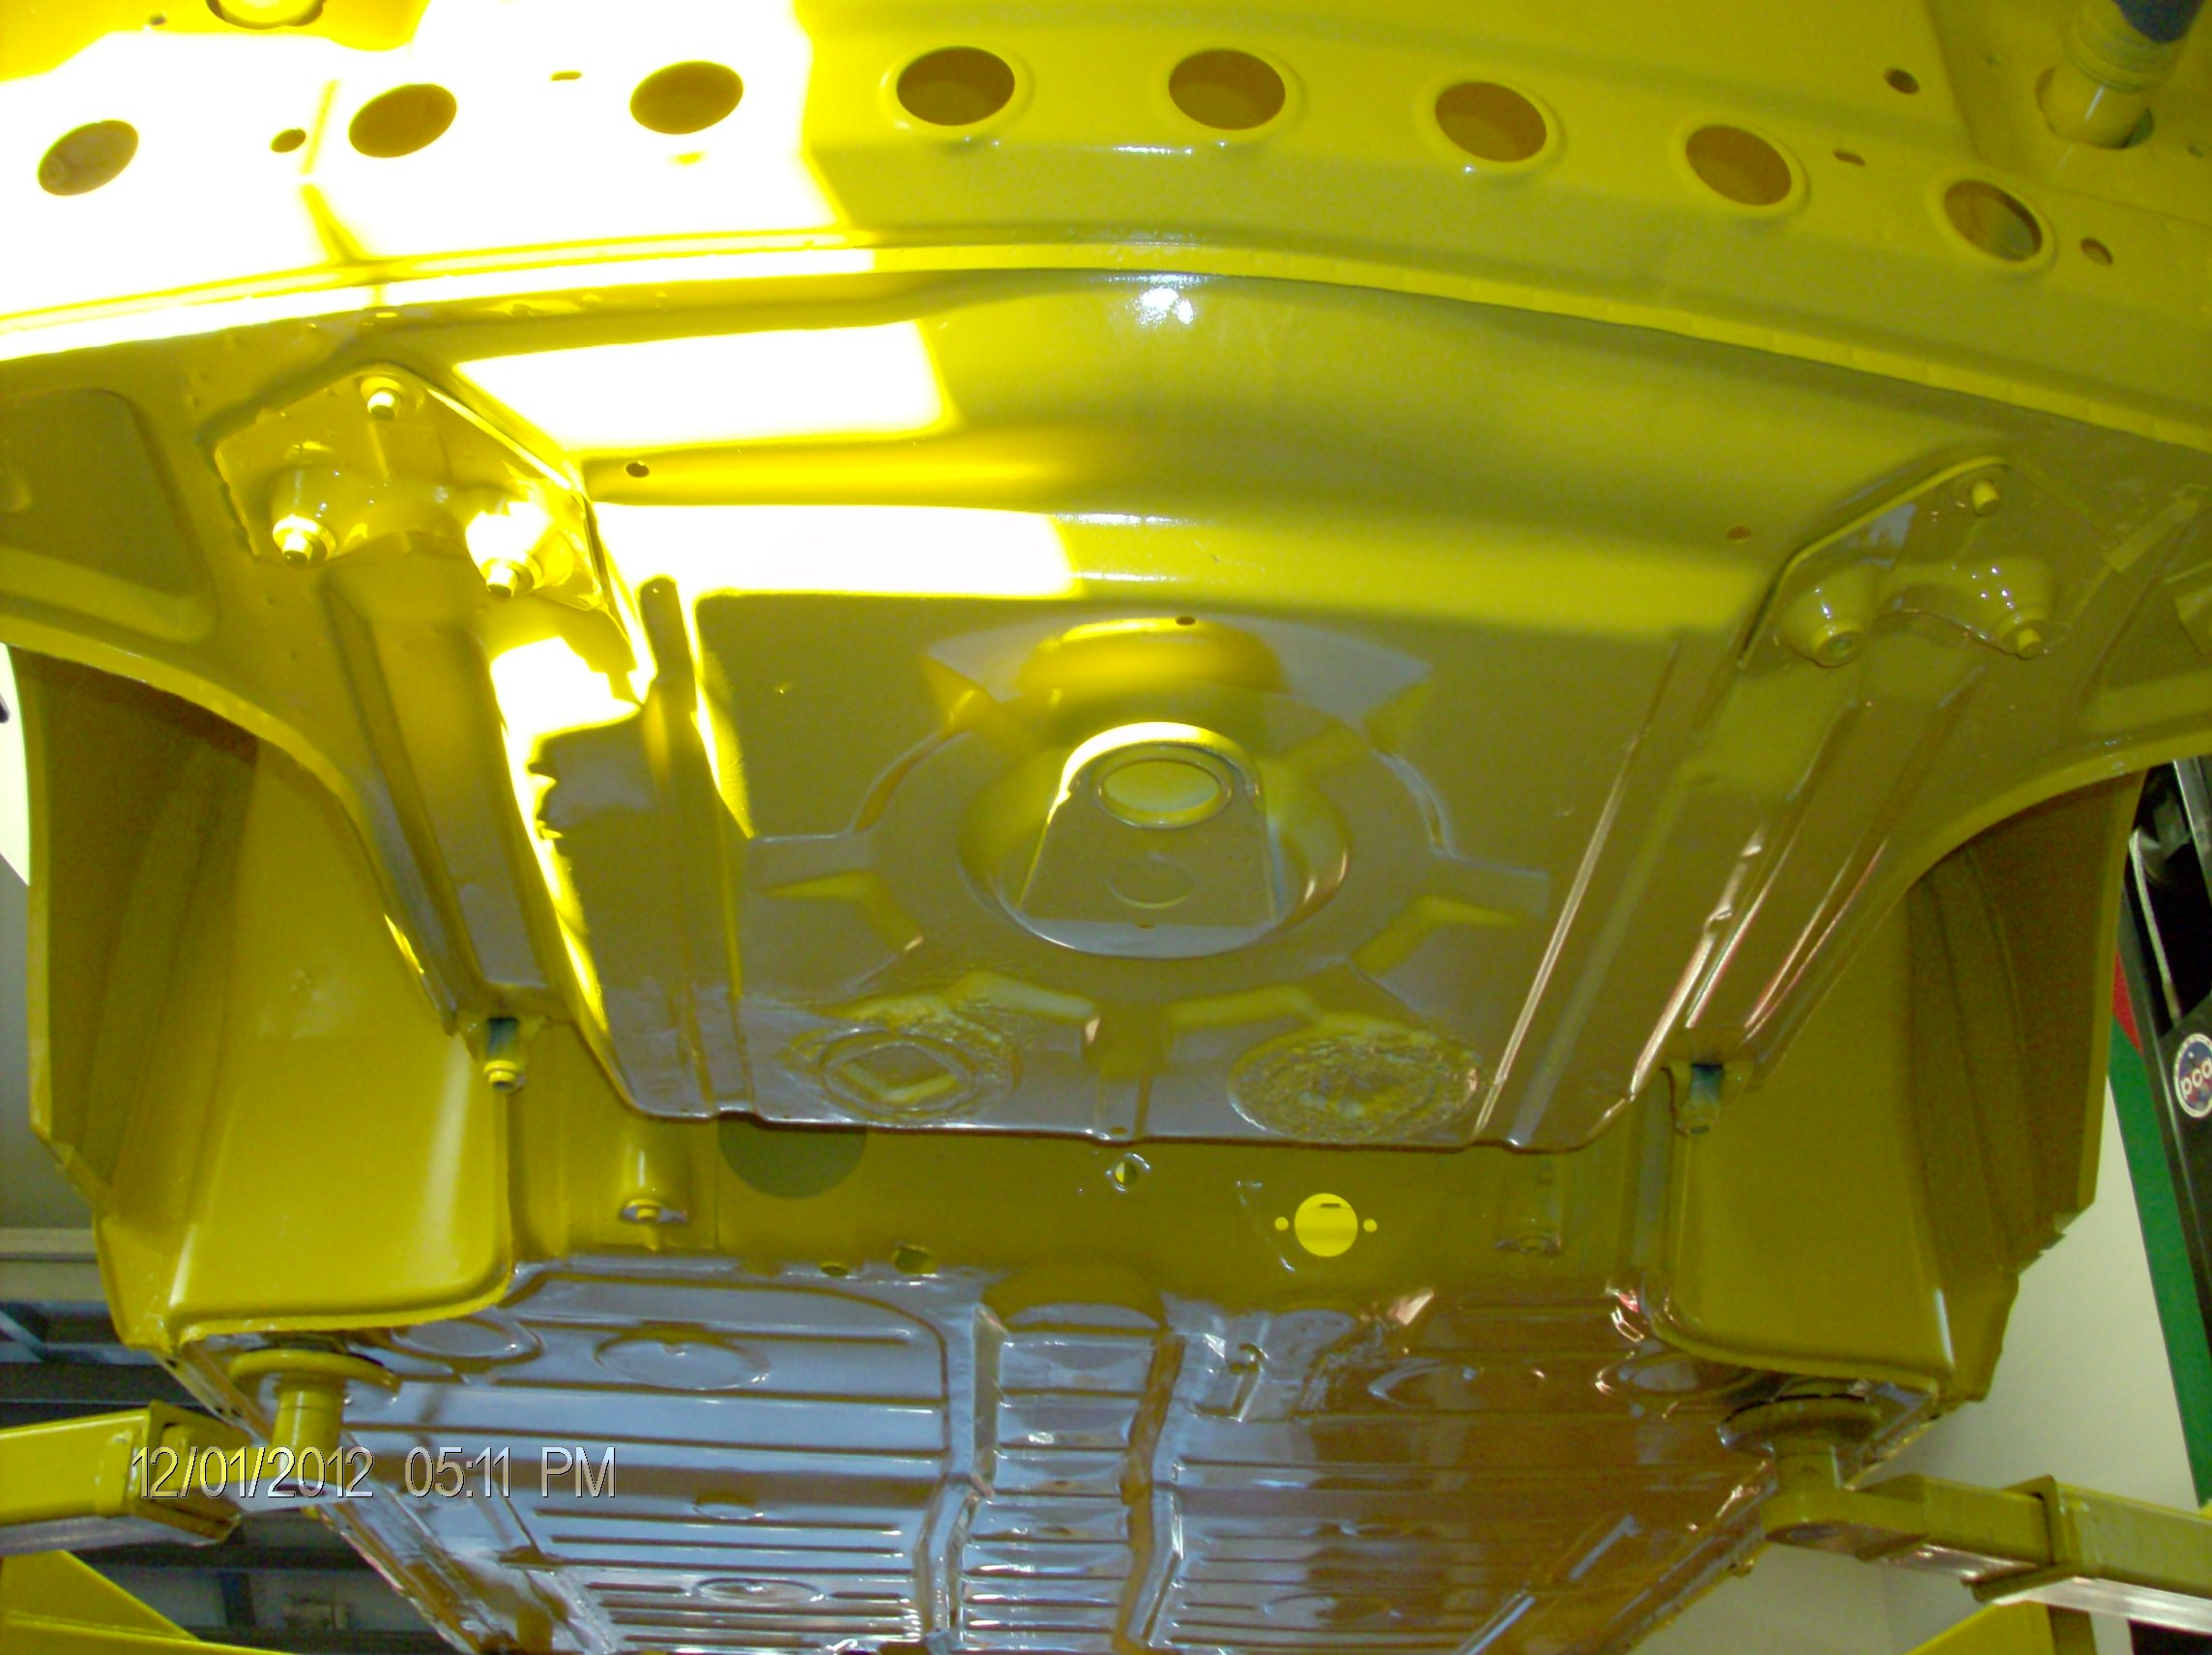
|
|
|
|
| FourBlades |
Dec 1 2012, 09:50 PM
Post
#169
|
|
From Wreck to Rockin Group: Members Posts: 2,054 Joined: 3-December 07 From: Brevard, FL Member No.: 8,414 Region Association: South East States |
Wow, that is beautiful. (IMG:style_emoticons/default/smilie_pokal.gif) Too nice to put any greasy parts on it. (IMG:style_emoticons/default/biggrin.gif) Just leave it like that... John |
|
|
|
| Cairo94507 |
Dec 2 2012, 08:34 AM
Post
#170
|
|
Michael Group: Members Posts: 9,719 Joined: 1-November 08 From: Auburn, CA Member No.: 9,712 Region Association: Northern California |
That looks so nice! I can't wait to see some parts start to appear.
|
|
|
|
| saigon71 |
Dec 2 2012, 08:46 AM
Post
#171
|
|
Senior Member Group: Members Posts: 1,998 Joined: 1-June 09 From: Dillsburg, PA Member No.: 10,428 Region Association: MidAtlantic Region |
Dude...your car looks awesome! (IMG:style_emoticons/default/beerchug.gif) Great work!
I also picked up some of Eastwoods Internal Frame Coating that I plan to use in the center tunnel. What do you think of this product? Any application tips? Congrats again, I look forward to seeing this thing get put back together. |
|
|
|
| jersey914 |
Dec 2 2012, 09:56 AM
Post
#172
|
|
Member Group: Members Posts: 161 Joined: 6-September 12 From: Marlton, NJ Member No.: 14,895 Region Association: North East States |
Beautiful restoration! Another one saved! Now throw some muscle into it!
(IMG:style_emoticons/default/beerchug.gif) (IMG:style_emoticons/default/driving-girl.gif) (IMG:style_emoticons/default/aktion035.gif) |
|
|
|
| bulitt |
Dec 2 2012, 10:56 AM
Post
#173
|
|
Achtzylinder Group: Members Posts: 4,188 Joined: 2-October 11 Member No.: 13,632 Region Association: South East States |
What trailing arm bolts do you need? These?
(IMG:http://www.914world.com/bbs2/uploads/post-13632-1331139088.jpg) |
|
|
|
| 993inNC |
Dec 2 2012, 11:28 AM
Post
#174
|
|
Member Group: Members Posts: 194 Joined: 14-August 09 From: at the beach Member No.: 10,676 Region Association: South East States |
Those would probably be them Bob. I found allen headed bolts that did the trick but I don't like not using the right bolts. figured I'd at least get started and could always go back and change them out.
Also have seemed to misplace a rear strut spring cap and a trailing arm shaft nut.......got lazy at the end of disassembly! Everything else is bagged and tagged. John I'd love to leave it as is, but with two other cars, I need my lift (IMG:style_emoticons/default/smile.gif) And it is too nice to put old parts back on.......but its what I have so..... Saigon, you'll have to ask Doug about what he thought of the coating, I had nothing to do with it. Jersey, hadn't decided what I'm doing for a motor yet. I have two and considered building one up and saving the other. I'm not going crazy though, I have the 993 if I want to go fast. This just has to look good (IMG:style_emoticons/default/smile.gif) |
|
|
|
| trojanhorsepower |
Dec 2 2012, 04:46 PM
Post
#175
|
|
Senior Member Group: Members Posts: 861 Joined: 21-September 03 From: Marion, NC Member No.: 1,179 Region Association: None |
That looks awesome Chris! This car is really going to be nice. I will have to check it out next time I am down your way.
|
|
|
|
| dlee6204 |
Dec 3 2012, 11:18 AM
Post
#176
|
|
Howdy Group: Members Posts: 2,162 Joined: 30-April 06 From: Burnsville, NC Member No.: 5,956 |
QUOTE I also picked up some of Eastwoods Internal Frame Coating that I plan to use in the center tunnel. What do you think of this product? Any application tips? My only tip is that it can be very messy! It dries pretty quick too. I can't really comment on how well it performs other than it gets everywhere and is a pain to clean up! (IMG:style_emoticons/default/laugh.gif) |
|
|
|
| 993inNC |
Dec 3 2012, 06:25 PM
Post
#177
|
|
Member Group: Members Posts: 194 Joined: 14-August 09 From: at the beach Member No.: 10,676 Region Association: South East States |
QUOTE(trojanhorsepower @ Dec 2 2012, 05:46 PM) That looks awesome Chris! This car is really going to be nice. I will have to check it out next time I am down your way. Thanks brother, come down any time. |
|
|
|
| Eric_Shea |
Dec 3 2012, 06:45 PM
Post
#178
|
|
PMB Performance Group: Admin Posts: 19,274 Joined: 3-September 03 From: Salt Lake City, UT Member No.: 1,110 Region Association: Rocky Mountains |
Looks great Chris. Stay at it!
|
|
|
|
| Socalandy |
Dec 3 2012, 09:46 PM
Post
#179
|
|
Its got to be Yellow!!! Group: Members Posts: 2,432 Joined: 29-August 09 From: Orange Member No.: 10,742 Region Association: Southern California |
Looks Amazing!!!
|
|
|
|
| 993inNC |
Dec 4 2012, 02:59 PM
Post
#180
|
|
Member Group: Members Posts: 194 Joined: 14-August 09 From: at the beach Member No.: 10,676 Region Association: South East States |
QUOTE(Socalandy @ Dec 3 2012, 10:46 PM) Looks Amazing!!! Sure does! Got to thank Doug up there dlee6204, he did the body work on it. I couldn't have done what he did, that's for sure. I'm just proud to have a nicely restored ride. So many have been hacked or half ass fixed over the years, I think this car will really be something some day (hopefully soon). I'll have some more teaser pics very soon! |
|
|
|
|
1 User(s) are reading this topic (1 Guests and 0 Anonymous Users)
0 Members:

|
Lo-Fi Version | Time is now: 30th April 2024 - 01:03 AM |
Invision Power Board
v9.1.4 © 2024 IPS, Inc.