|
|
|
Porsche, and the Porsche crest are registered trademarks of Dr. Ing. h.c. F. Porsche AG.
This site is not affiliated with Porsche in any way. Its only purpose is to provide an online forum for car enthusiasts. All other trademarks are property of their respective owners. |
|
|

  |

| Bleyseng |
 Mar 28 2004, 07:13 PM Mar 28 2004, 07:13 PM
Post
#1
|
|
Aircooled Baby!  Group: Members Posts: 13,034 Joined: 27-December 02 From: Seattle, Washington (for now) Member No.: 24 Region Association: Pacific Northwest |
Check this out, can you spot the "special" gauge I finally got to work. All OEM 914 stuff no aftermarkter stuff for me!
Attached image(s) 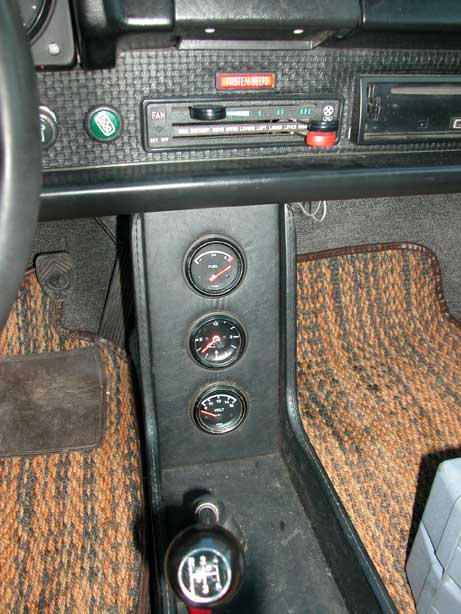
|
   |

 
|
| Bleyseng |
Mar 28 2004, 07:14 PM
Post
#2
|
|
Aircooled Baby! Group: Members Posts: 13,034 Joined: 27-December 02 From: Seattle, Washington (for now) Member No.: 24 Region Association: Pacific Northwest |
I needed it so these would work with these.
Attached image(s) 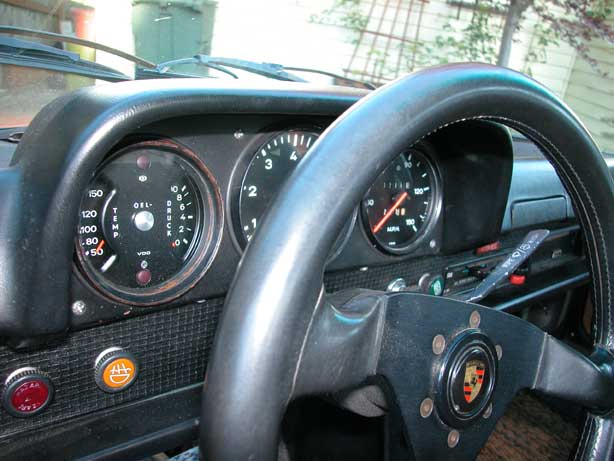
|
|
|
|
| Qarl |
Mar 28 2004, 07:15 PM
Post
#3
|
|
Shriveled member Group: Benefactors Posts: 5,233 Joined: 8-February 03 From: Florida Member No.: 271 Region Association: None |
Fuel gauge in console
|
|
|
|
| Aaron Cox |
Mar 28 2004, 07:16 PM
Post
#4
|
|
Professional Lawn Dart Group: Retired Admin Posts: 24,541 Joined: 1-February 03 From: OC Member No.: 219 Region Association: Southern California |
that is exactly what im doing on my car!!! plz post the details of the custom fuel gauge!!!!!! (IMG:style_emoticons/default/clap56.gif) (IMG:style_emoticons/default/clap56.gif) (IMG:style_emoticons/default/clap56.gif)
|
|
|
|
| Curvie Roadlover |
Mar 28 2004, 07:17 PM
Post
#5
|
|
Two trunks are better than one! Group: Members Posts: 2,025 Joined: 29-December 02 From: Southeast Michigan Member No.: 42 |
|
|
|
|
| Qarl |
Mar 28 2004, 07:33 PM
Post
#6
|
|
Shriveled member Group: Benefactors Posts: 5,233 Joined: 8-February 03 From: Florida Member No.: 271 Region Association: None |
Geoff,
Did you just run an extra wire for the oil temperature, and use the stock oil pressure idiot light wire (that's in the harness) for the oil pressure gauge? Or did you run two new wires? The reason I am asking is that I have the combo gauge with the oil temp and oil pressure gauges. I have the NOS main body harness and I'm thinking about the wiring changes I need to make before I install the harness in the body. Thanks! |
|
|
|
| Bleyseng |
Mar 28 2004, 07:36 PM
Post
#7
|
|
Aircooled Baby! Group: Members Posts: 13,034 Joined: 27-December 02 From: Seattle, Washington (for now) Member No.: 24 Region Association: Pacific Northwest |
Took me half of the day! I have tried three aftermarket fuel gauges that were supposed to work. I even called and ordered one from AA, nope didn't work. Of course I gave up trying to get my $$ back. SSOOOOOoooo this is how I did it.
1. Take apart your stock fuel gauge and carefully remove all the guts, including the needle without damaging anything. This takes lots of time! 2. Mark on the sensor where + is on it with it felt pen. 3. Take apart your oil temp gauge, note how the sensor is mounted. The fuel sensor needs to be mounted upside down so the needle sweeps right. Install the terminal connection on the back noting where the + is so it lines up. 4.Use this pic to glue over the gauge face after cutting out the holes for the screws and the needle peg is. Carefully as it shows. 5. Install the needle ever so carefully just beyond the E. 6. Install glass and case cover 7. Install in car 8. Extend the wires down to the console good to go. Geoff Oh, to make this face I just scaned it and then Photoshopped it adding the right info and deleting the words "TEMP". I used a high grade brochure paper which glues onto the face plate with spray glue. Attached image(s) 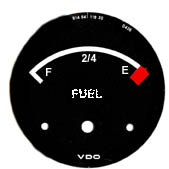
|
|
|
|
| Bleyseng |
Mar 28 2004, 07:40 PM
Post
#8
|
|
Aircooled Baby! Group: Members Posts: 13,034 Joined: 27-December 02 From: Seattle, Washington (for now) Member No.: 24 Region Association: Pacific Northwest |
I use the stock oem oil idiot light wire for the pressure gauge.
I use the stock oem oil temp wire and extend it at the console for the temperature gauge. I don't like the triple gauge as its too busy and I can't see the info that well. AXing I do look at the oil temp and pressure when I can (straight spot) and its real easy to see. Fuel who cares as long as it works and look like it fits in with the other gauges. I have seen the cockpit VDO gauge JP has but I have never been able to find it. When I have order it I get some other wrong POS with the wrong ohm range. Geoff |
|
|
|
| Qarl |
Mar 28 2004, 08:12 PM
Post
#9
|
|
Shriveled member Group: Benefactors Posts: 5,233 Joined: 8-February 03 From: Florida Member No.: 271 Region Association: None |
Are there TWO wires in the stock harness for oil pressure and temperature?
Did you happen to remember which wires was for the oil temp (what color?) Or is this only for cars that had the optional gauge abouve the fuel gauge? Or did you use the cylinder head temperature wire. |
|
|
|
| Bleyseng |
Mar 28 2004, 08:28 PM
Post
#10
|
|
Aircooled Baby! Group: Members Posts: 13,034 Joined: 27-December 02 From: Seattle, Washington (for now) Member No.: 24 Region Association: Pacific Northwest |
Yes, there are two wires for oil temp and pressure
The green/yellow is the oil pressure/idoit light wire The green/black is the ol temp wire but that only goes to the console so you have to extend it. If you want the idiot light add a wire which I will do at some point. This Euro combo gauge doesn't have a oil idiot light, just the brake warning light and the alt light. They all differ some depending on the year. The CHT wire is part of the FI harness and is busy. geoff |
|
|
|
| rhodyguy |
Mar 28 2004, 08:35 PM
Post
#11
|
|
Chimp Sanctuary NW. Check it out. Group: Members Posts: 22,075 Joined: 2-March 03 From: Orion's Bell. The BELL! Member No.: 378 Region Association: Galt's Gulch |
"bought from AA" , "gave up..." (IMG:style_emoticons/default/rolleyes.gif) . they wear you down. you're killing me. when will we learn? i thought your car ran rather cool? celsius, duh.
kevin "want a crappy s.e. valance pretty cheap?" |
|
|
|
| Bleyseng |
Mar 28 2004, 09:00 PM
Post
#12
|
|
Aircooled Baby! Group: Members Posts: 13,034 Joined: 27-December 02 From: Seattle, Washington (for now) Member No.: 24 Region Association: Pacific Northwest |
thats so Monique feels at home, runs around 100' C
|
|
|
|
| Bleyseng |
Mar 28 2004, 09:27 PM
Post
#13
|
|
Aircooled Baby! Group: Members Posts: 13,034 Joined: 27-December 02 From: Seattle, Washington (for now) Member No.: 24 Region Association: Pacific Northwest |
here is another gauge face
Attached image(s) 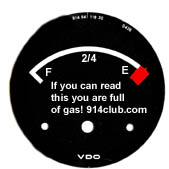
|
|
|
|
| ChrisReale |
Mar 28 2004, 10:12 PM
Post
#14
|
|
Sleazy Group: Members Posts: 2,665 Joined: 20-January 03 From: San Francisco Member No.: 176 |
This is a classic thread. I might end up doing the same thing as you Geoff....
|
|
|
|
| Rusty |
Mar 29 2004, 06:08 AM
Post
#15
|
|
Wanted: Engine case GA003709 Group: Admin Posts: 7,941 Joined: 24-December 02 From: North Alabama Member No.: 6 Region Association: Galt's Gulch |
I agree. Truly classic. (IMG:style_emoticons/default/smilie_pokal.gif)
Any other input/questions before I move it over? -Rusty (IMG:style_emoticons/default/smoke.gif) |
|
|
|
| Bleyseng |
Mar 29 2004, 08:40 AM
Post
#16
|
|
Aircooled Baby! Group: Members Posts: 13,034 Joined: 27-December 02 From: Seattle, Washington (for now) Member No.: 24 Region Association: Pacific Northwest |
Anyone can do it and its easy but also pretty hard. The parts are very small and weak so you can damage them. This is a time your time project and note how things fit as you take them apart.
Oh, for the needle paint I use some bright orange marking construction paint, matched pretty damn close. Go for it Chris as you work with clocks, you probably could do the 930 tach install if you put your mind to it. Geoff |
|
|
|
|
1 User(s) are reading this topic (1 Guests and 0 Anonymous Users)
0 Members:

|
Lo-Fi Version | Time is now: 9th May 2024 - 07:23 PM |
Invision Power Board
v9.1.4 © 2024 IPS, Inc.