|
|
|
Porsche, and the Porsche crest are registered trademarks of Dr. Ing. h.c. F. Porsche AG.
This site is not affiliated with Porsche in any way. Its only purpose is to provide an online forum for car enthusiasts. All other trademarks are property of their respective owners. |
|
|

  |

| rick 918-S |
 May 30 2010, 07:27 PM May 30 2010, 07:27 PM
Post
#21
|
|
Hey nice rack! -Celette  Group: Members Posts: 21,278 Joined: 30-December 02 From: Now in Superior WI Member No.: 43 Region Association: Northstar Region |
QUOTE(scotty b @ May 30 2010, 08:11 PM)  QUOTE(obscurity @ May 30 2010, 01:21 PM) If you come across spot welds (in appearance) that are gold in color when you grind them is that a braze? or was the last owner using some othe welding metal? Can you weld to it or should I cut it out? If it is truely a spot weld and is gold ( brazed ) it is not factory. Post a pic so we can see exactly what you are talking about. As steel gets hot it will turn goldish before it gets blue. Perhaps you just got the spot hot when grinding or drilling (IMG:style_emoticons/default/confused24.gif) If it's brass you can't weld to it. Remove it. Photos are always good. (IMG:style_emoticons/default/popcorn[1].gif) |
   |

 
|
| obscurity |
May 30 2010, 07:36 PM
Post
#22
|
|
Member Group: Members Posts: 413 Joined: 24-February 06 From: Atlanta ,GA Member No.: 5,628 Region Association: South East States |
QUOTE(scotty b @ May 30 2010, 09:11 PM) QUOTE(obscurity @ May 30 2010, 01:21 PM) If you come across spot welds (in appearance) that are gold in color when you grind them is that a braze? or was the last owner using some othe welding metal? Can you weld to it or should I cut it out? If it is truely a spot weld and is gold ( brazed ) it is not factory. Post a pic so we can see exactly what you are talking about. As steel gets hot it will turn goldish before it gets blue. Perhaps you just got the spot hot when grinding or drilling (IMG:style_emoticons/default/confused24.gif) You can see the gold in this picture just above the hole 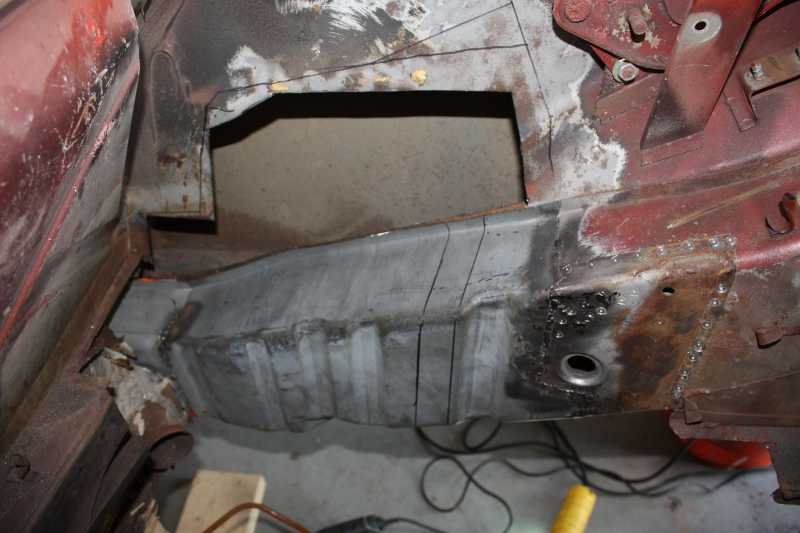 |
|
|
|
| scotty b |
May 30 2010, 07:49 PM
Post
#23
|
|
rust free you say ? Group: Members Posts: 16,375 Joined: 7-January 05 From: richmond, Va. Member No.: 3,419 Region Association: None |
Someone brazed in a battery tray at some point. Cut out above it to get clean metal.
|
|
|
|
| obscurity |
May 30 2010, 08:42 PM
Post
#24
|
|
Member Group: Members Posts: 413 Joined: 24-February 06 From: Atlanta ,GA Member No.: 5,628 Region Association: South East States |
QUOTE(scotty b @ May 30 2010, 09:49 PM) Someone brazed in a battery tray at some point. Cut out above it to get clean metal. Scotty B, Thanks for the help! Those spots have been bugging me since I uncovered them almost a year ago. I'll cut them out in the morning. (IMG:style_emoticons/default/smile.gif) |
|
|
|
| obscurity |
Jun 6 2010, 07:43 PM
Post
#25
|
|
Member Group: Members Posts: 413 Joined: 24-February 06 From: Atlanta ,GA Member No.: 5,628 Region Association: South East States |
I only got a small amount of time to work on the car this weekend but I just about have the inner wheel well cut out. It just needs a little more trimming.
 |
|
|
|
| obscurity |
Jul 4 2010, 01:52 PM
Post
#26
|
|
Member Group: Members Posts: 413 Joined: 24-February 06 From: Atlanta ,GA Member No.: 5,628 Region Association: South East States |
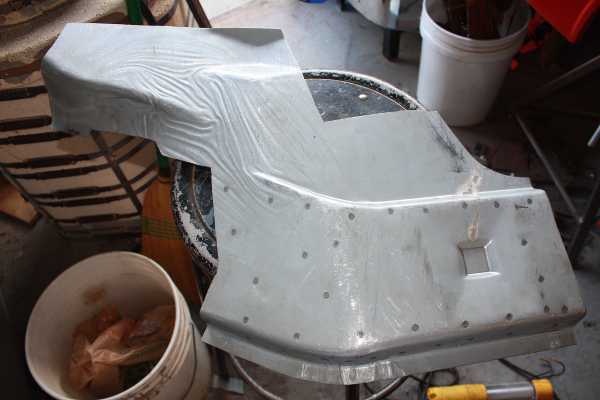
I am back at it this weekend. I received the jack point replacement piece from Restoration Design. Does anyone know what is on the inside of the panel. It looks like a paint of aome sort but it is silver and rough. It is not on the exposed side. My guess is weld through primer or etching primer. Here is the part mocked up. I plan to weld it tomorrow hopefully.
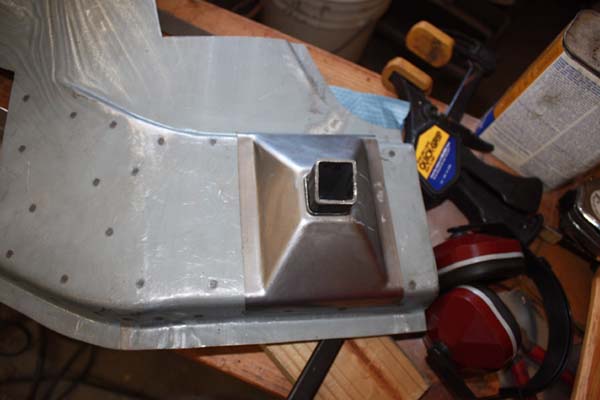 Beyond that I made a sleeve for the joint betweent the mid long and the rear long. I really don't like how every replacemet panel come together in a 6" area at the most strained point on the car so hopfully this will help with that. First a few pictures of the pattern and pattern transfer. 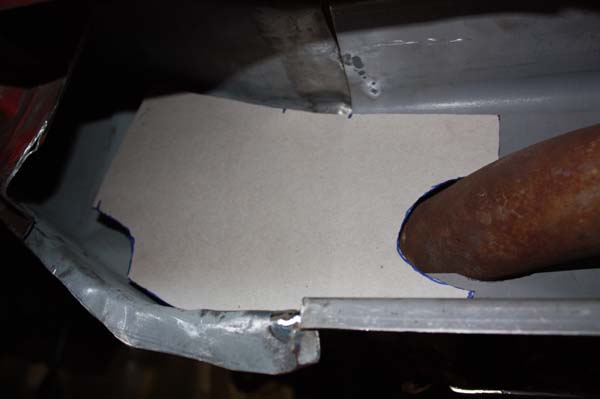  And finally the final part. It needs a little more shaping and the weld look like crap but overall I am happy with it. I will need to prime it as best I can and spot it in.  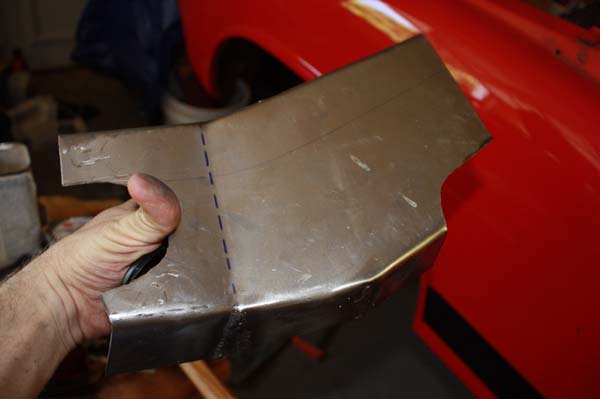 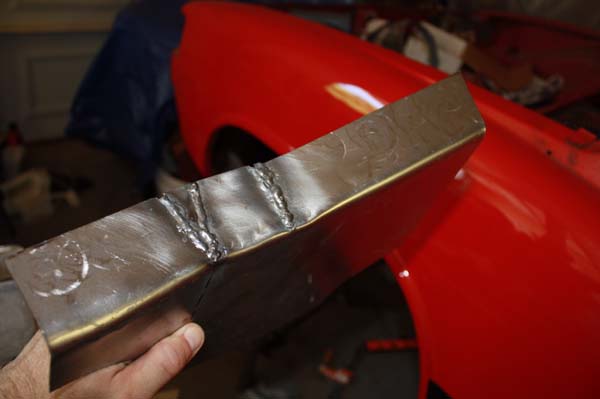 |
|
|
|
| scotty b |
Jul 4 2010, 02:00 PM
Post
#27
|
|
rust free you say ? Group: Members Posts: 16,375 Joined: 7-January 05 From: richmond, Va. Member No.: 3,419 Region Association: None |
please tell me you have braced that car WELL ??!!!! You've removed alot of structural metal AND have added a fair amoutn of heat. That's more than enough to make it twist. (IMG:style_emoticons/default/sad.gif)
|
|
|
|
| obscurity |
Jul 4 2010, 02:08 PM
Post
#28
|
|
Member Group: Members Posts: 413 Joined: 24-February 06 From: Atlanta ,GA Member No.: 5,628 Region Association: South East States |
QUOTE(scotty b @ Jul 4 2010, 04:00 PM) please tell me you have braced that car WELL ??!!!! You've removed alot of structural metal AND have added a fair amoutn of heat. That's more than enough to make it twist. (IMG:style_emoticons/default/sad.gif) I have the front half supported one a frame and the trunk up on some screw jackstands that I made. I have been taking measurements and it now a little straighter than it started...I Hope (IMG:style_emoticons/default/smile.gif) |
|
|
|
| scotty b |
Jul 4 2010, 02:34 PM
Post
#29
|
|
rust free you say ? Group: Members Posts: 16,375 Joined: 7-January 05 From: richmond, Va. Member No.: 3,419 Region Association: None |
You really should stop and make a solid brace within the door frame. Won't take long, just make it go from the hinge mount(s) to the latch or the seat belt mount. You can just tack weld a piece of pipe in place if you don't want to spend a lot of time on it. You're playing with fire IMHO (IMG:style_emoticons/default/popcorn[1].gif)
|
|
|
|
| scotty b |
Jul 4 2010, 02:36 PM
Post
#30
|
|
rust free you say ? Group: Members Posts: 16,375 Joined: 7-January 05 From: richmond, Va. Member No.: 3,419 Region Association: None |
[quote name='obscurity' date='Jul 4 2010, 12:08 PM' post='1339195']
(IMG:style_emoticons/default/cool.gif)--><div class='quotetop'>QUOTE(scotty b @ Jul 4 2010, 04:00 PM) </div><div class='quotemain'><!--quotec-->please tell me you have braced that car WELL ??!!!! You've removed alot of structural metal AND have added a fair amoutn of heat. That's more than enough to make it twist. (IMG:style_emoticons/default/sad.gif) [/quote] I Hope (IMG:style_emoticons/default/smile.gif) [/quote] My dad used to tell me " you can hope in one hand and sh*t in the other, tell me which one gets filled first" know whut I mean Vern ? |
|
|
|
| obscurity |
Jul 4 2010, 06:30 PM
Post
#31
|
|
Member Group: Members Posts: 413 Joined: 24-February 06 From: Atlanta ,GA Member No.: 5,628 Region Association: South East States |
QUOTE(scotty b @ Jul 4 2010, 04:34 PM) You really should stop and make a solid brace within the door frame. Won't take long, just make it go from the hinge mount(s) to the latch or the seat belt mount. You can just tack weld a piece of pipe in place if you don't want to spend a lot of time on it. You're playing with fire IMHO (IMG:style_emoticons/default/popcorn[1].gif) I have actually gotten mixed recommendations on this one from quite a few people. I share your concern, and I actually already built a brace from the hinge to the latch and had it in for a while but took it out because I couldn't tell if the body was flexing only if the distance between the hinge and the latch was constant. With the door in I can tell how the gap is working while I am welding. I have thought about making a solid brace that connects to two points on each side and has some x bracing to keep it all straight. |
|
|
|
| obscurity |
Jul 5 2010, 04:11 PM
Post
#32
|
|
Member Group: Members Posts: 413 Joined: 24-February 06 From: Atlanta ,GA Member No.: 5,628 Region Association: South East States |
Just a couple of quick thoughts as I sat out in my garage thinking about what needed to happen next...
When I began working on the project I was terrified to cut into the car despite the rust clearly cutting its own way out. Now after months of slowly moving forward I find myself almost gleefully willing to cut more metal off but terrified to start welding it back up. I think it is partially a fear of warping the car in the effort but also that if I weld it up now it makes it much harder to go back and fix anything I may have forgotten (or worse yet done wrong) Its times like these I would love to have some old time expert who swings by the house every once and a while for coffee and conversation who can tell me where I'm going to run into problems. I guess the task for the week is to steel myself against the idea of welding a substantial part of the long next weekend. |
|
|
|
| charliew |
Jul 5 2010, 05:15 PM
Post
#33
|
|
Advanced Member Group: Members Posts: 2,363 Joined: 31-July 07 From: Crawford, TX. Member No.: 7,958 |
My thoughts are you have blown off the best info provided so far. If you don't brace the tub you will not be happy with the outcome. If someone told you it doesn't need bracing the've never done it with this much removed at one time. THERE IS NO WAY that tub can stay straight while it is being heated and cooled. Every time a bead is put in it will shrink some as it cools, the idea is to limit it as much as possible. If you think it is cut up now wait till you try to straighten it out. But it will be a great story so try your best and lets see how you end up. The door gap and the twist, think about it. A support under the middle of the long and the center tunnel will also help. How long has it been suspended between the outer supports? Try putting a 8ft 2x4 on two supports at the ends and let it stay there for a month and see what happens. Metal is only stronger but it still does the same thing only less.
I forgot, the time to build the brace was before you cut all the pieces out. Somehow you are going to need to do some real close measuring on the top gap and the door gap top and bottom, and the side to side diagonal before you start to make sure it doesn't change as you proceed. You can put a straight edge on the outside of the doors to see if either side is out from the fender or quarter on the outside. Good luck and I hope it works out but you are in a pretty interesting spot at this point. You do seem to have some metal working skills though so maybe this will prove to everyone that has done it, it really doesn't need bracing if you are good enough. |
|
|
|
| obscurity |
Jul 5 2010, 05:41 PM
Post
#34
|
|
Member Group: Members Posts: 413 Joined: 24-February 06 From: Atlanta ,GA Member No.: 5,628 Region Association: South East States |
QUOTE(charliew @ Jul 5 2010, 07:15 PM) My thoughts are you have blown off the best info provided so far. If you don't brace the tub you will not be happy with the outcome. If someone told you it doesn't need bracing the've never done it with this much removed at one time. THERE IS NO WAY that tub can stay straight while it is being heated and cooled. Every time a bead is put in it will shrink some as it cools, the idea is to limit it as much as possible. If you think it is cut up now wait till you try to straighten it out. But it will be a great story so try your best and lets see how you end up. The door gap and the twist, think about it. A support under the middle will also help. I forgot, the time to build the brace was before you cut all the pieces out. Somehow you are going to need to do some real close measuring on the top gap and the door gap top and bottom, and the side to side diagonal before you start to make sure it doesn't change as you proceed. Good luck and I hope it works out but you are in a pretty interesting spot at this point. You do seem to have some metal working skills though so maybe this will prove to everyone that has done it, it really doesn't need bracing if you are good enough. I didn't mean to sound like I was not paying attention to scotty b's advice. I very much value the advice he has given me. He clearly knows what he is doing. Its obvious to me there is alot of force at work in this fix after reading Jeff Hail's account of breaking his turnbuckle in the process so the car could very easily move on me. I want to either make a brace that can not possibly move or I want to be sure I know when it moves so I can back up and take another route. It would be ideal if I could figure out a way to do both. So far all my measurements have indicated that nothing has moved in a bad way. I was able to take a little twist out of the that seemed to already be there. |
|
|
|
| mepstein |
Jul 5 2010, 06:23 PM
Post
#35
|
|
914-6 GT in waiting Group: Members Posts: 20,726 Joined: 19-September 09 From: Landenberg, PA/Wilmington, DE Member No.: 10,825 Region Association: MidAtlantic Region |
QUOTE(obscurity @ Jul 5 2010, 06:11 PM) Just a couple of quick thoughts as I sat out in my garage thinking about what needed to happen next... When I began working on the project I was terrified to cut into the car despite the rust clearly cutting its own way out. Now after months of slowly moving forward I find myself almost gleefully willing to cut more metal off but terrified to start welding it back up. I think it is partially a fear of warping the car in the effort but also that if I weld it up now it makes it much harder to go back and fix anything I may have forgotten (or worse yet done wrong) Its times like these I would love to have some old time expert who swings by the house every once and a while for coffee and conversation who can tell me where I'm going to run into problems. You just got the internet equivalent and you blew him off (IMG:style_emoticons/default/confused24.gif) I guess the task for the week is to steel myself against the idea of welding a substantial part of the long next weekend. |
 |
|
| obscurity |
Jul 5 2010, 06:32 PM
Post
#36
|
|
Member Group: Members Posts: 413 Joined: 24-February 06 From: Atlanta ,GA Member No.: 5,628 Region Association: South East States |
QUOTE(mepstein @ Jul 5 2010, 08:23 PM) You just got the internet equivalent and you blew him off (IMG:style_emoticons/default/confused24.gif) Like I said that was not my intent. In fact I just spent an hour in the garage trying to figure out how to both put in a brace and tell what is going on with the door gap. Obviously I don't express myself terribly well with the internet. |
|
|
|
| saigon71 |
Jul 5 2010, 08:08 PM
Post
#37
|
|
Advanced Member Group: Members Posts: 2,026 Joined: 1-June 09 From: Dillsburg, PA Member No.: 10,428 Region Association: MidAtlantic Region |
This thread shows braces running from the upper seat belt attach point to the inner cowl. This method will allow you to keep the doors on and constantly check the gaps. I am copying this approach on my restoration. The only modification I may do is to weld 1X1 steel tubing to the inner cowl (instead of flat plate) to get a little more clearance when the door closes.
http://www.914world.com/bbs2/index.php?sho...76791&st=20 Best of luck to you...I have very similar rust issues. |
|
|
|
| charliew |
Jul 6 2010, 10:43 PM
Post
#38
|
|
Advanced Member Group: Members Posts: 2,363 Joined: 31-July 07 From: Crawford, TX. Member No.: 7,958 |
Put the braces in and make sure the door closes easily and that it doesn't pull the jamb around as it latches. I would brace the door gap at the top and the bottom with the top gap equal on both sides. Make sure the door is perfect at it's front edge first. Loose hinges won't be very helpful either. Stop after short welds and either cool it or let it cool enough to put your hand on it.
|
|
|
|
| obscurity |
Jul 11 2010, 05:05 PM
Post
#39
|
|
Member Group: Members Posts: 413 Joined: 24-February 06 From: Atlanta ,GA Member No.: 5,628 Region Association: South East States |
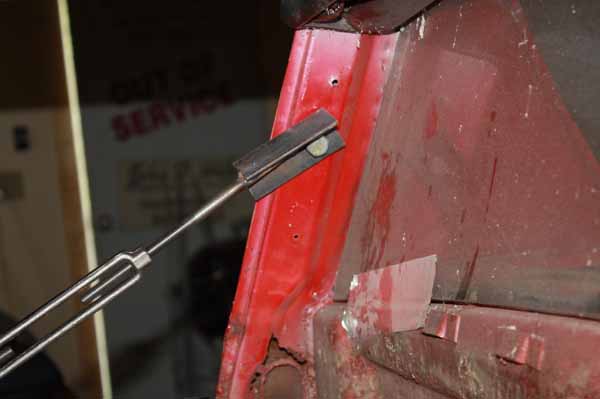
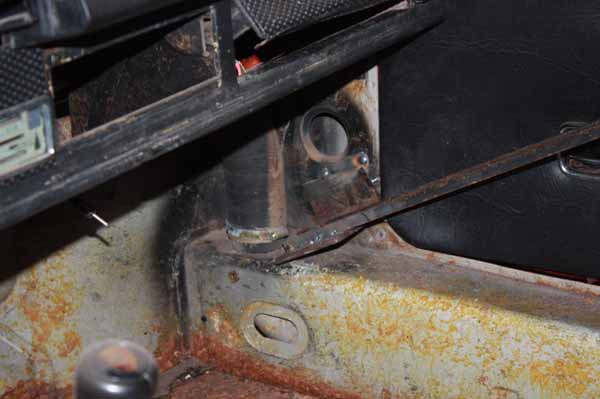
After several "recomendations" I took a step back and rebuilt the brace I had earlier so it could be installed like Jeff Hail's brace with the door on the car. Thank You for everyones urging and Saigon71's directing me back to Jeff Hail's very inspiring build thread. Here are a couple of pictures of the main diagonal. As soon as I finish a little welding at the botton I can install a second brace to the bottom of the latch jamb. I have set it up so it will just bypass the passenger side door handle.
  |
|
|
|
| strawman |
Jul 11 2010, 07:16 PM
Post
#40
|
|
Senior Member Group: Members Posts: 891 Joined: 25-January 08 From: Los Osos, CA Member No.: 8,624 Region Association: Central California |
I, too, have dug into the hell hole and related rustoration. My advice is use a beefier brace... when you start really welding on the structural stuff, you'll put a lot of stress on the brace.
|
|
|
|
|
5 User(s) are reading this topic (3 Guests and 0 Anonymous Users)
2 Members: porschetub, volksaddict

|
Lo-Fi Version | Time is now: 1st June 2026 - 08:50 PM |
Invision Power Board
v9.1.4 © 2026 IPS, Inc.