|
|
|
Porsche, and the Porsche crest are registered trademarks of Dr. Ing. h.c. F. Porsche AG.
This site is not affiliated with Porsche in any way. Its only purpose is to provide an online forum for car enthusiasts. All other trademarks are property of their respective owners. |
|
|

  |

| obscurity |
 Jul 12 2010, 04:59 AM Jul 12 2010, 04:59 AM
Post
#41
|
|
Member  Group: Members Posts: 413 Joined: 24-February 06 From: Atlanta ,GA Member No.: 5,628 Region Association: South East States |
QUOTE(strawman @ Jul 11 2010, 09:16 PM)  I, too, have dug into the hell hole and related rustoration. My advice is use a beefier brace... when you start really welding on the structural stuff, you'll put a lot of stress on the brace. How big do you recommend? It is a little unclear from the picture but the steel is a small channel so is much wider than it is tall. I thought about welding an angle or somthing to the bottom of it to reduce its slenderness ratio but I was thinking the second brace would help a lot. The second brace will have to take a much higher axial load than the first since it will be parallel to the long and just above it so it has no lever advantage. I was a little concerned that if I make the brace too stiff and the car shrinks that I will break though the fire wall before the brace bends. My thought was it might be better if the brace breaks just before the car does. |
   |

 
|
| strawman |
Jul 12 2010, 10:38 AM
Post
#42
|
|
Senior Member Group: Members Posts: 891 Joined: 25-January 08 From: Los Osos, CA Member No.: 8,624 Region Association: Central California |
Here is my build blog:
http://www.914world.com/bbs2/index.php?act...f=2&t=83031 Look at post #17, which describes the braces that I built. They're sturdy and cheap, and still permit you to open/close the doors. |
|
|
|
| obscurity |
Jul 12 2010, 11:19 AM
Post
#43
|
|
Member Group: Members Posts: 413 Joined: 24-February 06 From: Atlanta ,GA Member No.: 5,628 Region Association: South East States |
QUOTE(strawman @ Jul 12 2010, 12:38 PM) Here is my build blog: http://www.914world.com/bbs2/index.php?act...f=2&t=83031 Look at post #17, which describes the braces that I built. They're sturdy and cheap, and still permit you to open/close the doors. Strawman, Your thread is impressive and I will look at ways to beef up my brace. In looking at your thread I noticed you are using a rotisserie before the hell hole is completed. Did you have any problems due to flexing when the car is off the ground and spanning that far when you started cutting out steel inthe hell hole? |
|
|
|
| strawman |
Jul 12 2010, 01:01 PM
Post
#44
|
|
Senior Member Group: Members Posts: 891 Joined: 25-January 08 From: Los Osos, CA Member No.: 8,624 Region Association: Central California |
QUOTE(obscurity @ Jul 12 2010, 10:19 AM) Strawman, Your thread is impressive and I will look at ways to beef up my brace. In looking at your thread I noticed you are using a rotisserie before the hell hole is completed. Did you have any problems due to flexing when the car is off the ground and spanning that far when you started cutting out steel inthe hell hole? Nope, everything seems lined up fine, based on the jigs I built before cutting in. Also, I didn't cut out too much metal at one time. If you'll look at my blog, I did the inner portion of the long (in the engine bay) first, and then the outer section. But I honestly won't know for sure until I get the car off the rotisserie and back on the ground in the coming weeks... and who's to say my car wasn't twisted before I started? Nonetheless, I tried to limit my exposure to chassis changes by bracing the car well. Geoff |
|
|
|
| obscurity |
Jul 18 2010, 12:56 PM
Post
#45
|
|
Member Group: Members Posts: 413 Joined: 24-February 06 From: Atlanta ,GA Member No.: 5,628 Region Association: South East States |
Not as much progress as I would like this weekend but I have start to prep the inner wheel well for final install and I have fitted the sleeve inside the long a little tighter so I can spot weld it in later after the ineer wheel well is in. I have also begun welding the jack sleeve to the inner wheel well. I don't think I can do it while it is in the car without cutting the outer wheel well partially off.
I would like to take a momment to pat the guy who invented clecos on the back. I picked up a pack from Eastwood and used them to hold the sleeve in place. They are truely a wonder tool.  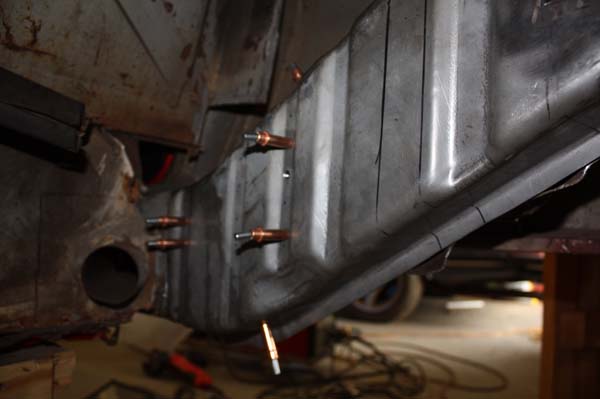 |
|
|
|
| obscurity |
Aug 28 2010, 08:15 PM
Post
#46
|
|
Member Group: Members Posts: 413 Joined: 24-February 06 From: Atlanta ,GA Member No.: 5,628 Region Association: South East States |
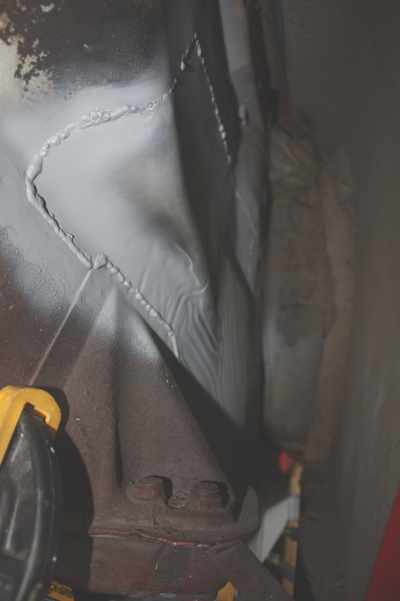
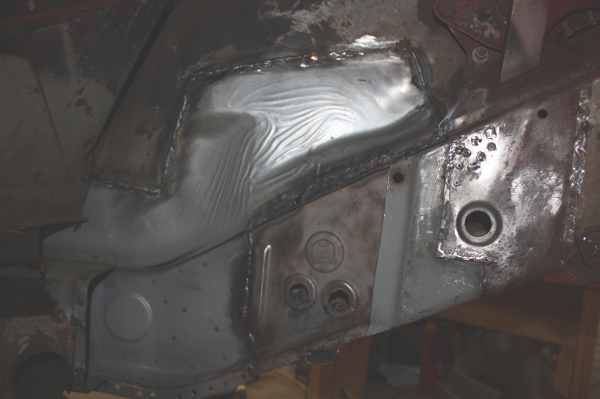
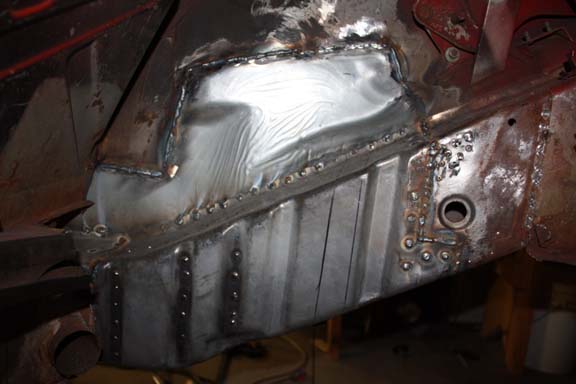
Finally got a chance to weld some more and so far the car has not warped at all but I have a ways to go (i.e. the inner long) Here are a few pictures. Of the inner wheel well.
  |
|
|
|
| obscurity |
Aug 28 2010, 08:20 PM
Post
#47
|
|
Member Group: Members Posts: 413 Joined: 24-February 06 From: Atlanta ,GA Member No.: 5,628 Region Association: South East States |
And a few more of upcoming challenges. This one is the drivers's side long. This one should be challenging since no makes the part.
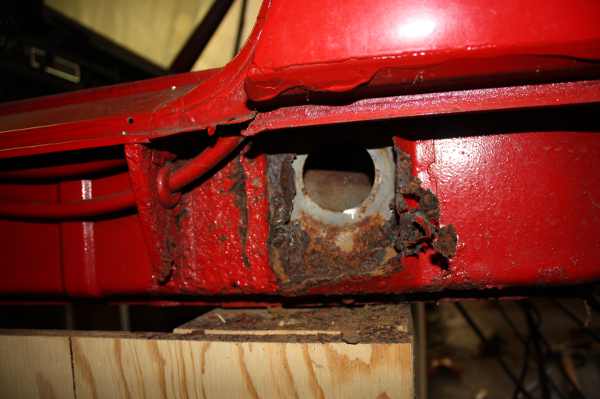 And this one is the center tunnel. Its not as bad as the picture looks but it is rusted through in places. 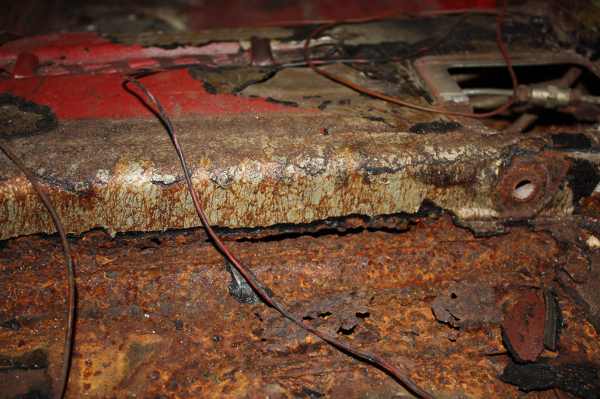 |
|
|
|
| avidfanjpl |
Aug 28 2010, 08:45 PM
Post
#48
|
|
914 Hemophiliac Group: Members Posts: 720 Joined: 6-April 10 From: Bear, Delaware Member No.: 11,566 Region Association: MidAtlantic Region |
Hey John,
If you think no one makes the jackplate and tube, go to Restoration Design in Canada. They are easy to google. I just bought 2. But, one has to have someone fabricate the round piece to hold the jacktube before you put the plate on over it and have it seam welded closed. RD has the only correctly thick plate. I looked. And I think the Long you show may not be shot at all, but I can only see the jack tube area in the top pic. I cut both my jack plates/tubes out in 2 evenings. My car is ready for welding. I abated the rust with Marine Clean and then Metal Ready and sprayed weld through Wurth's primer before the body shop gets it with the parts. I have seen worse. I have owned worse. Guys here have brought back worse. I would be more concerned about the tunnel. Your work is excellent, so you are way ahead of my skill level. Good luck! John |
|
|
|
| obscurity |
Oct 2 2010, 12:30 PM
Post
#49
|
|
Member Group: Members Posts: 413 Joined: 24-February 06 From: Atlanta ,GA Member No.: 5,628 Region Association: South East States |
Spent a little more time last weekend and got the inner long (dogleg) welded into place. Needs a little more work and the welds need cleaning up but it is getting closer. I also have start opening up the drivers long. Does anyone have a method to look at the length of the long to check for interior rust without taking off the outer long. I hate to drill out all those perfectly good factory spot welds just to check for rust.
 |
|
|
|
| SUNAB914 |
Oct 3 2010, 09:24 AM
Post
#50
|
|
Senior Member Group: Members Posts: 698 Joined: 29-December 08 From: Fredericksburg VA Member No.: 9,880 Region Association: South East States |
Hey , by any chance did you buy this car from AA years ago? I think I have the sales pictures that AA sent me when I was looking for a new one. I think I still have them in a drawer also. Had to have been over 15 years ago I got the pics.
Keep up the good work. |
|
|
|
| obscurity |
Oct 3 2010, 12:28 PM
Post
#51
|
|
Member Group: Members Posts: 413 Joined: 24-February 06 From: Atlanta ,GA Member No.: 5,628 Region Association: South East States |
QUOTE(SUNAB914 @ Oct 3 2010, 11:24 AM) Hey , by any chance did you buy this car from AA years ago? I think I have the sales pictures that AA sent me when I was looking for a new one. I think I still have them in a drawer also. Had to have been over 15 years ago I got the pics. Keep up the good work. I did buy it from AA about 15 years ago! If you find that sales picture I'd love to see a scan of it. When I bought it it looked much better than the rust I have discovered would lead you to believe especially when you consider that I have driven it very little in the interveneing years and it has been garaged and dry most of that time |
|
|
|
| SUNAB914 |
Oct 6 2010, 08:32 AM
Post
#52
|
|
Senior Member Group: Members Posts: 698 Joined: 29-December 08 From: Fredericksburg VA Member No.: 9,880 Region Association: South East States |
PM me your address and I will dig them out and send them to you if I can find them. That's about right 15 years ago. I almost bought it. I think it was $3500 or so? keep up the good work.
|
|
|
|
| obscurity |
Mar 7 2011, 07:53 PM
Post
#53
|
|
Member Group: Members Posts: 413 Joined: 24-February 06 From: Atlanta ,GA Member No.: 5,628 Region Association: South East States |
Finally got some time to work on the car again over the last few weekends. I fabricated the part below to patch a rust hole on the drivers side right behind the jackpost. When I started the jack post and "pyramid" cover looked pretty solid but a few minutes with a screwdriver and I had what you saw above. I bought a few new parts from AA and fabricated the piece below. They are not the prettiest but they are the best lookin' part I have made to date
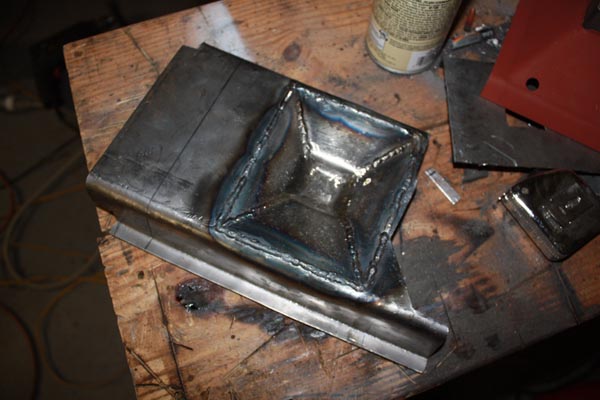 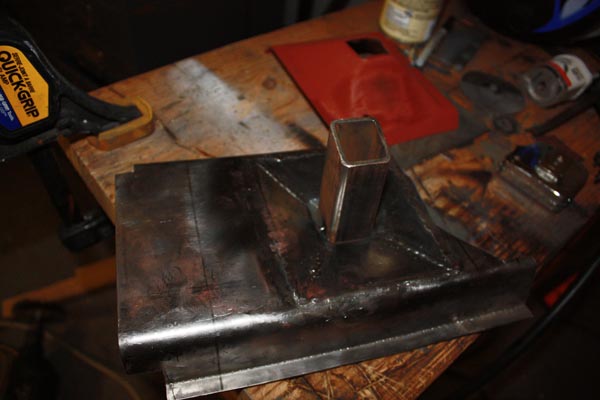 It may be alittle while before I can weld it on since I think I would be well served to remove the outer clamshell and see what is going on aroud those heater tubes and I have little more work to do to the inner piece of steel behind this piece. |
|
|
|
| jaxdream |
Mar 8 2011, 07:46 AM
Post
#54
|
|
Senior Member Group: Members Posts: 974 Joined: 8-July 08 From: North Central Tennessee Member No.: 9,270 Region Association: South East States |
Looking great dude , I've got the drvr's and pssgr's side jack post areas both to do myself. I like the fact that you are fabing some of the peices that you need , gives me hope that I can do the same ( very low budget ).
Please keep the pics coming , you are doing a heck of a good job . (IMG:style_emoticons/default/piratenanner.gif) (IMG:style_emoticons/default/piratenanner.gif) Jack / Jaxdream |
|
|
|
| obscurity |
Mar 8 2011, 08:32 AM
Post
#55
|
|
Member Group: Members Posts: 413 Joined: 24-February 06 From: Atlanta ,GA Member No.: 5,628 Region Association: South East States |
Thanks! The only tools I used for this was a hammer, a welder and a dremel. It was not quick but so far it has been rewarding
John QUOTE(jaxdream @ Mar 8 2011, 08:46 AM) Looking great dude , I've got the drvr's and pssgr's side jack post areas both to do myself. I like the fact that you are fabing some of the peices that you need , gives me hope that I can do the same ( very low budget ). Please keep the pics coming , you are doing a heck of a good job . (IMG:style_emoticons/default/piratenanner.gif) (IMG:style_emoticons/default/piratenanner.gif) Jack / Jaxdream |
|
|
|
| Cevan |
Mar 8 2011, 12:54 PM
Post
#56
|
|
Senior Member Group: Members Posts: 1,079 Joined: 11-December 06 From: Western Massachusetts Member No.: 7,351 |
Keep up the great work. I love watching these resto threads.
|
|
|
|
| obscurity |
Jun 18 2011, 11:57 AM
Post
#57
|
|
Member Group: Members Posts: 413 Joined: 24-February 06 From: Atlanta ,GA Member No.: 5,628 Region Association: South East States |
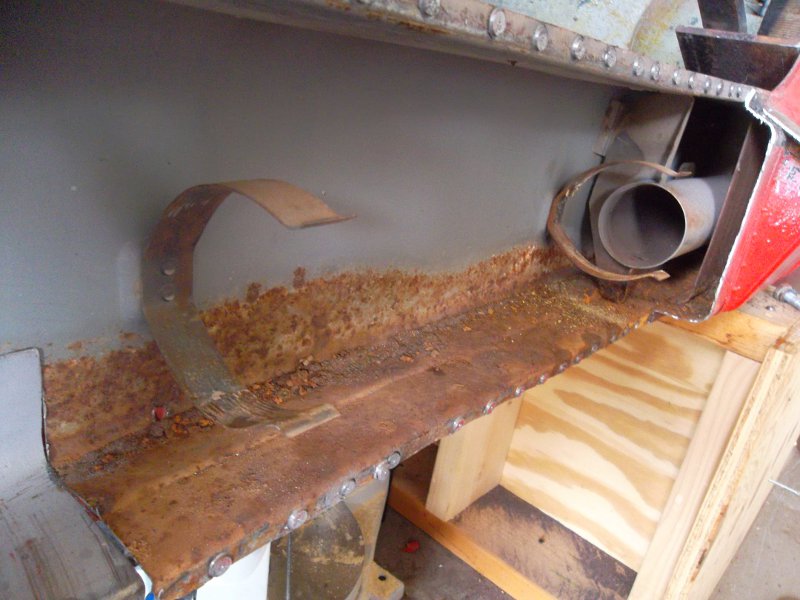
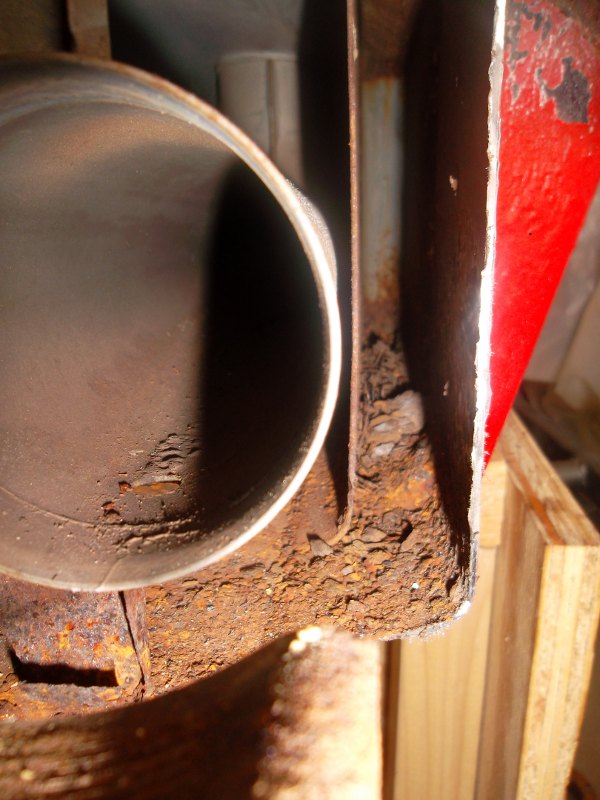
The year so far has conspired against my car habit. This is the first weekend I have had to work on the car since March. I have opened up the rockers and found some rust (no surprise) but it doesn't seem as bad as I expected. It seems like there is some scale a little further forward but I'm hoping it isn;t as bas as it looks since I is hard to open that area up.
  |
|
|
|
| saigon71 |
Jun 19 2011, 07:59 AM
Post
#58
|
|
Advanced Member Group: Members Posts: 2,026 Joined: 1-June 09 From: Dillsburg, PA Member No.: 10,428 Region Association: MidAtlantic Region |
Good to see you back at it! Great job fabricating that drivers side jack piece...I suspect I will be doing that soon myself. I really hope someone starts making that repair panel! (IMG:style_emoticons/default/beerchug.gif)
|
|
|
|
| Strudelwagon |
Jun 19 2011, 09:51 AM
Post
#59
|
|
Member Group: Members Posts: 411 Joined: 11-October 08 From: interior, British Columbia Member No.: 9,633 Region Association: Canada |
I'm always amazed when I see guys step out of their comfort zone and take on a complicated repair that they have no experience with.
These cars see alot of owners that would sit on the issue that you're up against and sell 5 years later feeling beaten. I think the ineternet and sites like 914World allow people to find their sows ear and turn it into that silk purse (I'm not saying your into purses). Guys like ScottyB, Sir Andy, Dr Evil are just a few of the mentors passing down the knowledge. whether you know it or not, you're inspiring others to step out of their comfort zone and wade into the rusty underworld . You're doing a great job, keep it going! (IMG:style_emoticons/default/welder.gif) SW |
|
|
|
| saigon71 |
Jun 20 2011, 05:58 AM
Post
#60
|
|
Advanced Member Group: Members Posts: 2,026 Joined: 1-June 09 From: Dillsburg, PA Member No.: 10,428 Region Association: MidAtlantic Region |
QUOTE(Strudelwagon @ Jun 19 2011, 11:51 AM) I'm always amazed when I see guys step out of their comfort zone and take on a complicated repair that they have no experience with. These cars see alot of owners that would sit on the issue that you're up against and sell 5 years later feeling beaten. I think the ineternet and sites like 914World allow people to find their sows ear and turn it into that silk purse (I'm not saying your into purses). Guys like ScottyB, Sir Andy, Dr Evil are just a few of the mentors passing down the knowledge. whether you know it or not, you're inspiring others to step out of their comfort zone and wade into the rusty underworld . You're doing a great job, keep it going! (IMG:style_emoticons/default/welder.gif) SW (IMG:style_emoticons/default/agree.gif) I read every build thread and learn something from each one. There is a wealth of knowledge on this site from people who have been through it before. Thanks to all who have passed down their knowledge! |
|
|
|
|
5 User(s) are reading this topic (3 Guests and 0 Anonymous Users)
2 Members: porschetub, volksaddict

|
Lo-Fi Version | Time is now: 1st June 2026 - 08:50 PM |
Invision Power Board
v9.1.4 © 2026 IPS, Inc.