|
|
|
Porsche, and the Porsche crest are registered trademarks of Dr. Ing. h.c. F. Porsche AG.
This site is not affiliated with Porsche in any way. Its only purpose is to provide an online forum for car enthusiasts. All other trademarks are property of their respective owners. |
|
|


| obscurity |
 May 29 2010, 08:36 AM May 29 2010, 08:36 AM
Post
#61
|
|
Member  Group: Members Posts: 413 Joined: 24-February 06 From: Atlanta ,GA Member No.: 5,628 Region Association: South East States |
Well we pick up our story already in progress but I hope that by forcing myself to post some pictures I will be motivated to keep going.
I bought the car may years ago and have yet to truely enjoy it. I have started to restore it several times and always get distracted but this weekend the baby (and his mother) is out of town and we have a three day weekend so lets see how far I can get. Here is where we are starting this morning. 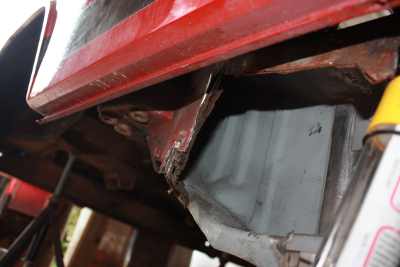 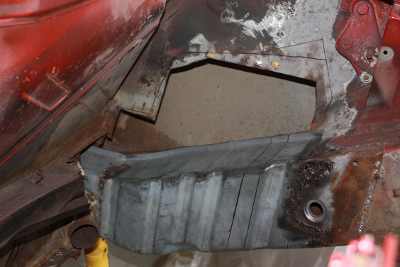 |
   |

 
|
Posts in this topic
obscurity Screw it I'm going in May 29 2010, 08:36 AM Lennies914 :sawzall: :welder: Is that the only bad area? May 29 2010, 08:39 AM obscurity Unfortunately no. The floors will have to be fixe... May 29 2010, 08:42 AM arkitect Post as many picts as you can....I like to see the... May 29 2010, 09:39 AM obscurity OK I took a step backward. I removed the dogleg p... May 29 2010, 10:07 AM obscurity Gonna try POR15. Off to AA and Home Depot for som... May 29 2010, 10:36 AM
 rohar
Gonna try POR15. Off to AA and Home Depot for so... May 29 2010, 11:05 AM veltror If you need any inspiration take a look at my thre... May 29 2010, 11:11 AM obscurity
If you need any inspiration take a look at my thr... May 29 2010, 01:28 PM corsepervita We are all amateurs till at some point we decided ... May 29 2010, 04:36 PM obscurity So here is a pic of the car a few years ago before... May 29 2010, 06:57 PM obscurity And this is how far I got today.
The plan is... May 29 2010, 07:04 PM SirAndy
paint as much as I can with POR15
Don't... May 29 2010, 09:34 PM obscurity
Don't!
I'm afraid, POR15 does not wo... May 30 2010, 06:17 AM kwales Inside the longs, I use zinc paint to act as a sac... May 30 2010, 10:18 AM obscurity
Inside the longs, I use zinc paint to act as a sa... May 30 2010, 10:56 AM obscurity How much pitting is too much pitting. Obviously m... May 30 2010, 10:59 AM obscurity If you come across spot welds (in appearance) that... May 30 2010, 03:21 PM scotty b
If you come across spot welds (in appearance) tha... May 30 2010, 07:11 PM rick 918-S B)-->
rohar
Gonna try POR15. Off to AA and Home Depot for so... May 29 2010, 11:05 AM veltror If you need any inspiration take a look at my thre... May 29 2010, 11:11 AM obscurity
If you need any inspiration take a look at my thr... May 29 2010, 01:28 PM corsepervita We are all amateurs till at some point we decided ... May 29 2010, 04:36 PM obscurity So here is a pic of the car a few years ago before... May 29 2010, 06:57 PM obscurity And this is how far I got today.
The plan is... May 29 2010, 07:04 PM SirAndy
paint as much as I can with POR15
Don't... May 29 2010, 09:34 PM obscurity
Don't!
I'm afraid, POR15 does not wo... May 30 2010, 06:17 AM kwales Inside the longs, I use zinc paint to act as a sac... May 30 2010, 10:18 AM obscurity
Inside the longs, I use zinc paint to act as a sa... May 30 2010, 10:56 AM obscurity How much pitting is too much pitting. Obviously m... May 30 2010, 10:59 AM obscurity If you come across spot welds (in appearance) that... May 30 2010, 03:21 PM scotty b
If you come across spot welds (in appearance) tha... May 30 2010, 07:11 PM rick 918-S B)-->QUOTE(scotty b @ M... May 30 2010, 07:27 PM
 obscurity B)-->
obscurity B)-->QUOTE(scotty b @ M... May 30 2010, 07:36 PM
obscurity I didn't get as far as I wanted today but when... May 30 2010, 05:29 PM
scotty b Someone brazed in a battery tray at some point. Cu... May 30 2010, 07:49 PM
obscurity B)-->
obscurity I didn't get as far as I wanted today but when... May 30 2010, 05:29 PM scotty b Someone brazed in a battery tray at some point. Cu... May 30 2010, 07:49 PM obscurity B)-->QUOTE(scotty b @ M... May 30 2010, 08:42 PM
obscurity I only got a small amount of time to work on the c... Jun 6 2010, 07:43 PM
obscurity I am back at it this weekend. I received the jack... Jul 4 2010, 01:52 PM
scotty b please tell me you have braced that car WELL ??... Jul 4 2010, 02:00 PM
obscurity B)-->
obscurity I only got a small amount of time to work on the c... Jun 6 2010, 07:43 PM obscurity I am back at it this weekend. I received the jack... Jul 4 2010, 01:52 PM scotty b please tell me you have braced that car WELL ??... Jul 4 2010, 02:00 PM obscurity B)-->QUOTE(scotty b @ J... Jul 4 2010, 02:08 PM
scotty b
B)--><div class='quotetop'>QUOT... Jul 4 2010, 02:36 PM
scotty b You really should stop and make a solid brace with... Jul 4 2010, 02:34 PM
obscurity B)-->
scotty b
B)--><div class='quotetop'>QUOT... Jul 4 2010, 02:36 PM scotty b You really should stop and make a solid brace with... Jul 4 2010, 02:34 PM obscurity B)-->QUOTE(scotty b @ J... Jul 4 2010, 06:30 PM
obscurity Just a couple of quick thoughts as I sat out in my... Jul 5 2010, 04:11 PM
mepstein
Just a couple of quick thoughts as I sat out in m... Jul 5 2010, 06:23 PM
obscurity
You just got the internet equivalent and you ble... Jul 5 2010, 06:32 PM
charliew My thoughts are you have blown off the best info p... Jul 5 2010, 05:15 PM
obscurity
My thoughts are you have blown off the best info ... Jul 5 2010, 05:41 PM
saigon71 This thread shows braces running from the upper se... Jul 5 2010, 08:08 PM
charliew Put the braces in and make sure the door closes ea... Jul 6 2010, 10:43 PM
obscurity After several "recomendations" I took a ... Jul 11 2010, 05:05 PM
strawman I, too, have dug into the hell hole and related ru... Jul 11 2010, 07:16 PM
obscurity
I, too, have dug into the hell hole and related r... Jul 12 2010, 04:59 AM
strawman Here is my build blog:
http://www.914world.com/bb... Jul 12 2010, 10:38 AM
obscurity
Here is my build blog:
http://www.914world.com/b... Jul 12 2010, 11:19 AM
strawman
Strawman,
Your thread is impressive and I will l... Jul 12 2010, 01:01 PM
obscurity Not as much progress as I would like this weekend ... Jul 18 2010, 12:56 PM
obscurity Finally got a chance to weld some more and so far ... Aug 28 2010, 08:15 PM
obscurity And a few more of upcoming challenges. This one i... Aug 28 2010, 08:20 PM
avidfanjpl Hey John,
If you think no one makes the jackplate... Aug 28 2010, 08:45 PM
obscurity Spent a little more time last weekend and got the ... Oct 2 2010, 12:30 PM
SUNAB914 Hey , by any chance did you buy this car from AA y... Oct 3 2010, 09:24 AM
obscurity
Hey , by any chance did you buy this car from AA ... Oct 3 2010, 12:28 PM
SUNAB914 PM me your address and I will dig them out and sen... Oct 6 2010, 08:32 AM
obscurity Finally got some time to work on the car again ove... Mar 7 2011, 07:53 PM
jaxdream Looking great dude , I've got the drvr's a... Mar 8 2011, 07:46 AM
obscurity Thanks! The only tools I used for this was a ... Mar 8 2011, 08:32 AM
Cevan Keep up the great work. I love watching these res... Mar 8 2011, 12:54 PM
obscurity The year so far has conspired against my car habit... Jun 18 2011, 11:57 AM
Strudelwagon I'm always amazed when I see guys step out of ... Jun 19 2011, 09:51 AM
saigon71
I'm always amazed when I see guys step out of... Jun 20 2011, 05:58 AM
saigon71 Good to see you back at it! Great job fabrica... Jun 19 2011, 07:59 AM
obscurity I broke out the sand blaster last weekend and clea... Jun 29 2011, 11:01 AM
obscurity After finishing center portion of the long I reali... Jun 29 2011, 11:06 AM
FourBlades Sand blasting is great when the flow is happening ... Jun 29 2011, 06:51 PM
obscurity
Sand blasting is great when the flow is happening... Jun 29 2011, 09:09 PM
dion9146 In a sick twisted way I'm jealous of guys like... Jun 29 2011, 07:13 PM
obscurity
In a sick twisted way I'm jealous of guys lik... Jun 29 2011, 09:05 PM
SUNAB914 I found the pics, would like to send them to you. ... Jun 30 2011, 06:40 AM
charliew When you take a lot of structure out without REAL ... Jun 30 2011, 03:54 PM
trojanhorsepower The only way to make sandblasting better is to pay... Jun 30 2011, 05:49 PM
obscurity It has been a while since my last post and I have ... Aug 14 2011, 03:55 PM
obscurity This is what I got done this weekend. Not quite w... Aug 21 2011, 05:49 PM
obscurity Didn't get that much done even though I worked... Aug 28 2011, 07:45 PM
SUNAB914 Did you get the pics? Aug 29 2011, 07:14 AM
obscurity
Did you get the pics?
I Did!! Sorry, I... Aug 29 2011, 07:21 AM
FourBlades Those are really nice looking patchs and welds. ... Aug 29 2011, 08:19 AM
obscurity
Those are really nice looking patchs and welds. ... Aug 29 2011, 10:37 AM
Root_Werks Welding the stiffener on the inside is very cool... Aug 29 2011, 10:12 AM
obscurity
Welding the stiffener on the inside is very cool... Aug 29 2011, 10:42 AM
obscurity Now that the passenger side is welded up, I have ... Sep 17 2011, 01:30 PM
obscurity An interesting discovery while I had it open. I h... Sep 17 2011, 01:37 PM
lrm914
An interesting discovery while I had it open. I ... Sep 17 2011, 07:00 PM
obscurity
Yeah it would probably be easier and I was think... Sep 17 2011, 07:24 PM
lrm914
Yeah it would probably be easier and I was thin... Sep 17 2011, 10:06 PM
obscurity
Yeah it would probably be easier and I was thi... Sep 18 2011, 10:47 AM
lrm914
[quote name='lrm914' post='1540717' date='Sep 18 ... Sep 18 2011, 01:49 PM
obscurity
Where you at in GA?
Larry
I'm in SW Atlan... Sep 18 2011, 05:37 PM
mark21742 Looking great man! As you have found out, the ... Sep 17 2011, 06:21 PM
obscurity Didn't get much done on the car this weekend (... Oct 9 2011, 05:33 PM
barada
Didn't get much done on the car this weekend ... Oct 9 2011, 06:23 PM
obscurity
John,
Still making great strides with your work.... Oct 9 2011, 06:36 PM
obscurity Made a little progress on the car in the last few ... Jun 23 2012, 12:32 PM
SUNAB914 Last few weeks?? You mean months, better get going... Jun 23 2012, 01:08 PM
obscurity I've got the suspension console tentatively fi... Jun 24 2012, 01:58 PM
obscurity I can't believe how long I have been working o... Jan 2 2022, 05:16 PM
krazykonrad Welcome back! It looks like you've done so... Jan 2 2022, 05:52 PM
obscurity Thought I would see if anyone has an opinion of so... Jan 23 2022, 12:04 PM
obscurity Just an update
Oct 29 2022, 05:30 PM
obscurity This project is a real slow burn
Turned some seat... Jun 1 2026, 07:17 PM
obscurity Just a couple of quick thoughts as I sat out in my... Jul 5 2010, 04:11 PM mepstein
Just a couple of quick thoughts as I sat out in m... Jul 5 2010, 06:23 PM obscurity
You just got the internet equivalent and you ble... Jul 5 2010, 06:32 PM charliew My thoughts are you have blown off the best info p... Jul 5 2010, 05:15 PM obscurity
My thoughts are you have blown off the best info ... Jul 5 2010, 05:41 PM saigon71 This thread shows braces running from the upper se... Jul 5 2010, 08:08 PM charliew Put the braces in and make sure the door closes ea... Jul 6 2010, 10:43 PM obscurity After several "recomendations" I took a ... Jul 11 2010, 05:05 PM strawman I, too, have dug into the hell hole and related ru... Jul 11 2010, 07:16 PM obscurity
I, too, have dug into the hell hole and related r... Jul 12 2010, 04:59 AM strawman Here is my build blog:
http://www.914world.com/bb... Jul 12 2010, 10:38 AM obscurity
Here is my build blog:
http://www.914world.com/b... Jul 12 2010, 11:19 AM strawman
Strawman,
Your thread is impressive and I will l... Jul 12 2010, 01:01 PM obscurity Not as much progress as I would like this weekend ... Jul 18 2010, 12:56 PM obscurity Finally got a chance to weld some more and so far ... Aug 28 2010, 08:15 PM obscurity And a few more of upcoming challenges. This one i... Aug 28 2010, 08:20 PM avidfanjpl Hey John,
If you think no one makes the jackplate... Aug 28 2010, 08:45 PM obscurity Spent a little more time last weekend and got the ... Oct 2 2010, 12:30 PM SUNAB914 Hey , by any chance did you buy this car from AA y... Oct 3 2010, 09:24 AM obscurity
Hey , by any chance did you buy this car from AA ... Oct 3 2010, 12:28 PM SUNAB914 PM me your address and I will dig them out and sen... Oct 6 2010, 08:32 AM obscurity Finally got some time to work on the car again ove... Mar 7 2011, 07:53 PM jaxdream Looking great dude , I've got the drvr's a... Mar 8 2011, 07:46 AM obscurity Thanks! The only tools I used for this was a ... Mar 8 2011, 08:32 AM Cevan Keep up the great work. I love watching these res... Mar 8 2011, 12:54 PM obscurity The year so far has conspired against my car habit... Jun 18 2011, 11:57 AM Strudelwagon I'm always amazed when I see guys step out of ... Jun 19 2011, 09:51 AM saigon71
I'm always amazed when I see guys step out of... Jun 20 2011, 05:58 AM saigon71 Good to see you back at it! Great job fabrica... Jun 19 2011, 07:59 AM obscurity I broke out the sand blaster last weekend and clea... Jun 29 2011, 11:01 AM obscurity After finishing center portion of the long I reali... Jun 29 2011, 11:06 AM FourBlades Sand blasting is great when the flow is happening ... Jun 29 2011, 06:51 PM obscurity
Sand blasting is great when the flow is happening... Jun 29 2011, 09:09 PM dion9146 In a sick twisted way I'm jealous of guys like... Jun 29 2011, 07:13 PM obscurity
In a sick twisted way I'm jealous of guys lik... Jun 29 2011, 09:05 PM SUNAB914 I found the pics, would like to send them to you. ... Jun 30 2011, 06:40 AM charliew When you take a lot of structure out without REAL ... Jun 30 2011, 03:54 PM trojanhorsepower The only way to make sandblasting better is to pay... Jun 30 2011, 05:49 PM obscurity It has been a while since my last post and I have ... Aug 14 2011, 03:55 PM obscurity This is what I got done this weekend. Not quite w... Aug 21 2011, 05:49 PM obscurity Didn't get that much done even though I worked... Aug 28 2011, 07:45 PM SUNAB914 Did you get the pics? Aug 29 2011, 07:14 AM obscurity
Did you get the pics?
I Did!! Sorry, I... Aug 29 2011, 07:21 AM FourBlades Those are really nice looking patchs and welds. ... Aug 29 2011, 08:19 AM obscurity
Those are really nice looking patchs and welds. ... Aug 29 2011, 10:37 AM Root_Werks Welding the stiffener on the inside is very cool... Aug 29 2011, 10:12 AM obscurity
Welding the stiffener on the inside is very cool... Aug 29 2011, 10:42 AM obscurity Now that the passenger side is welded up, I have ... Sep 17 2011, 01:30 PM obscurity An interesting discovery while I had it open. I h... Sep 17 2011, 01:37 PM lrm914
An interesting discovery while I had it open. I ... Sep 17 2011, 07:00 PM obscurity
Yeah it would probably be easier and I was think... Sep 17 2011, 07:24 PM lrm914
Yeah it would probably be easier and I was thin... Sep 17 2011, 10:06 PM obscurity
Yeah it would probably be easier and I was thi... Sep 18 2011, 10:47 AM lrm914
[quote name='lrm914' post='1540717' date='Sep 18 ... Sep 18 2011, 01:49 PM obscurity
Where you at in GA?
Larry
I'm in SW Atlan... Sep 18 2011, 05:37 PM mark21742 Looking great man! As you have found out, the ... Sep 17 2011, 06:21 PM obscurity Didn't get much done on the car this weekend (... Oct 9 2011, 05:33 PM barada
Didn't get much done on the car this weekend ... Oct 9 2011, 06:23 PM obscurity
John,
Still making great strides with your work.... Oct 9 2011, 06:36 PM obscurity Made a little progress on the car in the last few ... Jun 23 2012, 12:32 PM SUNAB914 Last few weeks?? You mean months, better get going... Jun 23 2012, 01:08 PM obscurity I've got the suspension console tentatively fi... Jun 24 2012, 01:58 PM obscurity I can't believe how long I have been working o... Jan 2 2022, 05:16 PM krazykonrad Welcome back! It looks like you've done so... Jan 2 2022, 05:52 PM obscurity Thought I would see if anyone has an opinion of so... Jan 23 2022, 12:04 PM obscurity Just an update
Oct 29 2022, 05:30 PM obscurity This project is a real slow burn
Turned some seat... Jun 1 2026, 07:17 PM  |
8 User(s) are reading this topic (5 Guests and 0 Anonymous Users)

|
Lo-Fi Version | Time is now: 1st June 2026 - 09:31 PM |
Invision Power Board
v9.1.4 © 2026 IPS, Inc.
| All rights reserved 914World.com © since 2002 |
|
914World.com is the fastest growing online 914 community! We have it all, classifieds, events, forums, vendors, parts, autocross, racing, technical articles, events calendar, newsletter, restoration, gallery, archives, history and more for your Porsche 914 ... |