|
|
|
Porsche, and the Porsche crest are registered trademarks of Dr. Ing. h.c. F. Porsche AG.
This site is not affiliated with Porsche in any way. Its only purpose is to provide an online forum for car enthusiasts. All other trademarks are property of their respective owners. |
|
|

  |

| mark21742 |
 Sep 17 2011, 06:21 PM Sep 17 2011, 06:21 PM
Post
#81
|
|
Member  Group: Members Posts: 162 Joined: 31-August 11 From: pa Member No.: 13,502 Region Association: North East States |
Looking great man! As you have found out, the best way to learn is to dive in! Lol keep up the good work and you'll have your baby back on the road in no time.....unless your wife is like mine and makes you work on her car every weekend instead of your car lol
|
   |

 
|
| lrm914 |
Sep 17 2011, 07:00 PM
Post
#82
|
|
Member Group: Members Posts: 50 Joined: 3-September 11 From: ga Member No.: 13,514 Region Association: South East States |
QUOTE(obscurity @ Sep 17 2011, 03:37 PM)  An interesting discovery while I had it open. I have always wondered why the brake light stayed on quite a bit while I was driving but I figured the switch must be bad or it was a wiring problem. I knew the hand brake had been replaced but the job looked pretty good so I figured it was not that. Turns out I was wrong. From the inside you can see that the new part does not cover the front holes that were drilled to remove the old part. Whoever did the work managed to weld the brake handle back on about 1/4" - 3/8" behind the priginal position so it fails to press the button in the down position. unless it sits just right. I guess I have to cut that off and redo that too. Inside the cabin looks good inside the long not so much I have been following your thread, keep up the good work! Instead of cutting out the PB to adjust 1/4 inch, would it be easier to add some kind of shim to the PB switch button to get it to contact better? |
|
|
|
| obscurity |
Sep 17 2011, 07:24 PM
Post
#83
|
|
Member Group: Members Posts: 413 Joined: 24-February 06 From: Atlanta ,GA Member No.: 5,628 Region Association: South East States |
QUOTE I have been following your thread, keep up the good work! Instead of cutting out the PB to adjust 1/4 inch, would it be easier to add some kind of shim to the PB switch button to get it to contact better? Yeah it would probably be easier and I was thinking along these lines until I took another look at how they buchered the long getting the old brake out. In the end, I think I am going to replace the metal and remount the brake. John PS Where in GA are you? |
|
|
|
| lrm914 |
Sep 17 2011, 10:06 PM
Post
#84
|
|
Member Group: Members Posts: 50 Joined: 3-September 11 From: ga Member No.: 13,514 Region Association: South East States |
QUOTE(obscurity @ Sep 17 2011, 09:24 PM) QUOTE I have been following your thread, keep up the good work! Instead of cutting out the PB to adjust 1/4 inch, would it be easier to add some kind of shim to the PB switch button to get it to contact better? Yeah it would probably be easier and I was thinking along these lines until I took another look at how they buchered the long getting the old brake out. In the end, I think I am going to replace the metal and remount the brake. John PS Where in GA are you? Hey John, I'm in Cave Spring Ga, about 10miles from Rome, GA... Ever heard of it? I got a project going here too. Larry |
|
|
|
| obscurity |
Sep 18 2011, 10:47 AM
Post
#85
|
|
Member Group: Members Posts: 413 Joined: 24-February 06 From: Atlanta ,GA Member No.: 5,628 Region Association: South East States |
QUOTE(lrm914 @ Sep 18 2011, 12:06 AM) QUOTE(obscurity @ Sep 17 2011, 09:24 PM) QUOTE I have been following your thread, keep up the good work! Instead of cutting out the PB to adjust 1/4 inch, would it be easier to add some kind of shim to the PB switch button to get it to contact better? Yeah it would probably be easier and I was thinking along these lines until I took another look at how they buchered the long getting the old brake out. In the end, I think I am going to replace the metal and remount the brake. John PS Where in GA are you? Hey John, I'm in Cave Spring Ga, about 10miles from Rome, GA... Ever heard of it? I got a project going here too. Larry Not Cave Springs but definitely Rome. Hows your car comeing? John |
|
|
|
| lrm914 |
Sep 18 2011, 01:49 PM
Post
#86
|
|
Member Group: Members Posts: 50 Joined: 3-September 11 From: ga Member No.: 13,514 Region Association: South East States |
QUOTE(obscurity @ Sep 18 2011, 12:47 PM) QUOTE(lrm914 @ Sep 18 2011, 12:06 AM) QUOTE(obscurity @ Sep 17 2011, 09:24 PM) QUOTE I have been following your thread, keep up the good work! Instead of cutting out the PB to adjust 1/4 inch, would it be easier to add some kind of shim to the PB switch button to get it to contact better? Yeah it would probably be easier and I was thinking along these lines until I took another look at how they buchered the long getting the old brake out. In the end, I think I am going to replace the metal and remount the brake. John PS Where in GA are you? Hey John, I'm in Cave Spring Ga, about 10miles from Rome, GA... Ever heard of it? I got a project going here too. Larry Not Cave Springs but definitely Rome. Hows your car comeing? John I am currentlt tempering High heat paint on some Heat exchanger parts on my BBQ grill, my wife thinks I'm nuts. Overall, much like you I have had this car for many years, my garage princess. And every so often when the honey do list begins to be completed, I catch the feaver to complete the car. For the past few months I have been polishing, cleaning, getting parts together from various source to complete the car. To date I have almost everything I will need in terms of parts, to get the car together to begin the process of getting it fired up. I still have alot of electrical wiring to sort out, but I've made more progress in the past 3 months than I have in the 13 years i have had the car. Where you at in GA? Larry |
|
|
|
| obscurity |
Sep 18 2011, 05:37 PM
Post
#87
|
|
Member Group: Members Posts: 413 Joined: 24-February 06 From: Atlanta ,GA Member No.: 5,628 Region Association: South East States |
QUOTE(lrm914 @ Sep 18 2011, 03:49 PM) Where you at in GA? Larry I'm in SW Atlanta. Just north of East Point |
|
|
|
| obscurity |
Oct 9 2011, 05:33 PM
Post
#88
|
|
Member Group: Members Posts: 413 Joined: 24-February 06 From: Atlanta ,GA Member No.: 5,628 Region Association: South East States |
Didn't get much done on the car this weekend (It was my Anniversary) but I did make it the the Peach State PCA Autocross at Atlanta Motor Speedway. All I did was spectate but it was a lot of fun. Below are some pics of what I got done last weekend.
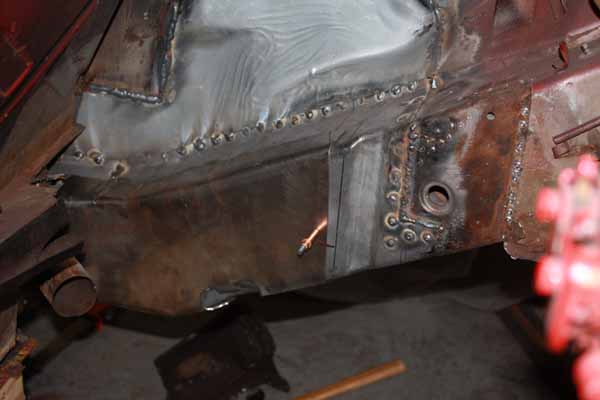
The deeper I dig into the Driver's long the less I like what I see. The front is still ok but as you can see the rear is very pitted on the inside. 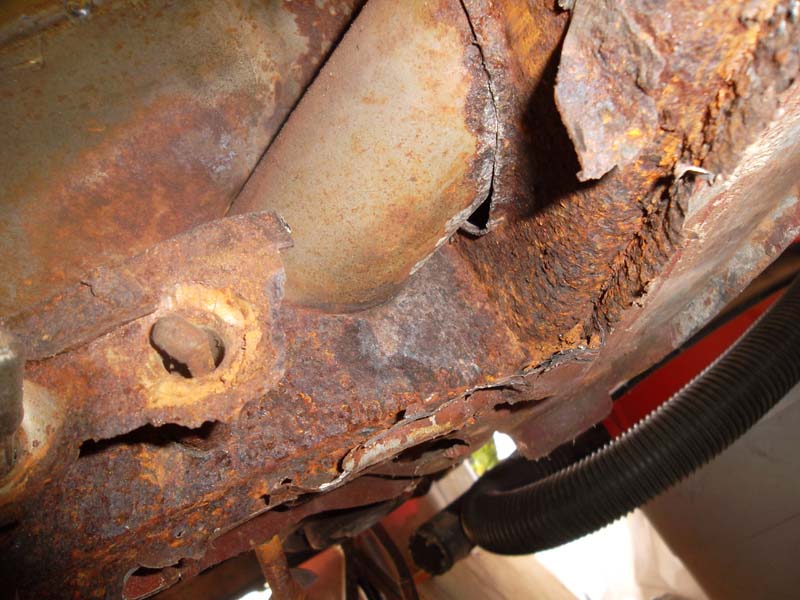 I have not yet decided how much farther back I will cut out. The area I have alreay cut out is easily replaced with some left over inner long from the passenger side but if I go much farther back I will need to fab some more custom parts as the long starts to turn up and he inner reinforcing layer starts to have corrugations. Before I make any more decisions I will need to determine whether this car has a drivers hell hole. 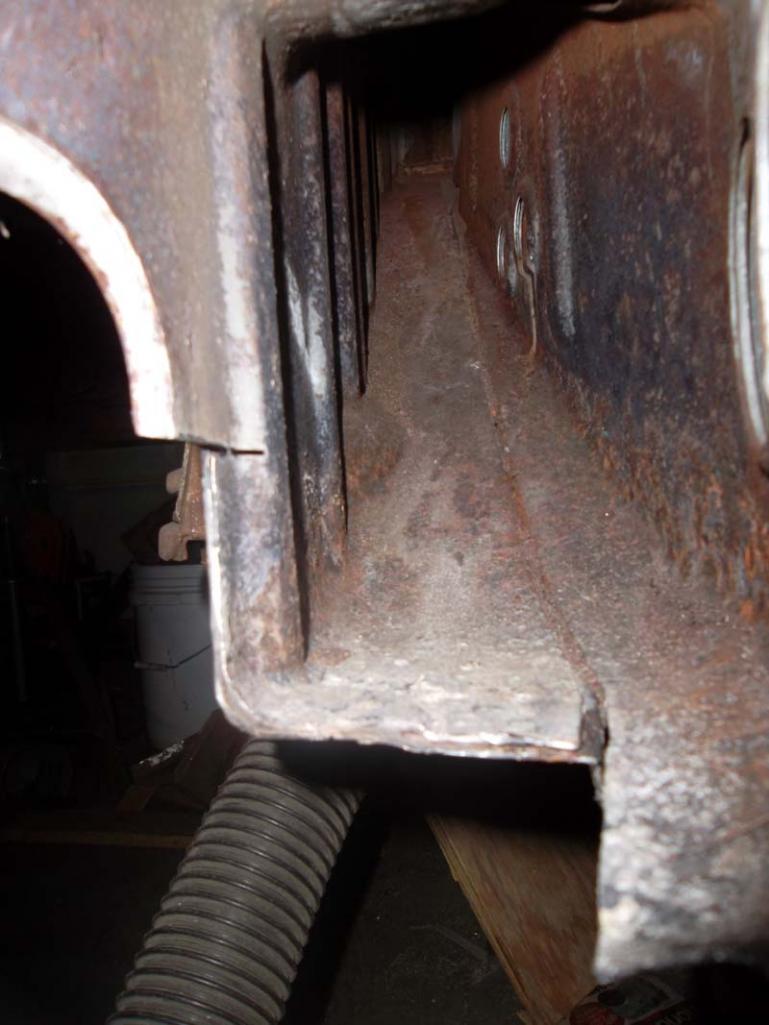 On the plus side I fabed the inner sleeve for the drivers side. I'll have to decide whether it is worth refabing it once I determine how much more comes out. 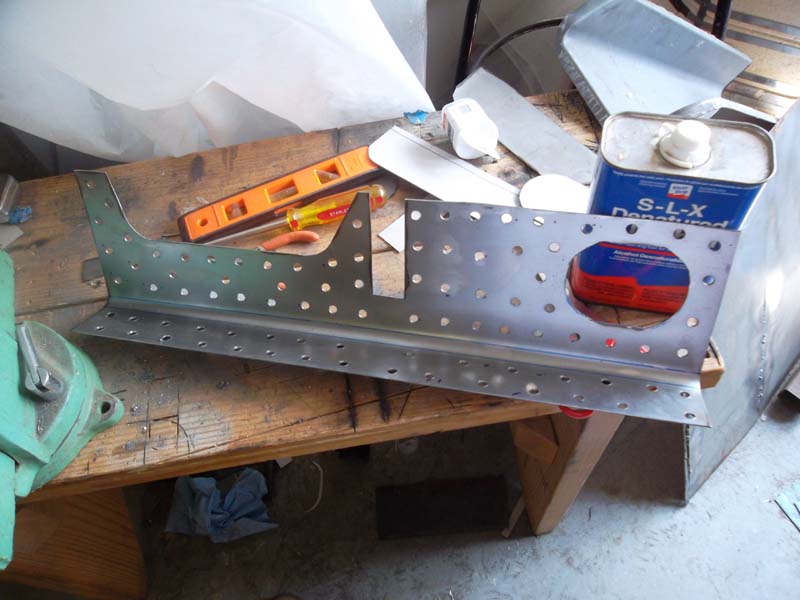 John |
|
|
|
| barada |
Oct 9 2011, 06:23 PM
Post
#89
|
|
Member Group: Members Posts: 257 Joined: 5-October 08 From: Atlanta Member No.: 9,613 Region Association: None |
QUOTE(obscurity @ Oct 9 2011, 07:33 PM) Didn't get much done on the car this weekend (It was my Anniversary) but I did make it the the Peach State PCA Autocross at Atlanta Motor Speedway. All I did was spectate but it was a lot of fun. Below are some pics of what I got done last weekend. The deeper I dig into the Driver's long the less I like what I see. The front is still ok but as you can see the rear is very pitted on the inside. I have not yet decided how much farther back I will cut out. The area I have alreay cut out is easily replaced with some left over inner long from the passenger side but if I go much farther back I will need to fab some more custom parts as the long starts to turn up and he inner reinforcing layer starts to have corrugations. Before I make any more decisions I will need to determine whether this car has a drivers hell hole. On the plus side I fabed the inner sleeve for the drivers side. I'll have to decide whether it is worth refabing it once I determine how much more comes out. John John, Still making great strides with your work. I went to the Autocross today as a spectator. Was in my Green 911. Phillip |
|
|
|
| obscurity |
Oct 9 2011, 06:36 PM
Post
#90
|
|
Member Group: Members Posts: 413 Joined: 24-February 06 From: Atlanta ,GA Member No.: 5,628 Region Association: South East States |
QUOTE(barada @ Oct 9 2011, 08:23 PM) John, Still making great strides with your work. I went to the Autocross today as a spectator. Was in my Green 911. Phillip I was wondering whose car that was. I really like the green color. John |
|
|
|
| obscurity |
Jun 23 2012, 12:32 PM
Post
#91
|
|
Member Group: Members Posts: 413 Joined: 24-February 06 From: Atlanta ,GA Member No.: 5,628 Region Association: South East States |
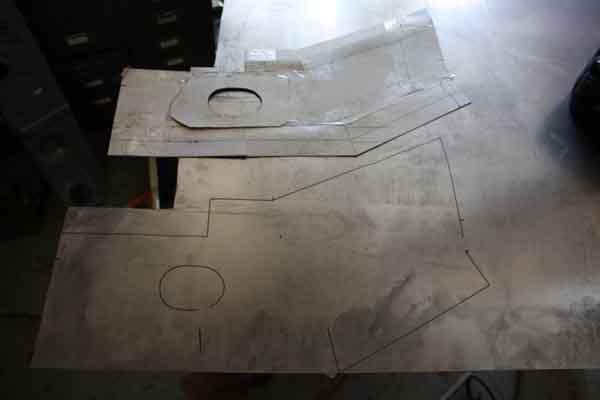
Made a little progress on the car in the last few weeks. Just a couple of photos of the pattern and part that I made to cover up the longitudinal ribs from the replacement panel in the engine compartment. I extended it through the fire wall since I have to replace the bottom of the fire wall anyway. It shoulld also help to stiffen the frame a little.
  Hopefully next weekend I can finish up the fabrication and start welding things onto the car. |
|
|
|
| SUNAB914 |
Jun 23 2012, 01:08 PM
Post
#92
|
|
Senior Member Group: Members Posts: 698 Joined: 29-December 08 From: Fredericksburg VA Member No.: 9,880 Region Association: South East States |
Last few weeks?? You mean months, better get going buddy. We're waiting!
|
|
|
|
| obscurity |
Jun 24 2012, 01:58 PM
Post
#93
|
|
Member Group: Members Posts: 413 Joined: 24-February 06 From: Atlanta ,GA Member No.: 5,628 Region Association: South East States |
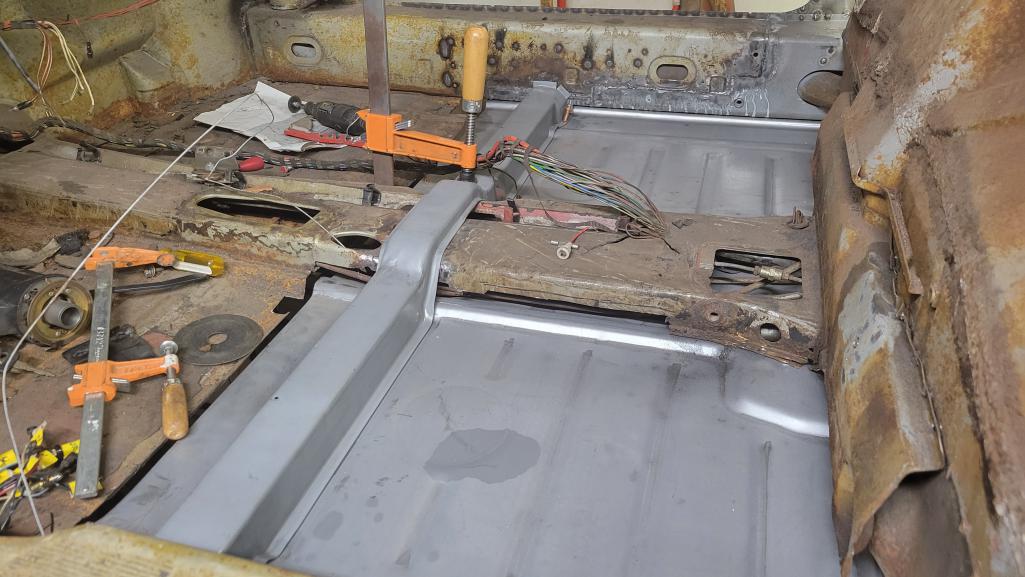
I've got the suspension console tentatively fitted.
 And I need to start looking at the engine mount. 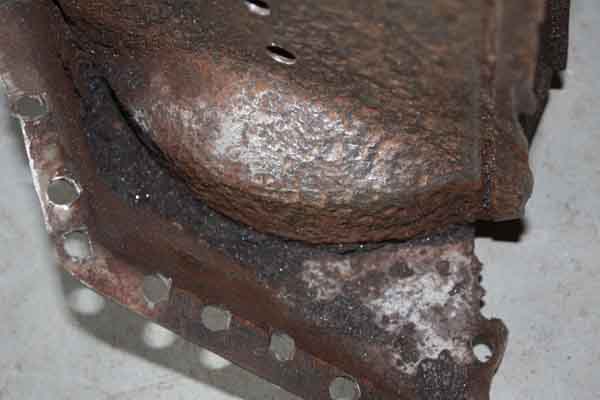 |
|
|
|
| obscurity |
Jan 2 2022, 05:16 PM
Post
#94
|
|
Member Group: Members Posts: 413 Joined: 24-February 06 From: Atlanta ,GA Member No.: 5,628 Region Association: South East States |
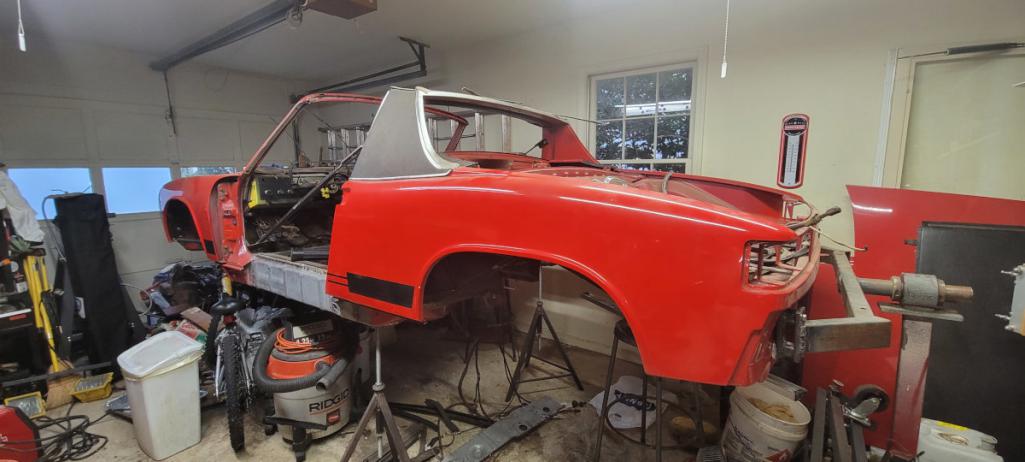
I can't believe how long I have been working on this car.. Anyway it is on the rotisserie. I'm going to have to will this thing to someone for completion.
 |
|
|
|
| krazykonrad |
Jan 2 2022, 05:52 PM
Post
#95
|
|
Senior Member Group: Members Posts: 1,177 Joined: 21-February 06 From: Canton, GA Member No.: 5,610 |
Welcome back! It looks like you've done some impressive work.
|
|
|
|
| obscurity |
Jan 23 2022, 12:04 PM
Post
#96
|
|
Member Group: Members Posts: 413 Joined: 24-February 06 From: Atlanta ,GA Member No.: 5,628 Region Association: South East States |
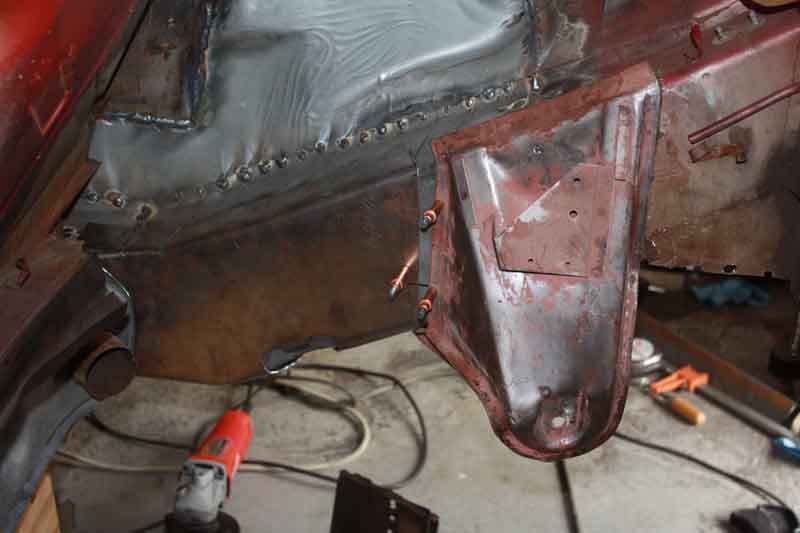
Thought I would see if anyone has an opinion of some of my welding plans. I have already welding in the replacement dogleg in the longitudinal.
 Since the corrugations look a little odd I thought I would add another layer of steel to smooth things out. I am a little concerned that the extra layer will add too much thickness but it will add more strength to the bend the bottom of the long. 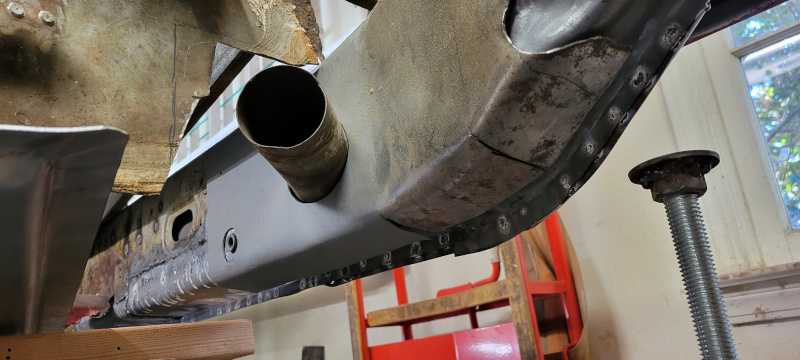 One the fire wall is in it looks ok. 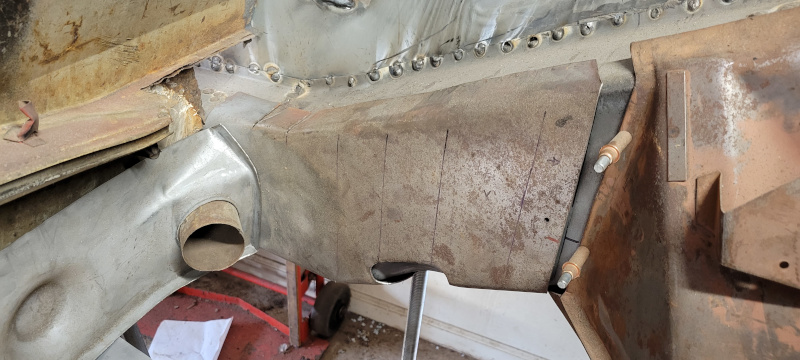 Let me know what you think. On a side note the surface rust will be cleaned up. I fabbed this several years ago. John W |
|
|
|
| obscurity |
Oct 29 2022, 05:30 PM
Post
#97
|
|
Member Group: Members Posts: 413 Joined: 24-February 06 From: Atlanta ,GA Member No.: 5,628 Region Association: South East States |
Just an update
 |
|
|
|
| obscurity |
Jun 1 2026, 07:17 PM
Post
#98
|
|
Member Group: Members Posts: 413 Joined: 24-February 06 From: Atlanta ,GA Member No.: 5,628 Region Association: South East States |
This project is a real slow burn
Turned some seatbelt anchor nuts for the center tunnel 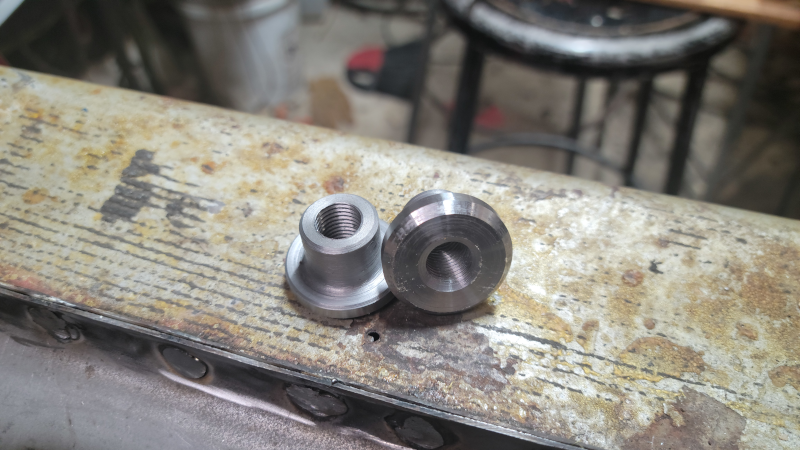 And welding in the bottom of the fire wall. Still needs some clean up 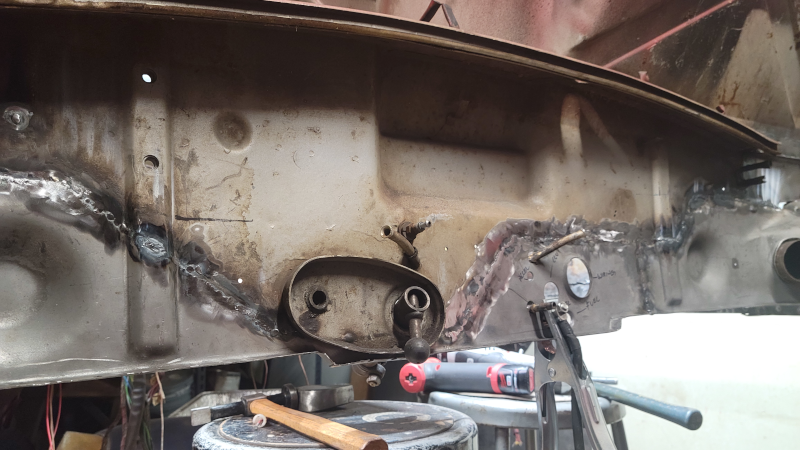 |
|
|
|
|
6 User(s) are reading this topic (4 Guests and 0 Anonymous Users)
2 Members: porschetub, volksaddict

|
Lo-Fi Version | Time is now: 1st June 2026 - 08:50 PM |
Invision Power Board
v9.1.4 © 2026 IPS, Inc.